background image


32 
 

Please input your user name and password. Default factory name is

 admin 

and password is 

admin

.  

Note:

 For security reasons, please modify your password after you first login. 


4.3  Homepage 

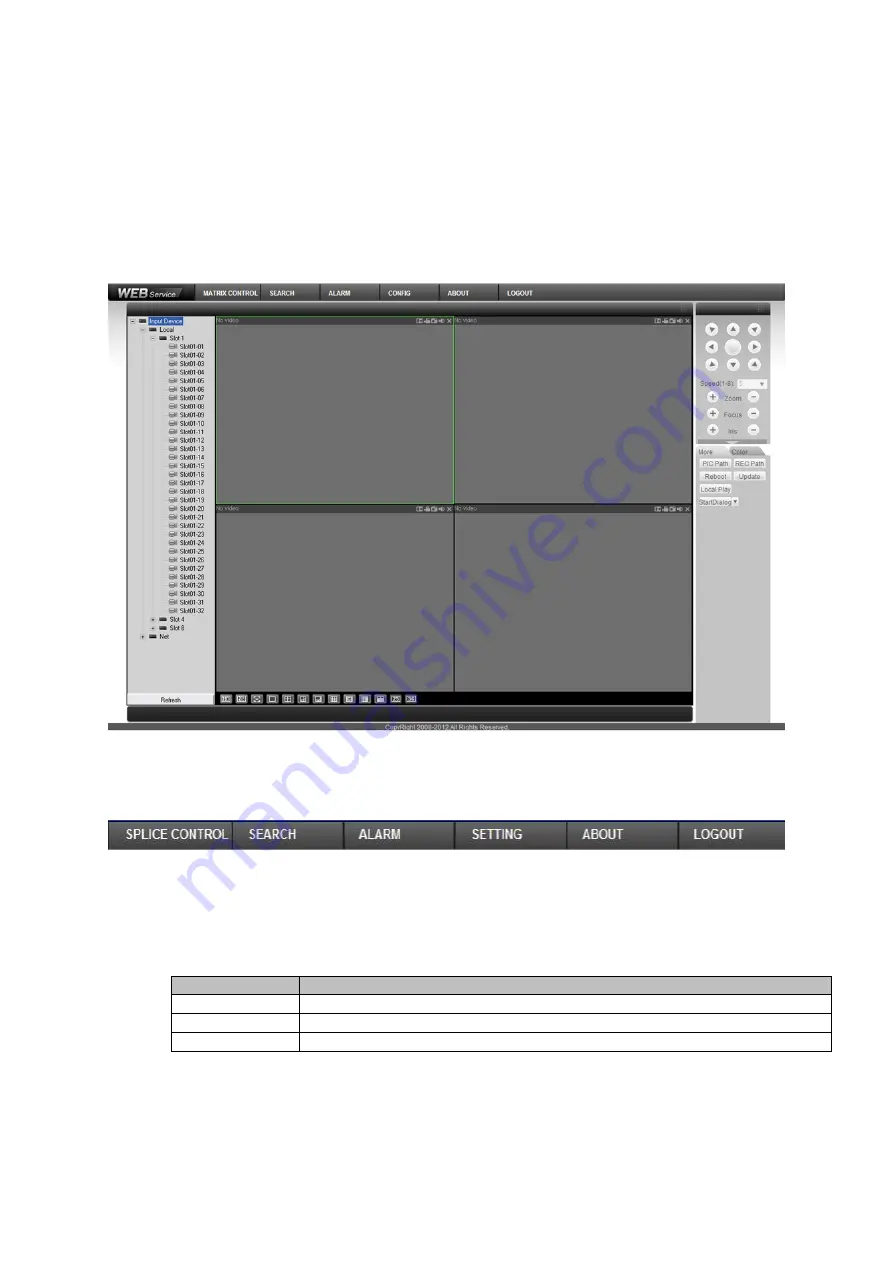
You will see the following interface after successful login in Figure 4- 2. 


Figure 4- 2


System Menu 


Figure 4- 3 

The above Figure 4- 3 is system menu buttons.  


Input List 

Parameter 

Note 

Local 

Device local connected input channel. 

Network 

Input channel add to Distributed Decoding System via network. 

Refresh 

Refresh local and network to add device input list.  


Real-Time Monitoring 

Click any channel to real-time monitor the channel. Monitoring window functions are summarized: 


Содержание DH-M70-D-0204HO

Страница 1: ...i Distributed Decoding System User s Manual V 2 0 1 ...

Страница 2: ...uted Encoding Box 8 1 6 2 0404BI 4 CH CVBS Distributed Encoding Box 9 1 6 3 0404CI 4 CH HDCVI Distributed Encoding Box 11 1 6 4 0104D1 1 CH DVI Distributed Encoding Box 12 1 6 5 0104DI 4K 1 CH DVI Distributed 4K Encoding Box 14 2 OPEN PACKAGE INSPECTION AND WIRING 17 2 1 Inspection Procedure 17 2 2 Accompanied Assessory Bag 17 2 3 Device Installation 17 2 3 1 Environment 17 2 3 2 Wiring 17 2 3 3 B...

Страница 3: ...ork Connection 31 4 2 Login 31 4 3 Homepage 32 4 4 Splice Control 38 4 5 System Settings 41 4 5 1 System Info 42 4 5 2 System Config 45 4 5 3 Advanced 74 4 6 Search 95 4 7 Alarm 100 4 8 About 101 4 9 Log Out 101 5 DSS OPERATION 102 6 FAQ 103 6 1 FAQ 103 6 2 Maintenance 106 APPENDIX A MOUSE CONTROL 107 ...

Страница 4: ... s manual is designed to be a reference tool for the installation and operation of your system Here you can find information about features and functions as well as a detailed menu tree Before installation and operation please read the following safeguards and warnings carefully ...

Страница 5: ...stalled in a cool dry place away from direct sunlight inflammable explosive substances and etc 6 Accessories Be sure to use all the accessories recommended by manufacturer Before installation please open the package and check all the components are included Contact your local retailer ASAP if something is broken in your package 7 Lithium battery Improper battery use may result in fire explosion or...

Страница 6: ...ior written notice The product updates might cause some differences between the actual product and the Manual Please contact the customer service for the latest program and supplementary documentation There still might be deviation in technical data functions and operations description or errors in print If there is any doubt or dispute please refer to our final explanation Upgrade the reader soft...

Страница 7: ...siness access centralized management distributed deployment of digital video matrix system It achieves analog digital HD network and HD digital video signal switch HD image output to wall video signal decode data storage network live preview and other management over network scheme log user right device maintenance This distributed decoding system also achieves HD video command deployment and vide...

Страница 8: ... 4 6 8 9 16 window split and free split Fluency function to double original video 25 fps or 30 fps into 50 fps or 60 fps respectively Maximum support 4 Road 800W HD decoding capabilities 16 1080p HD video decoding capabilities 36 720p HD video decoding capabilities 64 channel D1 standard definition video decoding capabilities and 64 960H standard definition video decoding capabilities Support 1200...

Страница 9: ...pport remotely receiving and configuring parameter remotely rebooting and remotely inputting outputting parameters Other Mutli alarm input output Audio talk Main control support 2 SATA ports Local output Complete set of operation alarm abnormality and log recording simplifying user and technical staff s maintenance Complete user authority management and storage management while the authority can b...

Страница 10: ... ch RS485 port 4 chBNC audio input 1 ch BNC audio output 4 ch alarm input 3 ch alarm output 1 ch audio talk input and output 2 SATA port 1 eSATA port 1 RJ45 port 1 standard 485 port 1 standard 232 port 2 USB port Optional 0404BI BNC encoding box 1 BNC a v input port 1 ch audio talk input and output 1 SD card port 4 ch alarm input 2 ch alarm output 1 RJ45 port 1 standard 485 port 1 antenna port Opt...

Страница 11: ...nd 1 ch DVI loop output 1 ch BNC audio input 1 ch audio talk input and output 4 ch alarm input 4 ch alarm output 1 RJ45 port 1 standard 485 port 1 standard 232 port 1 USB port Optional Output Module 0204HO H HDMI central decoding box 2 HDMI video output port Standard Chart 1 1 1 5 Decoding Box Central decoding box is responsible for management of HDMI distributed decoding box in the system HDMI di...

Страница 12: ... signal Alarm input GND NO1C1 NO2C2 NO3C3 NO4C4 4 ch alarm output port output alarm signal to alarm device NO1C1 NO alarm output 1 NO2C2 NO alarm output 2 NO3C3 NO alarm output 3 NO4C4 NO alarm output 4 NC Alarm constant A B RS485 port connect to PTZ dome and other control devices 11 Power input port Power port input 12V DC Chart 1 2 1 5 1 2 Technical Specification Model 0204HO Video Output 2 ch H...

Страница 13: ...ork port 1000M Ethernet port 8 VGA port Output analog video signal may connect to monitor to view analog video output 9 Audio talk input port Connect to MIC 10 Alarm input alarm output RS 485 port 1 4 4 ch alarm input receiving external alarm source s switch signal Alarm input GND NO1C1 NO2C2 NO3C3 NO4C4 4 ch alarm output port output alarm signal to alarm device NO1C1 NO alarm output 1 NO2C2 NO al...

Страница 14: ... No Port Note 1 GND GND 2 Video input port Connect to SDI camera video digital signal 3 Audio input port Receive analog audio signal from pick up 4 Audio output port Connect to audio output device 5 Audio talk output port Connect to headset and other audio talk output device 6 RS232 port General serial debugging set IP address Transmit transparent serial data 7 Network port 100M Ethernet port 8 HD...

Страница 15: ...al Specification Model 0404SI Video Input Port BNC 1 0VP P resistance 75Ω Signal Standard HD SDI standard 1 485Gbps Encoding Capacity Card 4 ch 1080P Encode Resolution 1080P 720P 960H D1 HD1 2CIF CIF QCIF Video Output 1 ch VGA output 1 ch HDMI output 1 ch NC 1 0VPP 75Ω Support TV VGA HDMI video sync output Audio Input 4 ch BNC audio input BNC Audio Output 1 ch BNC audio output BNC Audio Talk Indep...

Страница 16: ...Ethernet port 4 Power input port Input 12V DC During POE as power output port output 12V DC to front analog camera Front analog camera power shall not exceed 3W 5 Wireless antenna port Connect to wireless antenna receive WIFI 3G and etc 6 SD card port Place SD card Chart 1 8 1 6 2 2 Technical Parameter Model 0404BI Video Input Port BNC 1 0VP P resistance 75Ω Video Resolution 960H D1 HD1 2CIF CIF Q...

Страница 17: ...t 5 HDMI port HD a v signal output port transmitting uncompressed HD video and muitlchannel audio data to HDMI port of display device 6 Audio output port Connect speaker and other audio output device 7 GND GND 8 Video input port Connect to analog camera video digital signal 9 Audio input port Receive analog audio signal from pick up 10 VGA port Output analog video signal may connect to monitor to ...

Страница 18: ...720P non live 960H D1 HD1 2CIF CIF QCIF Video Output 1 ch VGA output 1 ch HDMI same source output HDMI VGA video sync output HDD Number 1 SATA port not support eSATA port card capacity max 6T recommend 4T USB Port 2 USB port Network Port 1 RJ45 port 100M Ethernet port RS485 Port 1 Chart 1 11 1 6 4 0104D1 1 CH DVI Distributed Encoding Box Figure 1 7 Front Figure 1 8 Rear 1 6 4 1 Port No Port Note ...

Страница 19: ...t DVI digital video output port transmit digital video data to display device with DVI port HDMI HD A V signal output port transmit uncompressed HD video and multichannel audio data to display device with HDMI port 2 VGA loop output Output analog video signal may connect monitor to view analog video output 3 DVI HDMI signal input Input digital signal or HD A V signal 4 VGA signal input port Input ...

Страница 20: ... 0V output resistance 16Ω Alarm Input output 4 in 4 out Network Port 1 RJ45 Ethernet port 10M 100M 1000M self adaptive RS232 1 standard 232 port DB9 USB Port 1 Mini USB 2 0 port RS485 1 485 port dual work Chart 1 14 1 6 5 0104DI 4K 1 CH DVI Distributed 4K Encoding Box Figure 1 9 Front Figure 1 10 Rear 1 6 5 1 Port No Port Note 1 Power switch Power of off ...

Страница 21: ...gital video output port transmit digital video data to display device with DVI port HDMI HD A V signal output port transmit uncompressed HD video and multichannel audio data to display device with HDMI port 2 VGA loop output Output analog video signal may connect monitor to view analog video output 3 DVI HDMI signal input Input digital signal or HD A V signal 4 VGA signal input port Input analog v...

Страница 22: ...m port level 2 0V Line in 50mV Mic in input resistance 10K output port 3 5mm port level 2 0V output resistance 16Ω Alarm Input output 4 in 4 out Network Port 1 RJ45 Ethernet port 10M 100M 1000M self adaptive RS232 1 standard 232 port DB9 USB Port 1 Mini USB 2 0 port RS485 1 485 port dual work Chart 1 17 ...

Страница 23: ...t 2 2 Accompanied Assessory Bag Accompanied assessory bag includes user s manual and disk When you unpackage the product please make sure all contents match the checklist 2 3 Device Installation 2 3 1 Environment Distributed decoding system device is a system level surveillance device which is usually placed on central control room Its installation location must follow relevant standards in corres...

Страница 24: ... press power switch on front panel Power indicator turns on and device boots up followed by boot interface which lasts for 90s When you boot up device please keep the following in mind 1 Make sure whether the supplied voltage is within 100 240V 47 63Hz Turn on the device after you check power line connection 2 We recommend you to use power supply with stable voltage and little interference refer t...

Страница 25: ...on cell otherwise all config will be lost We recommend you to replace with button cell in the same model as previously used Please check system time regularly and in general replace button cell on an annual basis At time of inserting mainboard and Function Card into chassis please remove the protection cover at connection interface of real panel Connect Ethernet port 2 on main control panel to any...

Страница 26: ...ulted Username admin Password admin administrator local and network Username 888888 Password 888888 administrator local only Username 666666 Passwords 666666 Lower authority user who can only monitor playback backup and etc Username default Password default hidden user You can use USB mouse front panel remote control or keyboard to input About input method Click to switch between numeral English c...

Страница 27: ...21 Figure 3 2 3 2 Network Network interface is shown below as in Figure 3 3 ...

Страница 28: ...rd can only bind one net bridge Bound net bridge will be shown in Ethernet dropdown box Bound network card as net bridge will be not shown Ethernet Card Name You can select from 1 2 Default Ethernet port You can select from 1 2 Under multiple addresses and bridge mode only Aggregation strategy Under aggregation link mode only Strategies available are MAC address based IP address and port based IP ...

Страница 29: ...alue is 80 RTSP port Default value is 554 You may set this port Max connection connections 0 128 System supports maximal 128 users 0 means there is no connection allowed Preferred DNS server Set DNS server IP address Alternate DNS server Set DNS server alternate IP address Transfer mode Here you can select the priority among fluency video qualities self adaption LAN download Under sufficient bandw...

Страница 30: ...usted sites then there will be no limit for IP address to visits this device Please see Figure 3 5 Figure 3 5 3 2 2 NTP Setting Figure 3 6 You need to install SNTP server Such as Absolute Time Server in your PC first In Windows 7 OS you can use command net start w32time to boot up NTP service NTP setting interface is shown as in Figure 3 6 ...

Страница 31: ... GMT 7 Beijing Hong Kong GMT 8 Tokyo GMT 9 Sydney GMT 10 Hawaii GMT 10 Alaska GMT 9 Pacific Time P T GMT 8 American Mountain Time M T GMT 7 American Central Time C T GMT 6 American Eastern Time E T GMT 5 Atlantic Time GMT 4 Brazil GMT 3 Middle Atlantic Time GMT 2 Update interval minimum value is 1 Max value is 65535 Unit minute 3 2 3 Multicast After multicast is enabled it will automatically get m...

Страница 32: ...ion shall work with special DDNS server and special Professional Surveillance Software PSS 3 2 5 UPNP Figure 3 8 The UPNP protocol is to establish a mapping relationship between the LAN and the WAN Please see Figure 3 8 UPNP on off Turn on or off the UPNP function of the device Status Display UPNP function status including success fail and searching Router LAN IP It is the router IP in the LAN WAN...

Страница 33: ...ing port value here User name Please input the user name to login the sender email box Password Please input the corresponding password here Sender Please input sender email address here Title Please input email subject here System support English character and Arabic number Max 32 digit Interval The send interval ranges from 0 to 3600 seconds 0 means there is no interval ...

Страница 34: ...for those test email The send interval ranges from 30 to 1440 minutes Note Click test button to test whether current EMAIL config is OK 3 2 7 Alarm Center This interface is reserved for you to develop If alarm occurs locally its alarm signal will be uploaded to alarm center For you to use alarm center please set server IP and port first When alarm occurs the device will send data according to prot...

Страница 35: ...29 Figure 3 12 3 2 9 Shutdown ...

Страница 36: ...select Please see Figure 3 13 Logout menu user log out menu You need to input password when you login the next time Restart application reboot Shutdown system shuts down and turns off power Switch user you can use another account to log in Shutdown menu includes the above four functions ...

Страница 37: ...tom Level Enable or prompt ActiveX and plug in IE7 and IE8 are preferred Step 5 Open the IE and then input IP address Step 6 It pops up security box asking you whether you accept webrec cab control unit please select accept and system will start to install If system forbid this download please check if there is other plug in blocking the download and meantime lower IE browser security level Note W...

Страница 38: ...fter successful login in Figure 4 2 Figure 4 2 System Menu Figure 4 3 The above Figure 4 3 is system menu buttons Input List Parameter Note Local Device local connected input channel Network Input channel add to Distributed Decoding System via network Refresh Refresh local and network to add device input list Real Time Monitoring Click any channel to real time monitor the channel Monitoring window...

Страница 39: ...cords are saved in Record Download file in system disk as default Snapshot Click this button to snapshot video Snapshots are saved in Picture Download file in system disk as default Audio Whether turn on audio or not Note Audio here is not related to audio in system setting Close video Include monitor output video input matrix no and video switch Monitoring Window Switch Figure 4 5 Please see Figu...

Страница 40: ...n system settings otherwise you cannot access PTZ control operation You may control the direction step length zoom focusing iris preset point to point tour pattern auto scan lighting wiper horizontal rotation and other controls Step length It is mainly used to control directions for example rotation speed of step length 8 is much faster than of step length 1 PTZ rotation It supports 8 directions u...

Страница 41: ... tour box Input preset value in correspond box and then click add button You may repeat this process to add multiple presets You may delete preset by clicking on delete button Pattern You may record down the above operations as Pattern X by click start to record button Then you should refer to Figure 4 6 to perform zooming focusing iris direction and etc You can stop recording by pressing stop but...

Страница 42: ...shot Record Path Click snapshot path or record path button to modify storage path Please see Figure 4 10 Figure 4 10 Reboot Device Click reboot device You will see a pop up box as in the left picture in Figure 4 11 and click OK to reboot Note Before you reboot please be notified 1 You must have authority to reboot device 2 There is no other users logging in system menu locally If someone is loggin...

Страница 43: ...37 Figure 4 11 Update Step 1 Click update button Step 2 Select updating file Please see Figure 4 12 Figure 4 13 and Figure 4 14 Figure 4 12 Figure 4 13 ...

Страница 44: ...cord file saved on PC Click local playback you will see a prompt box as in Figure 4 16 You need to select file to playback Figure 4 15 4 4 Splice Control Via splice control you can splice TV wall and complete output and input config Step 1 Click splice control to enter interface in Figure 4 16 ...

Страница 45: ... Figure 4 17 If system has just upgraded then click Save to see the following Figure 4 17 Step 2 If you want to add new card or delete output screen and add again please select to add and click Save Step 3 Select slot to config See Figure 4 19 ...

Страница 46: ...he red area can be dragged to move Step 4 Click Splice and select area to splice click OK Step 5 Right click scheme to add User can set splicing video wall accordingly Step 6 Click TV Matrix see Figure 4 19 Figure 4 19 ...

Страница 47: ...thout input device will show this background Select screen or output screen on the left and then select split mode and group no Cubeless video wall can split into 1 4 8 9 16 and free split free split is for tour and can use auto alignment You can modify decode strategy and you may drag according to live to fluent Input device list including local net input group and favorites Select input device a...

Страница 48: ...stem Info 4 5 1 1 Version Info Here you can view hardware features software version and its release date Please see Figure 4 22 Figure 4 22 4 5 1 2 HDD Info Here you can view HDD status free space and total space ...

Страница 49: ...ation config data management alarm event record user and deleted log You can select classification to search by directly clicking on search button The system will display logs in list format You may click backup button to record log on PC If you click delete button the system will clear all log files ...

Страница 50: ...44 Figure 4 24 4 5 1 4 System Status Here you can view status of system CPU memory network fan and power 4 5 1 5 Sub Card Status View sub card slot type temperature status and status ...

Страница 51: ...45 Figure 4 25 4 5 2 System Config 4 5 2 1 General ...

Страница 52: ... is full now system stops record If current working HDD is full now system goes to overwrite the previous file Pack Duration Here you can select file size The value ranges from 1 to 120 Default setting is 60 minutes Device No Set device no Video Standard There are two options PAL NTSC which will accord current video standard of the system Please note for the Web user this information is for refere...

Страница 53: ...oth video and audio by default You need to check the box here to enable audio function For extra stream you need to check the box to select the video first and then select the audio if necessary Resolution SD compression board s main stream supports D1 HD1 BCIF CIF QCIF HD compression board supports 1080P 720P D1 HD1 BCIF CIF QCI Frame rate PAL 1 25f s NTSC 1 30f s Bit rate type There are two opti...

Страница 54: ...stem has to lower bit rate and quality in order to guarantee fluency then bit rate shall not exceed this value in this case Under VBR this value is useless Profile Main and Baseline Figure 4 28 Watermark Here you can insert watermark into display Audio format The system supports three formats G711a PCM G711μ 4 5 2 3 Schedule Here you can select local or remote channels to record video for differen...

Страница 55: ...terface will appear as in Figure 4 30 2 Set record period and select designated day of week If you do not select the setting is effective for the day only 3 After you finish settings click OK to save You will return to the above interface and click OK to save Figure 4 30 4 5 2 4 RS232 ...

Страница 56: ... as RS232 RS422 and RS485 RS422 and RS485 are for alarm card only Function Select corresponding COM protocol Data bit You can select 5 to 8 Baud rate Select corresponding baud rate Parity There are four parities System default COM is console baud rate is 115200 data bit is 8 stop bit is and parity is none Address Set address 4 5 2 5 Network ...

Страница 57: ... IP address and then set its subnet mask and gateway DHCP It is to auto search IP When enable DHCP function you cannot modify IP Subnet mask Gateway These values are from DHCP function If you have not enabled DHCP function IP Subnet mask Gateway display as zero You need to disable DHCP function to view current IP information Besides when PPPoE is operating you cannot modify IP Subnet mask Gateway ...

Страница 58: ...an normal speed downloading with sufficient bandwidth 4 5 2 6 Email Here you can set SMTP server IP address port username password and email address of sender and set interval between each outgoing email You can input email title in CH EN and Arabic numerals up to 32 digits The email function allows up to 3 receiver addresses and SSL secured email boxes Please see Figure 4 33 Figure 4 33 4 5 2 7 D...

Страница 59: ...53 Figure 4 34 4 5 2 8 NTP ...

Страница 60: ...utes When you complete the above settings click save button If you have manually updated the time setting for twice and saved the changes SNTP server will immediately sync system time You can refer to the following sheet for time zone information City Region Name Time Zone London GMT 0 Berlin GMT 1 Cairo GMT 2 Moscow GMT 3 New Deli GMT 5 Bangkok GMT 7 Beijing Hong Kong GMT 8 Tokyo GMT 9 Sydney GMT...

Страница 61: ...le item after setup 4 5 2 9 Alarm Center Figure 4 36 Please see Figure 4 36 Please set the corresponding parameters Server IP Input address of alarm receiver server Port set range 1 65535 Date Never everyday Sunday Monday Tuesday Wednesday Thursday Friday and Saturday Time range 0 23 Please make sure you have enabled this function and saved the settings When external alarm is triggered the system ...

Страница 62: ...P function status successful failed and searching LAN IP Set LAN IP address WLAN IP Set WLAN IP address which is provided by telecommunication service provider Port Mapping List Display info of added ports Note Double click port to change its config 4 5 2 11 IP Filter You may classify valid log in IP and invalid log in IP by enabling white black list This is an IP filter function which can be acti...

Страница 63: ...57 Figure 4 38 4 5 2 12 Timeset IP Filter After you enable Timeset IP filter only when it filters devices on white list it can modify time on the platform See Figure 4 39 ...

Страница 64: ...ork storage protocol you may save local and remote video record inputted on device to remote storage server You may also add multiple SVRs which allows you to save image or video from different channels to different servers Please see Figure 4 40 ...

Страница 65: ...ure 4 40 4 5 2 14 Multicast After multicast is enabled login WEB select multicast method WEB will automatically get multicast address and add the group Then you can monitor video via multicast See Figure 4 41 ...

Страница 66: ...60 Figure 4 41 4 5 2 15 Detect By analyzing the video system enable motion detection alarm when it detects the motion signal reached the specified sensitivity ...

Страница 67: ...ask do not have this function Sensitivity There are 1 6 levels as 6 is highest sensitivity Alarm out You may set alarm output channel of motion detection signal Alarm out delay After alarm event ends alarm delays for this period within 10 to 300s Period Here you can set alarm period while motion detection function becomes activated in the specified periods There are six periods in one day Please c...

Страница 68: ...ecord for specified time after alarm ended The value ranges from 10s to 300s Alarm upload System can upload the alarm signal to the centre Including alarm centre Email If you enabled this function system can send out email to alert you when alarm occurs Shoe message Show message on screen Buzzer Check to enable buzzer do device will buzzer when it alarms Snapshot You can set to snapshot 4 5 2 16 P...

Страница 69: ...fault value is 8 Please set according to the speed dome dial switch setting Stop bit Default value is 1 Please set according to the speed dome dial switch setting Parity Default setting is none Please set according to the speed dome dial switch setting When you completes all above settings click save to return to monitoring interface When board card at corresponding slot is fiber encoding card HDC...

Страница 70: ...64 Figure 4 45 4 5 2 18 Input Title The interface may modify input channel name name of remote device cannot be modifies by default Control ID is no of input channel See Figure 4 46 ...

Страница 71: ...65 Figure 4 46 ...

Страница 72: ...5 2 19 Picture Manager User can upload picture to the platform Uploaded picture can be set as background of the platform Picture size cannot exceed 8M with resolution of 4096 4096 and lower in JPG format See Figure 4 48 ...

Страница 73: ...oder Bind Here you can bind unbind or reboot sub decoding box Note Sub decoding box received stream send by server and decode it to display It is managed by central decoding box Step 1 Select Setting Net Decoder Bind see Figure 4 46 ...

Страница 74: ...wap and force In global config enable Keep last frame to show the last frame when there is no stream If you do not enable this function the screen will be dark and show prompt as video requesting Use RTSP to connect platform use pull mode of this protocol If you enable RTSP then it will uses RTSP protocol to exchange Net TV push stream is push mode it is disabled by default Push mode At device end...

Страница 75: ...4 5 2 22 Input Channel Setup It adjusts DVI VGA signal inputs When input signal resolution is special resolution which causes input signal to be incomplete you can adjust to make input signal complete See Figure 4 51 ...

Страница 76: ...70 Figure 4 51 Color Setting It adjusts brightness contrast saturation HUE gain and phase of output image See Figure 4 52 Figure 4 52 ...

Страница 77: ... are four types of covers Never Never cover block Preview Set preview mode no one can preview covered area Monitor Set monitor mode no one can monitor covered area All Set preview and monitor modes no one can preview or monitor covered area See Figure 4 53 Figure 4 53 Time title and channel title Click setup button Drag time title or channel title to designated position and save it Title and chann...

Страница 78: ... such as disconnection video frame is not fluent and etc you can sniff network data on device It sniff via IP port and protocol type Sniffer data can be saved to Distributed Decoding System locally or USB You can find problem with the sniffer data See Figure 4 56 ...

Страница 79: ...56 4 5 2 24 Default Backup There are general schedule network detect display encode RS232 alarm PTZ and channel name as setup and output You can select them separately or all You cannot select alarm See Figure 4 49 ...

Страница 80: ...export config and select backup path to export all config on web Import config Click import config and select backup path to import backed up configuration 4 5 3 Advanced 4 5 3 1 HDD Management Please select the storage device first and then you can see the items on your right become valid Select one processing mode format read write or read only And click control storage device Please see Figure ...

Страница 81: ...75 Figure 4 58 Group setting is as follows please see Figure 4 59 and Figure 4 60 ...

Страница 82: ...76 Figure 4 59 Figure 4 60 4 5 3 2 Raid Config Figure 4 61 Click Add to add Raid and select corresponding level ...

Страница 83: ...77 Figure 4 62 Click hot spare management to set Raid hot spare disk which improves security Figure 4 63 ...

Страница 84: ...y After alarm out event ends alarm delays within 10 to 300s Alarm upload System can upload the alarm signal to the network includes the alarm centre Email If you enable this function system can send out email to alarm the specified user Show message Show alarm message on local screen Buzzer Check it to enable device will buzzer when alarm occurs 4 5 3 4 Record Record has main stream and sub stream...

Страница 85: ...d function as you set in record schedule setting Manual Enable corresponding channel to record no matter what period applied in the record setting Stop Stop current channel record no matter what period applied in the record setting 4 5 3 5 Account ...

Страница 86: ...add group button as in Figure 4 67 Input group name and select authority group from list Click save button if you want to save setting otherwise click cancel Delete group Click delete group button and the confirmation box will appear Modify group Click modify group button and it displays corresponding information in modification box Note You cannot delete group which contains users ...

Страница 87: ...81 Figure 4 67 ...

Страница 88: ...ion in the window and then select authority for this user 2 In authority list set authority and group for this user Modify user You can modify user here which is similar to add user except information of the user will be inputted automatically Delete user Click delete user button you will see a window as in Figure 4 69 Click OK to delete user Figure 4 69 ...

Страница 89: ...face as in Figure 4 70 Input current password new password and its confirmation Click save when you are done Figure 4 70 4 5 3 6 User Control User control allows user to disconnect current online user or shield some user within a certain period of time Click Refresh to see the most current user online status ...

Страница 90: ...84 Figure 4 71 4 5 3 7 Snapshot ...

Страница 91: ...ot frame rate support 1 7s pic Resolution Channel support 1080P 720P D1 HD1 BCIF CIF QCIF Quality There are six levels of quality 10 30 50 60 80 100 100 is the highest 4 5 3 8 Auto Maintenance Here you can select automatically reboot system and automatically delete old files while reboot system requires setting for time and interval from the dropdown list Click save when you are done Please see Fi...

Страница 92: ...86 Figure 4 73 4 5 3 9 Remote Device Here you can add remote device via automatic search or manually adding You also can modify and delete Please see Figure 4 74 and Figure 4 75 ...

Страница 93: ...87 Figure 4 74 Figure 4 75 ...

Страница 94: ...88 By Group Step 1 Click Group Manager to see Figure 4 76 Figure 4 76 Step 2 Select group and click Add See Figure 4 77 Figure 4 77 Step 3 Enter name click OK See Figure 4 78 ...

Страница 95: ...89 Figure 4 78 Step 4 Check input device on the left to add into group 1 and check group 1 See Figure 4 79 Figure 4 79 Step 5 Click Add to add input device into group 1 See Figure 4 80 ...

Страница 96: ...90 Figure 4 80 Step 6 Click Save to input grouping of input device You can add sub group under current group level 4 5 3 10 Net Decoder Step 1 Select Advanced Net Decoder see Figure 4 77 ...

Страница 97: ...et decoder Search device to add Manually enter IP address and TCP port to add see Figure 4 78 Figure 4 82 Step 3 Click OK to save 4 5 3 11 Ventilator Control You can set temperature to control speed of ventilator See Figure 4 68 ...

Страница 98: ...92 Figure 4 83 4 5 3 12 Directory Manager It is mainly for network keyboard to control matrix See Figure 4 69 ...

Страница 99: ...k Add See Figure 4 85 Figure 4 85 Step 2 Input name and fill in control no Each group has different control no If you enter same control no for two groups system will prompt Step 3 In device info list select input device to add into group 1 and it may be local or network device See Figure 4 86 ...

Страница 100: ...94 Figure 4 86 Step 4 Click Add See Figure 4 87 Figure 4 87 ...

Страница 101: ...ge supports up to 100 records You may flip pages by clicking on next page Select a single channel click earliest record to search the earliest record in this channel Select the file s you want to play and then click play button or double click the record system will play the selected record You may play in full screen and perform record backup at the same time The backup record will be automatical...

Страница 102: ...ure 4 89 Tip in parameter setting you may select date from the dropdown list and click search date Please see Figure 4 90 Red circle is current system date and grey number is start time of search Figure 4 90 ...

Страница 103: ...ay via corresponding buttons on control bar The channel No and device IP of this record are displayed in playback window Please see Figure 4 91 Figure 4 91 Download Select record click download button and the save dialogue pops up Please see Figure 4 92 IP and channel no ...

Страница 104: ... need to input record name and click save button to start to download The downloading progress bar will be displayed and the download button will change to a stop button Please see Figure 4 93 and Figure 4 94 Figure 4 93 ...

Страница 105: ...99 Figure 4 94 Click open local record button and select local record to play Please see Figure 4 95 ...

Страница 106: ...Figure 4 96 Type Parameter Note Event Type Video Loss When video is lost it alarms Motion Detect When motion detect is ON it triggers alarm Disk Full When disk is full it triggers alarm Disk Error When disk error occurs it triggers device alarm Video Mask When video is masked it alarms Operation Listen Alarm Web subscribes alarm type checked above when device alarms it will notice WEB and WEB will...

Страница 107: ...ound which you maycustomize Sound Path Customize alarm sound storage path 4 8 About Click about button you can view current web client information Please see Figure 4 97 Figure 4 97 4 9 Log Out Click log out button system goes back to log in interface You need to input user name and password to login again ...

Страница 108: ...102 5 DSS Operation Besides web based operation you can log in device via Digital Surveillance System DSS For detailed instructions please refer to DSS user s manual ...

Страница 109: ... please upgrade again d The configurations have changes so cannot boot up Please press the reset button the tiny hole on mainboard with a needle or equivalent for a few seconds until reboot e X86 board is damaged 4 Q After video matrix boots up there is no decoded outputs or preview A This may be due to a is set to no output in default so you have to set output in relevant channels manually b Make...

Страница 110: ...coustics c Audio cable is damaged d Hardware malfunctions 10 Q There is audio when monitor but there is no audio when system playback A This may be due to a Setting is not correct Please enable audio function b Corresponding channel has no video input Playback is not continuous when the screen is blue 11 Q Time display is not correct A This may be due to a Setting is not correct b Battery contact ...

Страница 111: ...ser has no authority to monitor e Device local video output quality is not good 16 Q Network connection is not stable A This may be due to a Network is not stable b IP address conflict c MAC address conflict d LAN switch malfunction or config e Device network card malfunction 17 Q Alarm signal cannot be disarmed A This may be due to a Alarm setting is not correct b Alarm output has been open manua...

Страница 112: ...se fire The device must be installed on solid and flat surface in order to guarantee safety under load and earthquake Otherwise it may cause device to fall off or turnover Do not place the device on carpet or quilt Do not block air vent of the device or ventilation around the device Otherwise temperature in device will rise and may cause fire Do not place any object on the device Do not disassembl...

Страница 113: ...he panel you can input numeral English character small capitalized and symbols Here stands for backspace button stands for space button Click Shift to switch upper lower cases 1 In English input mode _stands for input a backspace icon and stands for deleting the previous character 2 In numeral input mode _ stands for clear and stands for deleting the previous numeral 3 In symbol input mode _ stand...

Страница 114: ...ral input box Increase or decrease numeral value Switch the items in the check box Page up or page down Move mouse Select current control or move control Drag mouse Select motion detection zone Select cover area Drag input channel into target output channel Note This manual is for reference only All the designs and software here are subject to change without prior written notice All trademarks and...

Отзывы: