background image

18

install it, place the PoE injector near your router.  For a four-port injector, plug the
injector barrel power connector into the rear of the injector.  Plug the injector
power supply line cord into the injector and plug the line cord into a source of AC
power.  The power supply is rated for 110/240 VAC – 50/60 Hz power so if the
installation is not in the US, just use an AC adapter or a different line cord in
accordance with your AC power wall socket.

3. Using a second, short Ethernet cable, plug one end into the LAN connector on

your PoE injector.  For a 4-port injector, this is the right connector on the front of
the PoE injector labeled “5 - Uplink”.  For a single-port injector, it is labeled
“LAN”. We will connect the other end in a subsequent step.

4. Move the unconnected end of a long camera cable from the camera assembly to

the PoE injector, by some convenient route and avoiding creating a tripping
hazard.

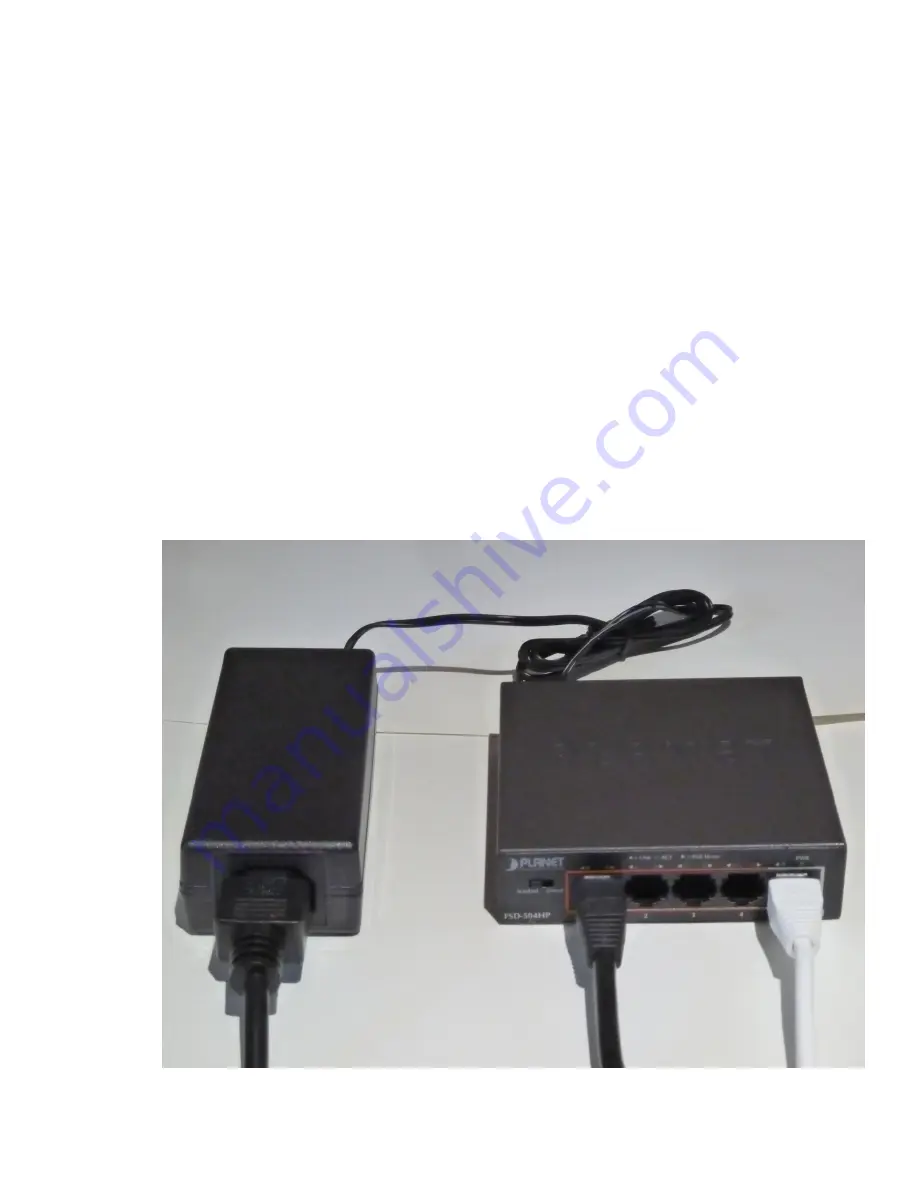
5. As shown below, plug the routed end of the camera cable into any of the four

unused ports of a four-port PoE+ injector or the “POE” port on a single-port
injector.  This cable may be a bit stiff so bend it near the injector so that the
connector goes straight into the injector socket, relieving stress on the
connection.

Содержание 50230UNI-A

Страница 1: ...UFODAS Unidentified Flying Object Data Acquisition System System Installation Guide Revised 11 5 19 Version 1 00 Copyright 2019 Ronald Olch RHOlch Systems PRELIMINARY Subject to change without notice...

Страница 2: ...NCLUDING BUT NOT LIMITED TO THE IMPLIED WARRANTIES OF MERCHANTABILITY AND FITNESS FOR A PARTICULAR PURPOSE ARE DISCLAIMED IN NO EVENT SHALL THE COPYRIGHT OWNER BE LIABLE FOR ANY DIRECT INDIRECT INCIDE...

Страница 3: ...12 Camera setup 8 Dahua N51BD22 camera setup 10 Fixed Camera Installation 12 MSDAU Installation 14 Preparing a camera for operation 16 Ethernet cable connections 17 Setting up an installed camera 21 D...

Страница 4: ...pe of camera s for your situation Pan Tilt Zoom PTZ or fixed optical field width and if PTZ maximum zoom Equipment mounting methods Using a tripod for temporary field studies or when more permanent at...

Страница 5: ...a total of up to 12 cameras and six MSDAUs The six units may be widely separated with OTDAU computers remote from their associated cameras and an MC at yet another remote site The internet connections...

Страница 6: ...12VDC source or from a solar battery system Sizing a power source for a remote UFODAS installation is based on the total power required and run time until recharged if battery storage is included The...

Страница 7: ...7...

Страница 8: ...These cameras cannot be used with a POE164 Injector due to its lower 30W output power The POE164 may be used with the N51BD22 camera 4 Ethernet 6 cable 5 Ethernet 100 196 or 300 all weather cables Not...

Страница 9: ...are extended To extend them unlatch extend retract and re latch For stability it is better to spread the legs to a wider rather than narrower stance and extend the legs if necessary to achieve a desir...

Страница 10: ...Injector This camera may also be used with the Planet POE171 single output 60W injector or a FSD 504HP due to their higher 60W outputs 10 Ethernet 6 cable 11 Ethernet 100 196 or 300 all weather cables...

Страница 11: ...preading the tripod legs and by how far the legs are extended To extend them unlatch extend retract and re latch For stability it is better to spread the legs to a wider rather than narrower stance an...

Страница 12: ...quest a detailed parts list customized for your particular system configuration The brackets shown below may be attached to an MSDAU mount to adapt it to a building corner or pole tower Outdoor instal...

Страница 13: ...purpose of the surge suppressors is to shunt a voltage spike induced anywhere along the Ethernet cable to ground rather than allow it to enter the outside or inside electronics All four of the recomme...

Страница 14: ...n the approximate center of the tripod head Tighten the tripod screw by hand using the handle under the screw Adjust the tripod legs for length and spread for the required MSDAU camera height and for...

Страница 15: ...era mounted on a Camera Mount is shown below An MSDAU with or without a camera and the passive Camera Mount share a common System Mounting Assembly The System Mounting Assembly consists of two black p...

Страница 16: ...camera body taking care not to dislodge the 0 ring under the dome 4 Peel the tape off both sides of the pan tilt mechanism taking the plastic lens cap with it taking care not to touch the lens 5 Set a...

Страница 17: ...nnector and screw it all the way onto the box connector Verify that the rubber cable gland is fully inserted into the back of the housing Then move the farther portion of the connector housing toward...

Страница 18: ...LAN connector on your PoE injector For a 4 port injector this is the right connector on the front of the PoE injector labeled 5 Uplink For a single port injector it is labeled LAN We will connect the...

Страница 19: ...t that location then a WiFi Extender may be used to provide a wireless connection from the injector to the router As shown below plug the short cable into the Extender and the Extender into a wall out...

Страница 20: ...is not directly connected to the camera s router that is at a different location no matter how remote via the internet To enable this the camera s router must be setup to port forward the camera s IP...

Страница 21: ...to install 2 If you are using Chrome search for nacl plugin Go to the NACL WEB Plug In page and click Launch app This will start a new NACL web browser 3 In the search box type the IP address and por...

Страница 22: ...instructions for the Dahua camera to check or adjust the various camera controls via the Setting tab on the top of the display All necessary settings have already been adjusted prior to delivery of y...

Страница 23: ...a Wiki at https dahuawiki com Template Manuals The following screen shots were captured using Internet Explorer IE to setup and control Dahua 50A230 or 50230 cameras They show initial settings suggest...

Страница 24: ...24 Set Picture settings to Profile Normal and leave others as shown above Set Flip to 180 degrees Set Exposure settings as shown above...

Страница 25: ...25 Set Backlight Profile to Normal and Mode Off Set WB to Profile Normal and Mode Auto...

Страница 26: ...26 Set Day Night settings as shown above Set Focus Zoom settings as shown above...

Страница 27: ...27 Set Defog Profile to Normal and Mode to Auto Disable all OSD info options...

Страница 28: ...rame resolution for 704 x 480 20 frames per second 1280 x 720 or 1920 x 1080 at up to 30 FPS could also be selected depending on OTDAU computer capacity ONVIF Authentication should be set to Off for n...

Страница 29: ...29 Set a Static IP address as desired Leave the other setting as is...

Страница 30: ...30 Select a HTTP Port number other than the default of 80 This number will be needed if the camera is later port forwarded on your router...

Страница 31: ...n object can be to an observer half way between them Anything farther will also be in view The answer to the question what is the farthest object that can be seen is a complex function of a number of...

Страница 32: ...32 CAMERA SEPARATION FOR TRIANGULATION...

Отзывы: