background image


4  Device Installation 

This section details installing the camera to a wall or to a ceiling. Note that the wall or ceiling must be 

capable of supporting a minimum of three times the weight of the camera and a bracket (if used).  

DO NOT connect the camera to the power supply during installation.  

Warning

: DO NOT connect the camera to the power supply during installation. 

Warning

: For units intended to be installed outdoors: All wiring connecting to the unit must be routed 

separately inside a different permanently earthed metal conduits (not supplied). 

Warning

: Install external interconnecting cables in accordance to NEC, ANSI/NFPA70 (for US 

application) and Canadian Electrical Code, Part I, CSA C22.1 (for CAN application) and in 

accordance to local country codes for all other countries. Branch circuit protection incorporating a 20 

A, 2-pole Listed Circuit Breaker or Branch Rated Fuses are required as part of the building installation. 

A readily accessible 2-pole disconnect device with a contact separation of at least 3 mm must be 

incorporated. 

Warning: 

DO NOT remove the protective film from the dome until the installation is complete to 

protect the dome from distortions from fingerprints, oil, grease or other contaminants.  

Note

: Dahua recommends attaching a “drip loop” (flex or hard conduit) during installation to ensure 

condensation does not form in the mount or the conduit. 


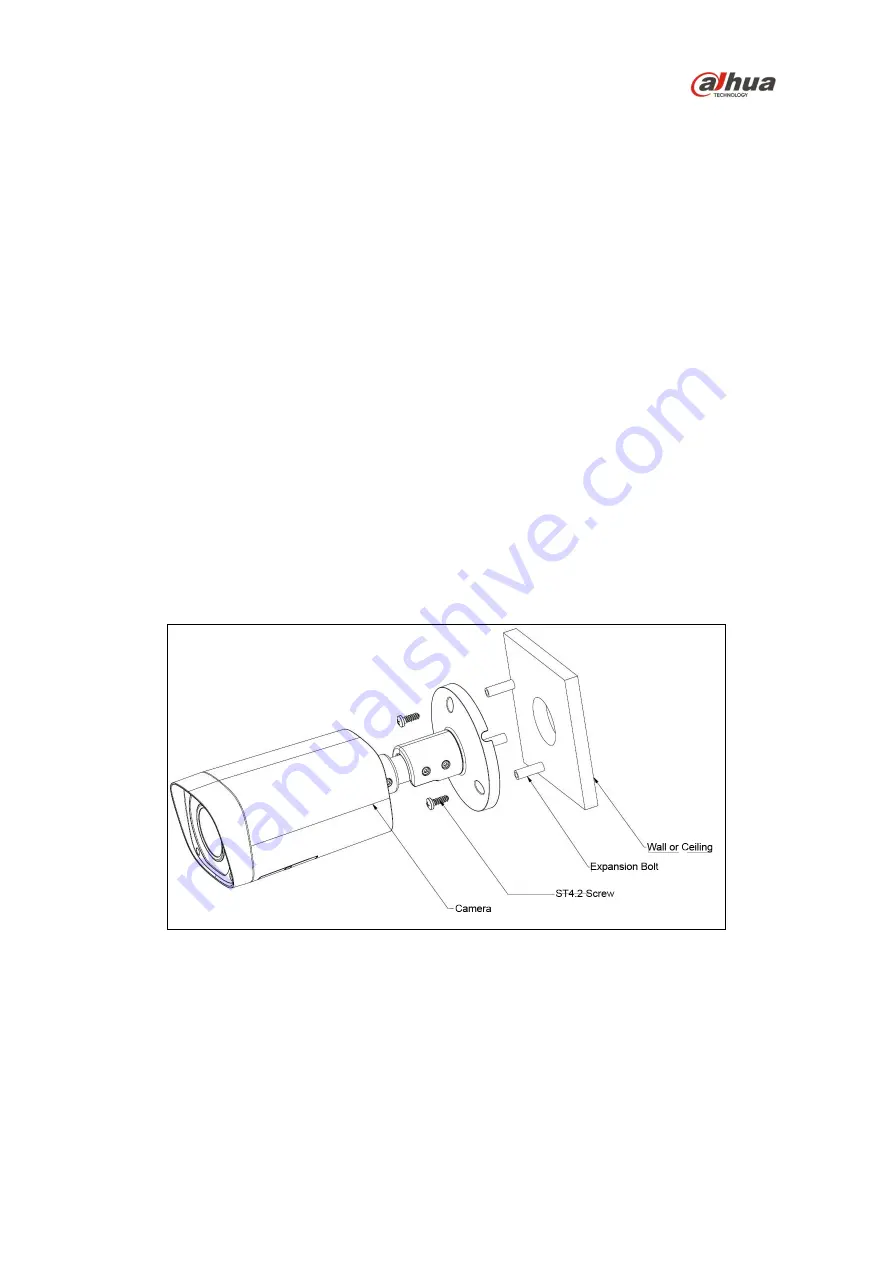
4.1  Mounting the Camera 


Figure 4-1 

1.  Remove the camera, the mounting template, hex key, and the hardware package from the box. 

2.  Apply the mounting template to the mounting medium. Pre-drill the three (3) perimeter holes for 

the expansion bolts, using a drill bit that is no wider than the expansion bolt.  

3.  Drill the center hole to route the cables from the camera through the installation medium. 

4.  Insert an expansion bolt into each pre-drilled perimeter hole.  

5.  Route the cables from the back of the camera through the installation medium and align the three 

(3) holes on the base of the camera with the expansion bolts. 

Содержание A21BC0V

Страница 1: ...2 MP HDCVI Vari focal Bullet Camera A21BC0V Quick Start Guide Version 1 0 1 Dahua Technology USA Inc ...

Страница 2: ...defined 3 2 Framework and Dimensions 6 3 3 Locally Storing Data Error Bookmark not defined 4 Device Installation 7 4 1 Inserting the Micro SD Card optional Error Bookmark not defined 4 2 Mounting the Camera 7 4 3 Adjusting the Focal Length 9 5 Network Configuration Error Bookmark not defined 5 1 Network Protocols Error Bookmark not defined 5 2 Modifying the IP Address Error Bookmark not defined 5 ...

Страница 3: ...o protect the unit from damage especially in damp environments Protect the plug and power cord from foot traffic being pinched and its exit from the unit Units with or without an ON OFF switch have power supplied to the unit whenever the power cord is inserted into the power source however the unit is operational only when the ON OFF switch is in the ON position The power cord is the main power di...

Страница 4: ...ing or installation Environmental Precautions Do not aim the unit at a strong light source or into direct sunlight to focus A strong light source may cause overexposure and may affect the longevity of the CCD or the CMOS sensor Transport use and store the unit within the specified temperature and humidity range Do not place the unit in a wet dusty extremely hot or an extremely cold environment and...

Страница 5: ...le solvent like alcohol benzene or thinner or use a strong detergent with abrasives which may damage the surface coating or reduce the working performance of the unit Do not touch or wipe a dome cover during installation this cover is an optical device Refer to the following methods clean the dome cover Stained with dirt Use an oil free soft brush or blower to gently remove the dirt Stained with g...

Страница 6: ...r guide is 2017 Dahua Technology Company LTD This user guide is the intellectual property of Dahua Technology Company LTD and is protected by copyright All rights reserved Trademarks All hardware and software product names used in this document are likely to be registered trademarks and must be treated accordingly 1 4 Disclaimer This user guide has been compiled with great care and the information...

Страница 7: ...entative The original packing carton is the safest container to transport the unit in the event the unit must be returned for service Retain the carton and all shipping material for future use Please refer to the enclosed CD for more details to view the detailed User s Manual and for configuration software Package Item Quantity HDCVI Camera 1 Mounting Template 1 Installation Hardware Pack 1 Expans...

Страница 8: ... Input Port Power port input 12 VDC or 24 VAC Note Please connect the default DC5 5 round port to the 2 pin converter cable when you are using 24 VAC power Use in accordance with device label instructions 3 2 Framework and Dimensions The following figures show the dimensions of the device in mm in These images are intended as a reference only Figure 3 2 ...

Страница 9: ... as part of the building installation A readily accessible 2 pole disconnect device with a contact separation of at least 3 mm must be incorporated Warning DO NOT remove the protective film from the dome until the installation is complete to protect the dome from distortions from fingerprints oil grease or other contaminants Note Dahua recommends attaching a drip loop flex or hard conduit during i...

Страница 10: ...a to the appropriate cables for Ethernet and power 8 Supply power to the camera 9 Adjust the monitoring direction of the camera Figure 4 2 a Loosen the three hex screws along the shaft of the camera b Position the camera by tilting twisting and rotating the camera to achieve the desired view c Tighten each hex screw to set the camera position ...

Страница 11: ...re 4 3 1 Remove the two pan head screws and remove the panel from the underside of the camera 2 Adjust the lens focus control until the scene is in focus 3 Replace the lower cover and secure it to the camera with the two 2 pan head screws ...

Страница 12: ...ct the System tab and select the PTZ link on the left side menu 3 Select the appropriate channel number for the camera 4 Set CONTROL MODE as HDCVI and set PROTOCOL as HD CVI Figure 5 1 5 Click Save to store the changes 6 Click the Camera tab at the top of the page 7 Select the ENCODE link on the left side menu 8 Click Save to store the changes 9 Click the right mouse button and select PTZ Control ...

Страница 13: ...gure 5 3 11 Use the following table to access the camera s menu Button Function Access the camera s settings menu Select a menu item Select a setting value Adjust lens zoom and auto trigger function Adjust lens focus Trigger autofocus at the current zoom factor ...

Страница 14: ...ology USA Inc 23 Hubble Irvine CA 92618 Tel 949 679 7777 Fax 949 679 5760 Email sales usa global dahuatech com Rev 001 001 2017 Dahua All rights reserved Design and specifications are subject to change without notice ...

Отзывы: