


ITEM
¤
Press the number 3 button, OSD
¤
will be displayed
the initial SVC mode screen.
¤Ł
Press the number 1 key in the
¤
screen, then the
auto adjust mode is executed for the Hi-Fi FM carrier.
in the screen, binking the “Check..” strings during
the adjusting. If the adjustment is finished
succesfully, the item displays the “OK”, otherwise “NG”.
¤Ø
Press the number 2 key, then you can change the
output gain with “-10%
¤A
0%
¤A
+10%”.
¤Œ
Press the number 3 key, then you can change the
output gain with “10.8dB
¤A
11.5dB
¤A
12.8dB-
¤A
14.0dB”.
¤º
Press the number 4 key, then you can change the
FM L/R mix ratio with “-10.0dB
¤A
-8.5dB
¤A1
12.5dB-
¤A
11.5dB”.
¤
Press the number 5 key, then you can set the default
values of all items
¤
Press the number 0 key, then the current values are
saved at th EEP ROM and quit this mode
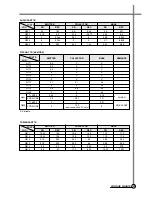
SERVICE MODE
60
8-7. H
I
-F
I CHECK MODE
8-8. T
HE
M
ETHOD TO
I
NITIALIZE THE EEPROM
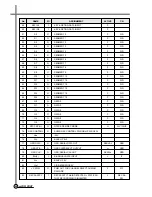
⁄U
AUTO ADJUST OK
⁄V
FM DET LEVEL -10%
⁄W
OUTPUT GAIN 14.0dB
⁄X
FM MIX RATIO -10.0dB
⁄Y
HIFI INITIAL DATA
SELECT
RETURN
0
1-5
Hi-Fi CHECK MODE
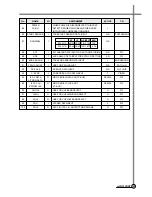
1. When [484] is sequentially pressed in MENU mode, the SERVICE mode is activated.
2. Choose “CHANGE OF EEPROM DATA” by pressing [3].
3. The input video signal should be PAL or null signal, and the speed should be SP.
4. Change the 7th and the 8th bits of GROUP 1 to 11 by the [
¤B
], [
¤A
], [OK] buttons.
5. The data are stored in EEPROM wihen [0] button is pressed.
6. Pull out the mains power cord.
7. Instantly short the JP056 and JP057 jumpers on MAIN PCB to reset the VCR.
8. Plug in the mains power cord again.
8-9. T
HE METHOD TO
C
ONTROL THE
A/V 1C
HP
(LA71501BM)S
ERIAL
D
ATA
1. Access to the SERVICE MODE by pressing [484] buttons sequentially in MAIN MENU.
2. Choose “CHANGE OF EEPROM DATA” by pressing [3].
3. Then the data table which indicates the current video system (PAL/MESECAM/NTSC) and speed (SP/LP/SLP) is
displayed on screen, while it detects the system and speed automatically.
4. Select the system and speed using [SYS. SEL] button and [SPEED] button on remote control if you need to change.
5. The cursor on the data table moves from right to left when the [
¤B
] button is pressed.
6. The cursor on the data table moves from right to down when the [
¤B
] button is pressed.
7. Data is toggled whenever the [OK] button is pressed on the cursor position.
8. If you need to change the data related to TRICK PLAY, it can be easily accessed in STILL mode.
9. First, the mode of the system detection should be AUTO mode after you change the data, and then if [0] button is
pressed after this, the data of the current status are stored in EEPROM, then the SERVICE MODE MENU is displayed.
10. The data corresponding to the system, speed, input selection, trick play are not changed.
* The group indication part on the data table is changed as in order of A1, A2, ...
¤A
P1, P2, ...
¤A
M1, M2, ..
¤A
] A1, A2, ...
whenever the [SYS. SEL] button on remote control is pressed, the system detection of which are A(AUTO), P(FORCED
PAL), M(FORCED MESECAM) respectively.
* The data changed to the current system according to the input video signal automatiically in case of AUTO mode. and if
no signal, if changes to PAL system.
* Adjust the correct system by prssing the [SYS. SEL] button on remote control if the current status of the system is not
correspont to the input vodeo signal.
Содержание DV-K*84W Series
Страница 71: ...CIRCUIT DIAGRAMS 68 SECTION 9 CIRCUIT DIAGRAM 9 1 CONNECTION DIAGRAM DV K884W K484W K284W...
Страница 72: ...CIRCUIT DIAGRAMS 69 9 2 POWER CIRCUIT DIAGRAM DV K884W K484W K284W...
Страница 73: ...CIRCUIT DIAGRAMS 70 9 3 SYSCON AND LOGIC CIRCUIT DIAGRAM...
Страница 74: ...CIRCUIT DIAGRAMS 71 9 4 PIF CIRCUIT DIAGRAM DV K884W K484W K284W...
Страница 75: ...CIRCUIT DIAGRAMS 72 9 5 IF MPX MODULE CIRCUIT DIAGRAM DV K884W K484W K284W...
Страница 76: ...CIRCUIT DIAGRAMS 73 9 6 VIDEO AUDIO CIRCUIT DIAGRAM DV K884W K484W K284W...
Страница 77: ...CIRCUIT DIAGRAMS 74 9 7 Hi Fi PRE AMP CIRCUIT DIAGRAM DV K884W K484W K284W...
Страница 78: ...DISASSEMBLY 79 SECTION 11 DISASSEMBLY 11 1 PACKING ASS Y...
Страница 79: ...DISASSEMBLY 80 11 2 FRONT PANEL ASSEMBLY...


