
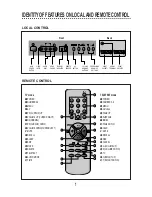


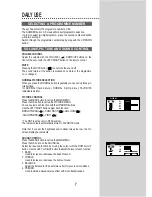


MAIN MENU
Press the MENU button to call up the MAIN MENU.
The MAIN MENU is consist of 6 sub-menus:
PICTURE, SOUND, TIMER, LANGUAGE, PRESET, EDIT
menu.
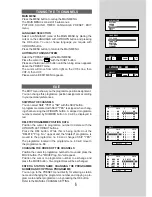
LANGUAGE SELECTION
Select a LANGUAGE menu at the MAIN MENU by placing the
cursor on the LANGUAGE with UP/DOWN button and pressing
the OK button. You can choose language you require with
UP/DOWN button.
Press the MENU button to return to the MAIN MENU.
AUTOMATIC TUNING SYSTEM
Select the PRESET menu at the MAIN MENU.
Place the cursor to "
" with the RIGHT button.
Press and hold down OK button until the tuning screen appears
above the PRESET menu.
The cursor will move from left to right on the VHF-L line, then
VHF-H, then UHF.
Please wait until EDIT MENU appears.
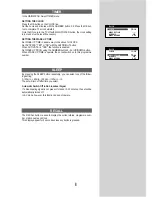
TUNING THE TV CHANNELS
The EDIT menu shows you the programme position assignment.
You can change this programme position assignment according
to your personal preferences.
SKIPPING THE CHANNELS
You can select SKIP "YES" or "NO" with the SKIP button.
A programme marked with SKIP "YES" is skipped when chang-
ing channel using the UP/DOWN button. A skipped programme
number selected by NUMBER button 0..9 will be displayed in
red.
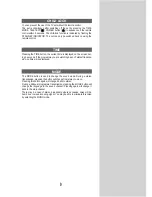
DELETE PROGRAMME POSITION DATA
Position the cursor to programme number to delete with the
UP/DOWN, LEFT/RIGHT buttons.
Press the DEL button. While this is being carried out the
"DELETE" Prog. No." appear and the "deleted" programme is
moved to the programme no. 69 and changed SKIP "YES".
The programme located in the programme no. 69 will move to
the programme no. 68.
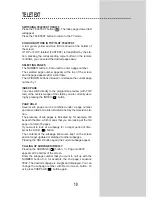
CHANGING THE ORDER OF THE CHANNELS
Position the cursor to programme number to move and press the
MOVE button. The "MOVE Prog. No." will appear.
Position the cursor to programme number to exchange and
press the MOVE button. Two programmes will be exchanged.
ENTER A STATION NAME, CHANGING THE PROGRAMME
NUMBER AND COPYING A PROGRAMME
You can go to the PRESET menu directly for entering a station
name and changing the programme number and copying a pro-
gramme to another programme no. by pressing the OK button.
Refer to the MANUAL CHANNEL SETTING.
EDIT
MAIN MENU
LANGUAGE
PICTURE
SOUND
TIMER
LANGUAGE
PRESET
EDIT
00 - - - - NO
01 - - - - NO
02 - - - - NO
03 - - - - NO
04 - - - - NO
P SKIP
P SKIP
05 - - - - NO
06 - - - - YES
07 - - - - NO
08 - - - - NO
09 - - - - NO
AUTO SEARCH UHF >>
EDIT
00 - - - - NO
01 - - - - NO
02 - - - - NO
03 - - - - NO
04 - - - - NO
P SKIP
DELETE 01
P SKIP
05 - - - - NO
06 - - - - NO
07 - - - - NO
08 - - - - NO
09 - - - - NO
EDIT
00 ARD NO
01 ZDF NO
02 BR3 NO
03 SAT1 NO
04 PR07 NO
P SKIP
MOVE 06
P SKIP
05 RTL2 NO
06 - - - - NO
07 - - - - NO
08 - - - - NO
09 - - - - NO
EDIT
êìëëäàâ
ENGLISH
FRANCAIS
DEUTSCH
ITALIANO
ESPANÍL
PRESET
P01
P
PRESET
P01
P
5
Содержание DTY-29G1
Страница 1: ...Instruction Manual P N 48586775E208 Colour Television DTY 29G1 ...
Страница 14: ...MEMO ...


