background image

Chapter 3 : Operating Your TV

Returning to the factory settings

If you would like to return to the original video settings, as they were calibrated at the
factory, follow these steps :

1

Complete steps 1-3 in the “Adjusting Video Settings” section, on the previous page.
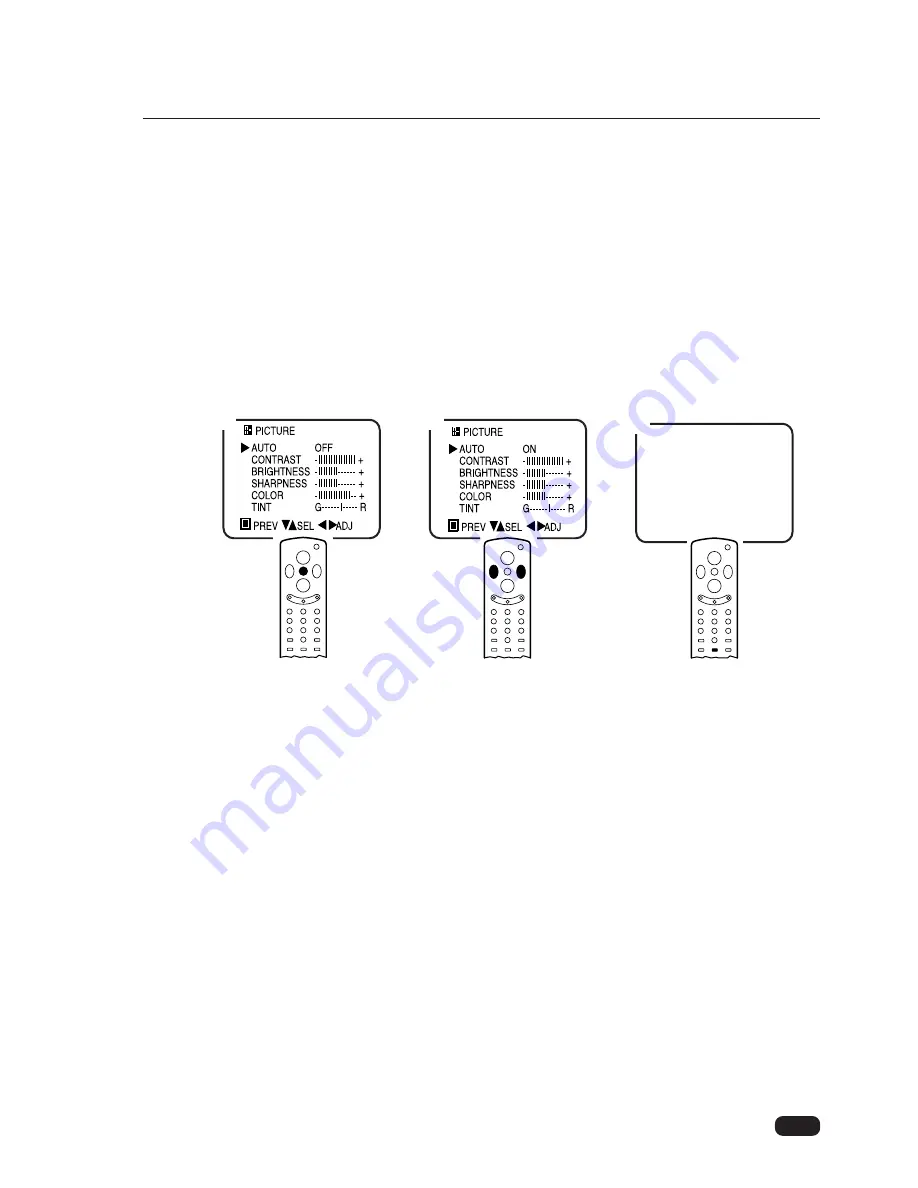
2

Press the 

C

VOL

B

button to set the AUTO setting to ON. This will return all video

settings to their default levels, as set at the factory.

3

You can also return to the factory settings during normal TV viewing by pressing the
AUTO.PICT button on the remote control.

The TV will remember the “custom” settings you had previously chosen. When you
set AUTO to OFF again, your previous custom settings will be restored.

Descriptions of video settings

The contrast setting controls the relation between the light and black areas of the screen.
If the light areas are too bright and are losing details, adjust the contrast towards the “-”
position; if the picture is gray and lacks contrast, adjust the contrast towards the “+”
position.

The brightness settings controls the overall amount of light in the picture. If the picture
is too bright, adjust the brightness setting towards the “-” position; if the picture is too
dark, adjust the brightness towards the “+” position.

Sharpness controls how the TV displays edges of objects on-screen. If the TV shows
multiple vertical lines at the edges of an object, adjust sharpness towards the “-” posi-
tion; if the vertical edges of on-screen objects are fuzzy, adjust sharpness towards the
“+” position.

The color setting controls the intensity of color. If the color is over-saturated, adjust the
color towards the “-” position; if the color is washed out, adjust the color towards the
“+” position.

The tint setting controls the relationship of red and green in a picture. Tint is especially
noticeable in flesh tones. If flesh tones seem too red or purple, adjust the color towards
“G”; if the flesh tones are too green, adjust the color towards “R”.

15

3

1

2

Содержание DTQ 26S1FC

Страница 1: ...Color Television INSTRUCTION MANUAL...

Страница 2: ...ES THAT THE CABLE GROUND SHALL BE CONNECTED TO THE GROUNDING SYSTEM OF THE BUILDING AS CLOSE TO THE POINT OF CABLE ENTRY AS PRACTICAL CAUTION The AC power cord provided with this product is polarized...

Страница 3: ...d consider Daewoo when you make your next pur chase of home entertainment equipment In addition to TV receivers Daewoo produces a full line of audiovisual products built to the same high design engine...

Страница 4: ...om memory 12 Changing the TV s channel memory with the menus 12 Changing the TV s Input 13 Changing the TV s Input with the remote control 13 Displaying the Current Channel 13 Adjusting Video Settings...

Страница 5: ...ensure reliable operation of the television equipment and to protect it from overheating these opening must not be blocked or covered The opening should never be blocked by placing the television equ...

Страница 6: ...may result in damage and will often require extensive work by a qualified technician to restore the TV receiver to its normal operation e If the television equipment has been dropped or the cabinet ha...

Страница 7: ...to turn the TV s menu system on and off 5 Remote control receiver This receiver receives a signal from your remote control Do not block it Your TV s Back Panel 1 Antenna terminal ANT Use this termina...

Страница 8: ...s memory or erase the channel from memory 7 MUTE Use to turn the TV s sound on and off 8 0 9 Use these buttons to change channels 9 SLEEP Use this button to program the TV to turn off after a certain...

Страница 9: ...and a new battery Remove and replace weak batteries Weak batteries can leak and damage your con troller Dispose of batteries properly never throw them into a fire Point your remote at the receiver on...

Страница 10: ...metal post partially surrounded by two plastic tabs For help in locating the antenna terminal see Your TV s Back Panel on page 4 There is no rod antenna rabbit ears provided with your TV Connecting an...

Страница 11: ...Press the cable from combiner onto the antenna terminal on the back of your TV If your antenna system has two sets of twin 300 ohm leads you must obtain a com biner available at your local electronic...

Страница 12: ...ch available at your local electronics store Connect a third coaxial cable between the OUT terminal on the converter box and the A IN termi nal on the A B switch Finally connect a coaxial cable betwee...

Страница 13: ...ns If a channel is not in memory you can tune to it with the number buttons but not with the VCHW buttons Follow these steps to program your TV s memory 1 With the TV on press the MENU button 2 Use th...

Страница 14: ...e last channel you were watching Changing the Volume 1 To change the volume of the TV set use the CVOLB buttons on the remote or on the front panel 2 To quickly turn off the sound press the MUTE butto...

Страница 15: ...ry 1 Use the number buttons to tune to the channel then press MENU 2 Use the VCHW buttons to select SETUP and press CVOLB 3 Use the VCHW buttons to select EDIT PROGRAM If the channel is in memory it w...

Страница 16: ...ons to select SETUP and press CVOLB 3 Use the VCHW buttons to select INPUT 4 Press CVOLB to change from TV to VIDEO Press CVOLB again to switch back to TV 5 Wait 7 seconds to return to normal viewing...

Страница 17: ...ll appear 4 The AUTO feature will be selected Use the CVOLB button to turn AUTO to OFF This will allow you to manually adjust the video settings 5 Use the VCHW buttons to select the video setting you...

Страница 18: ...adjust the contrast towards the position if the picture is gray and lacks contrast adjust the contrast towards the position The brightness settings controls the overall amount of light in the picture...

Страница 19: ...STEREO signal Changing The Sound Mode 1 With TV turned on press the MENU button 2 Use the VCHW buttons to select sound 3 Press the CVOLB buttons The SOUND menu will be displayed 4 Use the VCHW button...

Страница 20: ...e VCHW buttons to select TIMER 3 Press the CVOLB button The TIMER menu will be displayed Setting the Clock 1 Follow steps 1 3 in Accessing the Timer Menu above 2 Press VCHW buttons to select CLOCK 3 P...

Страница 21: ...set the minutes If you hold down either VOL button the corresponding num bers will change more quickly 4 When the setting is correct use the VCHW buttons to select another timer function or use the ME...

Страница 22: ...minutes to 4 hours in 15 minute increments the TV will count down the amount of time you set then turn itself off To set the sleep timer 1 Follow steps 1 3 in Accessing the Timer Menu 2 Use the CVOLB...

Страница 23: ...ayed on your TV screen There are two types of these words captions usually follow the action on screen providing a written version of the dialogue narration and sound effects text is not usually relat...

Страница 24: ...or on video tapes This mark indicates that captions are provided for that program Please note The content and appearance of captions are determined by the broadcaster not by the TV If the captions dis...

Страница 25: ...television is tuned to a channel that is not receiving a signal or is receiving a very weak signal your TV will automatically display a blue screen instead of static Automatic power off If your televi...

Страница 26: ...and is in good working order has no broken wires and is adjusted correctly The picture is OK but the sound is poor Try another station If the other stations are OK it may be a station problem Check th...

Страница 27: ...he reliability or detracts from its performance How to Obtain Warranty Service Warranty service can only be provided by an authorized DECI Servicentre For the clos est authorized Servicentre to you pl...

Отзывы: