background image

20

Chapter 4 : Using Timer Functions

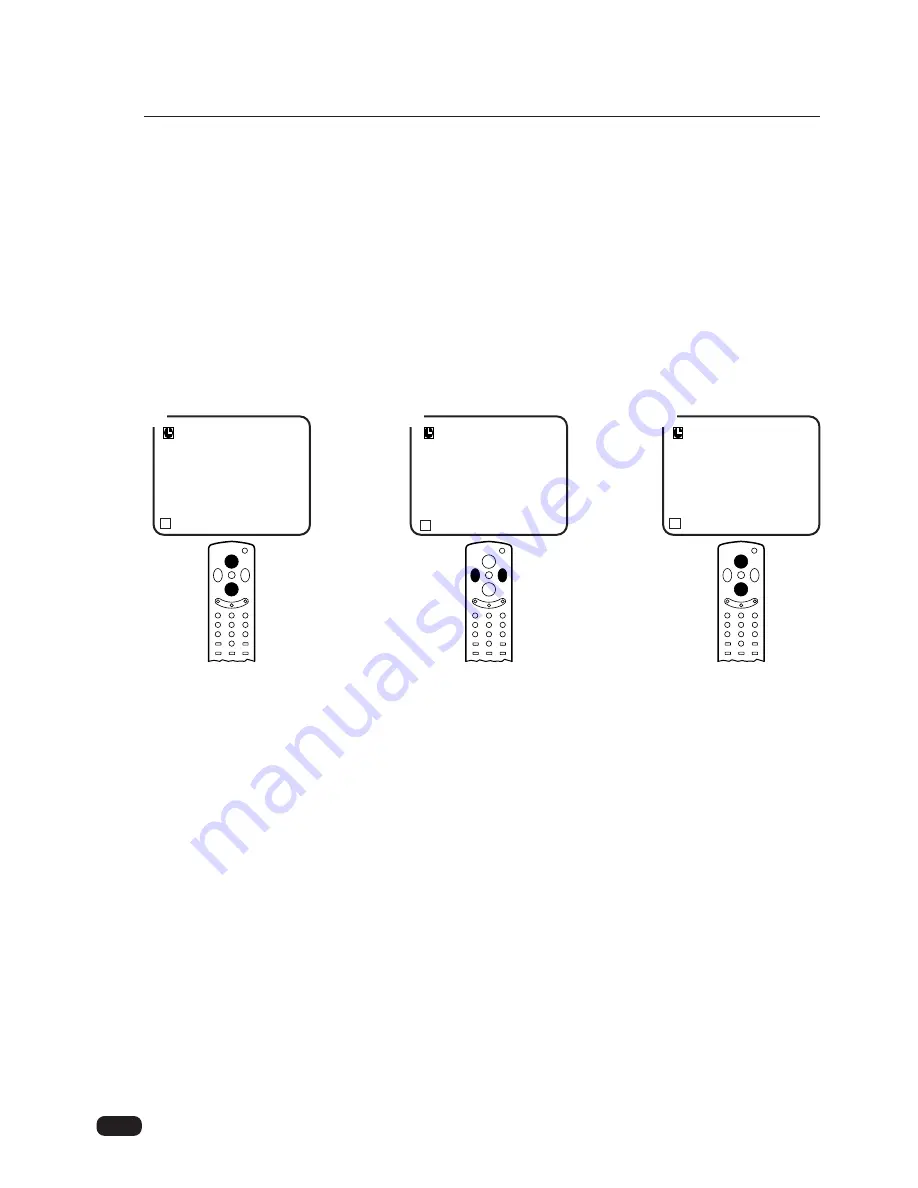
Setting the Clock

Follow steps 1-3 in “Accessing the Timer Menu,” above.

Press 

W

CH

V

buttons to select Clock.

Press the 

C

VOL button to set the hours (including AM/PM); press the VOL

B

button

to set the minutes. If you hold down either VOL button, the corresponding numbers
will change more quickly.

When the clock is set correctly, use the 

W

CH

V

buttons to select another timer func-

tion, or use the MENU button to exit this menu.

Wait 10 seconds, or press the MENU button twice to exit.

3

1

2

Timer

Clock

01:00 AM

On Time
Off Time
Sleep

L  

Prev 

WV

Select  

CB

Adjust

Timer

Clock

01:00 AM

On Time
Off Time
Sleep

L  

Prev 

WV

Select  

CB

Adjust

Timer

Clock

01:00 AM

On Time
Off Time
Sleep

L  

Prev 

WV

Select  

CB

Adjust

Содержание DTQ-20T3

Страница 1: ...MODEL NO MODEL NO DTQ 14Q1 20Q1 14Q2 20Q2 14Q1FS 20Q1FS DTQ 14Q1 20Q1 14Q2 20Q2 14Q1FS 20Q1FS 14Q3 20Q3 14T1 20T1 14T1AS 14Q3 20Q3 14T1 20T1 14T1AS 14T2 20T2 14T3 20T3 21T1PS 14T2 20T2 14T3 20T3 21T1PS ...

Страница 2: ...TEM INSTALLER S ATTENTION TO ARTICLE 820 40 OF THE NEC THAT PROVIDES GUIDELINES FOR PROPER GROUNDING AND IN PARTICULAR SPECIFIES THAT THE CABLE GROUND SHALL BE CONNECTED TO THE GROUNDING SYSTEM OF THE BUILDING AS CLOSE TO THE POINT OF CABLE ENTRY AS PRACTICAL CAUTION To provide power to the TV insert the AC plug into a standard 110 220V 50 60Hz polarized outlet NOTE If you feel a static discharge ...

Страница 3: ... channel to memory 13 Erasing a channel from memory 14 Changing the TV s channel memory with the menus 14 Changing the TV s Input 15 Displaying the Current Channel 15 Adjusting Video Settings 16 Returning to factory settings 17 Descriptions of video settings 18 Chapter 4 Using Timer Functions 19 Accessing the Timer Menu 19 Setting the Clock 20 Setting the On Timer 21 Setting the Off Timer 22 Cance...

Страница 4: ... to ensure reliable operation of the television equipment and to protect it from overheating these opening must not be blocked or covered The opening should never be blocked by placing the television equipment on a bed sofa rug or other similar surface This equipment should never be placed near or over a radiator or heat register This television equipment should not be placed in a built in install...

Страница 5: ...may result in damage and will often require extensive work by a qualified techni cian to restore the TV receiver to its normal operation e If the television equipment has been dropped or the cabinet has been dam aged f When the television equipment exhibits a distinct change in performance this indicates a need for service 18 When replacement parts are required be sure the service technician has u...

Страница 6: ...e an audio signal from your TV 5 STAND BY red indicator This indicator lights up when the power is off 6 Remote control receiver This receiver receives a signal from your remote control Don t block it 7 WCHV Use these buttons to change channels on your TV or to select items in the menu system 8 CVOLB Use these buttons to change your TV s volume to activate selections in the menu system or to chang...

Страница 7: ...se this terminal to attach an antenna or cable system to your TV 2 VIDEO IN This terminal allows the TV to receive a video signal from another component such as a VCR 3 AUDIO IN This terminal allows the TV to receive an audio signal from another component such as a VCR ANT VIDEO AUDIO ...

Страница 8: ...l to the TV s memory or erase the channel from memory 7 MUTE Use to turn the TV s sound on and off 8 0 9 Use these buttons to change channels 9 SLEEP Use this button to program the TV to turn off after a certain time 10 PREV CH Press this button to return to the previous channel you were watching If you have set Favorite Ch this key operates to Favorite func tion 11 TV VIDEO Use this button to sel...

Страница 9: ...ferent types of batteries or mix an old and a new battery Remove and replace weak batteries Weak batteries can leak and damage your con troller Dispose of batteries properly never throw them into a fire Point your remote at the receiver on the center of the front of the TV Make sure the receiver is not blocked The remote control can operate up to 30 feet away from the TV if you are directly fac in...

Страница 10: ...ocating the antenna terminal see Your TV s Back Panel on page 5 Connecting an Antenna If your antenna ends in a single coaxial lead simply press or screw the cable onto the antenna terminal on the back of your TV If your antenna ends in a pair of 300 ohm twin leads you must use a 300 ohm 75 ohm adaptor Place the leads underneath the screws on the adaptor tighten the screws then press the adaptor o...

Страница 11: ...minal on the back of your TV If your antenna system has two sets of twin 300 ohm leads you must obtain a combiner available at your local electronics store Place one set of twin leads under neath the screws on the combiner and tighten the screws Do the same with the other set of twin leads Press the cable from the combiner onto antenna terminal on the back of your TV Connecting a cable system If y...

Страница 12: ...e Connect a third coaxial cable between the OUT terminal on the converter box and the A IN terminal on the A B switch Finally connect a coaxial cable between the OUT terminal on the A B switch and the antenna terminal on the back of your TV When the A B switch is in the A position you need to change channels on the convert er box and your TV should be tuned to channel 3 or 4 when the A B switch is...

Страница 13: ...ess the MENU button 2 Use the WCHV buttons to select Setup and press the CVOLB buttons 3 Use the WCHV buttons to select Auto Program and press the CVOLB buttons 4 Use the WCHV buttons to select Source then use the CVOLB buttons to select Air or Cable 5 If you connected an antenna to your TV select Air if you connected a cable sys tem select Cable 6 Use the WCHV buttons to select Auto Program and p...

Страница 14: ...g Your TV 5 7 8 XX Program L Stop Auto Prog Source Air Auto Program L Prev WVSelectCBAdjust 6 Auto Prog Source Cable Auto Program L Prev WVSelectCBAdjust Auto Prog Source Auto Program CBTo Program L Prev WVSelectCBAdjust 9 ...

Страница 15: ...hannel it was in memory Changing the Volume 1 To change the volume of the TV set use the CVOLB buttons on the remote or on the front panel 2 To quickly turn off the sound press the MUTE button on the remote To return the volume to its previous level press the MUTE button again Changing the TV s Channel Memory Your TV s memory determines the channels that are available using the WCHV but tons You c...

Страница 16: ...d press the CVOLB buttons 3 Use the WCHV buttons to select Edit Program and press the CVOLB buttons If the channel is in memory it will be labeled Added and the number in the corner will be white If the channel is not in memory it will labeled Erased and the num ber in the corner will be red 4 Use the CVOLB buttons to change the Added or Erased setting 5 Wait 10 seconds or press the MENU button tw...

Страница 17: ... the Main Menu Use the WCHV buttons to select Setup and press the CVOLB buttons 3 Use the WCHV buttons to select Input 4 Press the CVOLB buttons to change from TV to VIDEO Press the CVOLB but tons again to switch back to TV 5 Wait 10 seconds to return to normal viewing or press the MENU button twice When it connected an audio cable from the AUDIO out jack on the VCR to the AUDIO jack on the front ...

Страница 18: ...uttons to adjust the video setting to the level you prefer 6 Use the WCHV buttons to select another video setting to adjust 7 When you are finished press the MENU button twice to return to normal viewing 16 Chapter 3 Operating Your TV 1 2 Setup Video Timer L Prev WVMoveCBSelect 3 4 5 6 7 Video Picture Pref Preset Contrast Brightness Sharpness Color Tint L Prev WVSelect CBAdjust Video Picture Pref ...

Страница 19: ...s to their default level as set at the factory 4 Wait 10 seconds or press the MENU button twice to exit If you set to Preset and Custom in direct mode Use the AUTO PICT button follow these step 1 Press the AUTO PICT button 2 Press the AUTO PICT button to set to Preset or Custom 3 Wait 3 seconds to exit 17 Chapter 3 Operating Your TV 3 1 2 1 Picture Pref Custom Preset Video Picture Pref Preset Cont...

Страница 20: ...ition Sharpness controls how the TV displays edges of objects on screen If the TV shows multiple vertical lines at the edges of an object adjust sharpness towards the posi tion if the vertical edges of on screen objects are fuzzy adjust sharpness towards the position The color setting controls the intensity of color If the color is over saturated adjust the color towards the position if the color ...

Страница 21: ...th the TV turned on press the MENU button 2 Use the WCHV buttons to select TIMER 3 Press the CVOLB buttons The TIMER menu will be displayed 4 Wait 10 seconds or press the MENU button twice to exit Using Timer Functions CHAPTER 4 1 4 2 Setup Video Timer L Prev WVMove CBSelect 3 Timer Clock 01 00 AM On Time 12 35 AM Off Time 12 34 AM Sleep 11 05 PM L Prev WVSelect CBAdjust 19 Chapter 4 Using Timer F...

Страница 22: ...er VOL button the corresponding numbers will change more quickly 4 When the clock is set correctly use the WCHV buttons to select another timer func tion or use the MENU button to exit this menu 5 Wait 10 seconds or press the MENU button twice to exit 3 1 2 Timer Clock 01 00 AM On Time Off Time Sleep L Prev WVSelect CBAdjust Timer Clock 01 00 AM On Time Off Time Sleep L Prev WVSelect CBAdjust Time...

Страница 23: ...LB button to set the minutes If you hold down either VOL button the corresponding numbers will change more quickly 4 When the setting is correct use the WCHV buttons to select another timer function or use the MENU button to exit this menu 5 Wait 10 seconds or press the MENU button twice to exit Chapter 4 Using Timer Functions 3 1 2 Timer Clock On Time 12 35 AM Off Time Sleep L Prev WVSelect CBAdj...

Страница 24: ...us page 2 Use the WCHV buttons to select Off Time 3 Press the CVOL button to set the hours including AM PM press the VOLB but ton to set the minutes If you hold down either VOL button the corresponding num bers will change more quickly 4 When the setting is correct use the WCHV buttons to select another timer func tion or use the MENU button to exit this menu 5 Wait 10 seconds or press the MENU bu...

Страница 25: ...e setting is correct use the WCHV buttons to select another timer func tion or use the MENU button to exit this menu 5 You can also set the Sleep timer during normal TV viewing simply by pressing the Sleep button on the remote control This button steps through the available sleep times see step 2 one by one 6 Wait 10 seconds or press the MENU button twice to exit To cancel the sleep timer turn the...

Страница 26: ...aptions These captions are hidden words that can be displayed on your TV screen There are two types of these words captions usu ally follow the action on screen providing a written version of the dialogue narration and sound effects text is not usually related to the action on screen often providing information such as news or weather A TV program might be providing more than one set of captions T...

Страница 27: ...nge characters misspellings or odd words those errors are made by the broadcaster not your TV Errors in captioning are more common during live programs than during taped programs Your TV cannot display captions when it is displaying any other on screen information If you use the RECALL or VOL buttons the captions will briefly disappear Power Restore 1 With the TV turned on press the MENU button 2 ...

Страница 28: ...l is not in memory it will labeled Normal and this will be with the number in the corner 5 Use the CVOLB buttons to change the Favorite or Normal setting 6 Wait 10 seconds or press the MENU button twice to exit Automatic power off If your television does not receive a television signal for 15 minutes it will automatically turn off 1 Setup Video Timer L Prev WVMove CBSelect 2 3 Ch 13 Favorite L Pre...

Страница 29: ...ted and is in good working order has no broken wires and is adjusted correctly The picture is OK but the sound is poor Try another station If the other stations are OK it may be a station problem Check that the antenna is connected is in good working order has no broken wires and adjusted correctly There is poor reception on some channels Try another station If the other stations are OK it may be ...

Страница 30: ...xtend to any of our electronic products which have been sub jected to misuse neglect accident incorrect wiring not our own improper installation unauthorized modification or to use in violation of instructions furnished by us nor units which have been repaired or altered outside of our factory nor to cases where the serial number thereof has been removed defaced or changed This warranty is in lieu...

Страница 31: ...P N 48586201E10D R0 ...

Отзывы: