background image

ENGLISH

19

WALL/ARM MOUNTING

18

DAILY  USE

CALLING UP SUBPAGE DIRECTLY

Pressing the SUBPAGE button , " S - - - - " appears.
Enter the subpage number that you want to call up with the
NUMBER button, for example, the 2nd page, sequence 0002.
The desired subpage will eventually be displayed on the screen
and holds it there. 
Meanwhile whilst you are waiting, it is possible to go back to the
TV picture by pressing the CANCEL button on the remote and
after a while, press the CANCEL button again to revert back to
the saved Teletext sub page.

WATCHING TV DURING TELETEXT MODE

Some pages are continually updated, for example, stock market
reports, sports announcements, and the latest news.
If you want to watch television and stay informed at the same
time, press CANCEL button.
The regular programme is still visible and the Teletext page
number appears at the top of the screen.
Pressing the CANCEL button, the Teletext page appears with the
updated information.

REVEAL ANSWER

This function can be used on certain pages to reveal the solution
of riddles.
Press the REVEAL button to reveal a hidden answer and press
again to hide it.

DOUBLING CHARACTER SIZE

Repeatedly pressing the SIZE button doubles the character size in
the following order:
Upper half of the page 

?

?

?

?

?

?

?)X?f?

?@)Xf?

?@@)X?e?

?@@@1?e?

?@@@@Le?

?@@@@@@@@@@@@@@@@@@)K??

?@@@@@@@@@@@@@@@@@@@@(?

?@@@@@@@@@@@@@@@@@@@(Y?

?@@@@@@@@@@@@@@@@@@(Y??

?@@@@He?

?@@@5?e?

?@@(Y?e?

?@(Yf?

?(Y?f?

?

?

?

?

?

?

?

Lower half of the page 

?

?

?

?

?

?

?)X?f?

?@)Xf?

?@@)X?e?

?@@@1?e?

?@@@@Le?

?@@@@@@@@@@@@@@@@@@)K??

?@@@@@@@@@@@@@@@@@@@@(?

?@@@@@@@@@@@@@@@@@@@(Y?

?@@@@@@@@@@@@@@@@@@(Y??

?@@@@He?

?@@@5?e?

?@@(Y?e?

?@(Yf?

?(Y?f?

?

?

?

?

?

?

?

Normal size

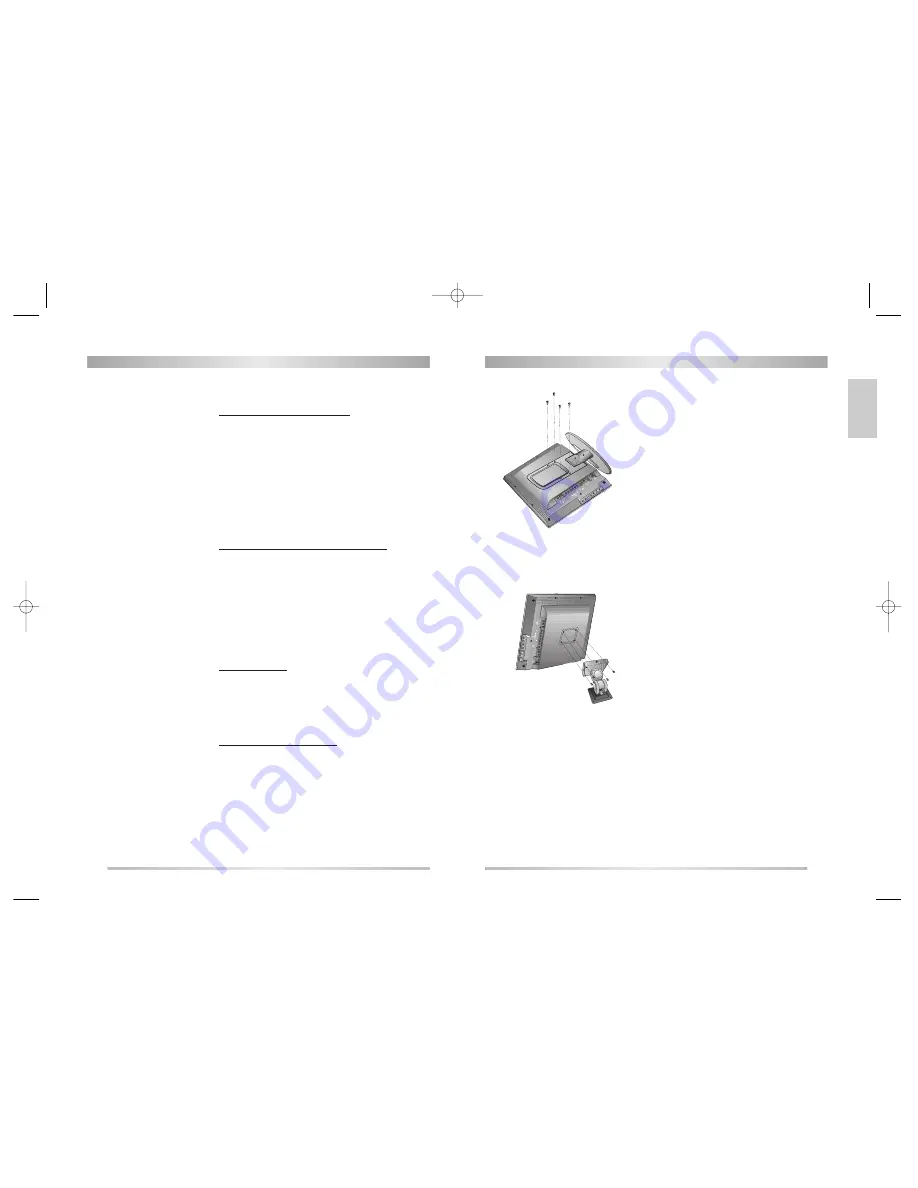
Attaching a Wall or Arm mounting device

This TV supports the VESA mounting standard and will
accommodate various VESA mounting devices. 
To install any VESA mounting device, please follow the
manufacturer’s instructions.

1. Remove all cables connected to the TV.
2. Lay the LCD TV face-down on a flat surface with a blanket

or other soft materials to protect the screen.

3. Remove the four screws attaching the stand. Remove

stand from LCD TV.

4. Now you are ready to install the VESA mounting device

suited to your applications (see instructions below).

5. Connect all cables removed at step 1.

Installing VESA compliant mounting devices

1. Align the mounting interface pad (100mm x 100mm hole

spacing) with the holes in the televisions rear cover
mounting pad.

2. Secure bracket with the four screws (4mmØ) that came

with the VESA mounting device.

DSL20D1T(PAL)·º¿ GB  03.10.23 1:48 PM  ˘

` 18   mac001  1200DPI 90LPI

Содержание DSL-20D1T

Страница 1: ...SC AV A2 NICAM STEREO SOUND TELETEXT SCART VIDEO S VIDEO COMPONENT MULTI LANGUAGE OSD Ver 032302 Instruction Manual Instruction Manual 20 LCD Television MODEL NO DSL 20D1T GB ENGLISH DSL20D1T PAL GB 0...

Страница 2: ...markings identifying the terminals in your plug proceed as follows The wire coloured BLUE must be connected to the terminal marked with the letter N or coloured BLUE or BLACK The wire coloured BROWN...

Страница 3: ...p the TV equipment away from the heat sources such as radiator heater stoves and other heat generating products 5 SETTING Do not place this TV on unstable cart stand or table Placing the TV on an unst...

Страница 4: ...l system during thunderstorms f f f f f f f f f f f f Cleaning Unplug the set from the mains before cleaning Dust the set by wiping the LCD screen and the cabinet with a soft clean cloth If the screen...

Страница 5: ...V R03 or type AAA Make sure that the polarity matches with the and marks inside of the battery compartment Plug the mains cable into the power socket with 100V 240V AC 50 60 Hz For better picture and...

Страница 6: ...ton to select AV2 In AV mode you can change the TV programme number with the UP DOWN button or the NUMBER button Headphone Jack Insert the headphone plug 3 5 mm g C5 g O2 U g W2 M W Xg 7 He7Y 1g J 5 J...

Страница 7: ...it Features Manual setup Setup Select Adjust Exit Picture Country Sound GB I Features D IRE Setup F EURO CH E EURO 6 Press the button Auto setup will begin your stations will be located and stored 7 P...

Страница 8: ...TUNING If you are unable to get a good picture or sound because of a poor broadcast signal it is possible to adjust the fine tuning 1 Move the selection bar to Fine tune 2 Press the button to activate...

Страница 9: ...re used for direct programme selection To select a two digit programme press the second numbered button within 2 seconds SELECTION You can also select a programme by pressing step by step the buttons...

Страница 10: ...1 Sound 2 or Mono Note Note When receiving a NICAM signal NICAM will be displayed Select Adjust Exit Picture Bass 50 Sound Treble 50 Features Balance 0 Setup Spatial No e h h h h h h f h h h h h h e...

Страница 11: ...e page viewed last will appear Press the TELETEXT button again to return to the TV mode COLOUR BUTTONS IN TOP FLOF TELETEXT A red green yellow and Cyan field is shown at the bottom of the screen If TO...

Страница 12: ...dles Press the REVEAL button to reveal a hidden answer and press again to hide it DOUBLING CHARACTER SIZE Repeatedly pressing the SIZE button doubles the character size in the following order Upper ha...

Страница 13: ...power cable Try positioning cables further apart Picture has lines and faded colours Transmission aerial of amateur radios and cellular phones may cause interference Position the TV set as far away a...

Страница 14: ...MEMO MEMO DSL20D1T PAL GB 03 10 23 1 48 PM 22 mac001 1200DPI 90LPI...

Страница 15: ...MEMO DSL20D1T PAL GB 03 10 23 1 48 PM 24 mac001 1200DPI 90LPI...

Отзывы: