2
EN
1. SAFETY INSTRUCTIONS
Definitions: Safety words
This instruction manual uses the following safety words to alert you to hazardous situations and
your risk of personal injury or property damage.
DANGER:
Indicates an imminently hazardous situation which, if not avoided, will result in death or
serious injury.
WARNING:
Indicates a potentially hazardous situation which, if not avoided, could result in death or
serious injury.
CAUTION:
Indicates a potentially hazardous situation which, if not avoided, may result in minor or
moderate injury. (Used without word) Indicates a safety related message.
NOTICE:
Indicates a practice not related to personal injury which, if not avoided, may result in
property damage.
Important safety warnings
WARNING:
When using electric gardening appliances, basic safety precautions should always be
followed to reduce risk of fire, electric shock, and personal injury, including the following.
Read all instructions
• ALWAYS WEAR EYE PROTECTION – Wear safety spectacles or goggles at all times when battery
is installed. These items are available for purchase.
• DRESS PROPERLY – Do not wear loose clothing or jewelry. They can be caught in moving parts.
Gloves and substantial rubber soled footwear are recommended when working outdoors. Don’t
operate the appliance when barefoot or wearing open sandals. Wear heavy long pants to protect
your legs. Wear protective hair covering to contain long hair.
• KEEP ALL BYSTANDERS AWAY – at a safe distance from work area, especially children.
• MAKE SURE that other persons and pets are at least 100 feet (30 m) away.
• AVOID ACCIDENTALLY STARTING – Do not carry with finger on trigger when battery is installed.
• USE THE RIGHT APPLIANCE – Do not use this appliance for any job except that for which it is
intended.
• DO NOT OVERREACH – Keep proper footing and balance at all times.
• DO NOT FORCE APPLIANCE – It will do the job better and with less likelihood of a risk of injury at
the rate for which it was designed.
• DAMAGE TO UNIT – If you strike or become entangled with a foreign object, stop appliance imme-
diately, remove battery, check for damage and have any damage repaired before further operation is
attempted.
1. Make sure power cord is unplugged. Push the tab below the trigger, twist and separate the nozzle
from the turbine. Wipe the exterior of the cup and nozzle until clean.
2. The nozzle only -
a. Remove the adjustment ring carefully from the connecting nut. Loosen the connecting nut.
b. Remove the parts as shown. Clean all parts with a cleaning brush and the appropriate cleaning
solution. To reassemble, see the instructions on the next page.
3. Clean the air vent on the suction tube with a soft bristled cleaning brush.
4. Clean the rear of the nozzle (d) with the appropriate cleaning solution. Use a thin layer of petro-
leum jelly to lubricate the O-ring.
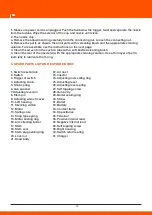
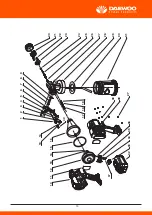
6. SPARE PARTS LIST AND EXPLODED VIEW
spray gun further away from the surface.
NOTE:
If after following the guidelines on these two pages you are still not getting the spray perfor-
mance you need, refer to the 'Troubleshooting’ section on page 15. Besides adjusting the controls,
other factors that should be considered when spraying:
• Distance from the spray object - if you are too far from the spraying surface, the material will go on
too thin, and vice versa.
• Material thickness - if the spray pattern runs and/or is too splotchy, the material may need to be
thinned.
NOTE:
Only thin the material if absolutely necessary to improve spray performance. Optimal spray
performance should be achieved simply by adjusting the various controls on the unit. If the material
needs to be thinned, dilute the material in steps of 5% - 10% until the desired spray pattern is
achieved.
• Spray gun movement - moving the gun too quickly will cause the spray pattern to be too thin and
excess overspray. Moving the gun too slowly will cause the spray pattern to be too coarse or thick.
5. CLEANUP
Flushing the unit
Before you begin:
When cleaning, use the appropriate cleaning solution (warm, soapy water for latex materials; mine-
ral spirits for oil-based materials)
Important: Never clean air cap or air holes in the nozzle with sharp metal objects. Do not use
solvents or lubricants containing silicone. Special cleanup instructions for use with flammable
solvents (must have a flashpoint above 100°F (38°C):
• Always flush spray gun outside.
• Area must be free of flammable vapors.
• Cleaning area must be well-ventilated.
• Do not submerge turbine!
To Flush the Unit:
1. Unplug the power cord. Loosen the material container by 1/2 turn, but do not remove it. This will
relieve any pressure left over in the system. Pull the trigger so that the material inside the spray
nozzle drains back into the container.
2. Unscrew the container and remove. Empty any remaining material back into the material contai-
ner.
3. Pour a small amount of the appropriate cleaning solution into the cup (Water=1/2 full. Mineral
spirits=1/4 full).
4. Attach the cup to the nozzle and plug in the sprayer.
5. Spray the cleaning solution into a safe area. While spraying, gently shake the spray gun. This
slight agitation will help break up smaller particles of spray material.
6. Unplug the power cord. Loosen the material container by 1/2 turn, but do not remove it. This will
relieve any pressure left over in the system. Pull the trigger so that the material inside the spray
nozzle drains back into the container.
IMPORTANT:
If you cleaned the sprayer using mineral spirits, repeat steps 1-6 using warm, soapy
water.
Move on to “Cleanup - Cleaning the Nozzle”,
Cleaning the Nozzle
To Clean the Nozzle:
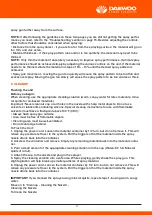
• Always apply a thin coat of material on the first pass and allow to dry before applying a second,
slightly heavier coat.
• When spraying larger surfaces, overlap each spray pass by at least 50% This will ensure full
coverage.
• When spraying, always trigger the spray gun after spray pass has begun and release trigger
before stopping the pass. Always keep the gun pointed squarely at the spray surface and overlap
passes slightly to obtain the most consistent and professional finish possible.
During a project, periodically wipe the nozzle tip with a cloth to remove any dried paint.
NOTE:
When you quit spraying for any length of time, unplug the sprayer. When you restart, wipe
the nozzle with a damp cloth to remove any dried paint.
Pattern examples
Use the images and guidelines below in order to assist you in achieving the desired spray pattern
for your project. These are meant to be general starting points - you may have to slightly modify
certain controls on the system in order to get the exact performance you need.
NOTE:
It is recommended that the trigger first be pulled partially in order to start the turbine before
a spray pass is made.
STOP
During a project, periodically wipe the nozzle tip with a cloth to remove any dried paint.
Large surface projects
Generally, high material flow and air power are needed for spraying large surface areas, such as
walls and decks.
The nozzle is ideal for these applications and is designed for broad coverage in either horizontal or
vertical spraying.
Small surface projects
Generally, low material flow and air power are needed for spraying smaller surface areas, such as
corners, lattice, or spindles. For this type of project, reduce power, material flow and switch to a
narrow width when using the nozzle. Moving closer to the spray surface narrows the fan and moving
farther away widens it.
• If you feel the material is going on too thin, increase the material flow.
• If you feel the material is going on too thick, decrease the material flow even further or move the
Tips:
1. Start with a fan pattern for painting trim work (1-5” width) and larger surfaces like doors and walls
(>5” width).
2. Adjust Material & Air Flow settings as shown in chart based on coating, fan pattern width, and
nozzle.
3. Fine tune the Material and Air Power settings to achieve the best results for your application.
4. Pull trigger slightly to start the turbine before pulling all the way to spray material.
5. Use narrow pattern for detailed work, touch up.
6. Recommended settings for Material and Air Power may change if the coating is thinned.
PROPER SPARY TECHNIQUE
The room you are spraying must be properly masked in order to prevent overspray from covering
woodwork, floors or furnishings. Make sure you have properly masked the room per the instructions
on the enclosed “Taping Guide”. If spraying with an air-assisted spray system is new or unfamiliar to
you, it is advisable to practice on a piece of scrap wood or cardboard before beginning on your
intended workpiece and/or test with water.
Surface preparation
All objects to be sprayed should be thoroughly cleaned before spraying material on them. Areas not
to be sprayed may, in certain cases, need to be masked or covered.
Spray Area Preparation
The spray area must be clean and free of dust in order to avoid blowing dust onto your freshly
sprayed surface.
How to sprayproperly
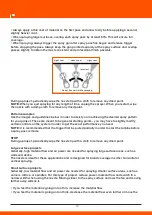
It is important to keep your arm moving whenever the gun is being triggered. If you pause or linger in
one spot too long, too much material will be sprayed to the surface. Partially pulling the trigger will
start the turbine, but no material will spray until the trigger is pulled fully. It is recommended that the
trigger first be pulled partially in order to start the turbine before a spray pass is made.
• Position the spray gun perpendicular to and six (6) to eight (8) inches from the spray surface,
depending upon the spray pattern size desired. With reduced material flow and air power, you can
get closer to the spraying surface.
• Spray parallel to the surface with smooth passes at a consistent speed as illustrated below. Doing
this will help avoid irregularities in the finish (i. e. runs and sags).
• For thinner materials, it is recommended that you start with a low material flow setting, and then
gradually increase the flow to suit your particular spraying needs.
• The higher the flow setting, the quicker you will have to work in order to avoid drips and sags in
your spray pattern.
Adjust spray shape - both nozzles
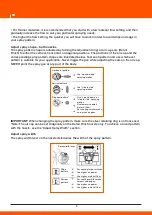
The spray pattern shape is adjusted by turning the adjustment ring) or air cap ears (Detail
Finish) to either the vertical, horizontal, or diagonal positions. The positions of the air cap and the
corresponding spray pattern shapes are illustrated below. Test each pattern and use whichever
pattern is suitable for your application. Never trigger the gun while adjusting the ears on the air cap.
NEVER point the spray gun at any part of the body.
IMPORTANT:
When changing the spray pattern, make sure the silver retaining ring is not loosened.
*Note: The air cap can be set diagonally on the Detail Finish nozzle only. To achieve a round pattern
with the nozzle, see the “Adjust Spray Width” section.
Adjust spray width
The spray width lever on the nozzle determines the width of the spray pattern.
• REMOVE BATTERY – when not in use, or prior to cleaning.
• AVOID DANGEROUS ENVIRONMENTAL CONDITIONS – Do not use electric appliances in damp or
wet locations. Follow all instructions in this Instruction Manual for proper operation of your applian-
ce. Don’t use the appliance in the rain.
• DO NOT OPERATE portable electric appliances in gaseous or explosive atmospheres. Motors in
these appliances normally spark, and the sparks might ignite fumes.
• STORE IDLE APPLIANCES INDOORS – When not in use, appliances should be stored indoors in a
dry, locked-up place out of reach of children.
• STAY ALERT – Do not operate this unit when you are tired, ill, or under the influence of alcohol,
drugs, or medication.
• MAINTAIN APPLIANCES WITH CARE –Follow instructions in maintenance section. Keep handles
dry, clean and free from oil and grease.
• GENERAL SAFETY RULES
•If the power supply cord is damaged, it must be replaced only by the manufacturer or by an autho-
rized service center to avoid risk.
• Do not point the blower nozzle in the direction of people or pets.
• Never run the unit without the proper equipment attached. Always ensure the sweeper tubes are
installed.
• When not in use, blower should be stored indoors in a dry, locked up place—out of the reach of
children.
• Maintain tool with care. Keep fan area clean for best and safest performance. Follow instructions
for proper maintenance. Do not attempt to clear clogs from tool without first removing the battery.
• To reduce the risk of electrical shock, do not expose to rain, do not use on wet surfaces. Store
indoors.
• Save these instructions. Refer to them frequently and use them to instruct others who may use
this power tool. If you loan someone this power tool, loan them these instructions also.
• DO NOT immerse appliance in water or squirt it with a hose. DO NOT allow any liquid to get inside
it.
• DO NOT store the appliance on or adjacent to fertilizers or chemicals.
• DO NOT clean with a pressure washer.
• Keep guards in place and in working order.
• Keep hands and feet away from cutting area.
• Do not charge appliance in rain, or in wet locations.
WARNING:
Do not use appliance if the switch trigger does not turn the appliance on or off. Any
appliance that cannot be controlled with the switch trigger is dangerous and must be repaired.
WARNING:
Some dust created by this product contains chemicals known to the State of California
to cause cancer, birth defects or other reproductive harm.
Some examples of these chemicals are:
-
Compounds in fertilizers
-
Compounds in insecticides, herbicides and pesticides
-
Arsenic and chromium from chemically treated lumber
To reduce your exposure to these chemicals, wear approved safety equipment such as dust masks
that are specially designed to filter out microscopic particles.
WARNING:
This product is not an edger and is not intended to be used for edging.
2. READ ALL INSTRUCTIONS
Important safety instructions for all
Battery Packs
WARNING:
Read all safety warnings and all instructions for the battery pack, charger
and appliance. Failure to follow the warnings and instructions may result in electric shock, fire
and/or serious injury.
• Do not charge or use the battery pack in explosive atmospheres, such as in the presence of
flammable liquids, gases or dust. Inserting or removing the battery pack from the charger may ignite
the dust or fumes.
• NEVER force the battery pack into the charger. DO NOT modify the battery pack in any way to fit
into a non-compatible charger as battery pack may rupture causing serious personal injury. Consult
the chart at the end of this manual for compatibility of batteries and chargers.
• DO NOT splash or immerse in water or other liquids.
• Do not store or use the appliance and battery pack in locations where the temperature may reach
or exceed 104 °F (40 °C) (such as outside sheds or metal buildings in summer). For best life store
battery packs in a cool, dry location.
NOTE:
Do not store the battery packs in an appliance with the trigger switch locked on. Never tape
the trigger switch in the ON position.
• Do not incinerate the battery pack even if it is severely damaged or is completely worn out. The
battery pack can explode in a fire. Toxic fumes and materials are created when lithium ion battery
packs are burned.
• If battery contents come into contact with the skin, immediately wash area with mild soap and
water. If battery liquid gets into the eye, rinse water over the open eye for 15 minutes or until irrita-
tion ceases. If medical attention is needed, the battery electrolyte is composed of a mixture of liquid
organic carbonates and lithium salts.
• Contents of opened battery cells may cause respiratory irritation. Provide fresh air. If symptoms
persist, seek medical attention.
WARNING:
Burn hazard. Battery liquid may be flammable if exposed to spark or flame.
WARNING:
Fire hazard. Never attempt to open the battery pack for any reason. If the battery pack
case is cracked or damaged, do not insert into the charger. Do not crush, drop or damage the
battery pack. Do not use a battery pack or charger that has received a sharp blow, been dropped,
run over or damaged in any way (e.g., pierced with a nail, hit with a hammer, stepped on). Damaged
battery packs should be returned to the service center for recycling.
Transportation WARNING:
Fire hazard. Do not store or carry the battery pack so that metal objects
can contact exposed battery terminals. For example, do not place the battery pack in aprons,
pockets, tool boxes, product kit boxes, drawers, etc., with loose nails, screws, keys, etc. Transpor-
ting batteries can possibly cause fires if the battery terminals inadvertently come in contact with
conductive materials such as keys, coins, hand tools and the like. The US Department of Transpor-
tation Hazardous Material Regulations (HMR) actually prohibit transporting batteries in commerce
or on airplanes in carry-on baggage UNLESS they are properly protected from short circuits. So
when transporting individual battery packs, make sure that the battery terminals are protected and
well insulated from materials that could contact them and cause a short circuit.
3. TECHNICAL SPECIFICATIONS
Power: 20 V
Capacity container: 500 ml
Max flow rate: 380 ml/min (water)/90 ml/min (paint)
Max pressure: 11 kPa
Nozzle size: 1.8 mm
Working time: 20 minutes
Charge time: 1 hour
Battery capacity: 2.0 Ah
Electronic protection system
Li-Ion appliances are designed with an Electronic Protection System that will protect the battery
pack against overloading, overheating or deep discharge. The appliance will automatically turn off if
the Electronic Protection System engages. If this occurs, place the lithium ion battery pack on the
charger until it is fully charged.
Storagerecommendations
1. The best storage place is one that is cool and dry, away from direct sunlight and excess heat or
cold.
2. For long storage, it is recommended to store a fully charged battery pack in a cool dry place out
of the charger for optimal results.
NOTE:
Battery packs should not be stored completely depleted of charge. The battery pack will
need to be recharged before use.
NOTE:
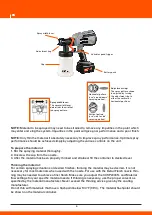
Material to be sprayed may need to be strained to remove any impurities in the paint which
may enter and clog the system. Impurities in the paint will give poor performance and a poor finish.
NOTE:
Only thin the material if absolutely necessary to improve spray performance. Optimal spray
performance should be achieved simply by adjusting the various controls on the unit.
To prepare the material:
1. Stir the spraying material thoroughly.
2. Unscrew the cup from the nozzle.
3. After the material has been properly thinned and strained, fill the container to desired level.
Thinning the material:
For certain spraying situations or desired finishes, thinning the material may be desired. It is not
necessary for most materials when used with the nozzle. For use with the Detail Finish nozzle thin-
ning may be needed to achieve a finer finish. Make sure you adjust the CCSP20001L and Material
flow settings for your specific material needs. If thinning is necessary, use the proper solvent as
specified by the material manufacturer. Never exceed the thinning advice given by the coating
manufacturer.
Do not thin with materials that have a flashpoint below 100°F (38°C). The material flashpoint should
be shown on the material container.
4. ASSEMBLY
Before you begin:
NEVER point the spray gun at any part of the body.
To Assemble:
IMPORTANT:
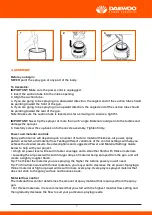
Make sure the power cord is unplugged.
1. Insert the suction tube into the intake opening.
2. Align the suction tube -
a. If you are going to be spraying in a downward direction, the angled end of the suction tube should
be pointing toward the front of the gun.
b. If you are going to be spraying in an upward direction, the angled end of the suction tube should
be pointing toward the rear of the gun.
Note: Make sure the suction tube is inserted as far as it will go to ensure a tight fit.
IMPORTANT:
Never tip the sprayer at more than a 45° angle. Material could get into the turbine and
damage the sprayer.
3. Carefully screw the cup back onto the nozzle assembly. Tighten firmly.
Power and material controls
Spray performance will depend upon a number of factors: material thickness, air power, spray
pattern selected, and material flow. Testing different variations of the control settings will help you
achieve the desired results. See descriptions and suggested Power and Material Settings Guide
below to help with your project.
• A high air power level will result in faster coverage and a smoother finish with thicker materials.
• Lowering the air power will result in larger drops of material being sprayed from the gun, and will
create a slightly rougher finish.
Tip: The thicker the material you are spraying, the higher the turbine power you will need.
Tip: For fine-finish work with thinner materials, you may want to decrease the air power. Spraying a
thinner material at high air power will result in more overspray. Overspray is sprayed material that
does not stick to the spray surface and bounces back.
Material flow control
The material flow control determines the amount of spray material that is sprayed from the spray
gun.
• For thicker materials, it is recommended that you start with the highest material flow setting and
then gradually decrease the flow to suit your particular spraying needs.


