


4. THE PROCEDURE OF SETUP OPERATION AND NOTICE
• In order to increase the lifetime of the crimping machine, and reduce the malfunction happens,
please fuel the original No.46# hydraulic oil(Make sure to use brand new hydraulic oil), or it will
cause the problems of the reversal valve.
• The electric cabinet must be opened and checked by skilled electricians. It will be easily for you to
take the electric cabinet off by loosing the four screws when you plan to check it.
• The rusted fitting and steel pipe can not be used. Warning, it will be dangerous if you have some
impurity in Nose such as iron scrap , mud and sand, cotton and silk and so on. The slope between
the mould seat and front board must be cleaned frequently.
• Lubricate the front internal cone by little oil brush or oil squirt before using. (The butter and
hydraulic oil mixed by 1:1).
Efficacy: It is beneficial to remove iron debris residue and increase the service life of the machine.
Mixed oil ratio: 50% hydraulic oil (used in the machine) + 50% grease (usually used in bearings)
Application area: the bottom of the eight-petal seat of the machine head
• Please put the work-piece into the mould when you plan to deal with it.
Warning!!! do not let it out of the mould, or the mould will be destroyed.
• In case of destroying or breaking off the mould , please do not use the mould out of the range.
• Please take good care of your hands when operating the machine.
• In order to avoid the Spring transforming, the mould base must be back to the original place when
the crimping machine power off.
• To avoid reducing the service life time of the machine, please turn off the general power switch
after work.
5. FUELING
Please fuel the original anti-abrasion hydraulic oil(BP46# for winter and BP68# for summer) which is
approximate 60 litters. Open the oil hole (figure 1) and fuel the oil into the red spot(figure 2)
6. ELECTRICAL CONNECTIONS
First find the reserved thread.
Prepare a special cable in advance. It is recommended to use a thickness of more than 6 square
meters and a length of more than 5 meters, or consult the local power staff and follow their sugges-
tions.
If the cable is too thin, it is easy to cause insufficient power supply.
Open the electric control box, find our signal cable connector position, and then remove the reser-
ved cable.
Do not connect directly with reserved cables!
Connect one end of the new cable prepared in advance to the machine power input ABC (three-pha-
se electrical connection to the three ports of ABC, single-phase electrical connection to A and C)
Connect the power switch to the other end.
Please note: The working cable of the crimping machine must be equipped with a separate power
switch outside the machine, and the input voltage must be stable and accurate.
When the machine is not working, turn off the power switch.
The voltage is divided into single-phase power (220V/110V) and three-phase power (380V or other).
The most popular applications are 220V single-phase power and 380V three-phase power.
If the purchased machine is 220V single-phase power, The power is connected to the two ports A
and C;
If the optional machine is 380V three-phase power, the cable is connected to the A and B and C port
Figure
)
ABC are input wire spots.
7. TEST-RUN THE MACHINE
Using the machine for the first time.
1) If the power supply is 220V single-phase power, link A and C, after turning on the machine, run for
one minute without any operation. Just let the machine motor and oil pump idling. Do not operate
the machine mold to open and close. Work can be carried out in one minute.
2)If it is 380V three-phase power, please link A and B and C.Then turn on the switch and start the
machine.Please note that the three-phase electric motor needs to check whether the motor rotates
clockwise. Inspection method: start the machine and then turn off the machine after a few seconds,
the motor will slowly stop rotating, check the direction of the motor rotating valve while the motor is
slowly stopping.
Thank you for purchasing our Hose Crimping Machine. To make sure that you could use it correctly
and safety, please read and keep well this manual book carefully before setting up and using.
This kind of crimping machine is the ninth generation production which is researched and develo-
ped based on the “68” “88” series crimping machine. And, this new-generation machine learned the
advantage of the British-imported crimping machine. It is the substitute of other model machine with
the high practicability and economy.
1. FEATURE
• With high pressure, long service life, the buckling pressure of the machine is 120T more than other
models. The high performance of the machine can make the electric motor and oil pump in a good
situation, which makes the crimping machine have a long life time.
• Positive cone
:
The diameter of the pole with nut is small after withhold, and the diameter of pole
with rubber hose is 20 string bigger than positive cone. Proved by experiments, positive cone’s life
time will be increased by 20% than negative cone
,
if the joint pole with nut is 0.2mm bigger than the
rubber hose pole. The withhold quality of positive cone and cylinder are several times higher than
negative cone.The life time of this product is much longer than the cylinder sold in the market .( The
abrasion of the machine has business with the using frequency. At the same frequency, positive
cone will have a better performance than cylinder both in longevity and effects.)
• Large diameter hole in the center of the crimping machine makes the abnormal fittings through
easily.
2. PREPARATORY WORK BEFORE INSTALLATION
• Prepare about 60L N0.46# hydraulic oil in winter and No.68# in summer.
It is recommended to use No. 46 hydraulic oil in Southeast Asia and the Middle East.
In Africa, No. 68 hydraulic oil is recommended.
It is recommended to use No. 32 hydraulic oil in Russia and Europe.
The European area 46 and 32 are used together (for reference only)
• Prepare A 6M cable to connect the machine and the general switch.
3. THE USAGE OF POSITIONER
• When the scales point to 0:0, the withhold size will be the size of mould. If you turn it around by
clockwise every lap, the diameter of the withhold size will increase by 1 mm. By inference, it will be
decrease by anticlockwise direction. The perimeter is divided to 100 parts, so , the size is absolutely
accurate, which could completely meet your demands.
• Crimping standard: The shrink of the internal hole of the rubber hose fitting should be at from
0.1mm to 1mm. Warning, never exceed the range. Otherwise, the more withhold pressure, the less
service life.
Clockwise rotation is the correct direction, as shown by the red arrow in the figure.
If you find that the motor does not rotate clockwise, please change the connection of A and B, or
replace B and C, restart the machine, and check the direction of motor rotation.
3) Common problem: If the motor is noisy or the motor fan cannot rotate evenly after the motor
starts, please use an electric meter to check whether the power input is stable and the voltage
meets the requirements.
8. TESTING
In manual mode, activate the mold close button, and the machine mold will slowly close.
If the machine does not shake, it proves that the machine is ok, and you can directly use the machi-
ne to work normally.
If the machine shakes, it proves that there is a small amount of air remaining inside the machine.
Solution:
Remove the front limit and the rear limit, please pay attention to put them on a clean cardboard box
or cotton cloth, do not touch magnets and iron objects.
Then press the mold to open and close, each time you have to wait for the pressure gauge to
display the pressure, and then switch to another button.
Repeat five rounds.
Remove the air inside the machine, and finally put the micrometer and the rear limit back to the
original position.
Please take care to protect the sensor link cable.
Don't knock, otherwise it will affect the use of the machine.
9. FREQUENTLY QUESTIONS AND SOLUTIONS
Please check the oil level gauge or the turning direction of the motor fan, according to the previous
introductions, and eliminate the problems step by step according to the following solutions.
Questions 1: Mould base in the nose can not move forward
Solution
1
-
Check the wires on the relay base loose or not. If loosen, screw them and start the machine again.
2- Press the “close mould”button, and check the solenoid valve light on the pump work or not. If
not, please pull out all the four relays in the electric cabinet, disorder them and insert the four relay
back again, then restart the machine. If the fault still exist, try more times, or change the relays. If
the light of solenoid valve is on work, but the mould base can not move, please try it by step 3.
3- Power the electric motor, push heavily the core of the solenoid valve 11
(Forward is on right, and backward is on left). Push the core on the right of the solenoid valve.
Warning, do not smash the core with hard stuff. When the core reach to the bottom, you will feel the
spring. If it is still not on work, please change the oil pump or check the pipe connected with the oil
pump.
4- If you have to push the core of the solenoid valve, please disassembling and cleaning the sole-
noid valve.Please contact your supplier and let them take a video of how to clean.
Question 2: The mould base in the nose can not move backward
Solution
1- Power on the electric motor and check the light of the fourth relay is on work or not. If light on,
that means that the induction limit in the back of the machine is not on work. Unplug the open mould
limit plug on the side
of the electric cabinet. Try the machine again and change the sense limit.
2- Check the wires on the relay base loose or not. Try the machine.
3- Unplug all relays, disorder them, and plug them again. Then try the machine.
4- Power on electric motor, Push heavily the core of the solenoid valve(Froward is on the right,and
Backward is on the left). Push the core on the left of the solenoid valve. It will be no problem even if
it not rebound back. Warning, Do Not Smash It. When the core reach to the bottom, you could feel
the spring. If it is still not on work, please change the oil pump or the connected steel pipe
5- If you have to push the core of the solenoid valve frequently, please disassemble the solenoid and
clean it.
Question 3: Move forward or Backward without the operating the buttons.
Solution
1- Power off the electric motor. Press the close mould button and open mould button alternatively
for around , and then re-power on the motor, and try the machine again.
2- Disassemble the solenoid and clean it
Question 4: The operation panel can not be on work after it is electrified.
Solution
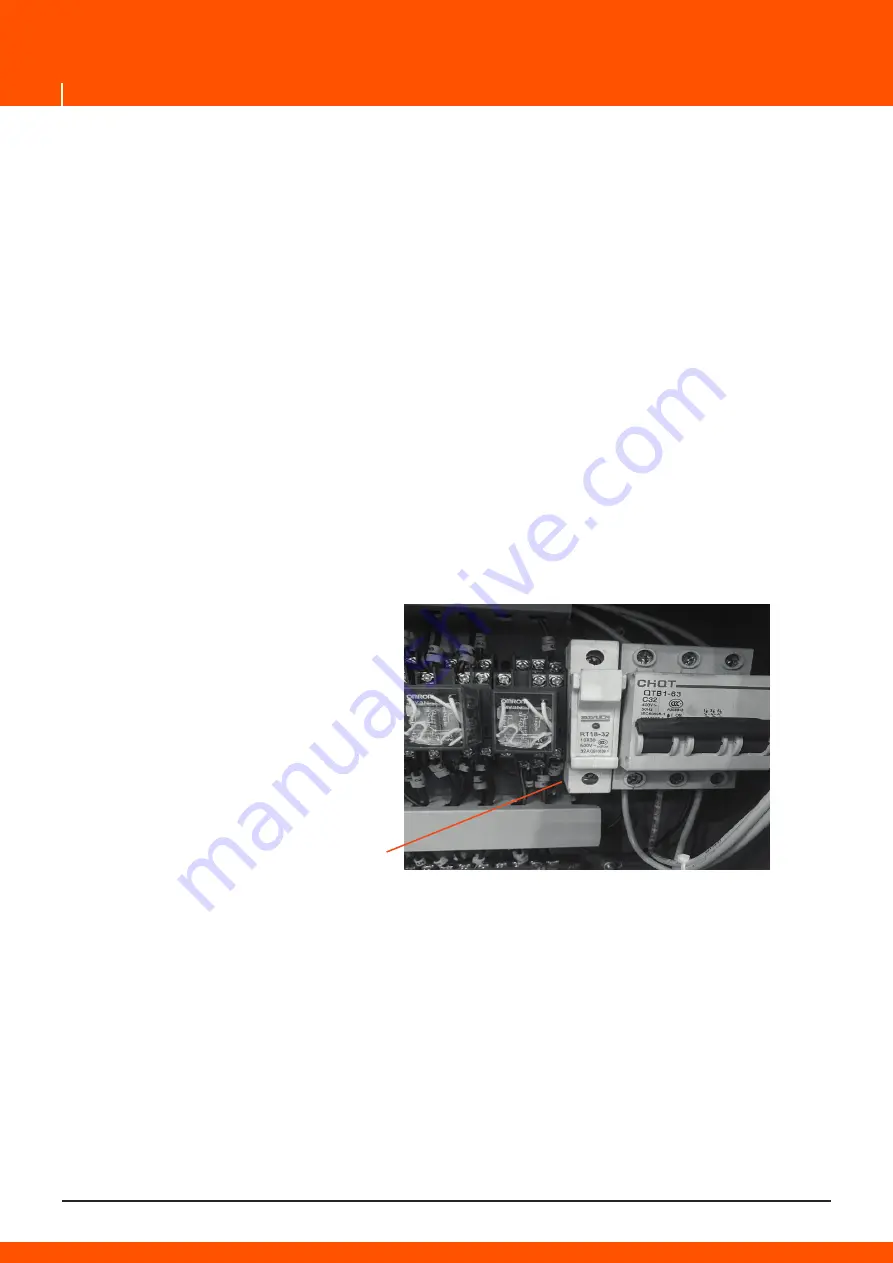
1- Check the insurance on the left of the white blank switch in the electric cabinet. If the light is on
work, means the insurance is not on work. If the indicator light is off, it proves that the insurance has
been damaged and needs to be replaced
2-Check the the wires loose or not in the electric cabinet.
Question 5: Open the electric motor, no move forward or backward.
Solution
1- Check the electric motor, and see whether it start or not.
Usually three-phase power will encounter this situation.
You need to check the power supply of the three wires to see if they are all working properly.
If two live wires are connected, the other is not, the electric motor will also be affected.
Take the universal electric metre to measure it.(electroprobe can not measure it).
Generally speaking, it is the electric motor switch which has a loose contact. So, just to change the
switch.
EN
9
Switch fuse


