7
Recalling an FM preset radio station
1.
To recall preset Radio Stations, briefly press the
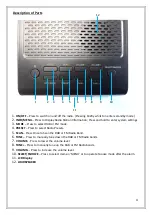
PRESET
button (4) to recall previously stored radio
stations
. “Preset Recall”
will be shown on the
LCD Display
(11).
2.
Press the
TUNE
controls (6 & 8) to scroll through the FM radio station presets.
Once the
LCD Display
(11) shows the desired preset station press the
SELECT/SNOOZE
button (10)
to select the desired radio station.
NB
If the preset has no radio station stored in it the
LCD Display
(6
) will show “
Preset Recall
<X:(Empty)>
”.
(Note: the letter ‘X’ is the preset number).
Saving up to 10 FM preset stations automatically
1.
Press the
SCAN
button (5) for 2 secs, the radio will automatically search the frequency range-
starting at 87.5MHz upwards, when a station of sufficient strength has been found the radio will
stop scanning and save it into the presets.
2.
Recall the presets using the process above.
Selecting FM Radio Information on the LCD Display
NB
the bottom line of the
LCD display
(11) will show the radio station name or frequency, radio
station information is shown on the lower line on the
LCD Display
(11)
Press the
INFO/MENU
(2) button to select the various FM radio station related information as
below:
a)
PTY (program type)
- Shows the type and description of the program provided by the radio station, i.e. Rock
Music, Pop Music, Classical, Country, etc.
b)
Radio Station Name.
c)
Stereo or Mono audio mode.
d)
Time
–
Shows the current time.
e)
Date
–
Shows the current date.
f)
Radio Text
–
Displays scrolling text information supplied by the broadcaster.
Operating Instructions
–
Using the Alarm Function
1.
Press the
ON/OFF
button (1) to power up the radio.
2.
Press and hold the
INFO/MENU
button (2) until
“
<Full scan >
”
(“<Scan setting>”
if using the FM
band)
appears on the
LCD Display
(11).
3.
Press the
TUNE+
button (8) until “
<System >
”
is shown on the
LCD Display
(11)
–
press the
SELECT/SNOOZE
button (10).
4.
Press the
TUNE+
button (8) until “
<Alarm >
”
is shown on the
LCD Display
(11)
–
press the
SELECT/SNOOZE
button (10) to select setting the alarm.
”
Alarm 1 Setup
”
will be shown on the
LCD Display (11).
5.
Press the
TUNE
buttons (6 & 8) to select Alarm 1 or Alarm 2,
NB
“
Alarm 2 Setup
” will be shown on
the
LCD Display
(11) if alarm 2 is selected. Press the
SELECT/SNOOZE
button (10) to select the
desired alarm. The alarm hour digits will now flash.
6.
Press the
TUNE
buttons (6 & 8) to set the alarm hour, press the
SELECT/SNOOZE
button (10) to set
the alarm hour. The alarm minute digits will now flash.
7.
Press the
TUNE
buttons (6 & 8) to set the alarm minutes, press the
SELECT/SNOOZE
button (10) to
set the alarm minutes. The alarm Duration time will now flash.
8.
Press the
TUNE
buttons (6 & 8) to set the alarm Duration time, select from 15, 30, 45, 60, 90 or
120 minutes, press the
SELECT/SNOOZE
button (10) to set the Duration time. The alarm Source
will now flash.
Содержание AVS1401
Страница 1: ...1 DAB FM Clock Radio...


