13
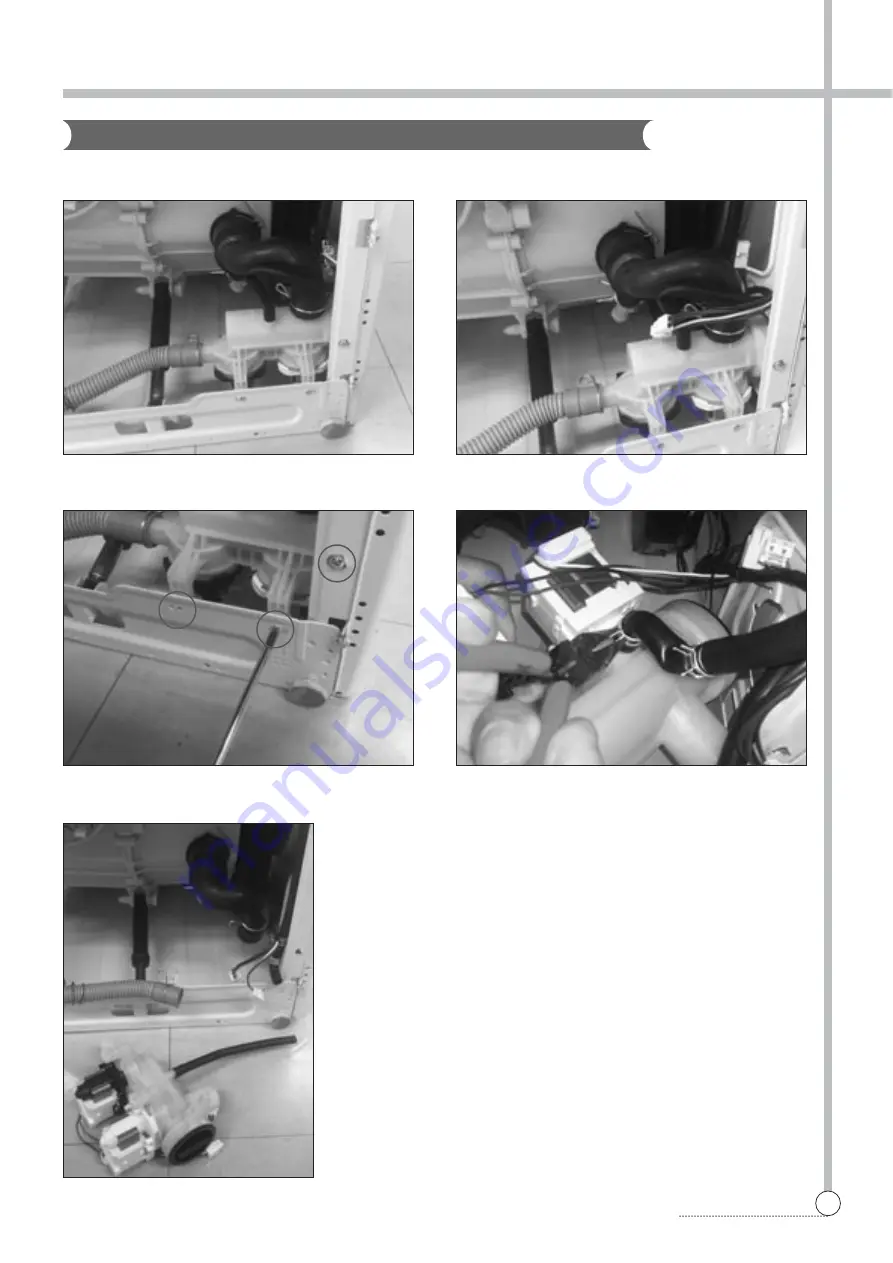
DIRECTION FOR DISASSEMBLY
DRAIN PUMP
1) Lay the right side of the washer on the floor.
2) Remove connectors.
3) Remove the screws.
4) Remove the drain hose and the hose water supply.
5) Remove the inner drain hose, and remove the drain pump.
Страница 1: ...tp svc dwe co kr Nov 2013 Caution In this Manual some parts can be changed for improving their performance without notice in the parts list So if you need the latest parts information please refer to...
Страница 2: ...ASHER AUTO WASHER AUTO WASHER AUTO WASHER AUTO WASHER AUTO WASHER AUTO WASHER AUTO WASHER AUTO WASHER AUTO WASHER AUTO WASHER AUTO WASHER AUTO WASHER AUTO WASHER AUTO WASHER AUTO WASHER AUTO WASHER AU...
Страница 3: ...CONSUMPTION 49 POWER CONSUMPTION 2200W MAXIMUM MASS WASH 9 Kg OF TEXTILE SPIN 9 Kg WASHER TYPE DRUM TYPE FRONT LOADING WASHING MACHINE OPERATING WATER PRESSURE 0 3 8kgf cm2 29 4 784kPa MODEL DWD HB141...
Страница 4: ...s are locked Before operating the washer remove the bolts along with the rubber bungs If they are not removed it may cause heavy vibration noise and malfunction 2 Unscrew the 3 bolts with the spanner...
Страница 5: ...correspond with the coloured markings identifying the terminals in your plug proceed as follows The wire which is coloured Green and Yellow must be connected to the terminal in the plug which is marke...
Страница 6: ...e water tap and tighten the four screws evenly while pushing up the adapter so that the rubber packing can stick to the water tap tightly Connecting inlet hose In using only one water tap or in case o...
Страница 7: ...ot be placed higher than 100cm above the floor Proper securing of the drain hose will protect the floor from damage due to water leakage When the drain hose is too long do not force back in to the was...
Страница 8: ...legs and the floor Turn adjustable legs by the enclosed spanner in order to adjust the level of the washing machine Make it sure that there is no swaying of the washing machine and check that the was...
Страница 9: ...using only cleaners labeled as washer safe Cold condition If the washer is stored in an area where freezing may occur or moved in freezing temperature follow these instructions to prevent damage to t...
Страница 10: ...ighten up the inlet hose 1 Open the lower cover 1 by using a coin Turn the cap hose 2 to pull out the hose Pull out the hose maximally About 13 14cm 2 Unplug the cap hose 2 allowing the water to flow...
Страница 11: ...ot easily removed Over time the build up of scale clogs appliances and if it is not kept in check these may have to be replaced Although the washing drum is made of stainless steel specks of rust can...
Страница 12: ...e gasket clamp 2 Remove the gasket from the front cabinet HEATER AND THERMISTOR 1 Remove five screws on the COVER B and separate the COVER B from washing machine 2 Remove the connectors of the HEATER...
Страница 13: ...ove the earth terminal from the HEATER 4 Loose the nut of the HEATER and pull out the HEATER BLDC MOTOR 1 Remove the nut using the 17mm hex wrench 2 Pull out the ROTOR 3 Remove six screws using the 10...
Страница 14: ...DISASSEMBLY DRAIN PUMP 1 Lay the right side of the washer on the floor 2 Remove connectors 3 Remove the screws 4 Remove the drain hose and the hose water supply 5 Remove the inner drain hose and remov...
Страница 15: ...5 EXPLODE VIEW AND PARTS LIST 14 EXPLODE VIEW AND PARTS LIST BOX INLET AS A01 A02 A03 A04 A05 A08 A07 A09 A10 A06 A12 A13 A11 A14 A15...
Страница 16: ...MFZN ID 38 1 A10 HOSE WATER SUPPLY 3613270900 EPDM ID9 5 OD14 5 L 225 2 3 COLD HOT A11 CLAMP HOSE 3611205800 100H ID 13 8 W 10 0 0 9T 4 6 COLD HOT 3615414900 220 240V 2 WAY PP BRACKET COLD VALVE A12 V...
Страница 17: ...ABS D H S 1ST 1 P06 WINDOW COURSE 3615512800 ABS D H S 1ST 1 P07 WINDOW DISPLAY 3615512600 ABS TR558 D H S 1ST 1 P08 WINDOW FUNCTION 3615512700 ABS TR558 D H S 1ST 1 P09 BUTTON START 3616650200 ABS D...
Страница 18: ...ABS D H S 1 C07 DECO FRAME DOOR 36116DWK01 ABS D H s For Gilding 1 C08 HANDLE DOOR 3612614701 ABS D H s For Gilding 1 C09 HOOK DOOR 3613101900 ZNDC D H S 1 C10 PIN HANDLE 3618200210 SUS304 D3 L53 1 S...
Страница 19: ...18 EXPLODE VIEW AND PARTS LIST TUB ASS Y D01 D02 D05 D03 D06 D07 D08 D09 D10 D11 D12 D13 D15 D14 D16 D17 D26 D33 D32 D28 D24 D21 D22 D23 D20 D25 D18 D34 D27 D19 D29 D31 D30 D04 D02 D33...
Страница 20: ...1 PP 1 D17 CLAMP HOSE 3611204700 ID27 1 D18 HOSE AIR 3613268600 ID 4 OD 8 L 580 1 D19 TUB REAR AS 36100E2U10 D FD14 1 D20 BEARING INNER 3616303100 F L E U 6206Z 1 D21 BEARING OUTER 3616303200 F L E U...
Страница 21: ...20 EXPLODE VIEW AND PARTS LIST CABINET AS E01 E04 E07 E02 E03 E15 E13 E14 E16 E09 E10 E06 E08 E11 E05 E12 E18 E19 E17...
Страница 22: ...R B 3611427100 PP 1 E10 EMI FILTER 3611909320 K25 MIN7MH X0 47U Y222 1 VAR471K NON FUSE E11 UNIT DRAIN PUMP AS 3618980000 D H s PUMP LELLI 220 240V 1 35W DPH5 WIRE TYPE E12 STOPPER SPRING 3615202200 P...
Страница 23: ...22 EXPLODE VIEW AND PARTS LIST F01 PLATE T AS F01 PLATE TOP AS 3614543400 D H S 1ST 1 SCREW TAPPING 7122401411 T2S TRS 4 14 MFZN 2 No PART NAME PART CODE SPECIFICATION Q TY REMARK...
Страница 24: ...eed Button By pressing this button the spin speed can be chosen Rinse Hold This function leaves clothes in the machine suspended in the water after a rinse without entering into spin Spin only If you...
Страница 25: ...d use this function Child Lock can be set by pressing Time Save and Time Delay buttons simulta neously during 2 3seconds When Child Lock is set no button functions except Power button To cancel Chid L...
Страница 26: ...1 1 3min Drain 1min B Spin 1min Middle Spin 4min Water Supply 2min Rinse 1 2 3min Drain 1min B Spin 1min Middle Spin 4min Water Supply 2min Rinse 2 3min Drain 1min B Spin 1min Middle Spin 4min Water S...
Страница 27: ...Water Supply 2min Rinse 2 3min Drain 1min B Spin 1min Middle Spin 4min Water Supply 2min Rinse 3 3min Drain 1min B Spin 1min Main Spin 7min 5min 3min Untangle 2min End 10sec 56 59 59 49 1 30 33 23 Di...
Страница 28: ...ve P Pre Wash Valve bb Bubble dr Drain Pump C H or C Cold Hot Option nPC or PC or etc PCB Option L_O Lock Switch Open L_C repetition The check mode of the water level frequency You can check the water...
Страница 29: ...nd this value increases by 50 up to 1400 4 When press Start button the washing machine continually operates with given spinning rpm The durability test mode You can repetitively operate the washing ma...
Страница 30: ...ses or drain hose are loose at tap or washer House drain pipes are clogged Water supply is not adequate in area Water supply tap is not completely open Water inlet hose is kinked The filter of the wat...
Страница 31: ...ected by a qualified electrician Turn on water supply tap Close the door and press the Start Pause button After pressing the Start Pause button it may take a few moments before the clothes washer begi...
Страница 32: ...but the water level sensor Change the water level sensor sensor pressure is inferior sensor pressure The drain motor does not work Change the drain motor The drain motor is an inferior product or brok...
Страница 33: ...he water in the tub Check the water level and the heater wash The PCB ASS Y is an inferior product Change the PCB ASS Y The drain pump filter is clogged Clean the drain pump filter The drain pump does...
Страница 34: ...C 05 WF5 C 01 WF1 C 03 RY2 C 02 WF3 BR GN YW PK GY WH RD BK PK VT BL RD RD GN OR VT BL YW WH BK WH BL BL RD BR FUSE VOLTAGE OPTION FILTER OPTION OPTION POWER CORD VOLTAGE OPTION BL BR GN YW RING E RIN...
Страница 35: ...S M NO DAEWOO ELECTRONICS CORP 1 2 Jeo dong 1 il ga Jung gu Seoul Korea C P O BOX 8003 SEOUL KOREA TELEX DWELEC K28177 8 CABLE AEWOOELEC PRINTED DATE Nov 2013...
Страница 36: ...ea at ti iv ve eL L i in nc cN N V T ABOUT THIS MANUAL ABOUT THIS MANUAL m o d e l dwdMhbQTQQ HsOmI RPQSNQQNQX memo SU vision telZ WSPMPVVP faxZ WSPMSWXX QSNQQNQXM L L R L QU L QV L QW L QY L RQ L RS...