


Daewoo DM-K40 Service Manual
Page
4
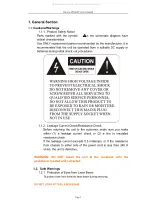
laser diode or not resistant to static electricity.
1.3.2. DVD Loading Unit Precautions when handling the Mechanism
Block
1.3.2.1. Do not loosen any screws in the Pickup Block.
1.3.2.2. Do not adjust any screws in the Mechanism Block except
for “Tilt Adjust Screws”, as they are adjusted precisely at
the factory.
1.3.2.3. Replacement of the Pickup Block is impossible. Always
replace the Traverse Ass’y when the Pickup Block needed
to be replaced. Do not touch the lens or lens holder of the
Pickup Block.
1.3.2.4. The Guide Rails of the Pickup Block are greased. Take
care when handing.
1.3.2.5. When you try to slide the Pickup Block, do not press or
pull it directly. Always turn the dive gears with your fingers.
1.3.2.6. Be sure that the anti-slipping rubber on the turntable or
clean. If there is dust or it is greasy, clean the part with the
liquid that contains 50% each of alcohol and water.
1.3.2.7.
When removing the Mechanism P.C.B. Ass’y, you need to
short-circuit the laser diode shorting lands beforehand.
1.4. Software Upgrade
You can upgrade DVD Player using the software we provide as following step:
―
Creating a software upgrade CD
―
Use only a new CD-R/CD-RW(not an erased one).
―
Give the CD a name of your choice(e.g. version and unit name).
―
Burn the unpacked documents on the CD-R/CD-RW.
―
The root directory(uppermost level) of the software upgrade CD
Attention: If a failure should occur during the software upgrade (e.g. a mains failure), it
may happen that the units function and a restart of the upgrade function are no longer
possible. If this should be the case, you must replace the intergraded FLASH ICs with
preprogrammed ICs (see corresponding spare parts list).
─
Insert the upgrade CD (see corresponding spare parts list) and observe the hints on
the display and on the screen of the TV set.
─
Carry out an initialization of the set.
Displaying the Software Version Number
―
Press one after the other the “STOP” and “EJECT” buttons on the unit.
―
Press the“OSD” with the remote control.
―
Using the cursor buttons on the remote control, select the software version “MICRO
Version” or “CUSTOMER VERSION” .The respective software version number then is
displayed
All manuals and user guides at all-guides.com
Содержание DM-K40
Страница 9: ...Daewoo DM K40 Service Manual Page 8 All manuals and user guides at all guides com...
Страница 10: ...Daewoo DM K40 Service Manual Page 9 All manuals and user guides at all guides com...
Страница 11: ...Daewoo DM K40 Service Manual Page 10 All manuals and user guides at all guides com a l l g u i d e s c o m...
Страница 12: ...Daewoo DM K40 Service Manual Page 11 All manuals and user guides at all guides com...
Страница 13: ...Daewoo DM K40 Service Manual Page 12 All manuals and user guides at all guides com...
Страница 14: ...Daewoo DM K40 Service Manual Page 13 All manuals and user guides at all guides com...
Страница 15: ...Daewoo DM K40 Service Manual Page 14 All manuals and user guides at all guides com...
Страница 16: ...Daewoo DM K40 Service Manual Page 15 All manuals and user guides at all guides com a l l g u i d e s c o m...
Страница 17: ...Daewoo DM K40 Service Manual Page 16 All manuals and user guides at all guides com...
Страница 18: ...Daewoo DM K40 Service Manual Page 17 All manuals and user guides at all guides com...
Страница 19: ...Daewoo DM K40 Service Manual Page 18 All manuals and user guides at all guides com...
Страница 20: ...Daewoo DM K40 Service Manual Page 19 All manuals and user guides at all guides com...
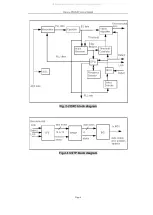
Страница 25: ...Daewoo DM K40 Service Manual Page 24 Fig 2 12 POWER AV PORT All manuals and user guides at all guides com...


