-39-
SL-110P Service Data
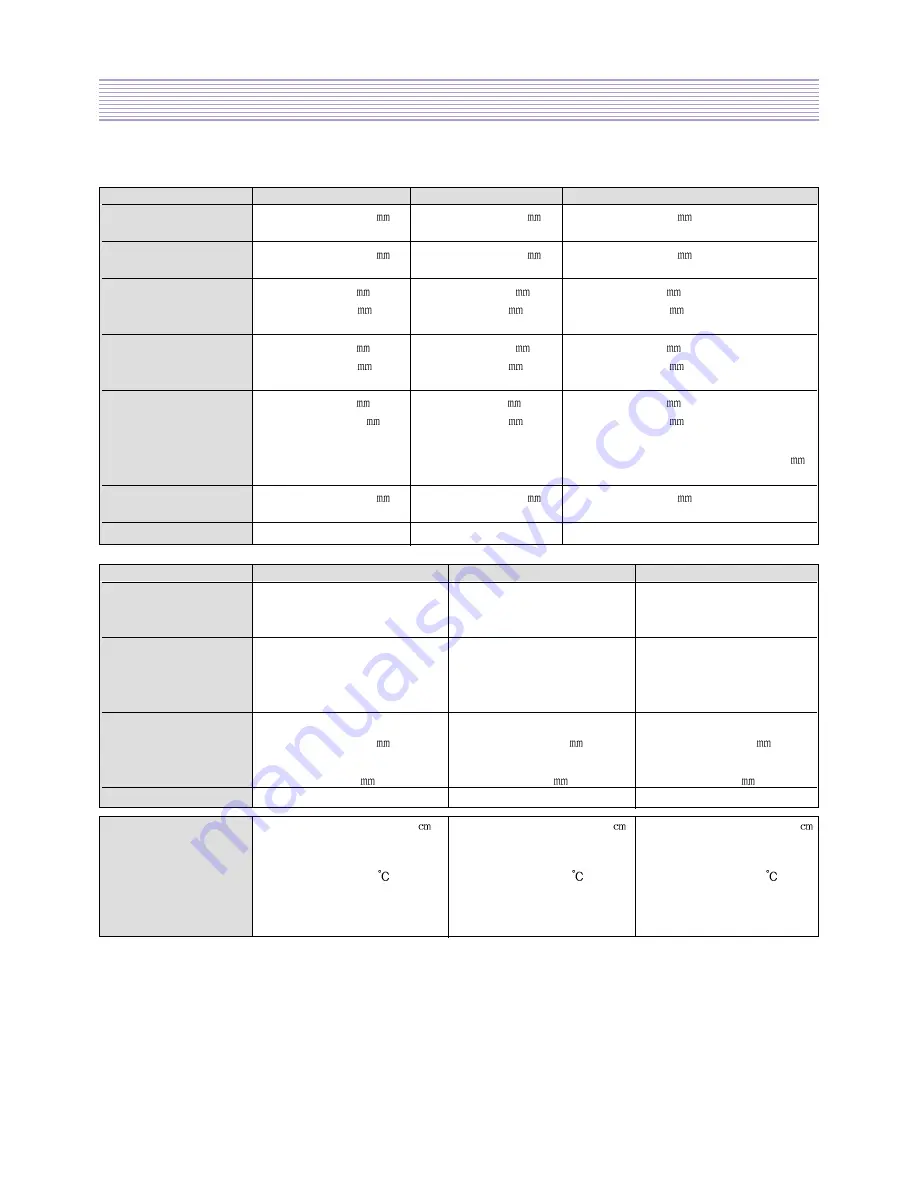
7-6. PANEL DEFECT Test
Visual Inspection
15” SS panel
17” SS panel
20.1” AUO panel
Bright Spot
diameter <= 0.8 .
diameter <= 0.8 .
diameter <= 0.5 .
Numberr <= 4.
Numberr <= 4.
Numberr <= 5.
Dark Spot
diameter <= 0.8 .
diameter <= 0.8 .
diameter <= 0.5 .
Numberr <= 4.
Numberr <= 4.
Numberr <= 5.
Width <= 0.1
&
Width <= 0.08
&
Width <= 0.15
&
Bright Lines
length <= 3.0 .
length <= 2.0 .
length <= 10.0 .
Number <= 4.
Numberr <= 4.
Numberr <= 5.
Width <= 0.1
&
Width <= 0.08
&
Width <= 0.15
&
Dark Lines
length <= 3.0 .
length <= 2.0 .
length <= 10.0 .
Number <= 4.
Numberr <= 4.
Numberr <= 5.
Width <= 0.1
&
Width <= 0.1
&
Width <= 0.15
&
length <= 10.0 .
length <= 5.0 .
length <= 20.0 .
Polarizer Scratch
Number <= 3.
Numberr <= 3.
Numberr <= 5.
(circle scratch : diameter <= 20.0 .
Number <=
5.)
Polarizer dent/bubble
diameter <= 0.8 .
diameter <= 0.8 .
diameter <= 0.5 .
Numberr <= 3.
Numberr <= 6.
Numberr <= 5.
Max. Defects
Numberr <= 7.
Numberr <= 10.
Electrical Inspection
15” SS panel
17” SS panel
20.1” AUO panel
random number <= 2.
random number <= 2.
random number <= 2.
Bright Dot
2 neighboring dots <= 1.
2 neighboring dots <= 1.
2 neighboring dots <=0.
3 neighboring dots <= 0.
3 neighboring dots <= 0.
random number <= 7.
random number <= 6.
Dark Dot
2 neighboring dots <= 2.
2 neighboring dots <= 2.
random number <= 5.
3 neighboring dots <= 1.
3 neighboring dots <= 0.
2 neighboring dots <= 0.
neighboring dots<= 0.
distance between
distance between
distance between
defect min distance
bright sots >=15 .
bright sots >=15 .
bright sots >=15 .
distance between
distance between
distance between
dark dots >=5 .
dark dots >=5 .
dark dots >=5 .
Max. Defects
number <= 7.
number <= 6.
number <= 5.
watching distance : 30 - 50
watching distance : 50 - 70
watching distance : 60 +- 5
Iuminance : 300 - 700 Iux
Iuminance : 300 - 700 Iux
Iuminance : 300 - 700 Iux
(nominal 500 Iux)
(nominal 500 Iux)
condition
temperature : 25+-3
temperature : 25+-5
temperature : 25+-25
angle : front
angle : front
angle : front
pattern : R, G, B, black, white
pattern : R, G, B, black, white pattern : R, G, B, black, white
test : active area
test : active area
test : active area
(1) SVC KEY on the SVC remote controller => PART key => PR DOWN / UP KEY
TEST PATTERN : R, G, B, White, Black (Toggle : PR KEY)
PART KEY : Cancel
(2) Test method : In each pattern of R, G, B, White, Black, Check the DOT DEFECT number.
Содержание DLP-15D3SHS
Страница 7: ...7...
Страница 8: ...8...
Страница 20: ...20...
Страница 21: ...21...
Страница 22: ...22...
Страница 23: ...23...
Страница 24: ...24...
Страница 25: ...25...
Страница 26: ...26...
Страница 27: ...27...
Страница 28: ...28...
Страница 29: ...29 DLP 15D3SHS DLP 17D3SHS TOP...
Страница 30: ...30 DLP 15D3SHS DLP 17D3SHS BOTTOM...
Страница 31: ...31 DLP 20D3SHS TOP...
Страница 32: ...32 DLP 20D3SHS BOTTOM...
Страница 64: ...64 DLP 15D3SHS...
Страница 65: ...65 DLP 17D3SHS...
Страница 66: ...66 DLP 20D3SHS...
Страница 67: ...LCD Projection TV Service Training 13 13 SOFTWARE INSTALL SOFTWARE INSTALL...
Страница 69: ...2 Copy FlashUpgrader exe in the PW113 folder to PC...
Страница 70: ...3 Run FlashUpgrader exe to execute Flash Rom upgrading program without install Flash Rom upgrade program...
Страница 72: ...2 Click the Setup_Visual_I2C_v3 2b18 file twice to execute...
Страница 73: ...3 Progress the Install as shown below Select the YES Y button Select the Next button...
Страница 74: ...Select the Next button After check I accept the agreement Choose the Next button...
Страница 75: ...Select the Next button Select the Next button...
Страница 76: ...Select the Next button Select the Install button...
Страница 77: ...Installing Select the Finish button...
Страница 79: ...5 Progress the Install as shown below Select the I Agree button Select the Next button...
Страница 80: ...Select the Install button Select the Close button...
Страница 81: ...6 Copy VCTI_D2 folder to PC in the CD...
Страница 82: ...7 Restart the PC 8 Run the LptDrvTest in Micronas folder as shown below...
Страница 85: ...LCD Projection TV Service Training 14 14 SOFT UPGRADE SOFT UPGRADE...
Страница 87: ...Figure 2 Click twice the PwSDK inf Figure 1 Click the Choose button Figure1 Figure2...
Страница 92: ...FIGURE 1 Click the TVT button FIGURE 2 Click the Bootloader button Figure1 Figure2...
Страница 93: ...FIGURE 3 Normal condition Figure3 Figure4 FIGURE4 Error condition Repeat 2 progress...
Страница 94: ...Click the Erase Flash button and one more Click the Erase 16bit Flash button and one more Figure5 First Second...


