background image

12

Installation Instructions

Installing the Oven in the Cabinet

 WARNING

• Failure to properly install the mounting screws may

result in movement or tipping of the oven during use,

resulting in personal injury.

• Do not block the oven air exhaust located at the bot-

tom of the oven. Blocking the intake may result in a

fire hazard, cabinet damage or poor performance.

• The wall oven is heavy. Do not attempt to install it in

the cabinet with less than two people.

• Do not use the exhaust grill or the bottom edge of

the oven opening as a gripping point. Damage to the

exhaust grill may result.

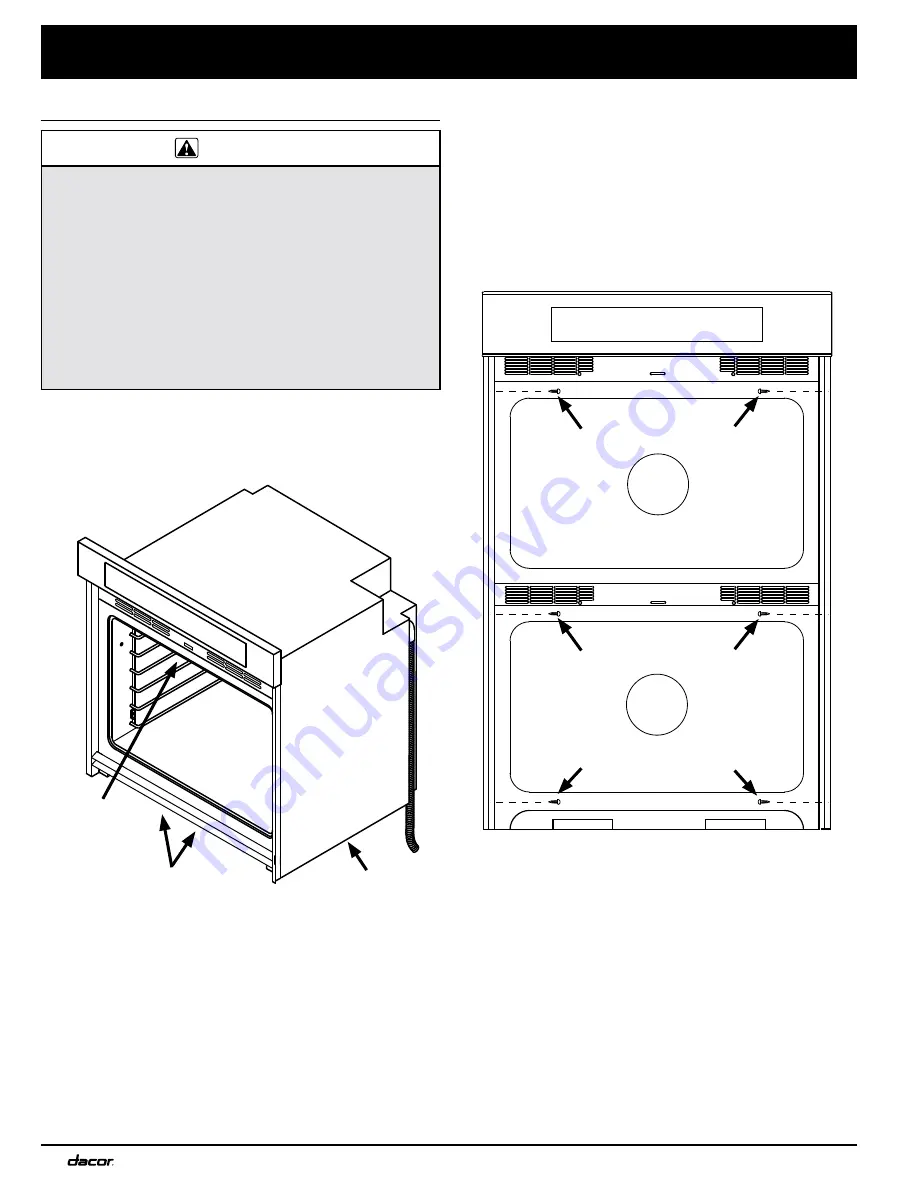
1. Lift the wall oven up to the cabinet cutout, using the

upper edge of the cavity opening and the bottom of the

oven case side as gripping points. Be certain to take all

necessary safety precautions due to the weight of the

appliance.

2. Resting the oven on the cabinet-mounting platform,

slide the oven into the recessed area until the rear

edge of the oven frame is flush with the cabinet face

and the oven is centered within the cutout. Ensure that

the electrical conduit slides through the opening in the

cabinet platform or coils above the oven chassis as the

oven is slid into place. The cable must be placed into

the recessed area located along the rear vertical edge

of the oven or coiled above the oven chassis. Do not

trap the appliance cable between the oven case back

and the rear wall.

3. Locate the mounting holes in the trim on both sides

of the oven. There are four (4) holes, two (2) on each

side, for single oven models and six (6) holes for dou-

ble oven models.

4. Use a 1/16” drill bit to drill pilot holes in the cabinet

through all of the trim mounting holes.

5. Install all of the provided #6 screws through the oven

trim into the cabinet to secure the oven. Do not over-

tighten.

Mounting Screws:

Four (4) for single oven

Six (6) for double oven

Gripping 

point

Gripping point:  

case bottom 

both sides

Do not

grip here!

Содержание Renaissance RNWO130

Страница 1: ...Installation Instructions Renaissance Wall Oven Models RNWO130 RNWO230 RNWOV130 and RNWOV230 Français Voir page 21 ...

Страница 2: ...All specifications are subject to change without notice Dacor assumes no liability for changes to specifications 2011 Dacor all rights reserved ...

Страница 3: ...eneral Safety Precautions 2 Customer Service Information 3 If You Need Help 3 Appliance Data Plate 3 Model Identification 3 Product Specifications 4 Electrical Specifications 4 Product Dimensions 4 Important Safety Instructions Important Installer In the interest of safety and to minimize problems read these installation instructions completely and care fully before you begin the installation proc...

Страница 4: ... the oven unless specifically instructed to do so in this manual WARNING General Safety Precautions To reduce the risk of fire electric shock serious injury or death when using your appliance follow basic safety precau tions including the following To prevent injury due to the unit tipping forward secure the oven to the cabinet using the supplied mounting screws Keep flammable items such as paper ...

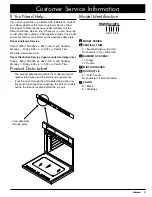
Страница 5: ...b site www dacor com Dacor Distinctive Service repairs under warranty only Phone 800 793 0093 ex 2822 U S A and Canada Monday Friday 6 00 a m to 5 00 p m Pacific Time Product Data Label The product data label contains the model and serial number information and the electrical requirements It can be seen through the grill located below the con trol panel Open the door to expose the grill On double ...

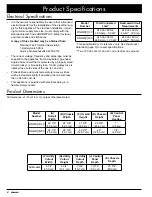
Страница 6: ...cal wiring in a flexible metal conduit Product Specifications Model Number Total Connected Load Dedicated Circuit Requirements RNWO V 130 240 Vac 60 Hz 24 5 Amp 6 0 kW 240 Vac 60 Hz 4 wire 30 Amp RNWO V 230 240 Vac 60 Hz 48 6 Amp 12 0 kW 240 Vac 60 Hz 4 wire 50 Amp This specification is for reference only See the product data label page 3 for exact specifications Two 120 Vac hot L1 and L2 one neut...

Страница 7: ...D J B H G F Top of chassis Utility cutout K Control panel side view Control panel front Top of chassis E Design Specifications 3 1 2 8 9 cm 3 3 16 8 1 cm 1 1 8 2 9 cm 1 1 8 2 9 cm 1 1 8 2 9 cm Product Dimensions All tolerances 1 16 1 6 mm unless otherwise stated Handle Dimensions Epicure Millennia Order kit AROVH30S Flush Double Oven Single Oven 21 7 8 55 6 cm ...

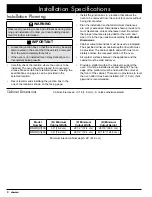
Страница 8: ...disconnected Plan the installation so that all minimum clearances are met or exceeded Dimensions shown provide mini mum clearances unless otherwise noted Be certain that proper clearance is provided for the oven door when it is in the open position according the Product Dimensions Cabinet cutout dimensions must be used as indicated The specified minimum cabinet depth and width must be provided The...

Страница 9: ... 1 9 cm support platform 31 1 4 79 4 cm recommended 1 2 5 cm min to bottom of cabinet door 1 2 5 cm min to top of cabinet door N 1 1 2 3 8 cm typical counter 1 2 5 cm min to combustible floor 3 4 1 9 cm support platform 1 2 5 cm min to combustibles Recommended electrical location 4 typical toe kick 36 typ 91 4 cm P R Cabinet Dimensions Single Wall Oven Installed Under Counter Single Wall Oven Cuto...

Страница 10: ... oven rack single ovens come with 1 double ovens come with 2 Remove the door s to reduce weight and make the oven easier to lift WARNING Do not attempt to disengage the hinge catches with the door removed from the oven The hinge springs could release causing personal injury Do not lift or carry the oven door by the door handle On double ovens remove the bottom door first to reduce the chance of da...

Страница 11: ...rd household wiring of the dedicated supply circuit They are suitable for connection to household wiring under the jurisdiction of the National Electric Code and or the local inspection authority 1 Before proceeding turn off power to the circuit to which the oven will be connected at the circuit breaker or fuse box 2 Position the oven directly in front of the cabinet cutout 3 Feed the appliance co...

Страница 12: ...ve metal continuity to electrical ground and must not be interrupted by insulating materials Any insulating materials must be jumped with a minimum 4 AWG wire to establish continuity to ground See facing page NOTE If the junction box has been properly grounded by a licensed electrician the green ground wire from the appliance conduit may be connected to the junction box using a loop terminal To co...

Страница 13: ...h External Ground Conduit to oven Incoming power Wire nut 4 places Junction box Separate 10 AWG wire minimum Clamp wire tightly to pipe RED RED WHITE WHITE GREEN GREEN BLACK BLACK Clamps Bare metal Insulating device 4 AWG wire minimum Insulated Pipe Jumper ...

Страница 14: ...et mounting platform slide the oven into the recessed area until the rear edge of the oven frame is flush with the cabinet face and the oven is centered within the cutout Ensure that the electrical conduit slides through the opening in the cabinet platform or coils above the oven chassis as the oven is slid into place The cable must be placed into the recessed area located along the rear vertical ...

Страница 15: ...on bottom of hinge Lower lip of hinge receptacle Verifying Proper Operation 1 For stainless steel ovens peel off the protective layer of plastic that covers the stainless steel surfaces 2 Remove any packaging from inside the oven s 3 Slide the oven racks onto the supports inside the oven chamber s according to the use and care manual 4 Turn on power to the oven at the circuit breaker or fuse box 5...

Страница 16: ...red and grounded according to these instructions and in accordance with all applicable elec trical codes See pages 4 and 9 Is the oven secured into the cabinet with all the mount ing screws four 4 on single oven models six 6 on double ovens See page 12 Is are the oven door s properly installed according to these instructions See page 13 Has proper operation been verified Has the warranty been acti...

Страница 17: ...Instructions d installation Four mural Modèles RO130 RO230 ROV130 and ROV230 ...

Страница 18: ...s spécifications figurant dans ce manuel sont susceptibles d être modifiées sans préavis Dacor n assumera aucune responsabilité en cas de modification de ces spécifications 2014 Dacor tous droits reserves ...

Страница 19: ...oximite de cet appareil ou de tout autre appareil electromenager Garder les articles qui pourraient exploser comme les généra teurs d aérosol éloignés des appareils ménagers Ne pas entreposer de produits inflammables ou explosifs dans des armoires ou zones attenantes ou au dessus et au dessous ADVERTISSEMENT AVERTISSEMENT NE JAMAIS utiliser cet appareil comme dispositif de chauffage de la pièce Le...

Страница 20: ...rs l avant de l appareil fixer l appareil à l armoire à l aide des vis de montage fournies ADVERTISSEMENT Mesures de sécurité générales Pour réduire le risque d incendie de choc électrique de blessures ou de dommages lors de l utilisation de cet appareil il convient d observer certaines précautions élémentaires dont les suivantes Garder les articles inflammables comme le papier le carton le plasti...

Страница 21: ...du modèle et le numéro de série de l appareil Le modèle et le numéro de série sont imprimés sur l étiquette de données sur le produit Équipe de service à la clientèle Dacor Téléphone 800 793 0093 ex 2813 É U et Canada Du lundi au vendredi de 6 h à 17 h heure du Pacifique Site Web www dacor com Ligne de réparations réservée aux produits Dacor réparations sous garantie uniquement Téléphone 800 793 0...

Страница 22: ...légèrement plus longs si l appareil fonctionne avec un circuit de moins de 240 VCA Cet appareil ménager est fourni avec du câblage électrique dans un conduit en métal flexible Prescriptions d installation Modèle Exigences circuit réservé Charge branchée totale RNWO V 130 240 VCA 60 Hz 4 fil 30 A 240 VCA 60 Hz 24 5 Amp 6 0 kW RNWO V 230 240 VCA 60 Hz 4 fil 50 A 240 VCA 60 Hz 48 6 Amp 12 0 kW Deux f...

Страница 23: ...mand E Haut du châssis Vue latérale Longueur du conduit d alimentation 60 152 cm Haut du châssis L entaille pour les services Prescriptions d installation Dimensions du produit Toutes les tolérances 1 16 1 6 mm sauf indication contraire Poignée Vue latérale Epicure Millennia Ensemble n AROVH30S Intégrée Fours Doubles Fours simples 21 7 8 55 6 cm 3 1 2 8 9 cm 3 3 16 8 1 cm 1 1 8 2 9 cm 1 1 8 2 9 cm...

Страница 24: ...tre débranché Planifier l installation afin de respecter ou dépasser tous les dégagements minimums Les dimensions indiquées offrent les dégagements minimums sauf indication contraire S assurer de tenir compte du dégagement approprié pour la porte du four lorsqu elle est ouverte selon les Dimensions du produit La profondeur et la largeur de l armoire doivent encadrer complètement la partie enfoncée...

Страница 25: ...ctrique recommandé Emplacement électrique de remplacement 1 1 2 3 8 cm comptoir type 1 2 5 cm min au plancher combustible 1 2 5 cm min aux combustibles Emplacement électrique recommandé 4 coup de pied type 36 91 4 cm P R 3 4 1 9 cm plateforme de support Dimensions de l armoire Four simple sous le plan de travail Four Simple Dimensions du placard Four Double Dimensions du placard Tolérances de l ar...

Страница 26: ...our GlideRack MC 1 pour four simple 2 pour four double Enlèvement de la porte Enlever la porte pour faciliter le déplacement de la four pen dant le processus d installation ADVERTISSEMENT Ne pas tenter de dégager les crochets de charnière avec la porte retirée du four Les ressorts de charnières pour raient se libérer et causer des blessures Ne transportez pas le porte par le poignée Sur les fours ...

Страница 27: ...e d un calibre plus petit que le câblage standard du domicile de la conduite d alimentation réservée Ils répondent aux exigences du raccordement au câblage du domicile selon les attributions du National Electric Code et ou de l autorité de l inspection locale 1 Avant de poursuivre couper l alimentation au circuit auquel sera branché l appareil au niveau du tableau disjoncteurs ou du coffret de fus...

Страница 28: ... raccordement du fil de mise à la terre à un tuyau d eau froide mis à la terre raccorder à l aide d un fil de mise à la terre séparé en cuivre no 10 minimum et une bride avec une vis de mise à la terre externe Le tuyau d eau froide mis à la terre doit avoir de la continuité de métal pour la mise électrique à la terre et ne doit pas être interrompu par des matériaux isolants Tous les matériaux isol...

Страница 29: ...ucteurs depuis le four Conduit depuis le point de distribution du domicile Connecteurs de fils 4 Boîtier de jonction Fil de 10 AWG minimum séparé Fixer le fil solidement au tuyau Brides de serrage métal nu Dispositif isolant Fil de 4 AWG minimum Instructions d installation ...

Страница 30: ...re du four soit égal au devant de l armoire et que le four est centré dans l entaille S assurer que la con duit électrique passe par l ouverture dans la plateforme de l armoire ou les serpentins au dessus du châssis du four lorsqu on glisse le four en place Le conduit doit être placé dans la zone renfoncée située le long du bord vertical arrière du four ou enroulé au dessus du châssis du four Ne p...

Страница 31: ...ur du four 3 Glisser les grilles du four sur les supports à l intérieur des chambres de cuisson selon le manuel d utilisation 4 Alimenter à l appareil au niveau du disjoncteur ou du coffret de fusibles 5 Régler l horloge selon le manuel d utilisation REMARQUE Pour les fours doubles vérifier le fonctionnement du four du haut et du bas 6 Appuyer sur la touche BAKE cuisson du four sur le tableau de c...

Страница 32: ...t solide et horizontale Voir page 22 L appareil ménager est il câblé et mis à la terre selon ces instructions et conformément à tous les codes électriques en vigueur Les raccordements sont ils serrés Voir pages 20 et 25 L appareil ménager est il fixé dans l armoire avec toutes les vis de fixation Voir page 28 La porte du four est elle bien installée conformément à ces instructions Voir page 29 Le ...

Страница 33: ...31 Notes ...

Страница 34: ...32 Notes ...

Страница 35: ......

Страница 36: ...Dacor 14425 Clark Avenue City of Industry CA 91745 Phone 800 793 0093 Fax 626 403 3130 www dacor com Part No 105487 Rev J ...

Отзывы: