


6
Installation Instructions
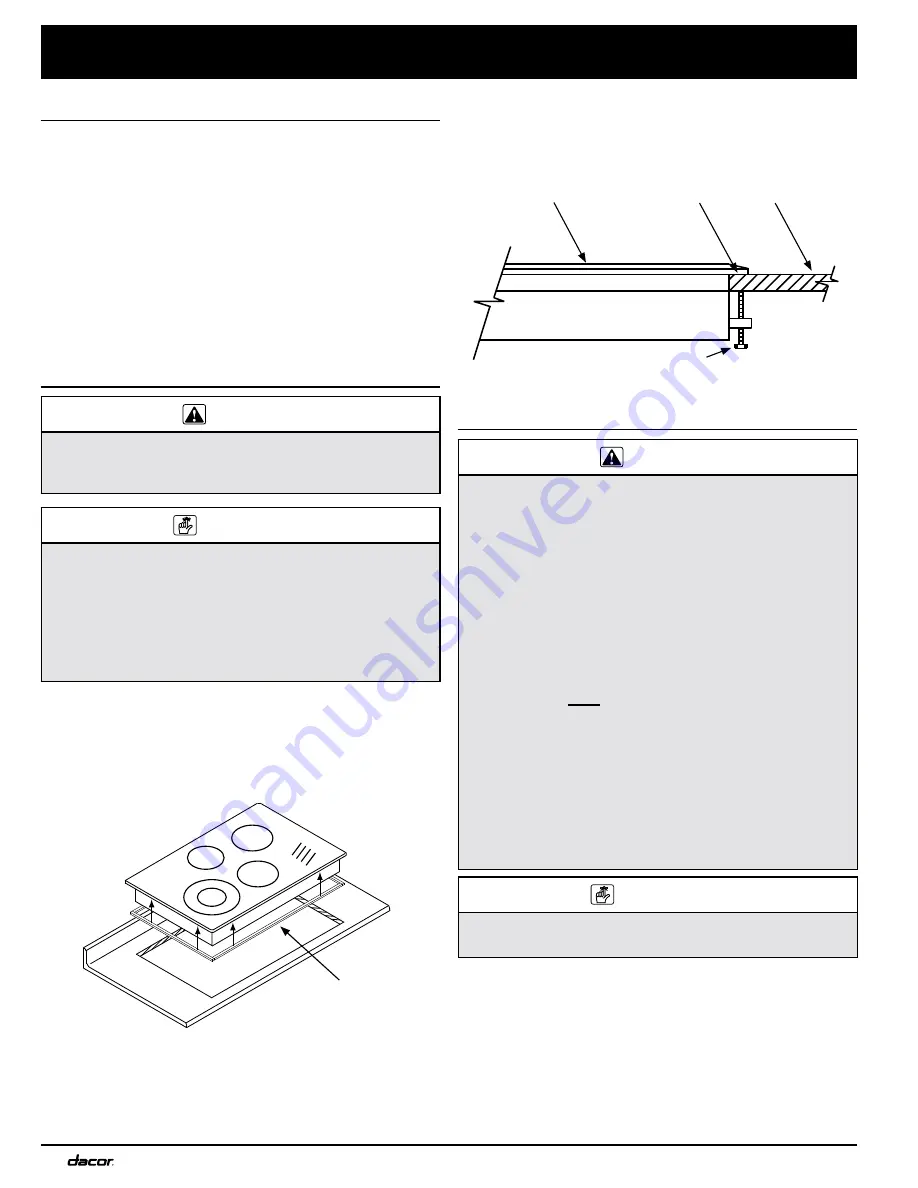
Secure the cooktop to the countertop utilizing the two
4.
(2) hold-down brackets provided. Slide the brackets
into the slots located on the left and right sides of the
chassis, then tighten the screws to the underside of the
countertop.
Electrical Connection
WARNING
To prevent an electric shock or fire hazard, turn off
•
power to the circuit at the circuit breaker or fuse box
prior to connecting the cooktop wiring to the junction
box.
Failure to connect the cooktop electrical wiring as
•
specified may result in an electric shock hazard, a fire
hazard and damage to the appliance.
Connect the ground (green) wire from the appliance
•
to a grounded, metallic, permanent wiring system or
grounding conductor. DO NOT ground the appliance
with a neutral (white) house supply wire. A separate
ground wire must be utilized.
This appliance must be properly grounded according
•
to these instructions any time power is applied.
If aluminum house supply wiring is utilized, splice the
•
appliance copper wires to the aluminum house wiring
using special connectors designed and agency-certi-
fied for joining copper and aluminum. Follow the con-
nector manufacturer’s recommended procedure care-
fully. Improper connection may result in a fire hazard.
IMPORTANT
Provide slack in the conduit to allow the cooktop to slide
out for servicing.
Before proceeding, turn off power to the circuit to which
1.
the cooktop will be connected at the circuit breaker
panel or fuse box.
Feed the appliance conduit into the electrical junction
2.
box and attach it using a UL certified strain relief.
Depending upon local codes, utilize one of the two
3.
methods shown on the facing page to connect the
appliance to the power.
Verify the Package Contents
Verify that all the items below have been provided. If any
item is missing or damaged, please contact your dealer
immediately. Do not install a damaged or incomplete appli-
ance. Make sure that you have everything necessary to
ensure proper installation before proceeding.
Foam tape
•
Mounting brackets (2)
•
Glass scraper
•
Dacor Cooktop Cleaning Creme
•
Product literature
•
Chassis Installation
WARNING
If the electrical service provided does not meet the speci-
fications on page 3, do not proceed with the installation.
Call a licensed electrician to install the required wiring.
IMPORTANT
Do not over-tighten the hold down bolts. Over tighten-
•
ing the hold down bolts may result in damage.
Do not use a hardening compound, glue or caulk to
•
seal the cooktop into place. The cooktop must be
readily removable if service is required. Removal of
any sealant to service the unit will be performed at the
customer’s expense.
If the cooktop will be used with a raised vent, install the
1.
vent according to it’s installation instructions first. Install
it in the back of the cutout.
Attach the foam tape provided with the unit to the
2.
underside of the cooktop mounting surface.
Lower the cooktop into the cutout and center it.
3.
Foam tape
Cooktop
Countertop
Foam tape seal
Hold down bracket and screw


