


7
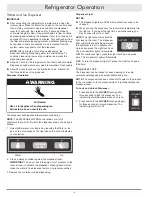
Freezer Compartment
The freezer compartment is located in the bottom drawer. It is
equipped with modular storage bins for storing frozen foods.
NOTE: The ice maker is located in the refrigerator compartment.
See the
Ice and Water
section below for more information.
Ice and Water
Connect the ice maker to the water supply as instructed in the
installation instructions.
Proper water flow and a level refrig-
erator are essential for optimal ice maker performance.
Do not use with water that is microbiologically unsafe or of
unknown quality without adequate disinfection before or after
the system. Systems certified for cyst reduction may be used
on disinfected waters that may contain filterable cysts.
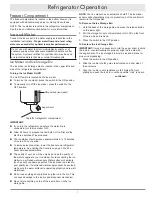
Ice Maker and Ice Storage Bin
The ice maker and storage bin are located in the upper left-hand
side of the refrigerator compartment.
Turning the Ice Maker On/Off
The On/Off switch is located on the ice maker.
To turn on the ice maker, press the switch to the ON position.
To manually turn off the ice maker, press the switch to the
OFF position.
IMPORTANT:
If you turn the refrigerator on before the water line is
connected, turn the ice maker OFF.
Allow 24 hours to produce the first batch of ice. Discard the
first three batches of ice produced.
The ice maker should produce approximately 8 to 12 batches
of ice in a 24-hour period.
To increase ice production, lower the freezer and refrigerator
temperature. See
Setting the Controls
on page 3. Wait 24
hours between adjustments.
The quality of your ice will be only as good as the quality of
the water supplied to your ice maker. Avoid connecting the ice
maker to a softened water supply. Water softener chemicals
(such as salt) can damage parts of the ice maker and lead to
poor quality ice. If a softened water supply cannot be avoided,
make sure the water softener is operating properly and is well
maintained.
Do not use anything sharp to break up the ice in the bin. This
can cause damage to the ice bin and dispenser mechanism.
Do not store anything on top of the ice maker or in the ice
storage bin.
NOTE:
Your ice maker has an automatic shutoff. The ice maker
sensors will automatically stop ice production, but the control will
remain in the ON position.
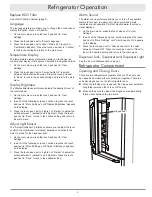
To Remove the Ice Storage Bin:
1. Hold the base of the storage bin and press the release button
on the lower right.
2. Pull the storage bin out until resistance is felt. Lift up the front
of the ice bin and remove.
3. Press the switch to the OFF position
To Replace the Ice Storage Bin:
IMPORTANT:
It may be necessary to turn the auger driver, behind
the ice bin, counterclockwise to properly align the ice bin with
the auger driver. The ice storage bin must be locked in place for
proper ice dispensing.
1. Press the switch to the ON position
2. Slide the ice bin into the guide rails located on either side of
the enclosure.
3. Push the ice bin in until resistance is felt. Raise the front
slightly and push the ice bin in until an audible “click” is heard.
continued...
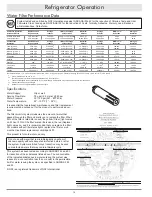
Refrigerator Operation
Top left of refrigerator compartment
ON position (ice maker)
Auger driver
Содержание EF36IWF
Страница 2: ...2009 Dacor all rights reserved...
Страница 18: ...16 Notes...


