background image

2

Important Safety Instructions

General Safety Precautions

To reduce the risk of fire, explosion, electric shock, serious injury or death when installing or using this appliance, follow basic safety 

precautions, including the following: 

• 

Read the accompanying use and care manual completely 

before operating this appliance.

• 

Keep packaging materials away from children. Plastic 

sheets and bags can cause suffocation.

• 

If you receive a damaged product, immediately contact 

your dealer or builder. Do not install or use a damaged 

appliance.

• 

This range must be properly installed by a qualified installer 

according to these installation instructions prior to use. The 

installer must show the customer the location of the gas 

shut off valve and the circuit breaker panel or fuse box so 

that they know where and how to turn off the gas supply 

and electric power to the range.

• 

To eliminate the risk of burns or fire by reaching over 

heated surface units, cabinet storage space located above 

surface units should be avoided.

• 

Do not install, repair or replace any part of the range unless 

specifically recommended in the literature accompanying 

it. A qualified service technician should perform all other 

service.

• 

Do not connect this range to the gas supply without the 

supplied gas pressure regulator installed.

• 

Before performing any type of service or installation, make 

sure that the gas supply and power to the range are off.

• 

NEVER block or cover any slots, holes or passages 

anywhere inside the oven or on the outside of the range or 

cover an oven rack with materials such as aluminum foil. 

Doing so blocks airflow through the oven and cooktop and 

may cause carbon monoxide poisoning or fire. See the 

Getting to Know Your Range

 section of the use and care 

manual for the location of the various air holes (slots).

• 

Only use this range for cooking tasks expected of a home 

appliance as outlined in the literature accompanying it. This 

range is not intended for commercial use.

• 

DO NOT TOUCH THE SURFACES OF THE OVEN OR 

COOKTOP DURING OR IMMEDIATELY AFTER USE.

• 

Do not climb on any part of the appliance.

• 

Never leave this appliance unattended when in use.

• 

Do not leave children or pets alone or unattended in the 

area around the range. Do not allow children to play with 

the controls, pull on the handle, or touch other parts of the 

range.

• 

Do not store items of interest to children on top of or 

above the range. Children could be burned or injured while 

climbing on the appliance.

• 

Do not attempt to use this appliance in the event of a power 

failure.

• 

Do not tamper with the controls. Do not adjust or alter any 

part of the range unless specifically instructed to do so in 

these instructions.

• 

Clean the cooktop thoroughly before operating it for the first 

time.

• 

To prevent damage, remove the meat probe from the oven 

when it is not being used.

• 

Do not line the oven with aluminum foil or other materials. 

These items can melt or burn up during self-cleaning and 

cause permanent damage to the oven.

• 

Do not leave objects, such as aluminum foil, the meat probe, 

cookie sheets, etc. on the bottom of the oven. Damage to 

the oven or the objects themselves may result.

• 

Do not cover the broil element on the ceiling of the oven with 

cookie sheets, aluminum foil, pots, pans, etc. Covering them 

could cause the heating elements to over-heat, damaging 

the oven.

• 

Do not expose the knobs or trim rings to direct flame, hot 

utensils or other sources of heat.

• 

Always ensure that the light fixture lens cover is in place 

when using the oven. The lens cover protects the light 

bulb from breakage caused by high oven temperatures or 

mechanical shock.


WARNING


WARNING


WARNING

• 

If the range is near a window, do not use long curtains as 

window treatment. The curtains could blow over the cooktop 

and create a fire hazard.

• 

Keep flammable items, such as paper, cardboard, plastic 

and cloth away from the burners and other hot surfaces. Do 

not place such items in the oven. Do not allow pot holders to 

touch hot surfaces or gas burners.

• 

Do not wear loose or hanging apparel while using the range. 

Do not allow clothing to come into contact with the interior of 

the oven or the cooktop and surrounding areas during and 

immediately after use.

• 

To avoid a fire hazard, do not hang flammable or heat 

sensitive objects over the range.

• 

Do not use the oven for storage.

• 

Do not touch the burner assembly, grates or surrounding 

surfaces (including the backguard) or the interior surfaces 

of the oven during use. After use, make sure these surfaces 

have had sufficient time to cool before touching them.

• 

Make sure that all the cooktop parts are dry before lighting a 

burner.

• 

Turn the knobs to the 

OFF

 position prior to removing them 

from the valve stems.

• 

Do not operate the cooktop without the knobs and trim rings 

in place.

• 

For your safety, do not use the oven to cook without the 

convection filter installed. When the filter is not installed, the 

spinning fan blades at the back of the oven are exposed.

• 

Non-stick coatings, when heated, can be harmful to birds. 

Remove birds to a separate, well-ventilated room during 

cooking.

Содержание DR30DH

Страница 1: ...Part No 106769 Rev E THIS APPLIANCE HAS BEEN TESTED IN ACCORDANCE WITH THE LATEST EDITIONs OF UL858 CSA C22 2 No 61 ANSI Z21 1 STANDARDs FOR HOUSEHOLD COOKING APPLIANCES Models DR30D DR30DH DR30DI DR3...

Страница 2: ...ons or problems with installation contact your Dacor dealer or the Dacor Customer Service Team For repairs to Dacor appliances under warranty call the Dacor Distinctive Service line Whenever you call...

Страница 3: ...e as a space heater to heat or warm the room Doing so may result in carbon monoxide poisoning and overheating of the appliance warning WARNING NEVER cover any slots holes or passages on the inside or...

Страница 4: ...njured while climbing on the appliance Do not attempt to use this appliance in the event of a power failure Do not tamper with the controls Do not adjust or alter any part of the range unless specific...

Страница 5: ...uit where local code permits connected to a 3 wire junction box Suggested conduit wiring color code black white red and green Using an appliance cord A 4 wire appliance cord equipped with a NEMA 14 50...

Страница 6: ...rdance with the National Fuel Gas Code ANSI Z223 1 Be certain that the appliance being installed is correct for the gas service provided natural gas or LP gas Also if operating the range at an altitud...

Страница 7: ...ates from top of trim 46 3 8 117 8 cm 28 1 2 72 4 cm 28 7 8 73 3 cm 26 1 2 67 3 cm 24 3 8 61 9 cm 9 22 9 cm Backguard 6 15 2 cm Backguard 3 7 7 cm Backguard External handle shown some models have inte...

Страница 8: ...tertop depth is at discretion of customer but cabinet face MUST NOT protrude further than rear of cabinet front see Product Dimensions 4 Consult local code for exact location requirements 6 Model DR30...

Страница 9: ...countertop below countertop To cabinet face Notch countertop overhang to width of cabinets below 1 4 min 6 mm countertop overhang 10 min 25 4 cm both sides To countertop front H J K Combustible side...

Страница 10: ...nd Cabinet Front Self Rimmed 20 5 8 52 4 cm NA 0 0 cm to 5 3 8 13 7 cm Countertop and Cabinet Front Self Rimmed side panels removed 23 7 8 60 6 cm NA 0 0 cm to 2 1 8 5 4 cm Cabinet face below countert...

Страница 11: ...w countertop Cabinet face To countertop front K 30 76 2 cm Model DR30DI H ERV3015 Countertop and Cabinet Front Self Rimmed 3 1 4 Inch Side Panels Removed Model DR30DI H ERV3015 Countertop and Cabinet...

Страница 12: ...cor Stainless Steel Cleaner Literature kit Install the Anti Tip Bracket and Foot Locate the anti tip bracket included in the parts box There are two ways to mount the anti tip bracket Floor mounting p...

Страница 13: ...Drill four 4 3 8 diameter countersink holes through any existing floor covering down to the concrete slab below Drill the 4 holes for the anchors 1 1 4 3 2 cm deep into the concrete slab using a 3 16...

Страница 14: ...in its final position based on the product dimensions on page 5 and the actual cabinet cutout dimensions used for the installation Determine and mark the required position of the anti tip bracket base...

Страница 15: ...d pull it away from the oven while continuing to lift Optional Backguard Island Trim Installation Freestanding Model DR30D H Only When used the optional island trim or optional 6 or 9 inch backguard m...

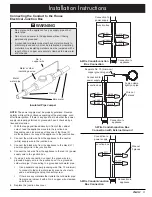
Страница 16: ...ong enough to allow the range to be pulled out for service without disconnecting it from power Types of Electrical Connections Refer to the product data label see inside cover for power requirements T...

Страница 17: ...rminal in the box 7 Connect the L1 wire to the L1 power supply terminal in the box 8 Connect the L2 wire to the L2 power supply terminal in the box 9 If using a 4 wire connection connect the ground wi...

Страница 18: ...ction loosen the grounding screw and remove the neutral to ground jumper link from the terminal block Leave the link in place for 3 wire connections 3 Remove the nut from the conduit strain relief not...

Страница 19: ...supply wire in the junction box 3 Connect the black wire from the appliance to the black L1 power supply wire in the junction box 4 Connect the red wire from the appliance to the red L2 power supply w...

Страница 20: ...This is in addition to the pressure regulator provided with the range The maximum gas supply pressure to the regulator must never exceed 1 2 pound per square inch psi or 3 5 kPa The range and shut of...

Страница 21: ...ps over the lower lip of each hinge receptacle 2 Lower the door to the fully opened position 3 Rotate the two hinge locks toward the oven 4 Slowly and carefully open and close the door completely to e...

Страница 22: ...y three 3 minutes the oven should begin to heat Press the CANCEL SECURE key to stop the oven heating process NOTES If either the oven or cooktop does not operate properly follow these troubleshooting...

Страница 23: ......

Страница 24: ...Dacor 14425 Clark Avenue City of Industry CA 91745 Phone 800 793 0093 Fax 626 403 3130 www dacor com...

Отзывы: