


E
12
13
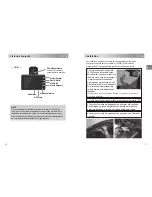
Automatic Start
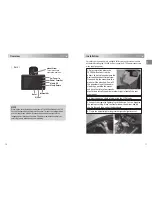
The CX1000 is designed to automatically start when power is supplied. If
the cigarette lighter plug is correctly connected the device will power up
automatically when the vehicle ignition is turned on.
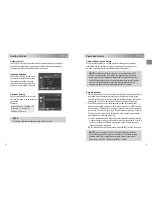
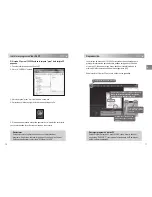
Language Selection
When the CX1000 is turned on for
the first time, follow the onscreen
instructions to set the language
using the arrow buttons and then
confirm by pressing the OK button.
Automatic Booting and Record
When connected properly, CX1000 will automatically boot and start
recording when the ignition is turned on. Booting may require up to 15
seconds, recording will start immediately after this process.
Recording Modes
1. Normal (Continuous) is the main mode of recording. Resolution and frame
rates should be set per your preference and considering the size of the
micro SD card. Changes in configuration can be made through the [Device
Setting] tab on the PC Viewer or go to [Video Settings] on the device.
2. Event (Shock and Panic) is a supplementary mode of recording that
activates when triggered by either an impact or a push of the [REC] button.
In such events, 15 seconds of pre and post event will be stored separately
in the micro SD card under [gsnr] and [recsw] folders respectively. A total of
10 events can be stored in each folder and will be, depending on settings,
overwritten or not recorded when full.
A. Shock triggered video and data will be recorded automatically when the
g-sensor senses a change in g-force of more than the set limit. This limit
can be set through the [Device Setting] tab on the PC Viewer or go to
[Video Settings] on the device.
B. Panic video and data will be recorded when the [REC] button is pushed.
NOTE
The default setting for record is “normal (continuous)” at
30 FPS, 720p resolution. This allows for separate event and panic
recordings. At this setting, the storage medium may fill up quickly
and will, depending on the settings, overwrite or stop recording when
full. To avoid losing valuable data, back up all relevant data to a
separate storage medium immediately after each incident.
NOTE
When recording at 30FPS, 1080p HD resolution, separate
Event files (Shock and Panic) will not be stored. If you wish to keep
separate event files, change the settings to a lower resolution or
frame rate, e.g. 10FPS, 1080p HD or 30FPS, 1080p
Operation Basics
Getting Started
Timezone Setting
Check your time zone’s time offset
and use the arrow keys to select the
correct one.
Examples
Seoul, Tokyo: +9 / Sydney: +10
New York: -5 / Chicago: -6
London: 0 / Paris: +1
NOTE
Recording will start immediately once Timezone is set.
Содержание Smarty CX1000
Страница 23: ...R 4 5 CX1000 CX1000 10 60 14 F 140 F 3 4 5 7 8 9 11 12 13 PC Viewer 16 17 18 19 20 21 22...
Страница 24: ...R 6 7 CX1000 GPS g Smarty CX1000 Smarty CX1000 100 SD Smarty CX1000 SD SD 19 SD SD CX1000 1080P Full HD...
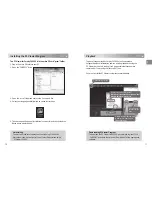
Страница 25: ...R 8 9 CX1000 1 CX1000 2 SD PC Viewer setup exe pcsw 4 3 CX1000 SD SD PC Viewer 18 5 Power Record SD 4...
Страница 26: ...R 10 11 CX1000 will OK A V CX1000 D TEG 2 3 4 1 CX1000...
Страница 33: ......
Страница 34: ...Model CX1000 ver 1 0 0 FW ver 1 0 1 Made in Korea D TEG Security Co Ltd www d teg com...