background image


30 

Appendix A  Replacing and Upgrading FRUs 

A.1  Installing or Replacing Drives 

Before you install or replace drives, plan where you will be placing the disk drives. If an 
array will not be fully populated with drives, be sure the drive slots contain drive trays 
and/or blank filler panels. For more information, see Figure 2-3 and Section 2.1. 


High Availability (HA) Note: A system using a single controller (DSN-5210 or 
DSN-5410) and its expansion array(s) may use SAS or SATA drives.  A system 
using dual controllers for High Availability operation (DSN-520 for the 5210 
or DSN-540 for the 5410) requires SAS drives be used in both the primary 
array and any expansion array(s). 

If you anticipate upgrading to HA with the addition of a second controller, 
then it is recommended you install SAS drives. 

Also, do not mix SAS and SATA drives in the same storage system. 

To install a drive, use the following procedure. 

1.


On the front of the enclosure, select an open drive slot. 

2.


Select the right type of drive for this drive slot (see the figures above). 

3.


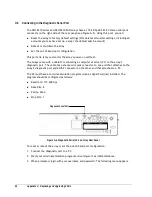
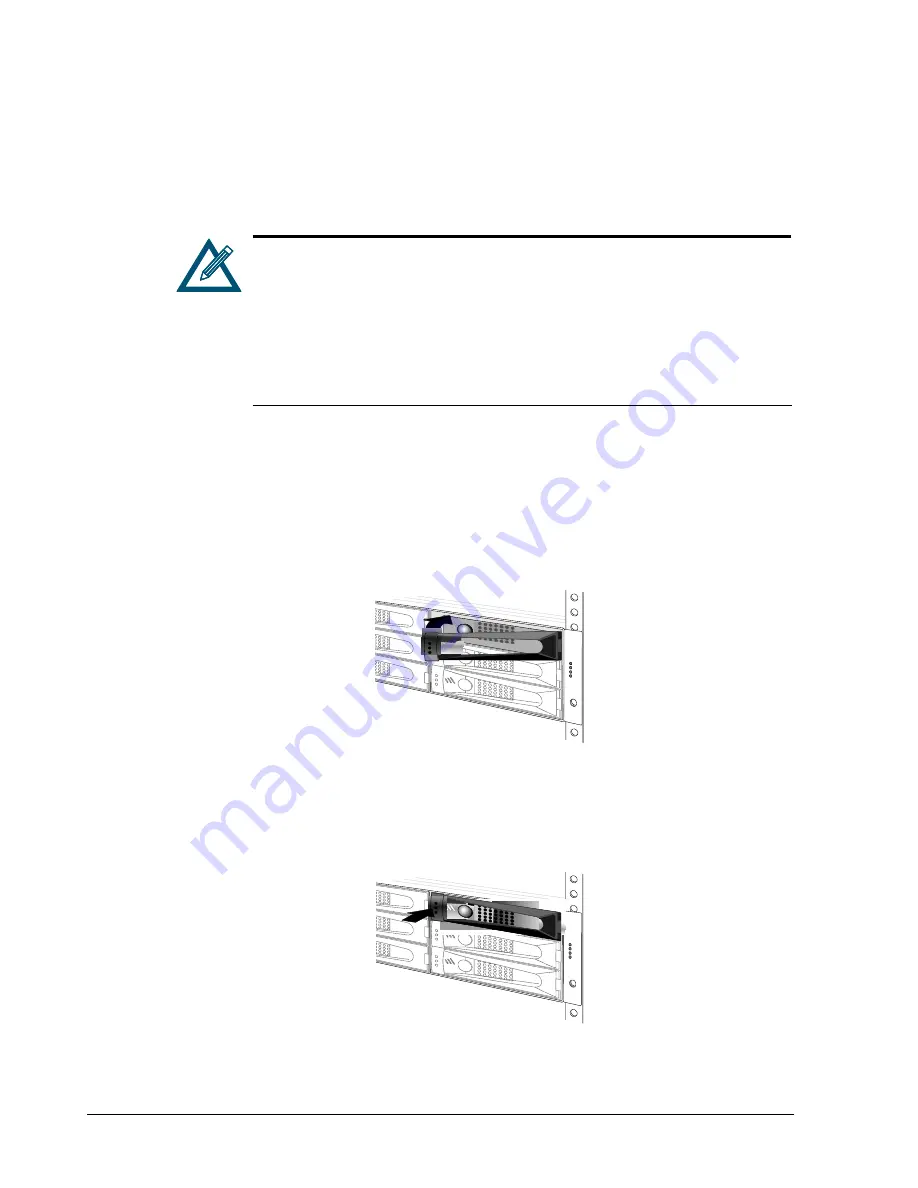
Hold the drive so the LEDs are on the left and the lever is fully open. Then slide the 
drive into the drive slot until the lever starts to close. 


Figure A-1. Installing a Drive 

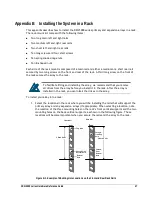
4.


Gently push the lever until it meets the latch on the left side of the drive slot and clicks 
into place. 


Figure A-2. Securing a Drive in the Slot 

5.


To install additional drives, repeat this procedure. 

Содержание xStack Storage DSN-5210

Страница 1: ...xStack Storage TM D Link xStack Storage iSCSI SAN Array Managed SAN Solution DSN 5210 DSN 5410 DSN 5000 Hardware Reference Guide Version 1 0 ...

Страница 2: ...ducts and services are set forth in the express warranty statements accompanying such products and services Nothing herein should be construed as constituting an additional warranty D Link shall not be liable for technical or editorial errors or omissions contained herein Copyright 2009 D Link Systems Inc Trademarks Includes one or more of the following United States patents 6 941 396 7 353 306 an...

Страница 3: ...s very possible that you will never need to replace it However should you need to replace it consult your service documentation Do not dispose of the battery along with household waste Contact your local waste disposal agency for the address of the nearest battery deposit site Following are the safety agency certifications that the xStack Storage enclosure has met CSA 60950 1 UL 60950 1 IEC 60950 ...

Страница 4: ...iv Document Revision Level Revision Date Description Version 1 0 January 27 2009 Version 1 0 ...

Страница 5: ...ves special attention They are preceded by Cautions Cautions contain information which if not followed can cause damage to the xStack storage system They are preceded by Warnings Warnings contain information which if not followed can cause damage to the xStack storage system and to the person installing it They are preceded by Related Documentation In addition to this document the following docume...

Страница 6: ...or by phone Tech Support for customers within the United States D Link Technical Support over the Telephone Please see our support site for current number http support dlink com Monday to Friday 8 00am 5 00pm PST PDT D Link Technical Support over the Internet http support dlink com Tech Support for customers within Canada D Link Technical Support over the Telephone Please see our support site for ...

Страница 7: ...o the Management Port 17 3 7 Connecting the Power Cords 20 3 8 Powering on the DSN 5000 series Primary Array 20 Chapter 4 DSN 5000 Expansion Array Layout and Installation 21 4 1 Expansion Array Front Panel Components 22 4 2 Expansion Array Rear Panel Components 24 4 3 Site Safety and Rack Mount Considerations 24 4 4 Unpacking the DSN 5000 Expansion Array 24 4 5 Items Supplied by the User 25 4 6 In...

Страница 8: ...viii Contents This Page Left Intentionally Blank ...

Страница 9: ...or System On A Chip and has the following features Up to 12 internal Serial Attached SCSI SAS per chassis and up to 36 drives per system The DSN 5210 DSN 5410 and DSN 5000 units can all support SATA hard drives when a single controller is used However the use of SAS hard drives is recommended and required for High Availability HA operation Support for redundant controllers for High Availability HA...

Страница 10: ...ximum number of internal SAS drives 12 System memory 512 MB Buffer cache memory 2 GB Single or Dual controllers are allowed A DSN 540 controller is installed in the empty bay of the DSN 5410 for High Availability XFP transceiver sold separately DSN 5000 single I O module Expansion DSN 500 additional I O module This is an expansion array with a single I O module that is used with a DSN 5210 or DSN ...

Страница 11: ...he Web Delivers Ethernet economics to storage for lower total cost of ownership and rapid deployment using known and trusted technologies Proven transport infrastructure for increased reliability investment protection and reduced training and administrative costs Ability to add up to two hot swappable 12 drive expansion arrays for up to 36 drives Scalability over long distances ideal for remote da...

Страница 12: ...dd a redundant controller DSN 520 for the 5210 or DSN 540 for the 5410 to any existing single controller system DSN 5210 or DSN 5410 Similarly a Field Upgrade Kit is available to add a second I O Module to the DSN 5000 expansion array The expansion array with a single I O module is the DSN 5000 An additional I O module for the DSN 5000 is the DSN 500 which is required when the DSN 5210 or DSN 5410...

Страница 13: ...imary Array Layout This chapter describes the hardware components on the DSN 5000 series primary array DSN 5210 DSN 5410 The topics covered in this chapter are Section 2 1 Front Panel Components Section 2 2 Rear Panel Components Section 2 3 Side and Bottom Panel Components ...

Страница 14: ...nel provides access to 12 drive slots The drive slots are arranged in four columns of 3 slots Drive carriers drives are mounted on a drive carrier Drive carriers have a push button lever for installing and removing drives and three status LEDs see Figure 2 2 and Table 2 2 Each carrier has a corresponding drive slot number see Figure 2 3 Figure 2 1 Front View of the DSN 5000 series Primary Array Fi...

Страница 15: ... DSN 5000 series primary array Blink used to visually identify the enclosure Identify Blue OFF no intent of identification is being performed Table 2 2 Drive Carrier Status LEDs LED Color Description LED 1 Green This LED is reserved for future use OFF no drive is installed drive slot is empty ON drive is online ready for operation Slow Flash drive is being prepared for removal or is being rebuilt ...

Страница 16: ...port stereo mini jack is located above the top right corner of the management port To connect to this port use the diagnostic cable supplied with your xStack Storage system Expansion ports EXP0 and EXP1 two expansion ports are located to the right of the management port These connectors let you attach up to two expansion arrays to the primary array to increase the array s storage capabilities see ...

Страница 17: ...undant controller when a failure occurs on the primary controller the network cables for the Management Port and each of the Data Ports must be connected to both controllers before the system starts up The network connections for the Management Port and each of the Data Ports must be connected to the same network switch to allow the failover mechanism to function correctly For example the Manageme...

Страница 18: ...y The DSN 5000 series primary array has two power switches Both must be turned on Reset Resets the system This switch is recessed to prevent against accidental resets Note This switch simply reboots the system without changing your configuration Restart This switch is reserved for future use Table 2 6 Rear Panel LEDs xStack Storage DSN 5210 and xStack Storage DSN 5410 Switch LED Color Description ...

Страница 19: ...nts The left and right sides of the DSN 5000 series primary array enclosure have rails for rack mounting the unit Product information labels will be found on the side bottom or rear of the unit For rack mount instructions refer to Appendix B and to the documentation for the rack ...

Страница 20: ...12 Chapter 2 DSN 5000 Series Primary Array Layout This Page Left Intentionally Blank ...

Страница 21: ... The topics covered in this chapter are Section 1 1 Site Considerations Section 3 2 Safety Considerations Section 3 3 Unpacking the DSN 5000 series Primary Array Section 3 4 Items Supplied by the User Section 3 5 Connecting to the iSCSI Data Ports Section 3 6 Connecting to the Management Port Section 3 7 Connecting the Power Cords Section 3 8 Powering on the DSN 5000 series Primary Array ...

Страница 22: ...let within six feet 1 82 meters of the DSN 5000 series primary array The location should allow for at least six inches 152 3 mm of space at the front and back of the DSN 5000 series primary array for ventilation Do not place the DSN 5000 series primary array next to on top off or below any device that generates a significant amount of heat or will block the fee flow of air through the DSN 5000 ser...

Страница 23: ...power supply connections must be properly grounded To ensure the integrity of the earth connection special attention must be given to connections that are not directly connected to the branch circuit for example power strips If additional DSN 5000 series expansion arrays will be added leave sufficient space in the rack for those arrays since the cables supplied for connections between the DSN 5000...

Страница 24: ... iSCSI initiator See Note 1 A PC with a NIC and Internet access that will access the management console See Note 1 Two available AC outlets not controlled by a wall switch An IP address for each DSN 5000 series primary array host connection data port that will connect to your SAN For the DSN 5210 an Ethernet cable for each DSN 5210 primary array host connection RJ 45 data port that will connect to...

Страница 25: ...10 Gigabit XFP iSCSI data port labeled iSCSI 0 see Figure 2 6 and Figure 2 7 This port connects to an XFP module for the appropriate 10 gigabit network for example LR SR or CX4 1 Connect one end of a single mode or multimode XFP optical cable to the DSN 5410 storage system optical host network connection port see Figure 2 5 and Figure 3 2 2 Connect the other end of the cable to your SAN or host sy...

Страница 26: ...agement port and connect another NIC in the same PC or a different PC to the host network connection port s Figure 3 1 Connecting Data and Management Ports DSN 5210 w Single Controller Figure 3 2 Connecting Data and Management Ports DSN 5410 with Single Controller Data Port Connection Management Port Connection Management Port Connection Data Port Connection ...

Страница 27: ...d Management Ports DSN 5210 with Dual Controllers Figure 3 4 Connecting Data and Management Ports DSN 5410 with Dual Controllers Network Switch Management Port Connections Data Port Connections To Host Servers To Host Servers Management Port Connections Data Port Connections ...

Страница 28: ...C power connection an audio alarm will sound until both power supply units are powered on 3 8 Powering on the DSN 5000 series Primary Array To power on the DSN 5000 series primary array turn on both of the rocker switches on both power supplies at the rear of the unit When the DSN 5000 series primary array powers on the following actions occur The front panel Power LED turns green The DSN 5000 ser...

Страница 29: ...r are Section 4 1 Expansion Array Front Panel Components Section 4 2 Expansion Array Rear Panel Components Section 4 3 Site Safety and Rack Mount Considerations Section 4 4 Unpacking the DSN 5000 Expansion Array Section 4 5 Items Supplied by the User Section 4 6 Installing the DSN 5000 Expansion Array Section 4 7 Connecting to the DSN 5000 Series Primary Array Section 4 8 Connecting the AC Power C...

Страница 30: ...EDs see Figure 4 2 and Table 4 2 Each carrier has a corresponding drive slot number see Figure 4 3 Figure 4 1 Front View of the DSN 5000 series Expansion Array Table 4 1 Enclosure LEDs LED Color Description ON DSN 5000 expansion array is powered on Power Green OFF power is not being received ON a fault occurred with the power supply fan over temperature internal module or controllers Fault Amber O...

Страница 31: ...e slot is empty ON drive is online ready for operation Slow Flash drive is being prepared for removal or is being rebuilt Green Fast Flash drive is being identified LED 2 Amber Fast Flash drive failed and should be replaced see Appendix A for information about installing or replacing drives LED3 Green Flash drive activity is occurring First Expansion Array Second Expansion Array Figure 4 3 Drive N...

Страница 32: ...either one or two I O modules DSN 500 is the second I O module The redundant I O module is required in the Expansion Array when used with a Primary Array that is equipped with dual controllers 4 3 Site Safety and Rack Mount Considerations All site safety and rack mount considerations listed for the DSN 5000 series primary array in Chapter 3 also apply to the DSN 5000 expansion array 4 4 Unpacking ...

Страница 33: ... for connections between the DSN 5000 series primary array and DSN 5000 expansion arrays require all arrays to be located in close proximity to each other Additional mounting hardware for specific rack being used if necessary 4 6 Installing the DSN 5000 Expansion Array If the DSN 5000 expansion array will be installed on a desktop or shelf locate the array close to the DSN 5000 series primary arra...

Страница 34: ...series Primary Array 3 To connect a second expansion array connect one end of the second supplied primary array to expansion chassis cable to the left expansion connector labeled EXP1 on the rear of the DSN 5000 series primary array and the other end to the HOST connector on the rear of the expansion array Secure the cable connectors at both ends of the cable to the primary array and expansion arr...

Страница 35: ... a wall switch 2 Repeat the previous step using the second power cable and power receptacle on the DSN 5000 expansion array For best practices use both power supplies and connect the second power receptacle to a different circuit 4 9 Powering on the DSN 5000 Expansion Array To power on the DSN 5000 expansion array turn on the rocker switches on both power supplies at the rear of the unit When the ...

Страница 36: ...28 Chapter 4 DSN 5000 Expansion Array Layout and Installation This Page Left Intentionally Blank ...

Страница 37: ...grade the Field Replaceable Units FRUs in the DSN 5000 series primary array and DSN 5000 expansion array FRUs that can be replaced or upgraded include SAS drives Power supply modules Controller module primary array only I O module expansion array only Connection of the serial port for diagnostics when working with D Link Support ...

Страница 38: ...s be used in both the primary array and any expansion array s If you anticipate upgrading to HA with the addition of a second controller then it is recommended you install SAS drives Also do not mix SAS and SATA drives in the same storage system To install a drive use the following procedure 1 On the front of the enclosure select an open drive slot 2 Select the right type of drive for this drive s...

Страница 39: ...ntil you are ready to replace it For hot swap operations we recommend you complete the replacement procedure within 2 minutes To replace a power supply and fan module 1 Optionally power down the DSN 5000 series primary array and remove the power cords from the back panel 2 Squeeze down on the top of the levers on either side of the module and pull down to disengage the module then pull the module ...

Страница 40: ...he levers on either side of the controller module on the primary array and pull down to disengage the module then pull the module straight out of the enclosure 3 Install a replacement controller module in the primary array by keeping the levers on the left and right sides down then slide the module into the enclosure until you feel it engage into place 4 Replace the power cords and power on the DS...

Страница 41: ... the levers on either side of the I O module on the expansion array and pull down to disengage the module then pull the module straight out of the enclosure 3 Install a replacement I O module in the expansion array by keeping the levers on the left and right sides down then slide the module into the enclosure until you feel it engage into place 4 Replace the power cords and power on the DSN 5000 s...

Страница 42: ...ith a cable for connecting a computer or server PC to the array s diagnostic port The cable has a stereo mini jack connector on one end that attaches to the array s diagnostic port and a DB 9 connector on the other end that attaches to a PC The PC must have a terminal emulation program such as HyperTerminal installed The program should be configured as follows Baud rate 115 200 bps Data bits 8 Par...

Страница 43: ...DSN 5000 series Hardware Reference Guide 35 4 Type the number that corresponds to the action you want to perform 5 Follow the screen prompts to complete the activity ...

Страница 44: ...36 Appendix A Replacing and Upgrading FRUs This Page Left Intentionally Blank ...

Страница 45: ...nd installing the array we recommend that you remove all drives from the array before you install it in the rack After the array is installed in the rack you can install the drives in the array To install your array into a rack 1 Select the locations in the rack where you will be installing the rails that will support the primary array and any expansion arrays if appropriate When selecting a locat...

Страница 46: ...es inwardly Then secure the right rear rail to the right main rail using the remaining two long or short screws the screws go through the slots in the rear rail into the threaded section of the long rail 5 Orient the right rear rail so its flange faces outwardly to the right and orient the right main rail so the bottom piece protrudes inwardly Then secure the right rear rail to the right main rail...

Страница 47: ...om holes on the left and right sides on the front of the rack as shown in the following figure Do not insert screws into the second from the bottom hole at this time Figure B 3 Securing the Rails to the Rack 8 Insert screws into the middle two rear rail holes 9 Verify that the rails are installed securely in the rack 10 Carefully slide the array onto the rails pushing it back until the flanges on ...

Страница 48: ... of the array Place a screw in the hole in the array then insert a screwdriver through the hole in the front flange of the array and tighten the screw to secure the array to the vertical supports as shown in the following figure Repeat this step using another screw and the second from the bottom hole on the left side of the rack Figure B 5 Securing the Array to the Rack Secure to the vertical supp...

Отзывы: