background image

1

D-Link WDA-30 User Manual

Section  - Installation

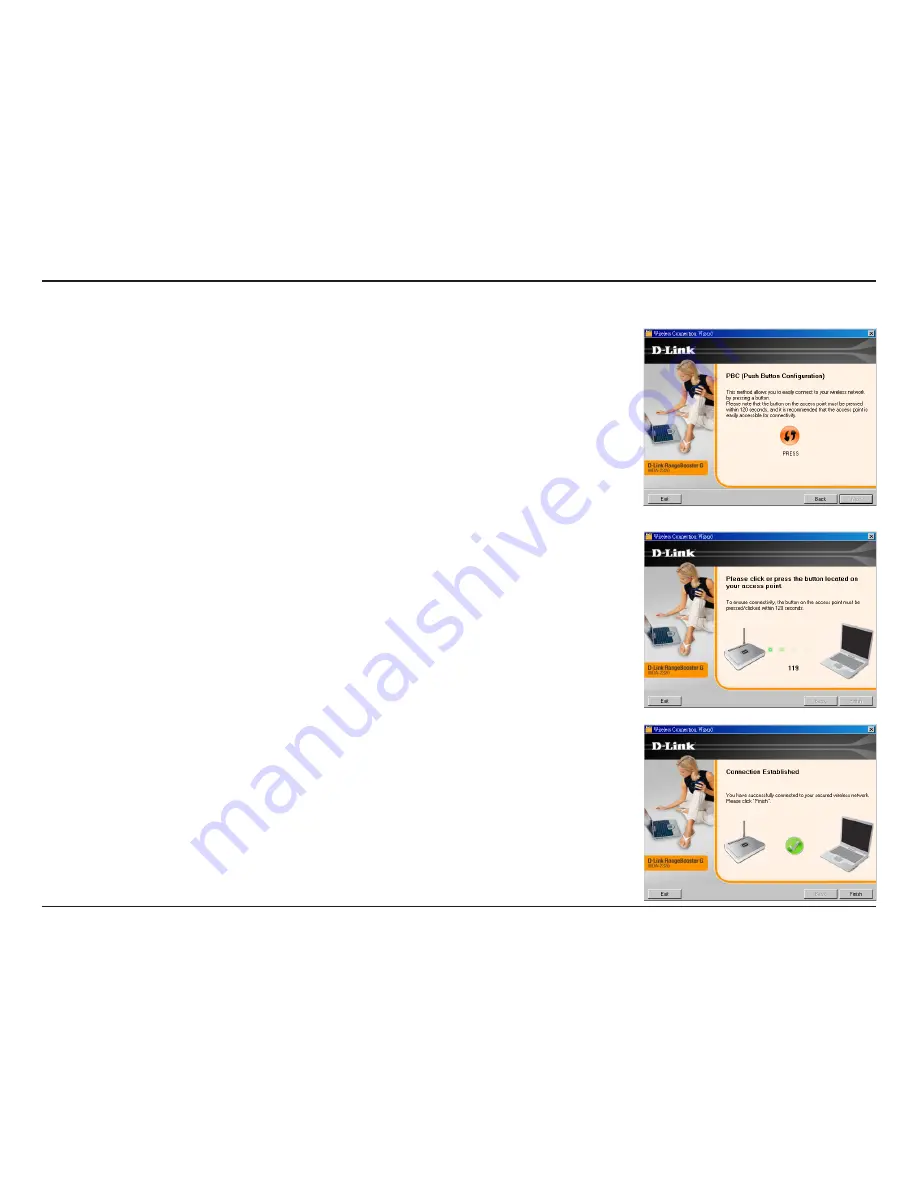
To connect to your network using the WPS push button configuration 

method, click the virtual button as shown in the screenshot.  

Press the WPS button on your access point or wireless router within  

minutes to establish connectivity.  

When  this  screen  appears,  you  have  successfully  connected  to  your 

wireless network. Click 

Next

 to complete your setup.

Push Button Configuration (PBC)

Содержание WDA-2320 RangeBooster G

Страница 1: ......

Страница 2: ...4 Windows Vista 25 Wireless Networks 25 Wi Fi Protected Setup WPS 26 Personal Identification Number PIN 27 My Wireless Networks 29 Add Profile 30 Modify Profile 31 Support 32 About 33 Windows XP 34 Wireless Networks 34 Wi Fi Protected Setup WPS 35 Personal Identification Number PIN 36 My Wireless Networks 38 Add Profile 39 Modify Profile 40 Support 41 About 42 Connect to a Wireless Network 43 Usin...

Страница 3: ...ing 60 Wireless Basics 65 Wireless Modes 69 Networking Basics 70 Check your IP address 70 Windows XP 2000 Users 70 Windows Vista Users 70 Statically Assign an IP address 71 Windows XP 2000 Users 71 Windows Vista Users 72 Technical Specifications 73 Contacting Technical Support 75 Warranty 76 Registration 81 ...

Страница 4: ...Booster G Desktop Adapter Manual and Warranty on CD D Link Wireless Utility on CD System Requirements A desktop computer with an available PCI slot Windows Vista XP Service Pack 2 or 2000 Service Pack 4 300MHz processor and at least 64MB of RAM Product Overview Package Contents ...

Страница 5: ...sed in infrastructure mode to connect with a wireless access point or router for access to the Internet in your office or home network The WDA 2320 features robust security to help protect the wireless network from intruders complying with the latest wireless networking security protocols including WEP encryption and Wi Fi Protected Access WPA support for both 802 1x and WPA PSK The products are a...

Страница 6: ...ecurity Pre Shared Key mode means that the home user without a RADIUS server will obtain a new security key every time he or she connects to the network vastly improving the safety of communications on the network Extra Protection 802 1x Authentication in conjunction with the RADIUS server verifies the identity of would be clients User friendly configuration and diagnostic utilities allow you to e...

Страница 7: ... D Link WDA 2320 User Manual Section 1 Product Overview Hardware Overview LEDs Link A steady light indicates a connection to a wireless network A blinking light indicates activity on the network ...

Страница 8: ...pters Verify the settings such as the SSID and security settings of the network s you want to connect to Remove Existing Installations If you ve installed a different manufacture s adapter or a different model D Link adapter make sure the software is uninstalled before installing the new software Some utilities may cause a conflict with the new software If you plan to use multiple adapters at diff...

Страница 9: ...Link wireless adapter it is recommended to disable the wireless adapter as well as any unused Ethernet adapters From the desktop right click on the My Computer icon and select Properties Click the Hardware tab and then click Device Manager Scroll down the list and click the sign to the left of Network Adapters Right click the adapter you would like to disable and select Disable ...

Страница 10: ... Installation Click Yes to disable the adapter The adapter is now disabled When disabled a red X will be displayed Disabling the adapter will not remove the drivers If you would like to use the adapter simply right click it and select Enable ...

Страница 11: ...that is 1 5 feet thick 5 meters at a 45 degree angle appears to be almost 3 feet 1 meter thick At a 2 degree angle it looks over 42 feet 14 meters thick Position devices so that the signal will travel straight through a wall or ceiling instead of at an angle for better reception 3 Building Materials make a difference A solid metal door or aluminum studs may have a negative effect on range Try to p...

Страница 12: ...the D Link WDA 2320 Driver CD in the CD ROM drive If the CD Autorun function does not automatically start on your computer go to Start Run In the run box type D WDA 2320 exe where D represents the drive letter of your CD ROM drive If the CD Autorun function does not automatically start on your computer type D Drivers setup exe If it does start proceed to the next screen Click Install Drivers Softw...

Страница 13: ...appear Click Next to continue By default setup will install to the default location C Program Files D Link WDA 2320 where C represents the drive letter of your hard drive To install to a different location click Browse and specify the location Click Next to continue Windows Vista Installation ...

Страница 14: ...lect the Program Files folder location Click Next to continue WDA 2320 will start configuring your new software installation This may take few minutes Once the installation is complete the InstallShield Wizard screen displays Click Finish to close the window ...

Страница 15: ...tion 2 Installation The Wireless Connection Wizard will now appear If you want to manually connect to a wireless network refer to page 17 The following instructions will connect you to a wireless network using Wi Fi Protected Setup WPS ...

Страница 16: ...ration method click the virtual button as shown in the screenshot Push Button Configuration PBC Press the WPS button on your access point or wireless router within 2 minutes to establish connectivity When this screen appears you have successfully connected to your wireless network Click Next to complete your setup ...

Страница 17: ... wireless network and then click Next Click the Scan button to display a list of wireless networks site survey Click on the network name SSID and click Next Enter the network name SSID manually If you enter the SSID incorrectly you will automatically be brought to the site survey page Click Scan to display the site survey page ...

Страница 18: ... Installation Click Finish to continue If you are prompted to reboot your computer select Yes I want to restart my computer now When this screen appears you are successfully connected to your wireless network Click Next to complete your setup ...

Страница 19: ...y default setup will install to the default location C Program Files D Link WDA 2320 where C represents the drive letter of your hard drive To install to a different location click Browse and specify the location Click Next to continue Select the Program Files folder location Click Next to continue Windows XP Installation ...

Страница 20: ...ou will have the option to use either the D Link utility or the built in Windows Wireless utility Click Next to continue The Wireless Connection Wizard will now appear If you want to manually connect to a wireless network refer to page 22 The following instructions will connect you to a wireless network using Wi Fi Protected Setup WPS ...

Страница 21: ...ration method click the virtual button as shown in the screenshot Press the WPS button on your access point or wireless router within 2 minutes to establish connectivity When this screen appears you have successfully connected to your wireless network Click Next to complete your setup Push Button Configuration PBC ...

Страница 22: ...ically be brought to the site survey page Click Next to continue or click Scan to display the site survey page To manually connect to your wireless network select Manually connect to a wireless network and then click Next Click the Scan button to display a list of wireless networks site survey Click on the network name SSID and click Connect ...

Страница 23: ...onnect to is using WEP enter the WEP key Click Next to continue If the wireless network you are trying to connect to is using WPA PSK enter the WPA PSK passphrase Click Next to continue Click Finish to continue If you are prompted to reboot your computer select Yes I want to restart my computer now ...

Страница 24: ...nection Manager The D Link WDA 2320 uses the Wireless Connection Manager as the management software The manager provides the user an easy interface to change any settings related to the wireless adapter Clicking on the Wireless Connection Manager icon on the desktop will start the Configuration If you are using Windows Vista please skip to page 25 or Windows XP skip to page 34 Double click the Wir...

Страница 25: ...next page Rescans for available wireless networks in your area Highlight a wireless network and click the Connect button If the network is secure a pop up window will appear Enter the security information to connect refer to the Wireless Security section for more information Select a wireless network profile from the drop down menu and click Active to connect Allow up to 30 seconds to connect MAC ...

Страница 26: ...guration PBC is a virtual button in the utility that connects you to other WPS enabled devices A connection can be established by clicking on the virtual button then pushing the physical button on the access point or wireless router within 120 seconds Refer to page 21 Personal Identification Number PIN is a unique number generated randomly by the wireless adapter s utility Entering this number in ...

Страница 27: ... Number and click Next Make sure your access point or wireless router is close by Write down the number on the screen Enter this number in your access point or wireless router Please refer to the manufacture s manual for instructions Once you click Next you will have 2 minutes to enter this number in your access point or wireless router Personal Identification Number PIN ...

Страница 28: ...Manual Section 3 Configuration The adapter will try to establish connectivity to your access point or wireless router When this screen appears you have successfully established connectivity Click Finish to complete your setup ...

Страница 29: ...be created New Button Modify Click New to create a new wireless network profile refer to page 30 Click Modify to edit a current profile refer to page 31 Click Delete to remove a profile Click Activate to use a profile Allow up to 30 seconds to connect to the wireless network The Profile Details section will display information about the wireless network such as the network name SSID network type I...

Страница 30: ...ID Enter a name for your profile e g Home Office Coffee Shop Enter the SSID of the wireless network Select the network type If you are connecting to a wireless router or access point select Infrastructure Select the type of security used Please refer to the Wireless Security section for more information Click OK to save your settings Network Type Set Security OK Button ...

Страница 31: ...rom the My Wireless Networks page Profile Name SSID Enter a name for your profile e g Home Office Coffee Shop Displays the SSID of the network Displays the network type Select the type of security used Please refer to the Wireless Security section for more information Click OK to save your settings Network Type Set Security OK Button ...

Страница 32: ...32 D Link WDA 2320 User Manual Section 3 Configuration Support If you need help click the Support button A pane will appear to the right of the utility which will display information about the utility ...

Страница 33: ...33 D Link WDA 2320 User Manual Section 3 Configuration The About screen gives you information about the Firmware and Utility Versions of the WDA 2320 About ...

Страница 34: ... next page Rescans for available wireless networks in your area Highlight a wireless network and click the Connect button If the network is secure a pop up window will appear Enter the security information to connect refer to the Wireless Security section for more information Select a wireless network profile from the drop down menu and click Active to connect Allow up to 30 seconds to connect MAC...

Страница 35: ...guration PBC is a virtual button in the utility that connects you to other WPS enabled devices A connection can be established by clicking on the virtual button then pushing the physical button on the access point or wireless router within 120 seconds Refer to page 21 Personal Identification Number PIN is a unique number generated randomly by the wireless adapter s utility Entering this number in ...

Страница 36: ... Number and click Next Make sure your access point or wireless router is close by Write down the number on the screen Enter this number in your access point or wireless router Please refer to the manufacture s manual for instructions Once you click Next you will have 2 minutes to enter this number in your access point or wireless router Personal Identification Number PIN ...

Страница 37: ...Manual Section 3 Configuration The adapter will try to establish connectivity to your access point or wireless router When this screen appears you have successfully established connectivity Click Finish to complete your setup ...

Страница 38: ... created New Button Modify Click New to create a new wireless network profile refer to page 39 Click Modify to edit a current profile refer to page 40 Click Delete to remove a profile Click Active to activate a profile Allow up to 30 seconds to connect to the wireless network The Profile Details section will display information about the wireless network such as the network name SSID network type ...

Страница 39: ...ID Enter a name for your profile e g Home Office Coffee Shop Enter the SSID of the wireless network Select the network type If you are connecting to a wireless router or access point select Infrastructure Select the type of security used Please refer to the Wireless Security section for more information Click OK to save your settings Network Type Set Security OK Button ...

Страница 40: ...rom the My Wireless Networks page Profile Name SSID Enter a name for your profile e g Home Office Coffee Shop Displays the SSID of the network Displays the network type Select the type of security used Please refer to the Wireless Security section for more information Click OK to save your settings Network Type Set Security OK Button ...

Страница 41: ...41 D Link WDA 2320 User Manual Section 3 Configuration Support If you need help click the Support button A pane will appear to the right of the utility which will display information about the utility ...

Страница 42: ...42 D Link WDA 2320 User Manual Section 3 Configuration The About screen gives you information about the Firmware and Utility Versions of the WDA 2320 About ...

Страница 43: ...ws Vista utility as seen below Right click on the wireless computer icon in your system tray lower right corner next to the time Select Connect to a network If you receive the Wireless Networks Detected bubble click on the center of the bubble to access the utility or The utility will display any available wireless networks in your area Click on a network displayed using the SSID and click the Con...

Страница 44: ...urity key or passphrase that is on your router and click Connect It may take 20 30 seconds to connect to the wireless network If the connection fails please verify that the security settings are correct The key or passphrase must be exactly the same as on the wireless router ...

Страница 45: ...survey option similar to the Windows XP utility as seen below Right click on the wireless computer icon in your system tray lower right corner next to the time Select View Available Wireless Networks If you receive the Wireless Networks Detected bubble click on the center of the bubble to access the utility or The utility will display any available wireless networks in your area Click on a network...

Страница 46: ...ink wireless utility you must disable the Windows XP wireless utility Right click on the wireless computer icon in your system tray lower right corner next to the time Select View Available Wireless Networks In the Choose a Wireless Network window click Change Advanced Settings on the left side below Related Tasks ...

Страница 47: ...47 D Link WDA 2320 User Manual Section 3 Configuration In the Wireless Network Connection Properties window uncheck Use Windows to configure my wireless network settings and then click OK ...

Страница 48: ... This section will show you the different levels of security you can use to protect your data from intruders The WDA 2320 offers the following types of security WPA2 Wi Fi Protected Access 2 WPA2 PSK Pre Shared Key WPA Wi Fi Protected Access WPA PSK Pre Shared Key 802 1x RADIUS ...

Страница 49: ...e authentication protocol EAP WEP regulates access to a wireless network based on a computer s hardware specific MAC address which is relatively simple to be sniffed out and stolen EAP is built on a more secure public key encryption system to ensure that only authorized network users can access the network WPA PSK WPA2 PSK uses a passphrase or key to authenticate your wireless connection The key i...

Страница 50: ...double clicking on the D Link icon on your desktop 2 Highlight the wireless network SSID you would like to connect to and click Connect If the network is using WPA PSK the screen as shown to the bottom right will appear 3 Enter the WPA PSK passphrase exactly as it is on your wireless router or access point Click the Show text in the password field box to see the passphrase Unchecking it will hide ...

Страница 51: ...1 Open the Wireless Utility by double clicking on the D Link icon in your system tray lower right corner of screen Click on New to create a new profile or highlight an existing profile and click Modify 2 Select WPA WPA2 Passphrase under Set Security Option 3 Select TKIP or AES 4 Enter the passphrase exactly as it is on your wireless router or access point 5 Click OK to connect to the network Allow...

Страница 52: ...cess point before configuring your wireless adapter If you are joining an existing network you will need to know the security key or passphrase being used 2 Highlight the wireless network SSID you would like to connect to and click Connect 1 Open the Windows Vista Wireless Utility by right clicking on the wireless computer icon in your system tray lower right corner of screen Select Connect to a n...

Страница 53: ...security key or passphrase that is on your router and click Connect It may take 20 30 seconds to connect to the wireless network If the connection fails please verify that the security settings are correct The key or passphrase must be exactly the same as on the wireless router ...

Страница 54: ...nt before configuring your wireless adapter If you are joining an existing network you will need to know the WPA PSK key being used 2 Highlight the wireless network SSID you would like to connect to and click Connect 1 Open the Windows XP Wireless Utility by right clicking on the wireless computer icon in your system tray lower right corner of screen Select View Available Wireless Networks ...

Страница 55: ...on box will appear Enter the WPA PSK passphrase and click Connect It may take 20 30 seconds to connect to the wireless network If the connection fails please verify that the WPA PSK settings are correct The WPA PSK passphrase must be exactly the same as on the wireless router or access point ...

Страница 56: ... setting up certificates 1 Open the Wireless Utility by double clicking on the D Link icon in your system tray lower right corner of screen Click on New to create a new profile or highlight an existing profile and click Modify 2 Select WPA WPA2 XP or WPA WPA2 EAP Vista under Set Security Option and then select TKIP or AES 3 Click on Advanced Config to continue Windows XP Windows Vista ...

Страница 57: ...vices on the network must use the same EAP type when using a RADIUS server for authentication Some RADIUS servers require that the Validate Server field be selected Check this field if your RADIUS server requires validation 5 Select an User Certificate from the drop down menu 6 Enter the login information required to authenticate 7 Click Add to enter the IP address es of your RADIUS servers 8 Clic...

Страница 58: ...ing a RADIUS server and setting up certificates 1 Open the Wireless Utility by double clicking on the D Link icon in your system tray lower right corner of screen Click on New to create a new profile or highlight an existing profile and click Modify 2 Select 802 1x under Set Security Option 3 Click on Advanced Config to continue Windows XP Windows Vista ...

Страница 59: ...devices on the network must use the same EAP type when using a RADIUS server for authentication Some RADIUS servers require that the Validate Server field be selected Check this field if your RADIUS server requires validation 5 Select an User Certificate from the drop down menu 6 Enter the login information required to authenticate 7 Click Add to enter the IP address es of your RADIUS servers 8 Cl...

Страница 60: ...occur during the installation and operation of the WDA 2320 Read the following descriptions if you are having problems Windows Vista users Open the Start menu right click on Computer and select Manage Click on Device Manager in the left hand side Windows XP 2000 users Go to Start right click My Computer and select Properties Select the Hardware Tab and then click Device Manager ...

Страница 61: ...ooting Click the sign next to Network Adapters Right click on D Link WDA 2320 Cardbus Adapter Select Properties to check that the drivers are installed properly Look under Device Status to check that the device is working properly Click OK to continue ...

Страница 62: ... your Access Point and the computer with the WDA 2320 Turn on the Access Point and then turn on the computer with the WDA 2320 Refresh the WDA 2320 Utility 2 I cannot connect to the access point or the wireless router Check to see if the WDA 2320 desktop adapter is firmly inserted into the PCI slot of your laptop computer 3 The WDA 2320 Power and Link lights are not on Reset the Access Point to it...

Страница 63: ...s from the INF and SYSTEM DRIVERS folders in the Windows directory Note Windows XP and Windows 2000 will rename inf files that have not received WHQL certification into oem inf files e g oem1 inf 5 The computer does not recognize the WDA 2320 Wireless Adapter Check that the LED indicators for the broadband modem are indicating normal activity If not there may be a problem with the broadband connec...

Страница 64: ... the WLAN icon in the taskbar click on Configuration to change the settings for the wireless adapter If Security is enabled make sure that the correct encryption keys are entered on both the WDA 2320 and the access point Double click on the WLAN icon in the taskbar click Encryption Check to see that the key selected is set to the same key as other devices on the network Move the WDA 2320 and Acces...

Страница 65: ...reless LANs are used increasingly in both home and office environments and public areas such as airports coffee shops and universities Innovative ways to utilize WLAN technology are helping people to work and communicate more efficiently Increased mobility and the absence of cabling and other fixed infrastructure have proven to be beneficial for many users Wireless users can use the same applicati...

Страница 66: ...ata from one point A to point B But wireless technology has restrictions as to how you can access the network You must be within the wireless network range area to be able to connect your computer There are two different types of wireless networks Wireless Local Area Network WLAN and Wireless Personal Area Network WPAN Wireless Local Area Network WLAN In a wireless local area network a device call...

Страница 67: ...ones laptops speakers and other devices that operate on batteries Who uses wireless Wireless technology as become so popular in recent years that almost everyone is using it whether it s for home office business D Link has a wireless solution for it Home Gives everyone at home broadband access Surf the web check email instant message and etc Gets rid of the cables around the house Simple and easy ...

Страница 68: ...te a task not knowing where to start That s why we ve put together a few setup steps and tips to help you through the process of setting up a wireless network Tips Here are a few things to keep in mind when you install a wireless network Centralize your router or Access Point Make sure you place the router access point in a centralized location within your network for the best performance Try to p...

Страница 69: ...WEP security feature on the router Refer to product manual for detail information on how to set it up There is basically one mode of networking Infrastructure All wireless clients will connect to an access point or wireless router An Infrastructure network contains an Access Point or wireless router All the wireless devices or clients will connect to the wireless router or access point Wireless Mo...

Страница 70: ...nfig and press Enter This will display the IP address subnet mask and the default gateway of your adapter Windows Vista Users Click Start All Programs Accessories Command Prompt You may need administrative access to run this application For all additional prompt windows inquiring of running the command prompt application select Yes OK or Continue At the prompt type ipconfig and press Enter This wi...

Страница 71: ...s network adapter or other adapter which will be connected to your router Highlight Internet Protocol TCP IP and click Properties Click Use the following IP address and enter an IP address that is on the same subnet as your network or LAN IP address on your router Example If the router s LAN IP address is 192 168 0 1 make your IP address 192 168 0 X where X is a number between 2 and 99 Make sure t...

Страница 72: ...l Version 4 TCP IPv4 and click Properties Click Use the following IP address and enter an IP address that is on the same subnet as your network or LAN IP address on your router or network Example If the router s LAN IP address is 192 168 0 1 make your IP address 192 168 0 X where X is a number between 2 and 99 Make sure that the number you choose is not in use on the network Set Default Gateway th...

Страница 73: ...ors Up to 328 feet 100 meters Outdoors Up to 1 312 feet 400 meters Power Consumption PowerSave mode 28mA Standby mode 4 66mA Transmit mode 248mA Modulation Technology Orthogonal Frequency Division Multiplexing OFDM Complementary Code Keying CCK Receiver Sensitivity 54Mbps OFDM 10 PER 68dBm 48Mbps OFDM 10 PER 68dBm 36Mbps OFDM 10 PER 75dBm 24Mbps OFDM 10 PER 79dBm 18Mbps OFDM 10 PER 82dBm 12Mbps OF...

Страница 74: ...inches 8 7mm Weight 0 12 lb 55g Warranty 1 Year Maximum wireless signal rate derived from IEEE Standard 802 11g specifications Actual data throughput will vary Network conditions and environmental factors including volume of network traffic building materials and construction and network overhead lower actual data throughput rate Environmental factors will adversely affect wireless signal range ...

Страница 75: ...del number of the product e g WDA 2320 Hardware Revision located on the label on the adapter e g rev A1 Serial Number s n number located on the label on the adapter You can find software updates and user documentation on the D Link website as well as frequently asked questions and answers to technical issues For customers within the United States Phone Support 877 453 5465 24 hours a day seven day...

Страница 76: ...er this Limited Warranty will be at D Link s option to repair or replace the defective Hardware during the Warranty Period at no charge to the original owner or to refund the actual purchase price paid Any repair or replacement will be rendered by D Link at an Authorized D Link Service Office The replacement hardware need not be new or have an identical make model or part D Link may at its option ...

Страница 77: ...a refund is given automatically terminates Non Applicability of Warranty The Limited Warranty provided hereunder for Hardware and Software portions of D Link s products will not be applied to and does not cover any refurbished product and any product purchased through the inventory clearance or liquidation sale or other sales in which D Link the sellers or the liquidators expressly disclaim their ...

Страница 78: ...nstallation lack of reasonable care repair or service in any way that is not contemplated in the documentation for the product or if the model or serial number has been altered tampered with defaced or removed Initial installation installation and removal of the product for repair and shipping costs Operational adjustments covered in the operating manual for the product and normal maintenance Dama...

Страница 79: ...SS WRITTEN WARRANTIES AND REMEDIES ARE EXCLUSIVE AND ARE IN LIEU OF ANY OTHER WARRANTIES OR REMEDIES EXPRESS IMPLIED OR STATUTORY Governing Law This Limited Warranty shall be governed by the laws of the State of California Some states do not allow exclusion or limitation of incidental or consequential damages or limitations on how long an implied warranty lasts so the foregoing limitations and exc...

Страница 80: ...levision reception which can be determined by turning the equipment off and on the user is encouraged to try to correct the interference by one or more of the following measures Reorient or relocate the receiving antenna Increase the separation between the equipment and receiver Connect the equipment into an outlet on a circuit different from that to which the receiver is connected Consult the dea...

Страница 81: ...nk WDA 2320 User Manual Appendix F Registration Version 1 1 04 01 2008 Product registration is entirely voluntary and failure to complete or return this form will not diminish your warranty rights Registration ...

Отзывы: