background image

D-Link WUA-340 User Manual

Section  - Troubleshooting

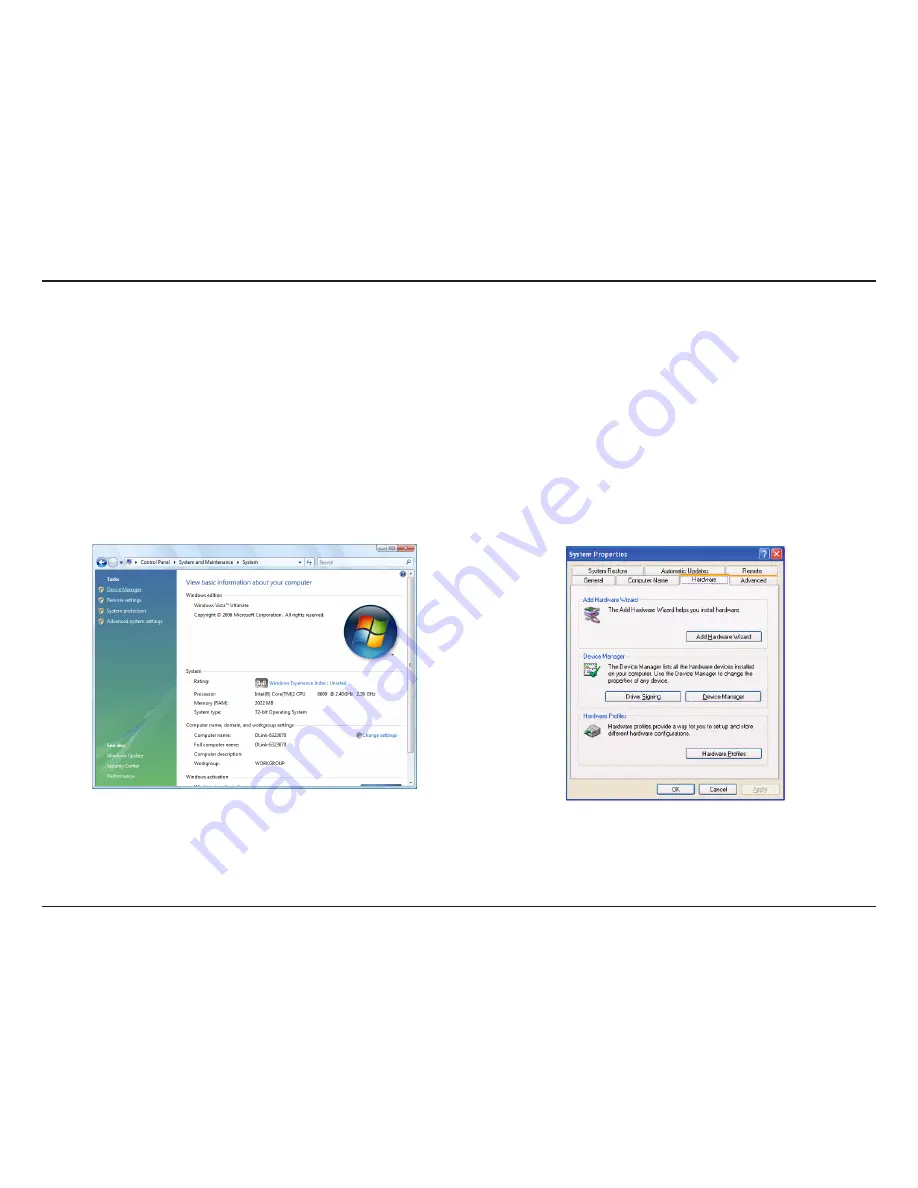
1.  How do I know if my adapter is installed properly?

Troubleshooting

This chapter provides solutions to problems that can occur during the installation and operation of the WUA-2340.  
Read the following descriptions if you are having problems.

Windows Vista

  users  -  Open  the  Start  menu, 

right-click on 

Computer and select Manage. Click on 

Device Manager in the left-hand side.

Windows

®

 XP/2000 users - Go to Start, right-click My 

Computer and select Properties. Select the Hardware 
Tab
 and then click Device Manager.

Содержание RANGEBOOSTER G WUA-2340

Страница 1: ......

Страница 2: ... Wi Fi Protected Setup WPS 25 My Wireless Networks 28 Add Profile 29 Modify Profile 30 Support 31 About 32 Windows XP 33 Wireless Networks 33 Wi Fi Protected Setup WPS 34 My Wireless Networks 37 Add Profile 38 Modify Profile 39 Support 40 About 41 Connect to a Wireless Network 42 Using Windows Vista 42 Using Windows XP 44 Disabling The Windows XP Utility 45 Wireless Security 47 What is WEP 47 What...

Страница 3: ...the D Link Utility 63 Troubleshooting 65 Wireless Basics 69 Networking Basics 74 Check your IP address 74 Windows XP 2000 Users 74 Windows Vista Users 74 Statically Assign an IP address 75 Windows XP 2000 Users 75 Windows Vista Users 76 Technical Specifications 77 Contacting Technical Support 78 Warranty 79 Registration 84 ...

Страница 4: ...CD D Link Wireless Connection Manager on CD Quick Installation Guide System Requirements A computer or laptop with an available USB 2 0 port Windows Vista XP Service Pack 2 or 2000 Service Pack 4 CD ROM Drive 500MHz processor and at least 64MB of RAM An 802 11g access point or wireless router Product Overview Package Contents ...

Страница 5: ...ctivity profiles of networks you frequently access You can also enable support for WPA WPA2 and 802 1x for enhanced data encryption and user authentication Like all other D Link wireless adapters the WUA 2340 Wireless USB Adapter can be used in peer to peer mode ad hoc to connect directly to other 802 11b g wirelessly enabled computers or in client mode infrastructure to communicate with other use...

Страница 6: ...data and communication than has previously been available Optimal wireless reception using its cradle included Position the WUA 2340 almost anywhere in your workspace to achieve the best reception possible Supports Infrastructure networks via an access point and Peer to Peer communication in Ad Hoc mode User friendly configuration and diagnostic utilities Maximum wireless signal rate derived from ...

Страница 7: ... D Link WUA 2340 User Manual Section 1 Product Overview Hardware Overview USB Port Used to connect the WUA 2340 to your computer Link Light A blinking light indicates activity on your wireless network ...

Страница 8: ...pters Verify the settings such as the SSID and security settings of the network s you want to connect to Remove Existing Installations If you ve installed a different manufacture s adapter or a different model D Link adapter make sure the software is uninstalled before installing the new software Some utilities may cause a conflict with the new software If you plan to use multiple adapters at diff...

Страница 9: ...Link wireless adapter it is recommended to disable the wireless adapter as well as any unused Ethernet adapters From the desktop right click on the My Computer icon and select Properties Click the Hardware tab and then click Device Manager Scroll down the list and click the sign to the left of Network Adapters Right click the adapter you would like to disable and select Disable ...

Страница 10: ... Installation Click Yes to disable the adapter The adapter is now disabled When disabled a red X will be displayed Disabling the adapter will not remove the drivers If you would like to use the adapter simply right click it and select Enable ...

Страница 11: ...that is 1 5 feet thick 5 meters at a 45 degree angle appears to be almost 3 feet 1 meter thick At a 2 degree angle it looks over 42 feet 14 meters thick Position devices so that the signal will travel straight through a wall or ceiling instead of at an angle for better reception 3 Building Materials make a difference A solid metal door or aluminum studs may have a negative effect on range Try to p...

Страница 12: ...e D Link WUA 2340 Driver CD in the CD ROM drive If the CD Autorun function does not automatically start on your computer go to Start Run In the run box type D WUA 2340 exe where D represents the drive letter of your CD ROM drive If the CD Autorun function does not automatically start on your computer type D Drivers setup exe If it does start proceed to the next screen Click Install Drivers Softwar...

Страница 13: ...appear Click Next to continue By default setup will install to the default location C Program Files D Link WUA 2340 where C represents the drive letter of your hard drive To install to a different location click Browse and specify the location Click Next to continue Windows Vista Installation ...

Страница 14: ... connect to a wireless network refer to page 16 The following instructions will connect you to a wireless network using Wi Fi Protected Setup WPS Insert the adapter into an available USB port on your computer If the Found New Hardware Wizard appears click Cancel Select the Program Files folder location Click Next to continue ...

Страница 15: ...ration method click the virtual button as shown in the screenshot Press the WPS button on your access point or wireless router within 2 minutes to establish connectivity When this screen appears you have successfully connected to your wireless network Click Next to complete your setup Push Button Configuration PBC ...

Страница 16: ... wireless network and then click Next Click the Scan button to display a list of wireless networks site survey Click on the network name SSID and click Next Enter the network name SSID manually If you enter the SSID incorrectly you will automatically be brought to the site survey page Click Scan to display the site survey page ...

Страница 17: ... Installation Click Finish to continue If you are prompted to reboot your computer select Yes I want to restart my computer now When this screen appears you are successfully connected to your wireless network Click Next to complete your setup ...

Страница 18: ...y default setup will install to the default location C Program Files D Link WUA 2340 where C represents the drive letter of your hard drive To install to a different location click Browse and specify the location Click Next to continue Select the Program Files folder location Click Next to continue Windows XP Installation ...

Страница 19: ...tinue Insert the adapter into an available USB port on your computer Optional If desired or necessary attach the cradle between the WUA 2340 and your computer If the Found New Hardware Wizard appears click Cancel Click Next to continue The Wireless Connection Wizard will now appear If you want to manually connect to a wireless network refer to page 21 The following instructions will connect you to...

Страница 20: ...ration method click the virtual button as shown in the screenshot Press the WPS button on your access point or wireless router within 2 minutes to establish connectivity When this screen appears you have successfully connected to your wireless network Click Next to complete your setup Push Button Configuration PBC ...

Страница 21: ...ically be brought to the site survey page Click Next to continue or click Scan to display the site survey page To manually connect to your wireless network select Manually connect to a wireless network and then click Next Click the Scan button to display a list of wireless networks site survey Click on the network name SSID and click Connect ...

Страница 22: ...onnect to is using WEP enter the WEP key Click Next to continue If the wireless network you are trying to connect to is using WPA PSK enter the WPA PSK passphrase Click Next to continue Click Finish to continue If you are prompted to reboot your computer select Yes I want to restart my computer now ...

Страница 23: ...nnection Manager The D Link WUA 2340 uses the Wireless Connection Manager as the management software The manager provides the user an easy interface to change any settings related to the wireless adapter Clicking on the Wireless Connection Manager icon on the desktop will start the Configuration If you are using Windows Vista please skip to page 24 or Windows XP skip to page 32 Double clicktheWire...

Страница 24: ...next page Rescans for available wireless networks in your area Highlight a wireless network and click the Connect button If the network is secure a pop up window will appear Enter the security information to connect refer to the Wireless Security section for more information Select a wireless network profile from the drop down menu and click Active to connect Allow up to 30 seconds to connect MAC ...

Страница 25: ...guration PBC is a virtual button in the utility that connects you to other WPS enabled devices A connection can be established by clicking on the virtual button then pushing the physical button on the access point or wireless router within 120 seconds Refer to page 20 Personal Identification Number PIN is a unique number generated randomly by the wireless adapter s utility Entering this number in ...

Страница 26: ... Number and click Next Make sure your access point or wireless router is close by Write down the number on the screen Enter this number in your access point or wireless router Please refer to the manufacture s manual for instructions Once you click Next you will have 2 minutes to enter this number in your access point or wireless router Personal Identification Number PIN ...

Страница 27: ...Manual Section 3 Configuration The adapter will try to establish connectivity to your access point or wireless router When this screen appears you have successfully established connectivity Click Finish to complete your setup ...

Страница 28: ...reated New Button Modify Click New to create a new wireless network profile refer to page 29 Click Modify to edit a current profile refer to page 30 Click Delete to remove a profile Click Active to activate a profile Allow up to 30 seconds to connect to the wireless network TheProfileDetailssectionwilldisplayinformation about the wireless network such as the network name SSID network type Infrastr...

Страница 29: ... Office Coffee Shop Enter the SSID of the wireless network Select the network type If you are connecting to a wireless router or access point select Infrastructure If you are connecting to another wireless client such as an adapter select Ad Hoc Select the type of security used Please refer to the Wireless Security section for more information Click OK to save your settings Network Type Set Securi...

Страница 30: ...rom the My Wireless Networks page Profile Name SSID Enter a name for your profile e g Home Office Coffee Shop Displays the SSID of the network Displays the network type Select the type of security used Please refer to the Wireless Security section for more information Click OK to save your settings Network Type Set Security OK Button ...

Страница 31: ...31 D Link WUA 2340 User Manual Section 3 Configuration Support If you need help click the Support button A pane will appear to the right of the utility which will display information about the utility ...

Страница 32: ...32 D Link WUA 2340 User Manual Section 3 Configuration The About screen gives you information about the Firmware and Utility Versions of the WUA 2340 About ...

Страница 33: ... next page Rescans for available wireless networks in your area Highlight a wireless network and click the Connect button If the network is secure a pop up window will appear Enter the security information to connect refer to the Wireless Security section for more information Select a wireless network profile from the drop down menu and click Active to connect Allow up to 30 seconds to connect MAC...

Страница 34: ...guration PBC is a virtual button in the utility that connects you to other WPS enabled devices A connection can be established by clicking on the virtual button then pushing the physical button on the access point or wireless router within 120 seconds Refer to page 20 Personal Identification Number PIN is a unique number generated randomly by the wireless adapter s utility Entering this number in ...

Страница 35: ... Number and click Next Make sure your access point or wireless router is close by Write down the number on the screen Enter this number in your access point or wireless router Please refer to the manufacture s manual for instructions Once you click Next you will have 2 minutes to enter this number in your access point or wireless router Personal Identification Number PIN ...

Страница 36: ...Manual Section 3 Configuration The adapter will try to establish connectivity to your access point or wireless router When this screen appears you have successfully established connectivity Click Finish to complete your setup ...

Страница 37: ...reated New Button Modify Click New to create a new wireless network profile refer to page 38 Click Modify to edit a current profile refer to page 39 Click Delete to remove a profile Click Active to activate a profile Allow up to 30 seconds to connect to the wireless network TheProfileDetailssectionwilldisplayinformation about the wireless network such as the network name SSID network type Infrastr...

Страница 38: ... Office Coffee Shop Enter the SSID of the wireless network Select the network type If you are connecting to a wireless router or access point select Infrastructure If you are connecting to another wireless client such as an adapter select Ad Hoc Select the type of security used Please refer to the Wireless Security section for more information Click OK to save your settings Network Type Set Securi...

Страница 39: ...rom the My Wireless Networks page Profile Name SSID Enter a name for your profile e g Home Office Coffee Shop Displays the SSID of the network Displays the network type Select the type of security used Please refer to the Wireless Security section for more information Click OK to save your settings Network Type Set Security OK Button ...

Страница 40: ...40 D Link WUA 2340 User Manual Section 3 Configuration Support If you need help click the Support button A pane will appear to the right of the utility which will display information about the utility ...

Страница 41: ...41 D Link WUA 2340 User Manual Section 3 Configuration The About screen gives you information about the Firmware and Utility Versions of the WUA 2340 About ...

Страница 42: ...ws Vista utility as seen below Right click on the wireless computer icon in your system tray lower right corner next to the time Select Connect to a network If you receive the Wireless Networks Detected bubble click on the center of the bubble to access the utility or The utility will display any available wireless networks in your area Click on a network displayed using the SSID and click the Con...

Страница 43: ...urity key or passphrase that is on your router and click Connect It may take 20 30 seconds to connect to the wireless network If the connection fails please verify that the security settings are correct The key or passphrase must be exactly the same as on the wireless router ...

Страница 44: ...survey option similar to the Windows XP utility as seen below Right click on the wireless computer icon in your system tray lower right corner next to the time Select View Available Wireless Networks If you receive the Wireless Networks Detected bubble click on the center of the bubble to access the utility or The utility will display any available wireless networks in your area Click on a network...

Страница 45: ...ink wireless utility you must disable the Windows XP wireless utility Right click on the wireless computer icon in your system tray lower right corner next to the time Select View Available Wireless Networks In the Choose a Wireless Network window click Change Advanced Settings on the left side below Related Tasks ...

Страница 46: ...46 D Link WUA 2340 User Manual Section 3 Configuration In the Wireless Network Connection Properties window uncheck UseWindows to configure my wireless network settings and then click OK ...

Страница 47: ... wireless network so that it is protected as it is transmitted from one wireless device to another To gain access to a WEP network you must know the key The key is a string of characters that you create When using WEP you must determine the level of encryption The type of encryption determines the key length 128 bit encryption requires a longer key than 64 bit encryption Keys are defined by enteri...

Страница 48: ...thentication protocol EAP WEP regulates access to a wireless network based on a computer s hardware specific MAC address which is relatively simple to be sniffed out and stolen EAP is built on a more secure public key encryption system to ensure that only authorized network users can access the network WPA PSK WPA2 PSK uses a passphrase or key to authenticate your wireless connection The key is an...

Страница 49: ...ur system tray lower right corner of screen From the list of available wireless networks select the network you want to connect to and click Connect If the network is using WEP the screen as shown to the left will appear 2 Enter the WEP key exactly as it is on your wireless router or access point 3 Click the Show text in the password field box to see the WEP key Unchecking it will hide the key 4 C...

Страница 50: ...hared Key 1 Open the Wireless Utility by double clicking on the D Link icon in your system tray lower right corner of screen Click on New to create a new profile or highlight an existing profile and click Modify 2 Select WEP under Set Security Option 3 Select Shared and then select the Key Length from the drop down menu 4 Enter the WEP key exactly as it is on your wireless router or access point 5...

Страница 51: ...onfiguring your wireless adapter If you are joining an existing network you will need to know the WEP key being used 2 Highlight the wireless network SSID you would like to connect to and click Connect 1 Open the Windows XP Wireless Utility by right clicking on the wireless computer icon in your system tray lower right corner of screen Select View Available Wireless Networks ...

Страница 52: ... Connection box will appear Enter the WEP key and click Connect It may take 20 30 seconds to connect to the wireless network If the connection fails please verify that the WEP settings are correct TheWEP key must be exactly the same as on the wireless router or access point ...

Страница 53: ...nfiguring your wireless adapter If you are joining an existing network you will need to know the WEP key being used 2 Highlight the wireless network SSID you would like to connect to and click Connect 1 Open the Windows XP Wireless Utility by right clicking on the wireless computer icon in your system tray lower right corner of screen Select View Available Wireless Networks ...

Страница 54: ... Connection box will appear Enter the WEP key and click Connect It may take 20 30 seconds to connect to the wireless network If the connection fails please verify that the WEP settings are correct TheWEP key must be exactly the same as on the wireless router or access point ...

Страница 55: ...le clicking on the D Link icon on your desktop 2 Highlight the wireless network SSID you would like to connect to and click Connect If the network is using WPA PSK the screen as shown to the bottom right will appear 3 Enter theWPA PSK passphrase exactly as it is on your wireless router or access point Click the Show text in the password field box to see the passphrase Unchecking it will hide it 4 ...

Страница 56: ...evices 1 Open the Wireless Connection Manager by double clicking on the D Link icon on your desktop Click on New to create a new profile or highlight an existing profile and click Modify 2 Select WPA WPA2 Passphrase under Set Security Option 3 Select TKIP or AES 4 Enter the passphrase exactly as it is on your wireless router or access point 5 Click OK to connect to the network Allow up to 30 secon...

Страница 57: ... point before configuring your wireless adapter If you are joining an existing network you will need to know the security key or passphrase being used 2 Highlight the wireless network SSID you would like to connect to and click Connect 1 Open the Windows Vista Wireless Utility by right clicking on the wireless computer icon in your system tray lower right corner of screen Select Connect to a netwo...

Страница 58: ...ity key or passphrase that is on your router and click Connect It may take 20 30 seconds to connect to the wireless network If the connection fails please verify that the security settings are correct The key or passphrase must be exactly the same as on the wireless router ...

Страница 59: ...efore configuring your wireless adapter If you are joining an existing network you will need to know the WPA PSK key being used 2 Highlight the wireless network SSID you would like to connect to and click Connect 1 Open the Windows XP Wireless Utility by right clicking on the wireless computer icon in your system tray lower right corner of screen Select View Available Wireless Networks ...

Страница 60: ...x will appear Enter the WPA PSK passphrase and click Connect It may take 20 30 seconds to connect to the wireless network If the connection fails please verify that the WPA PSK settings are correct The WPA PSK passphrase must be exactly the same as on the wireless router or access point ...

Страница 61: ...ting up certificates 1 Open the Wireless Utility by double clicking on the D Link icon in your system tray lower right corner of screen Click on New to create a new profile or highlight an existing profile and click Modify 2 Select WPA WPA2 XP or WPA WPA2 EAP Vista under Set Security Option and then select TKIP or AES 3 Click on Advanced Config to continue Windows XP Windows Vista ...

Страница 62: ... on the network must use the same EAP type when using a RADIUS server for authentication Some RADIUS servers require that the Validate Server field be selected Check this field if your RADIUS server requires validation 5 Select an User Certificate from the drop down menu 6 Enter the login information required to authenticate 7 Click Add to enter the IP address es of your RADIUS servers 8 Click OK ...

Страница 63: ...a RADIUS server and setting up certificates 1 Open the Wireless Utility by double clicking on the D Link icon in your system tray lower right corner of screen Click on New to create a new profile or highlight an existing profile and click Modify 2 Select 802 1x under Set Security Option 3 Click on Advanced Config to continue Windows XP Windows Vista ...

Страница 64: ...ces on the network must use the same EAP type when using a RADIUS server for authentication Some RADIUS servers require that the Validate Server field be selected Check this field if your RADIUS server requires validation 5 Select an User Certificate from the drop down menu 6 Enter the login information required to authenticate 7 Click Add to enter the IP address es of your RADIUS servers 8 Click ...

Страница 65: ...occur during the installation and operation of the WUA 2340 Read the following descriptions if you are having problems Windows Vista users Open the Start menu right click on Computer and select Manage Click on Device Manager in the left hand side Windows XP 2000 users Go to Start right click My Computer and select Properties Select the Hardware Tab and then click Device Manager ...

Страница 66: ...ooting Click the sign next to Network Adapters Right click on D Link WUA 2340 Cardbus Adapter Select Properties to check that the drivers are installed properly Look under Device Status to check that the device is working properly Click OK to continue ...

Страница 67: ...eway and DNS settings are correctly entered for the network In Infrastructure mode make sure the same Service Set Identifier SSID is specified on the settings for the wireless clients and access points The SSID factory default setting for D Link products is default Double click on the WLAN icon in the taskbar The Link Info screen will display the SSID setting In Ad Hoc mode both wireless clients w...

Страница 68: ...en connecting without an access point Double click on the WLAN icon in the taskbar click on Configuration to change the settings for the wireless adapter If Security is enabled make sure that the correct encryption keys are entered on both the WUA 2340 and the access point Double click on the WLAN icon in the taskbar click Encryption Check to see that the key selected is set to the same key as oth...

Страница 69: ...reless LANs are used increasingly in both home and office environments and public areas such as airports coffee shops and universities Innovative ways to utilize WLAN technology are helping people to work and communicate more efficiently Increased mobility and the absence of cabling and other fixed infrastructure have proven to be beneficial for many users Wireless users can use the same applicati...

Страница 70: ...ata from one point A to point B But wireless technology has restrictions as to how you can access the network You must be within the wireless network range area to be able to connect your computer There are two different types of wireless networks Wireless Local Area Network WLAN and Wireless Personal Area Network WPAN Wireless Local Area Network WLAN In a wireless local area network a device call...

Страница 71: ...ones laptops speakers and other devices that operate on batteries Who uses wireless Wireless technology as become so popular in recent years that almost everyone is using it whether it s for home office business D Link has a wireless solution for it Home Gives everyone at home broadband access Surf the web check email instant message and etc Gets rid of the cables around the house Simple and easy ...

Страница 72: ...sk not knowing where to start That s why we ve put together a few setup steps and tips to help you through the process of setting up a wireless network Tips Here are a few things to keep in mind when you install a wireless network Centralize your router or Access Point Make sure you place the router access point in a centralized location within your network for the best performance Try to place th...

Страница 73: ...wireless clients will connect to an access point or wireless router Ad Hoc Directly connecting to another computer for peer to peer communication using wireless network adapters on each computer such as two or more WUA 2340 wireless network USB adapters An Infrastructure network contains an Access Point or wireless router All the wireless devices or clients will connect to the wireless router or a...

Страница 74: ...nfig and press Enter This will display the IP address subnet mask and the default gateway of your adapter Windows Vista Users Click Start All Programs Accessories Command Prompt You may need administrative access to run this application For all additional prompt windows inquiring of running the command prompt application select Yes OK or Continue At the prompt type ipconfig and press Enter This wi...

Страница 75: ...s network adapter or other adapter which will be connected to your router Highlight Internet Protocol TCP IP and click Properties Click Use the following IP address and enter an IP address that is on the same subnet as your network or LAN IP address on your router Example If the router s LAN IP address is 192 168 0 1 make your IP address 192 168 0 X where X is a number between 2 and 99 Make sure t...

Страница 76: ...l Version 4 TCP IPv4 and click Properties Click Use the following IP address and enter an IP address that is on the same subnet as your network or LAN IP address on your router or network Example If the router s LAN IP address is 192 168 0 1 make your IP address 192 168 0 X where X is a number between 2 and 99 Make sure that the number you choose is not in use on the network Set Default Gateway th...

Страница 77: ...72mA Rx 290mA Modulation Technology Orthogonal Frequency Division Multiplexing OFDM Complementary Code Keying CCK Transmitter Output Power 16dBm 2dB Operating Voltage 5VDC 5 Operating Temperature 32 F to 104 F 0 C to 40 C Humidity 80 maximum non condensing Dimensions 1 1 x 3 4 x 0 5 Weight 0 1 lb Warranty 1 Year Maximum wireless signal rate derived from IEEE Standard 802 11g specifications Actual ...

Страница 78: ...dware Revision located on the label on the adapter e g rev A1 Serial Number s n number located on the label on the adapter You can find software updates and user documentation on the D Link website as well as frequently asked questions and answers to technical issues For customers within Canada Phone Support 800 361 5265 English 24 Hours 7 Days French Lundi Vendredi 9h 21h Internet Support http su...

Страница 79: ... s option to repair or replace the defective Hardware during the Warranty Period at no charge to the original owner or to refund the actual purchase price paid Any repair or replacement will be rendered by D Link at an Authorized D Link Service Office The replacement hardware need not be new or have an identical make model or part D Link may at its option replace the defective Hardware or any part...

Страница 80: ...oftware will be refunded by D Link provided that the non conforming Software and all copies thereof is first returned to D Link The license granted respecting any Software for which a refund is given automatically terminates Non Applicability of Warranty The Limited Warranty provided hereunder for Hardware and Software portions of D Link s products will not be applied to and does not cover any ref...

Страница 81: ...s not visible from the outside of the package The product owner agrees to pay D Link s reasonable handling and return shipping charges for any product that is not packaged and shipped in accordance with the foregoing requirements or that is determined by D Link not to be defective or non conforming RMA phone number 1 877 354 6561 Hours of Operation Monday Friday 10 30AM 7 00PM EST What Is Not Cove...

Страница 82: ...ICH D LINK S PRODUCT IS CONNECTED WITH LOSS OF INFORMATION OR DATA CONTAINED IN STORED ON OR INTEGRATED WITH ANY PRODUCT RETURNED TO D LINK FOR WARRANTY SERVICE RESULTING FROM THE USE OF THE PRODUCT RELATING TO WARRANTY SERVICE OR ARISING OUT OF ANY BREACH OF THIS LIMITED WARRANTY EVEN IF D LINK HAS BEEN ADVISED OF THE POSSIBILITY OF SUCH DAMAGES THE SOLE REMEDY FOR A BREACH OF THE FOREGOING LIMIT...

Страница 83: ...FCC Rules These limits are designed to provide reasonable protection against harmful interference in a residential installation This equipment generates uses and can radiate radio frequency energy and if not installed and used in accordance with the instructions may cause harmful interference to radio communication However there is no guarantee that interference will not occur in a particular inst...

Страница 84: ...84 D Link WUA 2340 User Manual Version 1 1 March 31 2008 Product registration is entirely voluntary and failure to complete or return this form will not diminish your warranty rights Registration ...

Отзывы: