background image

12

D-Link DCS-8515LH User Manual

Section 2: Installation

Step 3:

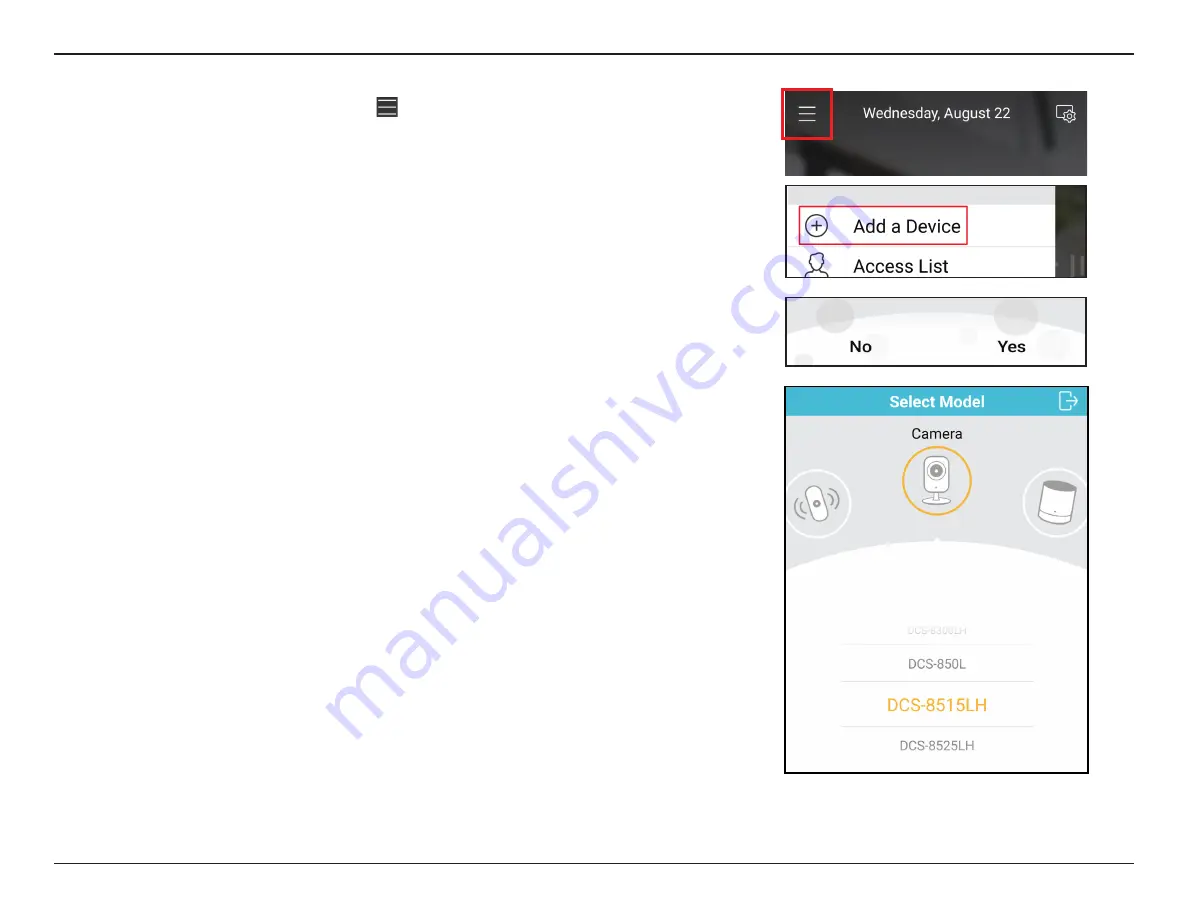
After logging in, tap the Menu icon   in the top-left corner, select 

Add New 

Device

 and follow the on-screen instructions to connect to your camera.   

Bluetooth needs to be enabled on your phone.

Step 4:

When you are asked to scan a QR code, select 

Yes

 or 

No

.

If you selected 

Yes

:

Scan the QR code


on the bottom of the the


camera, then press 

Next

.

If you selected 

No:

Select the 

DCS-8515LH 

camera from the list, then press 

Next

.

Select 

Next

 and continue to follow the onscreen instructions.

Final Step:

Congratulations, your HD Pan & Tilt Wi-Fi Camera is now ready to use! 

Be sure to check the 

www.mydlink.com

 website periodically for the latest 

firmware updates to keep your product secure and up to date with the latest 

features.

Note: 

If you experience issues registering this camera with your mydlink account, or if you 

purchased an open box or resold unit, perform a hard reset by pressing and holding the 

recessed reset button on the camera for 10 seconds while the device is powered on, making 

sure that you see the LEDs turn off.

Содержание MyDlink DCS-8515LH

Страница 1: ...DCS 8515LH User Manual HD Pan Tilt Wi Fi Camera Hardware A1 Manual Version 1 00 2018 10 25...

Страница 2: ...rent information Manual Revisions Revision Date Description 1 0 2018 10 01 Initial release Trademarks D Link and the D Link logo are trademarks or registered trademarks of D Link Corporation or its su...

Страница 3: ...Hardware Overview 3 Front 3 Back View 4 LED Behavior 5 Safety 9 Wireless Installation Considerations 10 Setting up the Camera Through mydlink App 11 Using the mydlinkTM App 13 Controlling Your Device...

Страница 4: ...please contact your reseller Note Using a power supply with a different voltage than the one included with your product will cause damage and void the warranty for this product DCS 8515LH HD Pan Tilt...

Страница 5: ...re captured in 720p high definition 1 megapixel resolution and H 264 compression saves space without sacrificing performance Wireless connectivity means there is no need for additional cabling System...

Страница 6: ...of the surrounding area 3 IR LEDs Infrared LED that encircles the camera lens for low light video recording 4 Microphone Records audio of the surrounding area 5 microSD card slot Where a microSD card...

Страница 7: ...1 Reset Button While the device is powered on use a paperclip to press the recessed reset but ton down for at least 10 seconds This will reset your camera to factory default settings 2 micro USB Powe...

Страница 8: ...erview LED Behavior Green Solid Wireless connected Blinking Ready for setup Blinking Data is being transferred Red Solid Powered on Solid System booting Blinking Not connected to wireless Blinking Fir...

Страница 9: ...f the power cord thread is also at the desired location Use a pencil to mark the holes Step 2 Using a 6 mm drill bit drill two 25 mm deep holes over the pencil marks For a plaster drywall or concrete...

Страница 10: ...7 D Link DCS 8515LH User Manual Section 2 Installation Step 4 Align the bottom of the camera to the threads on the mount Assure that the camera is securely snapped into place 4...

Страница 11: ...ection 2 Installation Installation Connecting The Camera Plug the power adapter into the micro USB port on the bottom of the camera then into an electrical outlet Make sure the power cable is routed t...

Страница 12: ...with liquids or solvents To clean the device disconnect from the power outlet and use a damp towel 4 This device should only be used indoors Plan the location of your cameras 1 Verify that your camer...

Страница 13: ...almost 3 feet 1 meter thick At a 2 degree angle it looks over 42 feet 14 meters thick Position your devices so that the signal will travel straight through a wall or ceiling instead of at an angle fo...

Страница 14: ...1 Download the mydlink app from the App Store iOS or Google Play Android Note Please ensure that your device is connected to the internet Step 2 Launch the mydlink app and create a new account or sig...

Страница 15: ...H camera from the list then press Next Select Next and continue to follow the onscreen instructions Final Step Congratulations your HD Pan Tilt Wi Fi Camera is now ready to use Be sure to check the ww...

Страница 16: ...quick link to your camera directly on the home screen Note Screenshots are representative only The mydlink app is constantly improving and so may appear different Using the mydlinkTM App Controlling...

Страница 17: ...ideo options such as saved pan tilt points microphone and video quality Recording Click on this button to enable recording of the video stream Snapshot Click on this button to take a snapshot from the...

Страница 18: ...3 Device Location Tap to change or add a new location for this device 4 Wi Fi Tap to change the wireless network this device will use to connect to the Internet Note The network must be the same as al...

Страница 19: ...Click to enable disable illumination of the LED on the front of the camera Default is enabled 13 Storage Tap here to change where to store video clips and to change subscription plan 14 Upgrade Time...

Страница 20: ...srecommendedyou enable Auto Upgrade to make sure you have the most up to date security updates 2 Upgrade Time Tap to change the time for automatic firmware updates to be downloaded and installed 3 Upg...

Страница 21: ...s firmware by using the mydlink app Please refer to the camera s settings page 3 What do I need to do before I upgrade from the mydlink Lite app to the mydlink app Please refer to the app s store page...

Страница 22: ...detection windows Video Compression Simultaneous H 264 format compression JPEG for still images Video Resolution Main Profile 720p 1280 x 720 at up to 30 fps Second Profile 360p 480 x 360 at up to 30...

Страница 23: ...C 32 to 104 F Storage 20 to 70 C 4 to 158 F Humidity Operating 20 to 80 non condensing Storage 5 to 95 non condensing Certifications EMC CE class B FCC class B IC class B RCM class B Safety CE LVD RF...

Страница 24: ...on between the equipment and receiver Connect the equipment into an outlet on a circuit different from that to which the receiver is connected Consult the dealer or an experienced radio TV technician...

Страница 25: ...st autoris e aux deux conditions suivantes 1 l appareil ne doit pas produire de brouillage et 2 l utilisateur de l appareil doit accepter tout brouillage radio lectrique subi m me si le brouillage est...

Страница 26: ...cy Band s Frequenzband Fr quence bande s Bandas de Frecuencia Frequenza e Frequentie s Max Output Power EIRP Max Output Power Consommation d nergie max Potencia m xima de Salida Potenza max Output Max...

Страница 27: ...ja toote p sivara on allalaadimiseks saadaval tootelehel www dlink com English Hereby D Link Corporation declares that this product accessories and software are in compliance with directive 2014 53 E...

Страница 28: ...felelnek a 2014 53 EU sz rendeletek rendelkez seinek Az EU Megfelel s gi nyilatkozat teljes sz vege s a term k firmware a term k oldal r l t lthet le a www dlink com c men Polski Polish D Link Corpora...

Страница 29: ...Corporation v yfir a essi vara fylgihlutir og hugb na ur eru samr mi vi tilskipun 2014 53 EB S kja m ESB samr misyfirl singuna heild sinni og fastb na v runnar af vefs u v runnar www dlink com Norsk...

Страница 30: ...your product uses 2 4 GHz and or 5 GHz wireless HINWEIS ZUR VERWENDUNG VON DRAHTLOS NETZWERK WLAN IN DER EUROP ISCHEN GEMEINSCHAFT NUR F R EIN DRAHTLOSES PRODUKT Der Betrieb dieses Ger ts in der Euro...

Страница 31: ...in de l UE Merci de vous r f rer au guide d utilisation ou de la fiche technique afin de v rifier si votre produit utilise 2 4 GHz et ou 5 GHz sans fil AVISO DE USO DE LA LAN DE RADIO INAL MBRICA EN L...

Страница 32: ...este per operare a 5 Ghz nell Unione europea Ti invitiamo a fare riferimento al manuale del prodotto o alla scheda tecnica per verificare se il tuo prodotto utilizza le frequenze 2 4 GHz e o 5 GHz KEN...

Страница 33: ...emeinen Sicherheitsvorschriften dienen als Hilfe zur Gew hrleistung Ihrer eigenen Sicherheit und zum Schutz Ihres Produkts Weitere Details finden Sie in den Benutzeranleitungen zum Produkt Statische E...

Страница 34: ...branchez toujours le produit de l alimentation avant de le nettoyer et utilisez uniquement un chiffon sec non pelucheux INSTRUCCIONES DE SEGURIDAD Las siguientes directrices de seguridad general se fa...

Страница 35: ...ollegare sempre il prodotto dalla presa elettrica prima di pulirlo e usare solo un panno asciutto che non lasci filacce VEILIGHEIDSINFORMATIE De volgende algemene veiligheidsinformatie werd verstrekt...

Страница 36: ...H DE Dieses Symbol auf dem Produkt oder der Verpackung weist darauf hin dass dieses Produkt gem bestehender rtlicher Gesetze undVorschriftennicht berdennormalenHausm llentsorgtwerdensollte sonderneine...

Страница 37: ...savoir plus sur les produits et emballages respectueux de l environnement veuillez consulter le www dlinkgreen com ESPA OL ES Este s mbolo en el producto o el embalaje significa que de acuerdo con la...

Страница 38: ...are energia e a ridurre le emissioni di anidride carbonica Per ulteriori informazioni sui prodotti e sugli imballaggi D Link a ridotto impatto ambientale visitate il sito all indirizzo www dlinkgreen...

Страница 39: ...oksyczno ci zar wno w przypadku samych produkt w jak i opakowa Firma D Link zaleca aby Pa stwo zawsze prawid owo wy czali z u ytku swoje produkty D Link gdy nie s one wykorzystywane Post puj c w ten s...

Страница 40: ...rgia megtakar t s ban s a sz ndioxid kibocs t s nak cs kkent s ben K rnyezetbar t term keinkr l s csomagol sainkr l tov bbi inform ci kat a www dlinkgreen com weboldalon tudhat meg NORSK NO Dette symb...

Страница 41: ...gi og reducere CO2 udledningerne Du kan finde flere oplysninger om vores milj m ssigt ansvarlige produkter og emballage p www dlinkgreen com SUOMI FI T m symboli tuotteen pakkauksessa tarkoittaa ett p...

Страница 42: ...ldioxid F r mer information om v ra milj ansvariga produkter och f rpackningar www dlinkgreen com PORTUGU S PT Este s mbolo no produto ou embalagem significa que de acordo com as leis e regulamenta es...

Отзывы: