background image

8

Cascade Chaining

The KVM switch supports cascades of up to 3 levels. Control up to 64/256/4096 

PCs from a single console. Cascaded units do not require any special configuration 

Once  connected,  the  KVM  Switches  will  automatically  configure  themselves 

appropriately as the Master or Slave.

To install a cascade chain, please follow the instruction below.

A. Power off any attached computers/devices before installing the KVM Switch.

B.  Use the 4-in-1 KVM combo cable (See Figure 5) to connect one or more Slave 

KVM Switches to any PC port on the Master KVM Switch. The KVM to KVM must 

be connected through a PS/2 connection. (Please refer to Figure 6 & Figure 7).


C. Plug in the power adapter for the first level Master KVM Switch and connect 

the Master KVM switch to computers.

D. Plug in the power adapter for each level Slave KVM Switch and connect the 

Slave KVM switch to computers. 

E.  The power on sequence should be:

1.  Master KVM Switch.

2.  Second  level  Slave  KVM  Switch  (connected  to  Master  KVM  Switch)  if 

needed.

3.  Third level Slave KVM Switch (connected to second level Slave KVM Switch) 

if needed.

4.  All computers connected to Master/Slave KVM Switch.

Initial Plug-in Process:

Please plug in the Master KVM Switch first before turning on any other devices 

like monitor or computers.

Hot plugging and hot swapping:

The KVM switch supports hot plugging and hot swapping.

Содержание KVM-440

Страница 1: ......

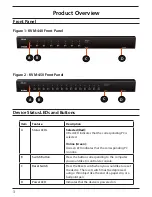
Страница 2: ...the following package contents are present and undamaged 1 8 Port or 16 Port PS2 USB Combo KVM Switch 4 4 in 1 PS2 USB Combo KVM cable 1 Rack Mount Bracket Kit Set 1 Power Adapter 1 CD ROM with Manua...

Страница 3: ...button corresponding to the computer you would like to control via console C Reset Switch Press the Reset switch when you would like to reset the device The reset switch must be depressed using a thin...

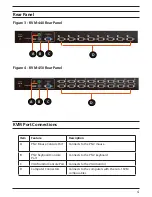
Страница 4: ...e B PS 2 Keyboard Console Port Connects to the PS 2 keyboard C VGA Monitor Console Port Connects to the VGA monitor D Computer Connectors Connects to the computers with the 4 in 1 KVM combo cables A B...

Страница 5: ...rk properly Some older computers may require you to enable USB in BIOS to make the USB interface work Console Connection Plug the keyboard mouse and monitor into the console ports on the rear panel of...

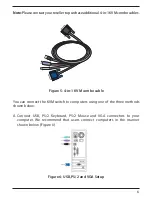
Страница 6: ...A Connect USB PS 2 Keyboard PS 2 Mouse and VGA connectors to your computer We recommend that users connect computers in the manner shown below Figure 6 Figure 6 USB PS 2 and VGA Setup Note Pleasecont...

Страница 7: ...Connect only PS 2 Keyboard PS 2 Mouse and VGA connectors to your computer Figure 7 Figure 7 PS 2 and VGA Setup C Connect only USB and VGA connectors to your computer Figure 8 Figure 8 USB and VGA Set...

Страница 8: ...connected through a PS 2 connection Please refer to Figure 6 Figure 7 C Plug in the power adapter for the first level Master KVM Switch and connect the Master KVM switch to computers D Plug in the pow...

Страница 9: ...n Please refer to the Hotkey Operation section in the User Manual 3 OSD Operation Please refer to the OSD Operation Section in the User Manual Figure 9 shows you how to attach the mounting brackets to...

Страница 10: ...10 Notes...

Страница 11: ...11 Notes...

Страница 12: ...World Wide Web http support dlink ca Version 1 0 July 6 2011 Copyright 2011 D Link Corporation D Link Systems Inc All rights reserved D Link and the D Link logo are registered trademarks of D Link Cor...

Отзывы: