background image

Connecting The DI-707P Broadband
Router To Your Network

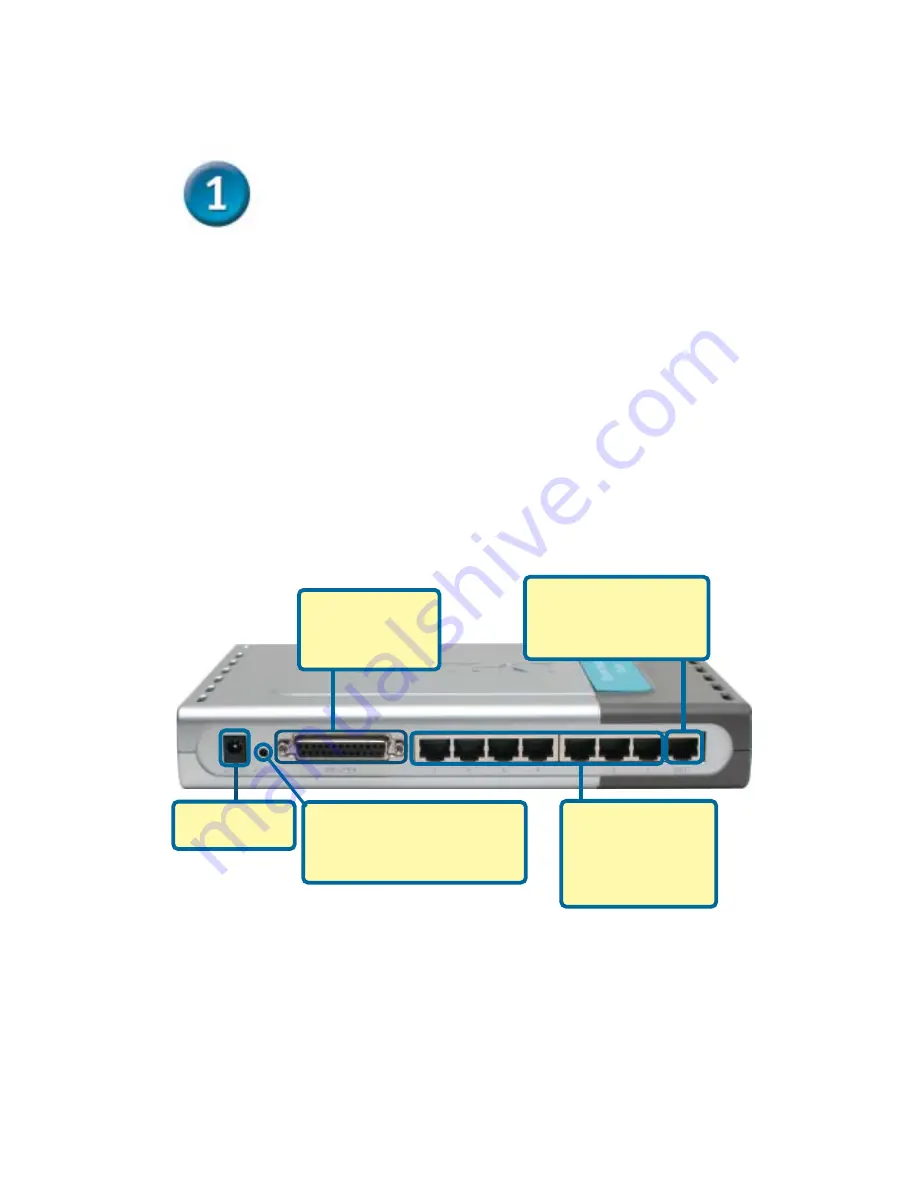
A.

First, connect the power adapter to the 

receptor

 at the back panel of

the DI-707P and then plug the other end of the power adapter to a wall
outlet or power strip. The Power LED will turn 

ON

 to indicate proper

operation.

B.

Insert one end of an Ethernet cable to the 

WAN port

 on the back panel

of the 

DI-707P and the other end to the Ethernet port located on your

Cable or DSL modem. The WAN LED light will illuminate to indicate
proper connection.

C.

Insert an Ethernet cable to 

LAN port 1

 on the back panel of the 

DI-

707P and an available Ethernet port on the network adapter in the
computer you will use to configure the DI-707P. The LED light for LAN
Port 1 will illuminate to indicate proper connection. (Note: The LAN
Ports on the DI-707P are Auto-MDI/MDIX.  Meaning you can use a
straight-through or crossover-cable to the LAN Ports.

D.

The parallel port on the DI-707P is used to connect printers only.
Connect one end of the printer cable to your printer and the other end
to the DI-707P.


A. 

Receptor for

Power Adapter

.

B. 

WAN Port

This is for the connection

of an Ethernet cable to

the Cable or DSL modem

C. 

LAN Ports

  These

are the connections

for Ethernet cables

to Ethernet enabled

computers.

D.  

Printer Port

You can connect a

Printer to the

Parallel Port here.

Reset Button


Pressing this button restores

the Router to its original factory

default settings.

Содержание Express Ethernetwork DI-707P

Страница 1: ...established Internet account from an Internet Service Provider ISP 2 It s best to use the same computer that is connected to your modem for configuring the DI 707P Broadband Router The DI 707P acts as...

Страница 2: ...port on the network adapter in the computer you will use to configure the DI 707P The LED light for LAN Port 1 will illuminate to indicate proper connection Note The LAN Ports on the DI 707P are Auto...

Страница 3: ...connection on the WAN port This LED blinks during data transmission LOCAL NETWORK LEDs a solid light on the port indicates a connection to an Ethernet enabled computer on ports 1 7 This LED blinks dur...

Страница 4: ...ted network should look similar to this Using The Setup Wizard The logon pop up screen will appear Open your Web browser and type http 192 168 0 1 into the URL address box Then press the Enter or Retu...

Страница 5: ...izard continued Once you have logged in the Home screen will appear You will see the following screens Set up your new password You have the option to establish a password Click Run Wizard Click Next...

Страница 6: ...Pond Cable in Australia If you selected Dynamic IP Address this screen will appear Used mainly for Cable Internet service What is a MAC address Each network adapter has a discrete Media Access Control...

Страница 7: ...d this option is selected then this screen will appear Used mainly for DSL Internet service Enter the IP address informa tion originally provided to you by your ISP You will need to complete all the r...

Страница 8: ...additional settings or information refer to the Advanced Tools or Status tabs on the web management interface or to the Manual located on the CD Then relaunch your Web browser i e Internet Explorer o...

Страница 9: ...be shown automatically If it is not please run autorun exe on the CD ROM Installing the Print Server Software Wait until the following Welcome dialog appears Select the destination folder Click Next...

Страница 10: ...he printer connected to the printer port of the DI 707P a printer server On a Windows 95 98 platform open the Printers window in the My Computer menu Click OK Now you can configure the print server of...

Страница 11: ...ws 2000 XP Platforms The configuration procedure for a Windows 2000 XP platform is similar to that of Windows 95 98 except the screen of printer Properties Note Screen shots are taken in Windows 2000...

Страница 12: ...matically for the DI 707P Broadband Router For Microsoft Windows XP Go to Start right click on My Network Places select Properties Double click on the Network Connection associated with the Ethernet a...

Страница 13: ...ct System Preferences Click on Network Select Built in Ethernet in the Show pull down menu Select Using DHCP in the Configure pull down menu Click on Apply Now The IP address information the Subnet Ma...

Страница 14: ...rt for customers within the United States for the duration of the warranty period on this product U S customers can contact D Link technical support through our web site or by phone D Link Technical S...

Отзывы: