background image


4

The web configuration can also be accessed through the 

SmartConsole Utility

. Open the 

SmartConsole Utility


and double-click the switch as it appears in the Device 
List. This will automatically load the web configuration in 
your web browser. 


NOTE:

 The switch's factory 

default IP address is 10.90.90.90 
with a subnet mask of 255.0.0.0 
and a default gateway of 0.0.0.0 


Step 3 

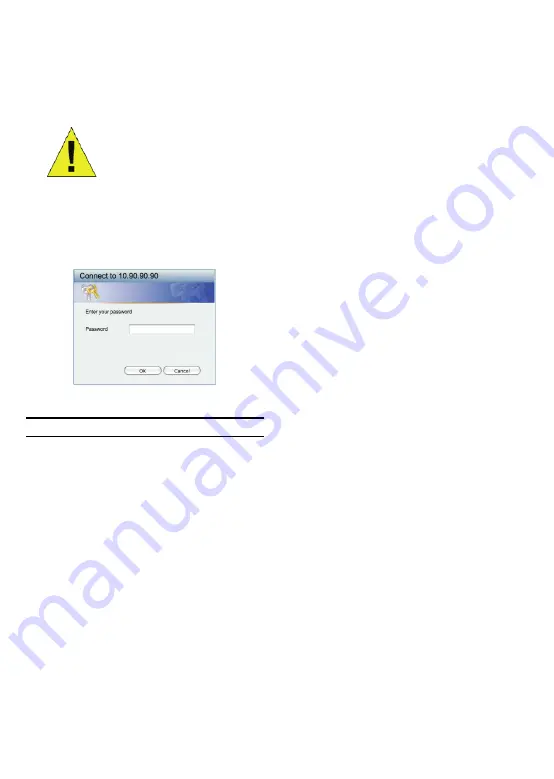
When the following logon box appears, enter “

admin

” for 

the password. Press

 OK 

to enter the main configuration 

window. 


Figure 8. User authentication  window 

SmartConsole Utility 

The SmartConsole Utility included on the installation CD 
is a program for discovering EasySmart Switches with 
the same L2 network segment connected to your PC. 
This tool is only for computers running Windows 2000, 
Windows XP, and Windows Vista x64/86 operating 
systems. There are two options for the installation of 
SmartConsole Utility, one is through the autorun program 
on the installation CD and the other is manual installation. 

Note: Please be sure to remove any existing SmartConsole 
Utility from your PC before installing the latest SmartConsole 
Utility. 


Option 1: Follow these steps to install the SmartConsole 
Utility via the autorun program on the installation CD. 

1.  Insert the Utility CD into your CD-Rom Drive. 
2.  The autorun program will pop up automatically 
3.  Simply click on the ”

Install SmartConsole Utility

” 

button and an installation wizard will guide you 
through the process.  

4.  After successfully installing the SmartConsole Utility, 

you can open the utility by clicking 

Start 

>

 Programs 

>

 D-Link SmartConsole Utility

5.  Just connect the EasySmart Switch to the same L2 

network segment of your PC and use the 

SmartConsole 

Utility

 to discover the EasySmart Switches. 


Option 2: Follow these steps to install the SmartConsole 
Utility manually. 

1. 

Insert the Utility CD into your CD-Rom Drive. 

2. From 

the 

Start


menu on the Windows desktop, 

choose 

Run

3. In 

the 

Run

 dialog box, type D:\D-Link SmartConsole 

Utility\setup.exe (where D:\ represents the drive 
letter of your CD-Rom) and click 

OK

4. 

Follow the on-screen instructions to install the utility. 

5. 

Upon completion, go to


Start 

>

 Programs 

>

 D-Link 

SmartConsole Utility

 and open the SmartConsole 

Utility. 

6.  Just connect the EasySmart Switch to the same   

L2 network segment of your PC and use the 

SmartConsole Utility

 to discover the EasySmart 

Switches. 

 
For a detailed look at SmartConsole’s functions, please 
refer to the SmartConsole Utility introduction in the user 
manual. 


Содержание EasySmart DGS-1100-16/E

Страница 1: ...Getting Started Guide Erste Schritte Guide de démarrage Guida introduttiva Guía de introducción Краткое руководство пользователя 快速安裝指南 Guia inicial Petunjuk Pemasangan 本製品のご利用にあたって ...

Страница 2: ...installing the switch on a desktop or shelf the rubber feet included with the device must be attached on the bottom at each corner of the device s base Allow enough ventilation space between the device and the objects around it Figure 1 Attaching the rubber feet Rack Installation The switch can be mounted in an EIA standard size 11 inch rack which can be placed in a wiring closet with other equipm...

Страница 3: ...is easy to start the initial setting of multiple EasySmart Switches Please refer to the following detailed installation instructions for the Web Based Management and SmartConsole Utility Web based Management Interface After a successful physical installation you can configure the switch monitor the LED panel and display statistics graphically using a web browser such as Netscape Navigator version ...

Страница 4: ...steps to install the SmartConsole Utility via the autorun program on the installation CD 1 Insert the Utility CD into your CD Rom Drive 2 The autorun program will pop up automatically 3 Simply click on the Install SmartConsole Utility button and an installation wizard will guide you through the process 4 After successfully installing the SmartConsole Utility you can open the utility by clicking St...

Страница 5: ...5 ...

Страница 6: ... auf den festen Sitz der Steckverbindungen Sorgen Sie für eine funktionierende Wärmeableitung und eine ausreichende Belüftung in der Umgebung des Switch Stellen Sie keine schweren Gegenstände auf den Switch Tisch oder Regalmontage Wenn Sie den Switch auf einem Tisch oder in einem Regal aufstellen möchten bringen Sie vorher die mitgelieferten Gummifüße in den vier Ecken an der Unterseite des Gehäus...

Страница 7: ...dung möglich Soll lediglich ein D Link EasySmart Switch verwaltet werden ist das webbasierte Management die bessere Option Jedem Switch muss eine eigene IP Adresse zugewiesen werden die zur Kommunikation mit dem webbasierten Management verwendet wird und der PC sollte eine IP Adresse im gleichen Adressenbereich wie der Switch haben Sollen jedoch mehrere D Link EasySmart Switches verwaltet werden i...

Страница 8: ...r bereits eine Version von SmartConsole installiert ist müssen Sie diese deinstallieren bevor Sie die neueste Version von SmartConsole installieren können 1 Option Führen Sie die folgenden Schritte durch um SmartConsole über das auf der Installations CD vorhandene Installationsprogramm zu installieren 1 Legen Sie die CD in das CD ROM Laufwerk ein 2 Das Installationsprogramm wird automatisch geöffn...

Страница 9: ...9 ...

Страница 10: ... qu il est parfaitement relié au connecteur d alimentation secteur Vérifiez que le switch présente une dissipation de chaleur adaptée et qu il est entouré d un espace suffisant pour garantir une bonne ventilation Ne posez pas d objets lourds sur le switch Installation sur un bureau ou sur une étagère Pour installer le switch sur un bureau ou une étagère vous devez ajouter les pieds en caoutchouc f...

Страница 11: ...via un PC utilisant l utilitaire SmartConsole Si vous ne voulez gérez qu un seul commutateur EasySmart de D Link l option Web est préférable Chaque commutateur doit posséder sa propre adresse IP pour communiquer avec le Web l adresse IP du PC doit se trouver sur la même plage que celle du commutateur Cependant si vous voulez gérez plusieurs commutateurs EasySmart de D Link l utilitaire SmartConsol...

Страница 12: ...stallation automatique présent sur le CD ou manuellement Remarque avant d installer la dernière version de l utilitaire SmartConsole veillez à supprimer toute installation précédente Option 1 la procédure suivante vous permet d installer l utilitaire SmartConsole via le programme d installation automatique du CD 1 Insérez le CD de l utilitaire dans le lecteur de CD ROM 2 Le programme d installatio...

Страница 13: ...13 ...

Страница 14: ...e de alimentación para comprobar que está correctamente conectado al conector de alimentación AC Se asegure de que alrededor del switch el calor se disipa correctamente y se ventila adecuadamente No sitúa objetos pesados sobre el switch Instalación de sobremesa o en estante Para instalar el switch sobre una mesa o en un estante debe fijar los pies de goma que se incluyen con el dispositivo en la b...

Страница 15: ...web o de cualquier PC que use la utilidad SmartConsole Si sólo desea gestionar un conmutador EasySmart D Link la gestión basada en la web es la mejor opción Se debe asignar a cada conmutador su propia dirección IP que se utiliza para la comunicación con la gestión basada en la web y el PC debe tener una dirección IP que esté en el mismo rango que el conmutador Sin embargo si desea gestionar varios...

Страница 16: ... de dos opciones a través del programa autorun del CD de instalación o bien del manual de instalación Nota Asegúrese de que ha eliminado cualquier utilidad SmartConsole que pudiera haber en su PC antes de instalar la última versión de la utilidad SmartConsole Opción 1 Siga estos pasos para instalar la utilidad SmartConsole a través del programa autorun del CD de instalación 1 Introduzca el CD de l...

Страница 17: ...17 ...

Страница 18: ... Verificare che attorno allo switch ci sia lo spazio sufficiente per un adeguata ventilazione e dissipazione del calore Non posizionare oggetti pesanti sopra lo switch Installazione su un ripiano o una scrivania Per installare lo switch su un ripiano o una scrivania fissare i piedini in gomma forniti con il dispositivo ai quattro angoli del pannello inferiore Per consentire una corretta ventilazio...

Страница 19: ...e SmartConsole Utility Se si desidera gestire un solo dispositivo D Link EasySmart Switch è preferibile utilizzare la funzione Gestione basata sul Web È necessario assegnare a ogni switch un indirizzo IP che verrà utilizzato per comunicare con Gestione basata sul Web È inoltre necessario che al PC sia assegnato un indirizzo IP compreso nello stesso intervallo di quello dello switch Se tuttavia si ...

Страница 20: ...ows Vista x64 86 Per l installazione della SmartConsole Utility sono disponibili due opzioni installazione mediante programma autorun sul CD di installazione o installazione manuale Nota Rimuovere tutte le SmartConsole Utility presenti sul PC prima di installare l ultima versione del programma Opzione 1 per installare la SmartConsole Utility utilizzando il programma autorun presente sul CD di inst...

Страница 21: ...21 ...

Страница 22: ...чения к разъему питания переменного тока Убедитесь что вокруг коммутатора достаточно пространства для вентиляции Не размещайте тяжелые или нагревающиеся объекты на коммутаторе Установка на стол или поверхность При установке коммутатора на стол или какую нибудь поверхность необходимо прикрепить к нему поставляемые вместе с ним резиновые ножки Самоклеющиеся ножки крепятся на дне устройства по его уг...

Страница 23: ...р с помощью утилиты SmartConsole Если пользователю требуется управление только одним коммутатором D Link серии EasySmart следует выбрать управление на основе web интерфейса Каждому коммутатору должен быть назначен собственный IP адрес который используется для доступа к web интерфейсу управления компьютер должен обладать IP адресом в той же сети что и коммутатор Тем не менее для управления нескольк...

Страница 24: ...пакт диске и другой установка вручную Примечание Перед установкой последней версии SmartConsole пожалуйста убедитесь в том что любая старая версия утилиты SmartConsole удалена из компьютера Вариант 1 Следуйте за этими шагами по установке утилиты SmartConsole через программу автозагрузки на установочном компакт диске 1 Поместите компакт диск с утилитой в привод CD ROM 2 Программа автозагрузки откро...

Страница 25: ...25 ...

Страница 26: ...連接插頭是安 全的 請確認交換器周圍為適當的通風散熱環境 不要放重物在交換器上 桌上型或架上行安裝 當安裝交換器在桌上或架子上 產品包裝內的橡膠腳墊請 安裝至交換器底部的四個角落 讓交換器與桌面有適當的 通風空間 圖 1 安裝橡膠腳墊 機架安裝 交換器可以安裝在 EIA 標準尺寸的 11 吋機架 安裝時 請將利用螺絲將機架固定架固定鎖緊在交換器的側面 兩 邊均要安裝 圖 2 固定機架固定架 然後 使用包裝內所提供的螺絲 將交換器鎖到機架上 面 圖 3 安裝交換器到標準尺寸的機架 將交換器安裝於牆上 壁掛 若您需要將 DGS 1100 交換器安裝於牆上 在交換器的底 部具備 2 個璧掛插槽 可滿足您的需求 安裝前請確認安 裝交換器的位置與牆面有保留足夠的空間 讓您能確認前 方面板 LED 指示燈的燈號及狀態 請參考下列圖示及說 明 A 璧掛於水泥牆上 1 在水泥牆壁鑽孔後 將塑膠壁虎安裝於鑽...

Страница 27: ...ity 您不需更換您電腦的 IP 位址 即可輕鬆開始進行 多部智慧型交換器的初始設定 請參考接下來 Web Based Management 與 SmartConsole Utility 的詳細安裝 說明 Web based 管理介面 設備成功安裝後 您可以設定交換器 監控LED面板顯示 與使用Netscape Navigator 6 2或以後版本 或Microsoft Internet Explorer 5 0或以後版本 進行圖形化統計資料 顯示 開始 Web 設定您的交換器時 您需要以下的設備 電腦具備提供 RJ 45 介面乙太網路卡 標準乙太網路線 步驟 1 使用標準網路線連接電腦網路卡與交換器前方任何網路 埠 圖 6 連接乙太網路線 步驟 2 電腦必須取得與交換器相同網段的 IP 位址 始可透過乙太 網路線連結登入與設定交換器 舉例來說 假如交換器的 IP 位址為 10 90 90...

Страница 28: ...光碟機中 2 自動執行程式將會彈出自動執行 3 點選 Install SmartConsole Utility 按鍵 安裝精靈 將會引導您設定過程 4 成功安裝 SmartConsole Utility 後 您可以透過點選開 始 程式集 D Link SmartConsole Utility 開啟 Utility 5 您的電腦僅需要與智慧型交換器放在相同的 L2 網段 中 就可以透過 SmartConsole Utility 尋找到交換 器 方式 2 透過手動安裝 SmartConsole Utility 請依據下 面幾個步驟安裝 1 將 Utility 光碟片放入您電腦的光碟機中 2 在 Windows 中點選開始 選擇執行 3 在執行對話框中 輸入 D D Link SmartConsole Utility setup exe D 表示您的光碟機位址 接著 點選 OK 4 接著可以隨著...

Страница 29: ...29 ...

Страница 30: ...e alimentação para se certificar se de que o mesmo esteja totalmente preso ao conector de alimentação CA Certifique que há dissipação de calor e ventilação adequadas em torno do switch Não coloque objetos pesados sob o switch Instalação em Mesa de Trabalho ou Prateleira Ao instalar o switch sobre uma mesa de trabalho ou prateleira os pés de borracha incluídos com o dispositivo devem ser fixados em...

Страница 31: ...gador web ou através de qualquer computador usando o utilitário SmartConsole Se você deseja gerenciar apenas um D Link Switch EasySmart o gerenciamento baseado na Web é a melhor opção Cada mudança deve ser atribuída ao seu próprio endereço IP que é usado para comunicação com os Web Based Management e o PC deve ter um endereço IP no mesmo intervalo que o Switch No entanto se você deseja gerenciar m...

Страница 32: ...meio do programa de execução automática autorun no CD de instalação e a outra é a instalação manual Observação Favor certificar se de remover qualquer SmartConsole Utility do seu PC antes de instalar a última versão do SmartConsole Utility Opção 1 Siga essas etapas para instalar o SmartConsole Utility via o programa de execução automática no CD de instalação 1 Insira o CD do Utiltário na sua Unida...

Страница 33: ...33 ...

Страница 34: ...naruh benda yang berat diatas switch Pemasangan di atas meja atau papan Ketika memasang switch di atas meja atau papan kaki karet yang termasuk dalam paket penjualan harus dipasang di switch pada setiap sudut bawah switch Berikan ruang yang cukup sebagai ventilasi disekitar switch Gambar 1 Memasang kaki karet Pemasangan pada Rak Switch dapat dipasang pada rak dengan ukuran standar EIA 11 inci dima...

Страница 35: ...n SmartConsole Utility anda tidak perlu mengganti alamat IP dari komputer anda dan sangat mudah untuk memulai pengaturan awal untuk beberapa EasySmart Switches Silahkan mengacu pada petunjuk pemasangan lebih detail berikut untuk Pengaturan berbasiskan Web dan SmartConsole Utility Antar Muka Pengaturan Berbasiskan Web Setelah pemasangan secara fisik selesai dilakukan anda dapat mengatur switch me m...

Страница 36: ...tility yang baru Pilihan 1 Ikuti langkah langkah berikut untuk memasang SmartConsole Utility menggunakan program autorun yang ada pada CD instalasi 1 Masukkan CD Instalasi pada CD ROM Drive anda 2 Program autorun akan muncul secara otomatis 3 Klik tombol Install SmartConsole Utility dan Wizard Pemasangan akan menuntun anda 4 Setelah proses pemasangan selesai anda dapat menjalan program dengan meng...

Страница 37: ...37 ...

Страница 38: ...品の上に重たいものを置かないでください 平置きおよび棚などへの設置 平置きおよび棚などに設置する場合は 付属のゴム足を本体底面 の四隅に取り付けます 周囲には通気のために十分なスペースを 確保し設置してください 図1 ゴム足を取り付ける ラックに設置するとき 本製品は EIA 規格の 11 インチラックに取り付けることができ サーバルームなどに設置する場合に便利です はじめに ラ ックマウントキットを付属のネジで本製品の両側面に取り付 けます 図2 ラックマウントキットを取り付ける 次に 付属のネジを使用して スイッチをラックに固定します 図3 スイッチをラックに取り付ける スイッチを壁に設置する場合 コンパクトサイズに設計された DGS 1100 シリーズ製品は壁に設置 することが可能です スイッチの下部に位置する 2 つの取り付け用 スロットは スイッチを壁に設置する目的に用意されてい...

Страница 39: ...e Utility を使用するにあたり PC の IP アドレス を変更することなく 複数の EasySmart Switch の初期設定を 開 始 す る こ と が 可 能 で す WEB ベ ー ス 管 理 及 び SmartConsole Utility のインストールに関しては 次の詳細を 参照ください Web ベース管理インターフェイス Webブラウザを使って スイッチの設定 ステータスLEDのモ ニタリング 統計情報のグラフ表示などができます 使用可 能なブラウザは Netscape Navigator バージョン6 2以降 や Microsoft Internet Explorer バージョン5 0以降 などです ウェブブラウザを使ったスイッチの設定には 以下のものが 必要です イーサネットポート RJ 45 を持つコンピュータ 標準的なイーサネットケーブル ステップ1 イ...

Страница 40: ...を利用したインストール 1 インストール CD をコンピュータの CD ROM ドライブにセ ットする 2 オートランが自動的にスタートします 3 Install SmartConsole Utility ボ タ ン を ク リ ッ ク す る インストールウィザードの指示に従ってインストールしてく ださい 4 インストールが完了したら スタート メニューの すべて のプログラム から D Link SmartConsole Utility をクリ ックし SmartConsole ユーティリティを起動します 5 スマートスイッチを設定用コンピュータと同じレイヤ2ネッ トワークセグメントに接続し SmartConsole ユーティリテ ィを使ってスマートスイッチを検出してください 2 手動インストール 1 インストール CD をコンピュータの CD ROM ドライブに セットする 2 Wi...

Отзывы: