background image

4 Configuration


D-Link 10 Gigabit Ethernet Switch User Manual


1

1

6

6


Configuration 

The features and functions of the Switch can be configured for optimum use through the Web-based 
Management Utility. 


Smart Wizard Configuration 

After a successful login, the Smart Wizard will guide you through essential settings of the Switch. If you do 
not plan to change anything, click 

Exit

 to leave the Wizard and enter the Web Interface. You can also skip it 

by clicking 

Ignore the wizard next time

 for the next time you logon to the Web-based Management. 


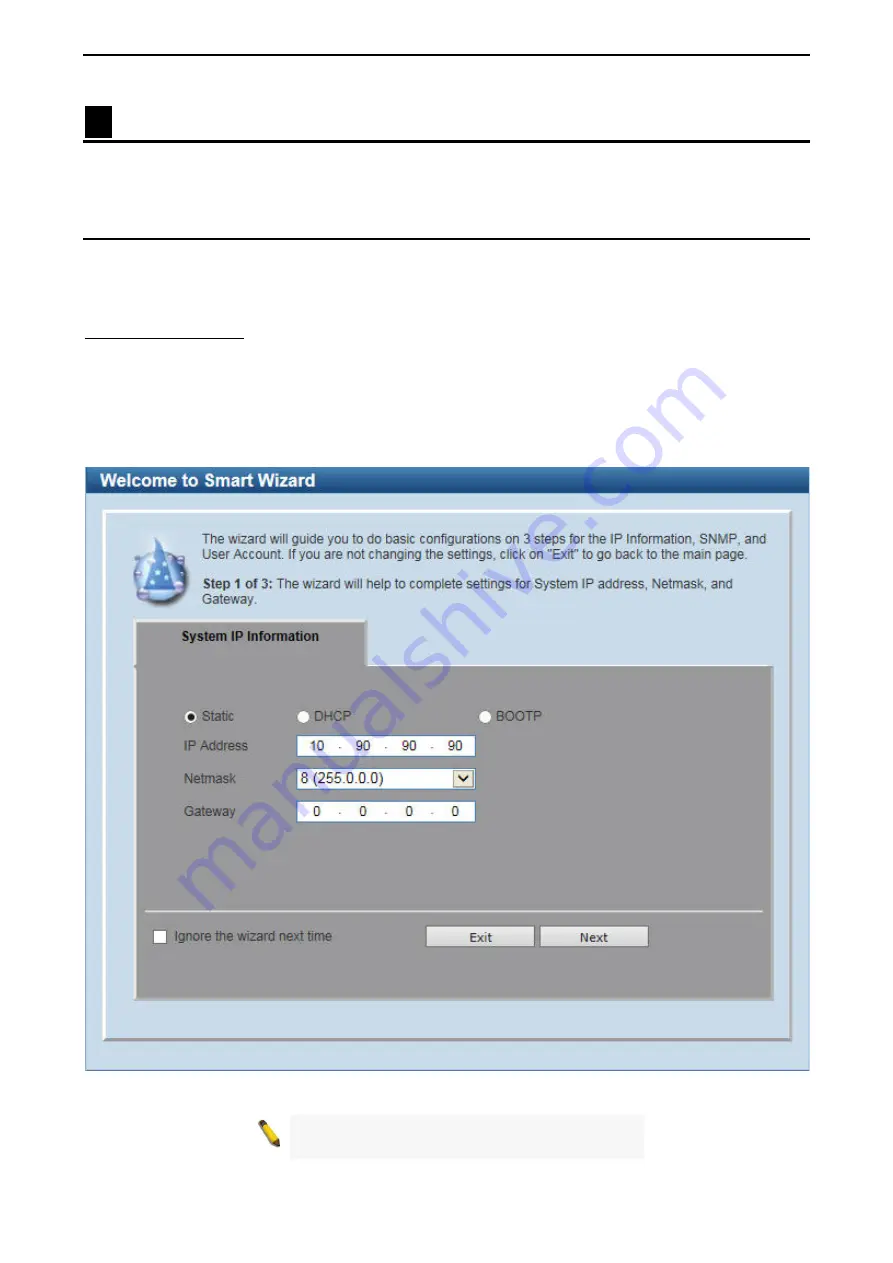
System IP Information 

IP Information 

will guide you to do basic configurations in 3 steps for the IP Information, access password, and SNMP. 

Select 

Static

DHCP

 or 

BOOTP

, and enter the desired new

 IP Address

, select the 

Netmask

 and enter the 

Gateway

 address, then click the 

Next

 button to enter the next User Accounts Settings window. (No need to 

enter IP Address, Netmask and Gateway if  DHCP and BOOTP are selected.) The Smart Wizard is for the 
quick setting in IPv4 environment. 

If you are not changing the settings, click the 

Exit

 button to go to the main page of 

Web-based Management.  You can  also  tick 

Ignore the wizard next time

  check box to skip wizard setting when the 

Switch boots up


Figure 4.1 – System IP Information in Smart Wizard 


NOTE: 

The Smart Wizard supports quick settings 

for IPv4 network. 

Содержание DXS-1100 series

Страница 1: ......

Страница 2: ...o cause harmful interference in which case the user will be required to correct the interference at his expense Warning Changes or modifications to this unit not expressly approved by the party responsible for compliance could void the user authority to operate the equipment CE Mark Warning This is a Class A product In a domestic environment this product may cause radio interference in which case ...

Страница 3: ...optiques et les embouts de câbles à fibres optiques tant qu ils sont sous tension SFP Mini GBIC XENPAK and XFP Regulatory Compliance Networks pluggable optical modules meet the following regulatory requirements Class 1 IEC EN60825 1 2007 2nd Edition or later European Standard FCC 21 CFR Chapter 1 Subchapter J in accordance with FDA and CDRH requirements Application of CE Mark in accordance with 20...

Страница 4: ... Unpacking 8 Step 2 Switch Installation 8 Desktop or Shelf Installation 8 Rack Installation 8 Step 3 Plugging in the AC Power Cord with Power Cord Retainer 10 Power Failure 12 3 Getting Started 13 Management Options 13 Using Web based Management 13 Supported Web Browsers 13 Connecting to the Switch 13 Login Web based Management 13 Smart Wizard 14 Web based Management 14 D Link Network Assistant DN...

Страница 5: ...NMP Linkchange Trap Settings 40 Management SNMP SNMP View Table Settings 41 Management SNMP SNMP Community Table Settings 42 Management SNMP SNMP Group Table Settings 42 Management SNMP SNMP Engine ID Local Settings 43 Management SNMP SNMP User Table Settings 44 Management SNMP SNMP Host Table Settings 44 Management RMON RMON Global Settings 45 Management RMON RMON Statistics Settings 46 Managemen...

Страница 6: ...ol MLD Snooping MLD Snooping Statistics Settings 74 L2 Features L2 Multicast Control Multicast Filtering 75 L2 Features LLDP LLDP Global Settings 76 L2 Features LLDP LLDP Port Settings 76 L2 Features LLDP LLDP Management Address List 77 L2 Features LLDP LLDP Basic TLVs Settings 78 L2 Features LLDP LLDP Dot1 TLVs Settings 78 L2 Features LLDP LLDP Dot3 TLVs Settings 79 L2 Features LLDP LLDP MED Port...

Страница 7: ... Port Counters 104 Monitoring Statistics Counters 106 Monitoring Mirror Settings 107 Monitoring Device Environment 108 Green Power Saving 108 Green EEE 110 Appendix A Technical Specifications 112 Hardware Specifications 112 Key Components Performance 112 Port Functions 112 Physical Environment 112 Emission EMI Certifications 112 Safety Certifications 112 Features 112 L2 Features 112 L3 Features 11...

Страница 8: ...Ethernet switches A NOTE indicates important information that helps a better use of the device A NOTICE indicates either potential damage to hardware or loss of data and tells how to avoid the problem A CAUTION indicates potential property damage or personal injury Safety Instructions Use the following safety guidelines to ensure your own personal safety and to help protect your system from potent...

Страница 9: ...ltage and current marked on the product s electrical ratings label The voltage and current rating of the cable should be greater than the ratings marked on the product To help prevent electric shock plug the system and peripheral power cables into properly grounded electrical outlets These cables are equipped with three prong plugs to help ensure proper grounding Do not use adapter plugs or remove...

Страница 10: ...perate the equipment in the absence of a suitably installed ground conductor Contact the appropriate electrical inspection authority or an electrician if you are uncertain that suitable grounding is available CAUTION The system chassis must be positively grounded to the rack cabinet frame Do not attempt to connect power to the system until grounding cables are connected A qualified electrical insp...

Страница 11: ...k seamlessly with VLAN and 802 1p traffic in the network Auto Surveillance VLAN will automatically place the video traffic from pre defined IP surveillance devices to an assigned VLAN with higher priority so it can be separated from normal data traffic Asymmetric VLAN is implemented in these switches for a more efficient use of shared resources such as server or gateway devices Network Security D ...

Страница 12: ... and all changes will be lost Rear Panel Figure 1 2 DXS 1100 10TS Rear Panel Power The power port is where to connect the external power adapter Security Lock Provide a Kensington compatible security lock to be able to connect to a secure immovable device Insert the lock into the notch and turn the key to secure the lock The lock and cable apparatus should be purchased separately Switch GND Use an...

Страница 13: ...When it has a green light it is running on 10G Fan Err The LED illuminates red when the fan has run time failure and is brought offline Reset By pressing and holding the Reset button inside the pinhole for 3 to 5 seconds the Switch will change back to the default configuration and all changes will be lost Rear Panel Figure 1 5 DXS 1100 16TC Rear Panel Power The power port is where to connect the A...

Страница 14: ...d lead to system failure or even severely damaged components Rack mounting Screw Holes The screw holes are used for attach mounting brackets when installing the Switch to the rack Fans Switches in this series have a built in temperature sensor that will measure the switch s internal temperature and then automatically adjust the speed of the fans to either high speed or low speed ...

Страница 15: ...For safe switch installation and operation it is recommended that you Visually inspect the power cord to see that it is secured fully to the AC power connector Make sure that there is proper heat dissipation and adequate ventilation around the switch Do not place heavy objects on the switch Desktop or Shelf Installation When installing the switch on a desktop or shelf the rubber feet included with...

Страница 16: ...talling the equipment in an environment compatible with the maximum ambient temperature Tma specified by the manufacturer B Reduced Air Flow Installation of the equipment in a rack should be such that the amount of air flow required for safe operation of the equipment is not compromised C Mechanical Loading Mounting of the equipment in the rack should be such that a hazardous condition is not achi...

Страница 17: ...ep 3 Plugging in the AC Power Cord with Power Cord Retainer To prevent accidental removal of the AC power cord it is recommended to install the power cord retainer together with the power cord A With the rough side facing down insert the Tie Wrap into the hole below the power socket Figure 2 4 Insert Tie Wrap to the Switch B Plug the AC power cord into the power socket of the Switch Figure 2 5 Con...

Страница 18: ...r Manual 1 11 1 Figure 2 6 Slide the Retainer through the Tie Wrap D Circle the tie of the Retainer around the power cord and into the locker of the Retainer Figure 2 7 Circle around the power cord E Fasten the tie of the Retainer until the power cord is secured ...

Страница 19: ...er cord F Users may now connect the AC power cord to an electrical outlet preferably one that is grounded and surge protected Figure 2 9 Plugging the switch into an outlet Power Failure As a precaution the switch should be unplugged in case of power failure When power is resumed plug the switch back in ...

Страница 20: ...lay statistics using a web browser Supported Web Browsers The embedded Web based Management currently supports the following web browsers Internet Explorer version 7 and later Firefox Google Chrome Safari Connecting to the Switch You will need the following equipment to begin the web configuration of your device 1 A PC with a RJ45 Ethernet connection 2 A standard Ethernet cable Connect the Etherne...

Страница 21: ... Web based Management By clicking the Exit button in the Smart Wizard you will enter the Web based Management interface Please refer to Chapter 4 Configuration for detailed instructions D Link Network Assistant DNA The D Link Network Assistant DNA included in the installation CD is a program that allows administrators to quickly discover all D Link smart switches and D Link Discover Protocol DDP s...

Страница 22: ...t Ethernet Switch User Manual 1 15 5 NOTE Please be sure to uninstall any existing DNA from your PC before installing the latest DNA For detailed explanations of the DNA functions please refer to D Link Network Assistant DNA User Guide ...

Страница 23: ... Information will guide you to do basic configurations in 3 steps for the IP Information access password and SNMP Select Static DHCP or BOOTP and enter the desired new IP Address select the Netmask and enter the Gateway address then click the Next button to enter the next User Accounts Settings window No need to enter IP Address Netmask and Gateway if DHCP and BOOTP are selected The Smart Wizard i...

Страница 24: ...e desired new username in the User Name field and select the Privilege between User and Administrator Select Password Type among None Plain Text and Encrypted and type the desired password in the Password field Click the Next button to the SNMP window Figure 4 2 User Accounts Settings in Smart Wizard ...

Страница 25: ...ing is Disabled Click Enabled and then click Apply Save to make it effective Figure 4 3 SNMP in Smart Wizard NOTE Changing the system IP address will disconnect you from the current connection Please enter the correct IP address in the Web browser again and make sure your PC is in the same subnet with the switch See Login Web based Management for a detailed description ...

Страница 26: ...e username with current IP address and the Logout button on the right Click Logout to end this session NOTE If you close the web browser without clicking the Logout button first then it will be seen as an abnormal exit and the login session will still be occupied By choosing different functions in the Function Tree you can change all the settings in the Main Configuration Screen The main configura...

Страница 27: ... Upgrade Backup Configuration Restore Backup Log Backup Ping Reset and Reboot System Figure 4 7 Tools Menu Firmware Upgrade and Backup Allow for the firmware to be saved or for an existing firmware file to be uploaded to the Switch The Switch can only allow having maximum 2 firmware files saved in the File System Go to Management File System to delete the old firmware files in order to upgrade fir...

Страница 28: ...from a remote TFTP server Specify TFTP server IP address with IPv4 or IPv6 address Source File Enter the source filename and path of the firmware file located on the TFTP server here This field can be up to 64 characters long Destination File Enter the destination filename and path where the new firmware should be stored on the Switch This field can be up to 64 characters long Click Upgrade after ...

Страница 29: ... field can be up to 64 characters long Click Backup to save the firmware to the TFTP server Configuration Restore and Backup Allow the current configuration settings to be saved to a file not including the password and if necessary you can restore the configuration settings from this file The Switch can only allow having maximum 2 configuration files saved in the File System Go to Management File ...

Страница 30: ...his field can be up to 64 characters long Destination File Enter the destination filename and path where the configuration file should be stored on the Switch This field can be up to 64 characters long Select the running config option to restore and overwrite the running configuration file on the Switch Select the startup config option to restore and overwrite the start up configuration file on th...

Страница 31: ...rom the Switch Destination File Enter the destination filename and path where the configuration file should be stored on the TFTP server This field can be up to 64 characters long Click Backup to save the current settings to the TFTP server Log Backup Allow the logs to be saved to HTTP or TFTP Figure 4 18 Tools Menu Log Backup Log Backup to HTTP This window is used to back up the logs to HTTP Figu...

Страница 32: ...ackets to the IP address you specify The destination node then responds to or echoes the packets sent from the Switch This is very useful to verify connectivity between the Switch and other nodes on the network Figure 4 21 Tools Menu Ping The fields that can be configured are described below Target IPv4 Address Target IPv6 Address Enter an IPv4 or IPv6 address to be pinged Ping Times Enter the num...

Страница 33: ... its factory defaults except IP address and then will save reboot option to reset the Switch s configuration to its factory default settings This option will exclude the IP address from being changed Select the The Switch will be reset to its factory defaults including IP address option to reset the Switch s configuration to its factory default settings Click Apply to initiate the factory default ...

Страница 34: ...he Online Help provides two ways of online support D Link Support Site will lead you to the D Link website where you can find online resources such as updated firmware images User Guide can offer an immediate reference for the feature definition or configuration guide Figure 4 25 Online Help ...

Страница 35: ...the Function Tree Click the setup item that you want to configure The following sections provide more detailed description of each feature and function Figure 4 26 Available settings in the Function Tree Device Information In this window the Device Information CPU and Used status are displayed It appears automatically when you log in the Switch ...

Страница 36: ...an be configured are described below System Name Enter a system name for the Switch if so desired This name will identify it in the Switch network System Location Enter the location of the Switch if so desired This string can be up to 255 characters long System Contact Enter a contact name for the Switch if so desired This string can be up to 255 characters long System Peripheral Settings This win...

Страница 37: ...4 30 System Port Configuration Port Settings The fields that can be configured are described below From Port To Port Select the appropriate port range used for the configuration here Medium Type If configuring the Combo ports this defines the type of transport medium to be used State Select this option to enable or disable the physical port here MDIX Select the Medium Dependent Interface Crossover...

Страница 38: ...sical layer type The master setting will also determine the master and slave relationship between the two connected physical layers This relationship is necessary for establishing the timing control between the two physical layers The timing control is set on a master physical layer by a local source The slave setting 1000M Slave uses loop timing where the timing comes from a data stream received ...

Страница 39: ...e value is between 0 and 1000 ErrDisable Cause Select the error disable causes here Options to choose from are All Port Security Storm Control and Loopback Detect State Select this option to enable or disable the auto recovery for an error port caused by the specified cause Interval Enter the time between 5 and 86400 seconds to recover the port Click Apply to accept the changes made for each indiv...

Страница 40: ...d manage events as well as report errors and informational messages Figure 4 34 System System Log System Log Settings The fields that can be configured are described below Source Interface State Enable or disable the source interface s global state Buffer Log State Enable or disable the buffer log s global state here Options to choose from are Enable Disabled and Default When selecting the Default...

Страница 41: ... facility s behavior option and the type of facility that will be associated with the selected behavior here Behavior options to choose from are Drops and Includes Severity Select the severity behavior option and the value of the type of information that will be logged Behavior options to choose from are Drops and Includes Severity value options to choose from are 0 Emergencies 1 Alerts 2 Critical...

Страница 42: ...splayed in this table is 1 000 The index number can go up to 90 000 When this log is full older entries will be removed and replaced by newer ones Figure 4 37 System System Log System Log Click Clear Log to clear the system log entries displayed in the table Enter a page number and click Go to navigate to a specific page when multiple pages exist System System Log System Attack Log This window is ...

Страница 43: ... the current day month and year to update the system clock Click Apply to accept the changes made System Time and SNTP Time Zone Settings This window is used to configure time zones and Daylight Savings Time settings for SNTP Figure 4 40 System Time and SNTP Time Zone Settings The fields that can be configured are described below Summer Time State Select the summer time setting Options to choose f...

Страница 44: ...ll start From Month Select the month that summer time will start From Year Enter the year that the summer time will start From Time HH MM Select the time of the day that summer time will start To Date of the Month Select date of the month that summer time will end To Month Select the month that summer time will end To Year Enter the year that the summer time will end To Time HH MM Select the time ...

Страница 45: ... drop down menu selects the hour and the second drop down menu selects the minute Click Apply to accept the changes made Click Find to locate a specific entry based on the information entered Click Delete Periodic to delete the periodic entry Click Delete to remove the specified entry Enter a page number and click Go to navigate to a specific page when multiple pages exist Management User Accounts...

Страница 46: ...e Click Apply to accept the changes made Click Delete to remove the specified entry Enter a page number and click Go to navigate to a specific page when multiple pages exist After clicking the Session Table tab the following page will appear Figure 4 44 Management User Accounts Settings Session Table A list of active user account session will be displayed Management Password Encryption This window...

Страница 47: ...sending of port link up notifications A linkup trap is generated when the device recognizes that one of the communication links has come up Port Link Down Tick this option to control the sending of port link down notifications A linkDown trap is generated when the device recognizes a failure in one of the communication links Coldstart Tick this option to control the sending of SNMP coldStart notif...

Страница 48: ...able the SNMP link change trap Click Apply to accept the changes made Management SNMP SNMP View Table Settings This window is used to assign views to community strings that define which MIB objects can be accessed by a remote SNMP manager The SNMP Group created with this table maps SNMP users identified in the SNMP User Table to the views created in the previous window Figure 4 48 Management SNMP ...

Страница 49: ...y Read write or read only level permission for the MIB objects accessible to the SNMP community Figure 4 49 Management SNMP SNMP Community Table Settings The fields that can be configured are described below Key Type Select the key type for the SNMP community Options to choose from are Plain Text and Encrypted Community Name Enter an alphanumeric string of up to 32 characters that is used to ident...

Страница 50: ...NoPriv Specify that authorization will be required but there will be no encryption of packets sent between the Switch and a remote SNMP manager AuthPriv Specify that authorization will be required and that packets sent between the Switch and a remote SNMP manger will be encrypted Read View Name Enter the read view name that the group user can access Write View Name Enter the write view name that t...

Страница 51: ... drop down list this option is available Select the authentication level Options to choose from are MD5 and SHA MD5 Select to use the HMAC MD5 96 authentication level This field will require the user to enter a password or a key SHA Specify that the HMAC SHA authentication protocol will be used This field will require the user to enter a password or a key Priv Protocol When selecting v3 in the SNM...

Страница 52: ...horization will be required but there will be no encryption of packets sent between the Switch and a remote SNMP manager AuthPriv Specify that authorization will be required and that packets sent between the Switch and a remote SNMP manger will be encrypted UDP Port Enter the UDP port number The default trap UDP port number is 162 The range of UDP port numbers is from 0 to 65535 Some port numbers ...

Страница 53: ...ion entered Click Delete to remove the specified entry Click Show Detail to see the detail information of the specific port Enter a page number and click Go to navigate to a specific page when multiple pages exist After clicking Show Detail the following window will appear Figure 4 56 Management RMON RMON Statistics Table Click Back to return to the previous window Management RMON RMON History Set...

Страница 54: ...nterface Figure 4 59 Management RMON RMON Alarm Settings The fields that can be configured are described below Index Enter the alarm index The range is from 1 to 65535 Interval Enter the interval in seconds for the sampling of the variable and checking against the threshold The valid range is from 1 to 2147483647 seconds Variable Enter the object identifier of the variable to be sampled Type Selec...

Страница 55: ... entry The string is up to 127 characters long Type Select the RMON event entry type Options to choose from are None Log Trap and Log and Trap Community Enter the community string The string can be up to 127 characters Owner Enter the owner string The string can be up to 127 characters Click Add to add a new entry based on the information entered Click Delete to remove the specified entry Click Vi...

Страница 56: ...ssion Timeout Enter the time in seconds of the web session timeout Tick Default to return to the default setting The value is from 60 to 36000 seconds The default value is 180 seconds Click Apply to accept the changes made Management File System The File System is used to provide the user with flexible file operation on the Flash All the firmware configuration information and system log informatio...

Страница 57: ...Copy When copying a file to the file system of this switch the user must enter the Source and Destination path Tick Replace to replace the current running configuration with the indicated configuration file Click Apply to initiate the copy Click Cancel the discard the process NOTE and space are not allowed in the file name NOTE When renaming the file or folder name or creating a directory the forw...

Страница 58: ...P port state Click Apply to accept the changes made for each individual section L2 Features FDB Static FDB Unicast Static FDB This window is used to view and configure the static unicast forwarding settings on the Switch Figure 4 68 L2 Features FDB Static FDB Unicast Static FDB The fields that can be configured are described below Port Drop The selection of the port number on which the MAC address...

Страница 59: ...ress belongs to MAC Address Enter the static destination MAC address of the multicast packets This must be a multicast MAC address The format of the destination MAC address is 01 XX XX XX XX XX Click Apply to accept the changes made Click Delete All to delete all the entries found in the display table Click Delete to remove the specified entry Enter a page number and click Go to navigate to a spec...

Страница 60: ...ble This window is used to view the entries listed in the MAC address table Figure 4 72 L2 Features FDB MAC Address Table The fields that can be configured are described below Port Select the port that will be used for this configuration here VID Enter the VLAN ID that will be used for this configuration here MAC Address Enter the MAC address that will be used for this configuration here Click Cle...

Страница 61: ...483647 seconds By default this value is 1 second History Size Enter the maximum number of entries listed in the history log used for notification This value must be between 0 and 500 By default this value is 1 MAC Notification Trap State Select this option to enable or disable the MAC notification trap state From Port To Port Select the range of ports that will be used for this configuration here ...

Страница 62: ... be displayed here Click Apply to accept the changes made Click Find to locate a specific entry based on the information entered Click View All to locate all the entries Click Edit to re configure the specific entry Click Delete to remove the specified entry Enter a page number and click Go to navigate to a specific page when multiple pages exist L2 Features VLAN Asymmetric VLAN This window is use...

Страница 63: ...ace Click Edit to re configure the specific entry After clicking VLAN Detail the following page will appear Figure 4 77 L2 Features VLAN VLAN Interface Information Click Back to return to the previous window L2 Features VLAN Auto Surveillance VLAN Auto Surveillance Properties This window is used to configure the auto surveillance VLAN global settings and display the ports surveillance VLAN informa...

Страница 64: ...N if the port is an automatic surveillance VLAN member When the last surveillance device stops sending traffic and the MAC address of this surveillance device is aged out the surveillance VLAN aging timer will be started The port will be removed from the surveillance VLAN after expiration of surveillance VLAN aging timer If the surveillance traffic resumes during the aging time the aging timer wil...

Страница 65: ... the Auto Surveillance VLAN Summary tab the following page will appear Figure 4 80 L2 Features VLAN Auto Surveillance VLAN MAC Settings and Surveillance Device Auto Surveillance VLAN Summary L2 Features VLAN Voice VLAN Voice VLAN Global Voice VLAN is a VLAN used to carry voice traffic from IP phone Because the sound quality of an IP phone call will be deteriorated if the data is unevenly sent the ...

Страница 66: ...e voice traffic resumes during the aging time the aging timer will be reset and stop Click Apply to accept the changes made for each individual section L2 Features VLAN Voice VLAN Voice VLAN Port This window is used to show the ports voice VLAN information Figure 4 82 L2 Features VLAN Voice VLAN Voice VLAN Port The fields that can be configured are described below From Port To Port Select the appr...

Страница 67: ...VLAN Device L2 Features VLAN Voice VLAN Voice VLAN LLDP MED Device This window displays the voice VLAN LLDP MED voice devices connected to the Switch Figure 4 85 L2 Features VLAN Voice VLAN Voice VLAN LLDP MED Device L2 Features STP STP Global Settings The Switch implements two versions of the Spanning Tree Protocol the Rapid Spanning Tree Protocol RSTP as defined by the IEEE 802 1D 2004 specifica...

Страница 68: ... ensure that old information does not endlessly circulate through redundant paths in the network preventing the effective propagation of the new information Set by the Root Bridge this value will aid in determining that the Switch has spanning tree configuration values consistent with other devices on the bridged LAN Bridge Hello Time Enter the bridge s hello time value here This value must be bet...

Страница 69: ... port is 20000 The lower the number the greater the probability the port will be chosen to forward packets State Enable or disable the STP port state Guard Root Enable or disable the guard root function Link Type Select the link type option here Options to choose from are Auto P2P and Shared A full duplex port is considered to have a point to point P2P connection On the opposite a half duplex port...

Страница 70: ...onfigured are described below Port Select the port number that will be cleared here Click Clear Detected Protocol to clear the detected protocol settings for the port selected Click Find to locate a specific entry based on the information entered Click Edit to re configure the specific entry Enter a page number and click Go to navigate to a specific page when multiple pages exist L2 Features Loopb...

Страница 71: ...n Test Protocol packets to detect a loop back event The valid range is from 1 to 32767 seconds The default setting is 10 seconds From Port To Port Select the appropriate port range used for the configuration here State Enable or disable the state of the port Click Apply to accept the changes made for each individual section L2 Features Link Aggregation Understanding Port Trunk Groups Port trunk gr...

Страница 72: ...consisting of 1 to 8 links ports Each port can only belong to a single link aggregation group All of the ports in the group must be members of the same VLAN and their STP status static multicast traffic control traffic segmentation and 802 1p default priority configurations must be identical Port locking must not be enabled on the trunk group Further the LACP aggregated links must all be of the sa...

Страница 73: ...l port first joins a channel group An interface can only join one channel group Mode Select the mode option here Options to choose from are On Active and Passive If the mode On is specified the channel group type is static If the mode Active or Passive is specified the channel group type is LACP A channel group can only consist of either static members or LACP members Once the type of channel grou...

Страница 74: ...n Click Find to locate a specific entry based on the information entered Click Find All to view all the entries Click Show Detail to see the detail information of the specific VLAN Click Edit to re configure the specific entry Enter a page number and click Go to navigate to a specific page when multiple pages exist After clicking Show Detail the following window will appear Figure 4 94 L2 Features...

Страница 75: ...val at which the IGMP snooping querier sends IGMP general query messages periodically Max Response Time Enter the maximum response time in seconds advertised in IGMP snooping queries The range is 1 to 25 Robustness Value Enter the robustness variable used in IGMP snooping Last Member Query Interval Enter the interval at which the IGMP snooping querier sends IGMP group specific or group source spec...

Страница 76: ...e changes made Click Delete to remove the specified entry Click Find to locate a specific entry based on the information entered Click Find All to view all the entries Enter a page number and click Go to navigate to a specific page when multiple pages exist L2 Features L2 Multicast Control IGMP Snooping IGMP Snooping Mrouter Settings This window is used to configure the specified interface s as th...

Страница 77: ... here This is available when Port is selected in the Statistics list Find Type Select the interface type Options to choose from are VLAN and Port VID Enter a VLAN ID between 1 and 4094 This is available when VLAN is selected in the Find Type list From Port To Port Select the appropriate port range used for the configuration here This is available when Port is selected in the Find Type list Click C...

Страница 78: ...in the ICMP packet header this message is sent by the listening port to the Switch stating that it is interested in receiving multicast data from a multicast address in response to the Multicast Listener Query message 3 Multicast Listener Done Akin to the Leave Group Message in IGMPv2 and labeled as 132 in the ICMPv6 packet header this message is sent by the multicast listening port stating that i...

Страница 79: ...ear Figure 4 100 L2 Features L2 Multicast Control MLD Snooping MLD Snooping VLAN Parameters The window displays the detail information about MLD snooping VLAN Click Modify to edit the information in the following window Click the X button at the upper right side to close the window After clicking Modify or Edit in MLD Snooping Settings window the following window will appear Figure 4 101 L2 Featur...

Страница 80: ...mit used Tick No Limit to ignore the rate limit Click Apply to accept the changes made Click the X button at the upper right side to close the window L2 Features L2 Multicast Control MLD Snooping MLD Snooping Groups Settings This window is used to configure and view the MLD snooping static group and view MLD snooping group Figure 4 102 L2 Features L2 Multicast Control MLD Snooping MLD Snooping Gro...

Страница 81: ...nfigured ports not to be multicast router ports From Port To Port Select the appropriate port range used for the configuration here Click Apply to accept the changes made Click Delete to remove the specified entry Click Find to locate a specific entry based on the information entered Click Find All to view all the entries Enter a page number and click Go to navigate to a specific page when multipl...

Страница 82: ...st Filtering This window is used to view and configure the Layer 2 multicast filtering settings Figure 4 105 L2 Features L2 Multicast Control Multicast Filtering The fields that can be configured are described below VID List Enter the VLAN ID list that will be used for this configuration here Multicast Filter Mode Select the multicast filter mode here Options to choose from are Forward Unregistere...

Страница 83: ...arded Fast Start Repeat Count Enter the LLDP MED fast start repeat count value This value must be between 1 and 10 Message TX Interval Enter the interval between consecutive transmissions of LLDP advertisements on each physical interface The range is from 5 to 32768 seconds Message TX Hold Multiplier Enter the multiplier on the LLDPDUs transmission interval that used to compute the TTL value of an...

Страница 84: ... frames RX The local LLDP agent can only receive LLDP frames TX and RX The local LLDP agent can both transmit and receive LLDP frames This is the default value Disabled The local LLDP agent can neither transmit nor receive LLDP frames IP Subtype Select the type of the IP address information to be sent Options to choose from are Default IPv4 and IPv6 Action Enable or disable the action field Addres...

Страница 85: ...DPDU TLV chassis ID TLV port ID TLV and Time to Live TLV The mandatory data types cannot be disabled There are also four data types which can be optionally selected These include Port Description System Name System Description and System Capability Figure 4 109 L2 Features LLDP LLDP Basic TLVs Settings The fields that can be configured are described below From Port To Port Select the appropriate p...

Страница 86: ... the port s VLAN identifier PVID that will be associated with untagged or priority tagged frames VLAN Name Enable or disable the VLAN name TLV to send and enter the ID of the VLAN in the VLAN name TLV Protocol Identity Enable or disable the Protocol Identity TLV to send and the protocol name Options for protocol name to choose from are None LACP STP and All Click Apply to accept the changes made L...

Страница 87: ...t duplex and bit rate settings of the sending IEEE 802 3 LAN node Link Aggregation Enable or disable the Link Aggregation TLV to send The Link Aggregation TLV indicates contains the following information Whether the link is capable of being aggregated whether the link is currently in an aggregation and the aggregated port channel ID of the port If the port is not aggregated then the ID is 0 Maximu...

Страница 88: ...apabilities Enable or disable transmitting the LLDP MED capabilities TLV Network Policy Enable or disable transmitting the LLDP MED network policy TLV Inventory Select this option to enable or disable transmitting the LLDP MED inventory management TLV Click Apply to accept the changes made L2 Features LLDP LLDP Statistics Information This window is used to view the neighbor detection activity LLDP...

Страница 89: ... port number that will be displayed Click Clear Counter to clear the counter information for the statistics displayed Click Clear All to clear all the counter information displayed L2 Features LLDP LLDP Local Port Information This window is used to display the information on a per port basis currently available for populating outbound LLDP advertisements in the local port brief table shown below ...

Страница 90: ...ased on the information entered Click Show Detail to view detailed information of the specific port After clicking Show Detail the following window will appear Figure 4 115 L2 Features LLDP LLDP Local Port Information Show Detail To view more details about for example the MAC PHY Configuration Status click the Show Detail hyperlink Click Back to return to the previous window After clicking the Sho...

Страница 91: ...tore the information as local Figure 4 117 L2 Features LLDP LLDP Neighbor Port Information Port Select the port number that will be displayed Click Find to locate a specific entry based on the information entered Click Clear to clear the specific port information Click Clear All to clear all the port information displayed L3 Features IPv4 Interface This window is used to configure the IPv4 interfa...

Страница 92: ... Hex to have the class identifier in the hexadecimal form Host Name Enter the host name The maximum length is 64 characters The host name must start with a letter end with a letter or digit and only with interior characters letters digits and hyphens Lease Specify the preferred lease time for the IP address to request from the DHCP server Enter the day duration of the lease or select the hour and ...

Страница 93: ...ribed below Client State Select this option to enable or disable the DHCPv6 client state Tick the Rapid Commit check box to proceed with two message exchange for prefix delegation Click Apply to accept the changes made Click Restart to restart DHCPv6 client on an interface L3 Features IPv6 Neighbor This window is used to configure and view the IPv6 neighbor settings Figure 4 123 L3 Features IPV6 N...

Страница 94: ...Port Default CoS This window is used to view and configure the port s default CoS settings Figure 4 125 QoS Basic Settings Port Default CoS The fields that can be configured are described below From Port To Port Select the appropriate port range used for the configuration here Default CoS Select the default CoS option for the port s specified here Options to choose from are 0 to 7 Select the Overr...

Страница 95: ...e any higher priority CoS queue must also be in the strict priority mode WRR WRR operates by transmitting permitted packets into the transmit queue in a round robin order Initially each queue sets its weight to a configurable weighting Every time a packet from a higher priority CoS queue is sent the corresponding weight is subtracted by 1 and the packet in the next lower CoS queue will be serviced...

Страница 96: ...ight value here This value must be between 0 and 127 To satisfy the behavior requirements of Expedited Forwarding EF the highest queue is always selected by the Per hop Behavior PHB EF and the schedule mode of this queue should be strict priority scheduling So the weight of the last queue should be zero while the Differentiate Service is supported Click Apply to accept the changes made QoS Basic S...

Страница 97: ...packets is configured Rate Limit Select and enter the rate limit value here Bandwidth Select to enter the input output bandwidth value used in the space provided This value must be between 64 and 10000000 kbps Also enter the Burst Size value in the space provided This value must be between 0 and 128000 kilobytes Percent Select to enter the input output bandwidth percentage value used in the space ...

Страница 98: ...t State The fields that can be configured are described below From Port To Port Select the appropriate port range used for the configuration here Trust State Select the port trust state option here Options to choose from are CoS and DSCP Click Apply to accept the changes made QoS Advanced Settings DSCP CoS Mapping ...

Страница 99: ...S value here This value must be between 0 and 63 Click Apply to accept the changes made Security Port Security Port Security Global Settings This window is used to view and configure the port security global settings Port Security is a security feature that prevents unauthorized computers with source MAC addresses unknown to the Switch prior to locking the port or ports from connecting to the Swit...

Страница 100: ...ied Maximum Enter the maximum number of secure MAC addresses that will be allowed on the port s specified This value must be between 0 and 64 By default this value is 32 Violation Action Select the violation action that will be taken here Options to choose from are Protect Restrict and Shutdown Protect Drop all packets from the insecure hosts at the port security process level but does not increme...

Страница 101: ... Enter the VLAN ID here This value must be between 1 and 4094 Click Add to add a new entry based on the information entered Click Delete to remove a new entry based on the information entered Click Clear by Port to clear the information based on the port selected Click Clear by MAC to clear the information based on the MAC address entered Click Clear All to clear all the information in this table ...

Страница 102: ... CPU load falls below the falling threshold value the Safeguard Engine will be deactivated and the Switch will exit the exhausted mode and enter the normal mode Figure 4 136 Security Safeguard Engine Settings The fields that can be configured are described below Safeguard Engine State Enable or disable the safeguard engine feature here Trap State Select to enable or disable the safeguard engine tr...

Страница 103: ...n there is no restriction on Layer 2 forwarding of packets received by the port Figure 4 137 Security Traffic Segmentation Settings The fields that can be configured are described below From Port To Port Select the receiving port range used for the configuration here From Forward Port To Forward Port Select the forward port range used for the configuration here Click Add to add a new entry based o...

Страница 104: ...en threshold Level Type Select the level type option here Options to choose from are PPS and Kbps PPS Rise Enter the rise packets per second value here This option specifies the rise threshold value in packets count per second This value must be between 0 and 14881000 packets per second If the low PPS value is not specified the default value is 80 of the specified risen PPS PPS Low Enter the low p...

Страница 105: ...ize which is 65535 bytes The sending of a ping of this size can crash the target computer Traditionally this bug has been relatively easy to exploit Generally sending a 65536 byte ping packet is illegal according to networking protocol but a packet of such a size can be sent if it is fragmented when the target computer reassembles the packet a buffer overflow can occur which often causes a system ...

Страница 106: ...ms MD5 Message Digest 5 and SHA Secure Hash Algorithm These three parameters are uniquely assembled in five choices on the Switch to create a three layered encryption code for secure communication between the server and the host The user may implement any one or combination of the cipher suites available yet different cipher suites will affect the security level and the performance of the secured ...

Страница 107: ... Path Click and enter the file system path for certificates and key pairs here TFTP Server Path Click and enter the TFTP server s path for certificates and key pairs here Password Enter the encrypted password phrase that is used to undo encryption when the private keys are imported here The password phrase is a string of up to 64 characters If the password phrase is not specified the NULL string w...

Страница 108: ...00 seconds By default this value is 600 seconds Secure Trustpoint Enter the secure trust point s name here This name can be up to 32 characters long Cipher Suites Select the cipher suites that will be associated with this profile here Click Apply to accept the changes made for each individual section Click Find to locate a specific entry based on the information entered Click Edit to re configure ...

Страница 109: ...g Utilization Port Utilization This window is used to display the percentage of the total available bandwidth being used on the port Figure 4 145 Monitoring Utilization Port Utilization The fields that can be configured are described below From Port To Port Select the appropriate port range used for the configuration here Click Find to locate a specific entry based on the information entered Click...

Страница 110: ...d are described below From Port To Port Select the appropriate port range used for the configuration here Click Find to locate a specific entry based on the information entered Click Refresh to refresh the display table Click Show Detail to see the detail information of the specific port After clicking Show Detail the following page will appear ...

Страница 111: ...ch User Manual 1 10 04 4 Figure 4 147 Monitoring Statistics Port Detail Click Back to return to the previous window Click Refresh to refresh the display table Monitoring Statistics Port Counters This window is used to display port counter statistics ...

Страница 112: ...ow From Port To Port Select the appropriate port range used for the configuration here Click Find to locate a specific entry based on the information entered Click Refresh to refresh the display table Click Show Errors to see all error counters of the specific port After clicking Show Errors the following page will appear Figure 4 149 Monitoring Statistics Counters Errors ...

Страница 113: ... Statistics Counters The fields that can be configured are described below From Port To Port Select the appropriate port range used for the configuration here Click Find to locate a specific entry based on the information entered Click Refresh to refresh the display table Click Clear to clear all the information for the specific ports Click Clear All to clear all the information in this table Clic...

Страница 114: ... This window is used to view and configure the mirror feature s settings The Switch allows users to copy frames transmitted and received on a port and redirect the copies to another port Attach a monitoring device to the mirroring port such as a sniffer or an RMON probe to view details about the packets passing through the first port This is useful for network monitoring and troubleshooting purpos...

Страница 115: ...oth RX and TX When selecting Both traffic in both the incoming and outgoing directions will be mirrored When selecting RX traffic in only the incoming direction will be mirrored When selecting TX traffic in only the outgoing direction will be mirrored Click Add to add the newly configured mirror entry based on the information entered Click Delete to delete an existing mirror entry based on the inf...

Страница 116: ...r Saving Enable or disable applying the power saving by scheduled port shutdown Scheduled Hibernation Power Saving Enable or disable applying the power saving by scheduled hibernation Scheduled Dim LED Power Saving Enable or disable applying the power saving by scheduled dimming LEDs Administrative Dim LED Select this option to enable or disable the port LED function Type Select the type of power ...

Страница 117: ...Port Select the appropriate port range used for the configuration here Time Range Enter the name of the time range to associated with the ports Click Apply to accept the changes made Click Delete to remove the specified entry Green EEE Energy Efficient Ethernet EEE is defined in IEEE 802 3az It is designed to reduce the energy consumption of a link when no packets are being sent Figure 4 157 Green...

Страница 118: ...ser Manual 1 11 11 1 The fields that can be configured are described below From Port To Port Select the appropriate port range used for the configuration here State Enable or disable the state of this feature here Click Apply to accept the changes made ...

Страница 119: ...P transceivers supported DEM 302S LX 1000BASE LX Single mode 2km DEM 310GT 1000BASE LX Single mode 10km DEM 311GT 1000BASE SX Multi mode 550m DEM 312GT2 1000BASE SX Multi mode 2km DEM 314GT 1000BASE LHX Single mode 50km DEM 315GT 1000BASE ZX Single mode 80km DGS 712 1000BASE T Copper SFP 100m SFP transceivers supported DEM 431XT DD 10GBASE SR 80m OM1 OM2 MMF 300m OM3 MMF DEM 431XT 10GBASE SR w o D...

Страница 120: ...ports maximum 128 entries SSL supports v1 v2 v3 IPv4 IPv6 OAM Cable diagnostics Reset button reset to factory default Management Web based graphical user interface D Link Network Assistant DNA SNMP support DHCP BOOTP client SNMP trap setting for fan and system events Monitoring Utilization Statistics Device Environment LLDP LLDP MED Syslog Password encryption Web based configuration backup restore...

Страница 121: ......

Отзывы: