background image

Protecting the Network Ports

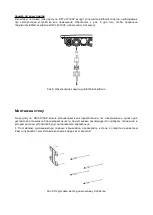
The DWL-8710AP’s Ethernet ports are equipped with a set of protective sealing caps designed for outdoor
use. Please refer to figure 8 for how to correctly attach and secure the Ethernet cables to the DWL-8710AP.

Mounting the AP to a Wall

The DWL-8710AP can be mounted either horizontally or vertically. However, it is recommended that the AP
is installed with the antennas positioned vertically in order to achieve optimal performance.

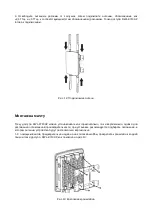
1.   Use   the   mounting   base   plate   to   mark   the   location   on   the   surface   where   you   want   to   mount   the
DWL-8710AP. Next, drill a hole of 8 mm wide and 37 mm deep on all 4 markings.

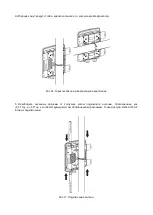
2. Remove the nut and washer from the bolts and place the bolts in the holes as shown below in figure 9.

Содержание DWL-8710AP

Страница 1: ... Installation Guide Краткое руководство по установке 802 11n ac Unified Wireless Outdoor PoE Access Point Внешняя беспроводная двухдиапазонная унифицированная точка доступа AC1200 с поддержкой РоЕ DWL 8710AP ...

Страница 2: ...connector caps 2 waterproof seals for Ethernet cable Grounding wire 180 cm Wall pole mounting kit CD ROM with documentation Warranty Certificate If any of the above items are damaged or missing please contact your local D Link reseller Connecting to Power To power the DWL 8710AP please use any D Link IEEE 802 3at compliant PoE switch or a PoE injector f i DPE 301GI System Requirements CD ROM drive...

Страница 3: ...d and working 2 LAN 1 LAN 2 Blinking Data is being processed On Port is connected to a device 3 2 4 GHz Blinking Wireless data is being processed On AP is transmitting over 2 4 GHz 4 5 GHz Blinking Wireless data is being processed On AP is transmitting over 5 GHz Table 1 LED overview ...

Страница 4: ...and PoE input port 3 LAN 2 Non PoE LAN input port 4 2 4 GHz Antenna connector for the 2 4 GHz band antenna Table 2 Connector description Top Interface Connectors Connector Description 1 5 GHz Antenna connector for the 5 GHz band antenna 2 2 4 GHz Antenna connector for the 2 4 GHz band antenna Table 3 Top connector description ...

Страница 5: ...particles while allowing air to pass through Table 4 Vent description Grounding Use the ground connector for grounding the DWL 8710AP Item Description 1 Ground Connector Meant for grounding the Access Point metal case Table 5 Ground Connector description ...

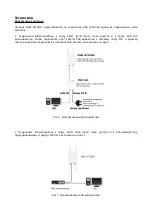
Страница 6: ...ort PoE Input on the DWL 8710AP Then connect the PoE injector s LAN IN port to an available Ethernet port on your computer and plug in the injector s power cord into a power outlet as shown in figure 6 2 Alternatively you may directly connect the LAN1 PoE Input port on the DWL 8710AP to any available PoE capable port of an 802 3at compliant PoE switch as illustrated in figure 7 ...

Страница 7: ...The DWL 8710AP can be mounted either horizontally or vertically However it is recommended that the AP is installed with the antennas positioned vertically in order to achieve optimal performance 1 Use the mounting base plate to mark the location on the surface where you want to mount the DWL 8710AP Next drill a hole of 8 mm wide and 37 mm deep on all 4 markings 2 Remove the nut and washer from the...

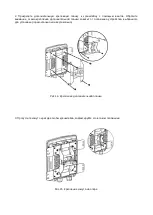
Страница 8: ...he mounting plate to the back of the DWL 8710AP using the screws as illustrated in figure 10 4 Mount the DWL 8710AP onto the bolts that were placed in the wall then fasten the bolts flat washers and nuts to secure the mounting plate with the AP to the wall surface ...

Страница 9: ...onnectors on the AP The DWL 8710AP is now ready to be connected to the network Mounting the AP to a Pole The DWL 8710AP can be mounted either horizontally or vertically However it is recommended that the AP is installed with the antennas positioned vertically in order to achieve optimal performance 1 Place the lock and flat washer on the cap screws and attach the mounting plate to the back of the ...

Страница 10: ...the pole mounting bracket to the mounting base plate accordingly using the screws Refer to figure 14 for the proper position of the pole mounting bracket for each direction 3 Thread the open end of the pole strap through the two tabs on the pole mounting bracket to secure the strap to the mounting bracket ...

Страница 11: ... pole mount bracket with the AP to the pole 5 Remove the protective caps covering the antenna ports on the AP if any Next attach the 2 antennas marked 2 4 GHz to the designated 2 4 GHz connectors and the 2 antennas marked 5 GHz to the designated 5 GHz connectors on the AP The DWL 8710AP is now ready to be connected to the network ...

Страница 12: ...onfigure the DWL 8710AP simply connect the AP directly to a computer and configure it through its Graphical User Interface GUI For more detailed information on how to set up and configure the DWL 8710AP please refer to the User Manual ...

Страница 13: ...и это предусмотрено конструкцией корпуса или вилки на кабеле питания Срок службы устройства 2 года Гарантийный период исчисляется c момента приобретения устройства у официального дилера на территории России и стран СНГ и составляет один год Вне зависимости от даты продажи гарантийный срок не может превышать 2 года с даты производства изделия которая определяется по 6 год и 7 месяц цифрам серийного...

Страница 14: ... Firefox 3 0 и выше Обзор устройства Индикаторы Рис 1 Индикаторы на передней панели Индикатор Режим Описание 1 Power Горит Питание подключено к точке доступа устройство работает корректно 2 LAN 1 LAN 2 Мигает Передача прием данных через порт LAN Горит Ethernet порт подключен к рабочему порту маршрутизатор коммутатор 3 2 4 GHz Мигает Передача прием данных в диапазоне 2 4 ГГц Горит Устройство работа...

Страница 15: ...PoE Input Порт LAN с поддержкой PoE 3 LAN 2 Порт LAN без поддержки PoE 4 2 4 GHz Подключение антенны 2 4 ГГц Таблица 2 Разъемы Разъемы верхней панели Рис 3 Разъемы верхней панели В таблице ниже приведены функции разъемов верхней панели Разъем Функция 1 5 GHz Подключение антенны 5 ГГц 2 2 4 GHz Подключение антенны 2 4 ГГц Таблица 3 Описание разъемов верхней панели ...

Страница 16: ...еспечивает доступ воздуха предотвращая попадание внутрь мелких частиц Таблица 4 Вентиляционное отверстие Заземление Устройство должно быть заземлено при помощи клеммы заземления Рис 5 Клемма заземления Функция 1 Клемма заземления Заземление металлического корпуса устройства Таблица 5 Клемма заземления ...

Страница 17: ... и к порту PoE Out PoE инжектора Затем подключите порт LAN IN PoE инжектора к сетевому порту ПК а адаптер питания инжектора подключите к электрической розетке как показано на рис 6 Рис 6 Использование PoE инжектора 2 Подключите Ethernet кабель к порту LAN1 PoE Input точки доступа и к PoE коммутатору поддерживающему стандарт 802 3at как показано на рис 7 Рис 7 Использование PoE коммутатора ...

Страница 18: ...е защиты для Ethernet кабеля Монтаж на стену Точку доступа DWL 870AP можно устанавливать как горизонтально так и вертикально однако для достижения оптимальной производительности при установке рекомендуется подбирать положение в котором антенны устройства будут располагаться вертикально 1 По отметкам сделанным при помощи кронштейна просверлите в стене 4 отверстия диаметром 8 мм и глубиной 37 мм Вст...

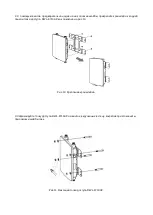
Страница 19: ...крепите кронштейн к задней панели точки доступа DWL 8710AP как показано на рис 10 Рис 10 Крепление кронштейна 3 Зафиксируйте точку доступа DWL 8710AP на винтах вкрученных в стену закрепив при этом винты при помощи шайб и гаек Рис 11 Фиксация точки доступа DWL 8710AP ...

Страница 20: ...на мачту Точку доступа DWL 8710AP можно устанавливать как горизонтально так и вертикально однако для достижения оптимальной производительности при установке рекомендуется подбирать положение в котором антенны устройства будут располагаться вертикально 1 С помощью винтов предварительно надев на них плоские шайбы прикрепите кронштейн к задней панели точки доступа DWL 8710AP как показано на рис 13 Ри...

Страница 21: ...внимание схема крепления дополнительной планки зависит от положения устройства выбранного для установки горизонтально или вертикально Рис 14 Крепление дополнительной планки 3 Пропустите хомут через две скобы кронштейна зафиксируйте его в таком положении Рис 15 Крепление хомута на опоре ...

Страница 22: ...сатор Рис 16 Горизонтальное и вертикальное крепление 5 Освободите антенные разъемы от заглушек затем подключите антенны обозначенные как 2 4 ГГц и 5 ГГц к соответствующим этим обозначениям разъемам Точка доступа DWL 8710AP готова к подключению Рис 17 Подключение антенн ...

Страница 23: ...астройка точки доступа Настроить точку доступа DWL 8710AP можно с помощью графического интерфейса подключив устройство к ПК Для получения более подробной информации обратитесь к руководству пользователя ...

Страница 24: ... 1Q VLAN Классификация сторонних точек доступа Настраиваемый QoS Изоляция Wi Fi клиентов Кластер точек доступа до 16 устройств Управление Автономный режим Управляемый режим совместимые контроллеры коммутаторы DWC 1000 DWC 2000 DWS 3160 24XX DWS 4026 Web интерфейс HTTP HTTPS Интерфейс командной строки CLI telnet SSH SNMP Физические характеристики Размеры 220 x 250 x 45 мм без кронштейна Вес 1 795 к...

Страница 25: ......
Отзывы: