background image

26

DSM-120 User’s Manual 

D-Link Systems, Inc.

Using the D-Link

®

 Media Server Software

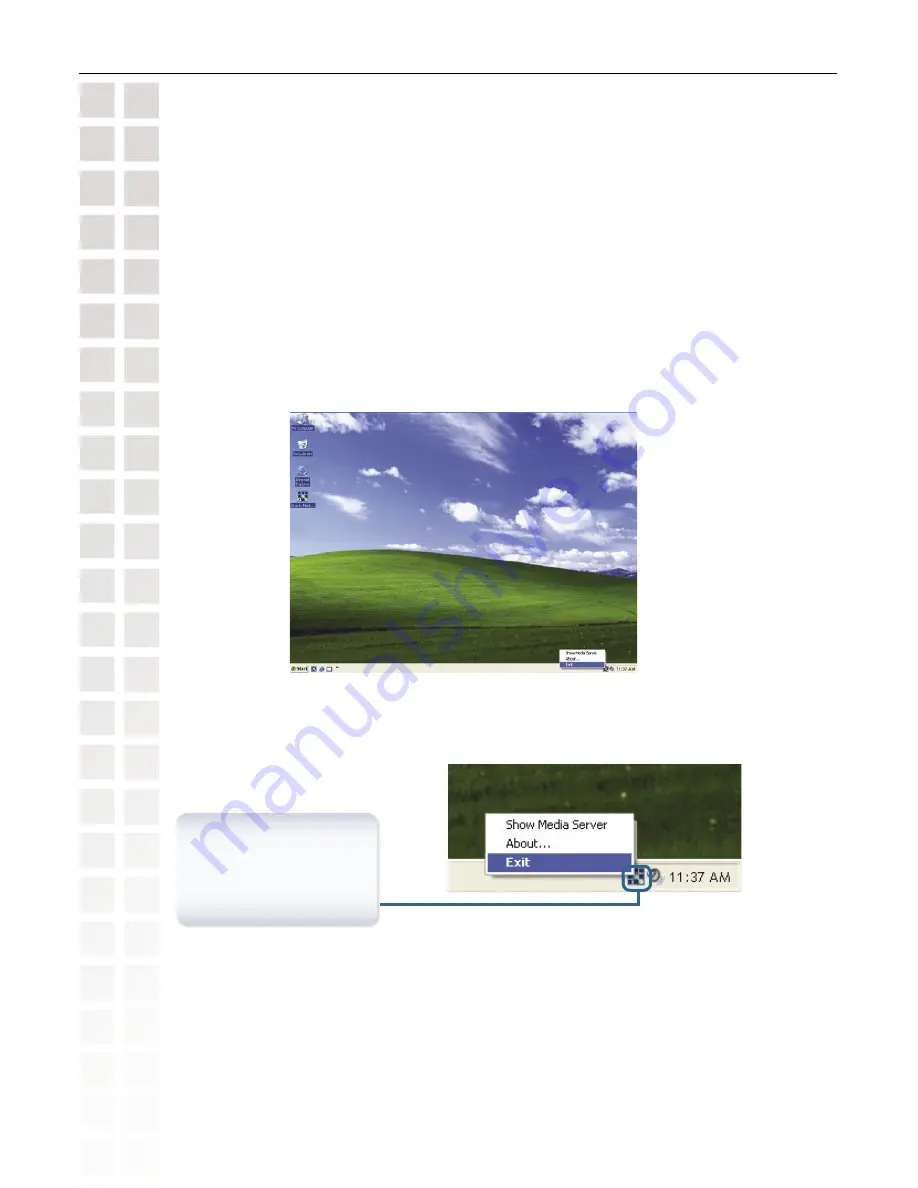
D-Link Media Server Menu

To open the D-Link Media 
Server menu, 

right click


on  the  system  tray  icon. 
The server menu will then 
be displayed.

Stopping the D-Link Media Server

To stop the D-Link

®

 Media Server (and stop sharing your music on your PC), right-click on 

the server icon and select 

Exit 

from the server menu.

Note:


The music files stored on your computer will be available to your DSM-120 only if 

the D-Link

®

 Media Server is running. Online Music content that does not require PC-based 

software (such as Live365) can still be accessed from the DSM-120 without running the 
D-Link

®

 Media Server software.

Содержание DSM-120

Страница 1: ......

Страница 2: ...a Connect 27 Installing the File Manager Software 31 Transferring Music with Mini USB 34 Disconnecting the Mini USB 35 Connecting the DSM 120 37 Audio Connections 37 Network Connections 38 USB Connection 39 The DSM 120 Setup Wizard 40 Welcome Screen 40 Connection Mode 42 Windows Connect Now Configuration 44 DSM 120 Menu 48 Menu Basics 48 Menu Home 48 Now Playing 48 PC Music 49 Music Quality 49 Supp...

Страница 3: ...ly Asked Questions 70 Troubleshooting 72 Technical Specifications 77 Appendix 79 Setting Microsoft Windows Power Options 79 Wireless Installation Considerations 80 Partition a FAT32 Hard Drive 81 Glossary 82 Networking 82 Music 83 Technical Support 84 Warranty 85 Registration 88 ...

Страница 4: ...lectric shock to persons The exclamation point within an equilateral triangle is intended to alert the user to the presence of important operating and maintenance servicing instructions in the literature accompanying the appliance CAUTION THE POWER ADAPTER IS USED AS THE MAIN DISCONNECT DEVICE ENSURE THAT THE SOCKET OUTLET IS LOCATED INSTALLED NEAR THE EQUIPMENT AND IS EASILY ACCESSIBLE CAUTION TO...

Страница 5: ...d in this unit will protect you if you observe the following procedures for installation use and servicing This device does not contain any user serviceable parts Carefully read and follow the Manual and Quick Install Guide Do not place the product near heat sources such as radiators heat registers stoves or other products that produce heat Do not use this product near water Unplug the unit from t...

Страница 6: ... interference to radio or television reception which can be determined by turning the equipment off and on the user is encouraged to try to correct the interference by one or more of the following measures Reorient or relocate the receiving antenna Increase the separation between the equipment and receiver Connect the equipment into an outlet on a circuit different from that to which the receiver ...

Страница 7: ...ring the wireless settings is easier than ever before Windows Connect Now allows you to run the Wireless Network Setup Wizard from Windows XP and transfer the wireless settings to the DSM 120 using a USB thumbdrive D Link MediaLoungeTM File Manager allows you to transfer music files to your Hard Drive via the network The File Manager software allows you to point to the folders on your PC s hard dri...

Страница 8: ...e and Manual Ethernet CAT5 UTP Straight Through Cable Standard Composite RCA Audio Cable Remote Control with Batteries Back Stand Mini USB Cable Energy Star certified Power Adapter A wireless 802 11g or 802 11b or Ethernet network Minimum to run the Media Server software PC with 500MHz processor 128MB RAM and 50MB of available hard disk space Windows XP 2000 A CD ROM drive Package Contents System R...

Страница 9: ...at up to 100Mbps UPnP AV and INMPR compliant for maximum compatibility Support for most popular digital music formats Sleek design complements your existing audio equipment 64 or 128 bit WEP security Convenient one touch access to copy music Supports DHCP for easy connection to your home network Easy setup wizard Direct playback from external USB media 2 5 HDD Enclosure for local playback without ...

Страница 10: ... Inc Hardware Overview Hardware Overview Enter Press Enter to make selections Navigation Tonavigatethrough the menu press the arrow buttons Volume Control Presstoadjustthevolume output on the DSM 120 Power Button Built in display Front Panel ...

Страница 11: ...ntenna Back Panel Connections Reset Power Ethernet USB Client For transferring music from your PC Head Phone Speaker Optical Digital Audio Composite Audio USB Host For Windows Connect Now or local music playback from your USB Media device Optional 2 5 HDD Enclosure ...

Страница 12: ...Ethernet port The DSM 120 Media Server software installed on the PC you will be sharing files from This computer will collect music content from local sources and from the Internet downloaded MP3 music The DSM 120 Wireless Music Player connected to your standard PC speakers or audio system Optional The 2 5 HDD can be used to play local music but it must be partitioned in order to work with the DSM ...

Страница 13: ...ons up arrow Previous down arrow Next 5 Stop 6 PAGE 7 VOLUME 8 Mute 9 RWD 10 FF 11 Repeat 12 Shuffle 1 2 3 4 5 6 7 8 10 9 11 12 You may be required to enter alphanumeric characters To edit information on a screen press the Enter button To enter letters and or numbers use the navigation buttons see below Toggle Up Down allows you to view all alphanumeric characters Toggle Left deletes an alphanumeri...

Страница 14: ... the DSM 120 menu While playing music the up arrow returns to the previous track and the down arrow continues to the next track Stop Stop a music file that is playing PAGE UP DOWN Page Up to scroll up a page and Page Down to scroll down a page VOLUME Increase the volume VOLUME Decrease the volume Mute Mute the volume of the music file RWD Rewind through a music file that is playing FF Fast Forward th...

Страница 15: ... D Link Media Server Software 2 Map network drives from the computer with the D Link Media Server software to additional computers that contain files you want to share This method also allows you to share files from computers that cannot run the D Link Media Server software such as Macintosh systems The computer running the D Link Media Server software must always be on when streaming content from a...

Страница 16: ...stall D Link Media Server If the screen on the right does not appear go to My Computer and double click on the CD ROM drive The DSM 120 Autorun will execute Insert the DSM 120 CD ROM into the CD ROM drive and the following screen will appear The D Link Media Server Setup Wizard will appear Click Next ...

Страница 17: ...ftware Click Next Click Next Choose a Start Menu folder or accept the default location Choose a Destination location or accept the default location This is where the D Link Media Server software will be copied to on your system Click Next The D Link license agreement screen appears ...

Страница 18: ...to the specified locations on your computer The D Link Media Server software installation has been completed Select the icons you want created Select Create a desktop icon to access the program from your desktop Select Create a Quick Launch icon to access the program from your taskbar Select Create a startup icon so the program launches on startup Click Next Click Install ...

Страница 19: ...plication by going to your Start Menu selecting All Programs and then clicking on D Link Media Server icon within the D Link Media Server folder The D Link Media Server software enables you to share the files from your computer with the DSM 120 By sharing the files there is no need to copy the files from your computer to the unit before they can play The data is streamed directly from the files on you...

Страница 20: ...ic Files to Share The FileTypes tab is where you select the types of audio files that you want to share The Shared Folder tab is where you select the folders that contain your audio files Click Add a folder Note The DSM 120 only supports MP3 and WMA file types ...

Страница 21: ... s Manual D Link Systems Inc Choosing Music Files to Share Select the folder containing the files you wish to share Click OK Repeat the steps until all of the folders containing audio you want to share have been added ...

Страница 22: ...ser s Manual D Link Systems Inc Choosing Music Files to Share The D Link Media Server software configuration is complete The Media Files tab will show all your audio files as well as display important file information ...

Страница 23: ... the included software on each PC where music is stored If you selected the option to Create a startup icon during the Media Server software installation See page 18 the D Link Media Server software will automatically start whenever you power on your PC Whenever you close the Media Server configuration window you can return to the Media Server configuration window by clicking on the Media Server ico...

Страница 24: ...ntent The D Link Media Server software scans the folders you share when you initially Add a folder If you copy additional files into these folders they will be seen by the DSM 120 when you refresh the folder contents Refresh a folder To refresh a folder s contents select a folder and then click the Refresh a folder button Refresh multiple folders Multiple folders can be selected if you hold down th...

Страница 25: ...t to setup an automatic refresh interval Click Time and select a time period This is how often the server will refresh the folder contents Naming the Media Server The Media Server name is entered here This is the server name that is displayed when searching for available media servers in the DSM 120 interface ...

Страница 26: ...k Media Server To stop the D Link Media Server and stop sharing your music on your PC right click on the server icon and select Exit from the server menu Note The music files stored on your computer will be available to your DSM 120 only if the D Link Media Server is running Online Music content that does not require PC based software such as Live365 can still be accessed from the DSM 120 without r...

Страница 27: ... to playback DRM Digital Rights Management protected files The Windows Media Connect software is available via Windows Update if you are using Windows XP with Service Pack 2 Configuring Windows Media Connect Launch the Windows Media Connect software and the window below will appear The Devices tab is where you add the DSM 120 to the list of devices that interact with Windows Media Connect Click Add ...

Страница 28: ...ual D Link Systems Inc Using Windows Media Connect Software The Sharing tab is where you configure the folders that you want to share with your DSM 120 Click Add Click Browse Select the folder that you want to share Click OK ...

Страница 29: ...ick OK The Settings tab allows you to automatically start folder sharing when Windows starts You can also Stop Start sharing Click Automatically start folder sharing when Windows starts The Shared Folders will appear in the window Repeat the steps until you ve shared all of the folders that you want the DSM 120 to access Click Close ...

Страница 30: ...not support WMA lossless WMA Pro MP3 mp3 Up to 320kbps Playlists M3U m3u pls MPEG Playlist File Be sure to select the Windows Media Connect server as the default server in the DSM 120 System Setup if you want to access the Windows Media Connect software To do so select Setup on the Home screen and navigate to System by using the down arrow and then pressing Enter Navigate to Music Server and press...

Страница 31: ...es you want to transfer The File Manager software allows you to point to folders on your personal computer s hard drive that contains music files and then allows you to copy the files to the DSM 120 s optional 2 5 Hard Drive via a wired wireless network connection Click Next The D Link MediaLounge File Manager Setup Wizard will appear Click Next If youacceptthetermsoftheLicense Agreement select the ...

Страница 32: ... Next Select Create a desktop icon to access the program from your desktop Click Next Choose a Start Menu folder or accept the default location Click Next Choose a Destination location or accept the default location This is where the File Manager software will be copied to on your system ...

Страница 33: ...tems Inc Installing the File Manager Software Click Finish Click Install Check Launch File Manager The File Manager software will be copied to the specified locations on your computer To use the D Link MediaLounge File Manager see page 64 ...

Страница 34: ...e image below will continue to show on your DSM 120 until you decide to disconnect the Mini USB cable WARNING You must choose to safely remove the USB storage device on your PC before disconnecting your Mini USB cable or you may damage your Hard Drive see Disconnecting the Mini USB cable on page 35 After the DSM 120 has detected your Mini USB connection the image on the right will be shown and you...

Страница 35: ...over the icon and you should see the functionality title as Safely Remove Hardware After double clicking the Safely Remove Hardware icon you should see the Safely Remove Hardware screen At this point you can click the Stop button or you can continue to verify which USB storage device you would like to stop by checking the Display device components checkbox This will provide you with a hierarchy of...

Страница 36: ...m your request to stop the DSM 120 Click OK Click OK After you click OK the Safely Remove Hardware screen will appear again and the USB Mass Storage device that was shown initially will eventually disappear Also the Safely Remove Hardware icon will inform you that it is now safe to remove the DSM 120 Click Close on the Safely Remove Hardware screen and disconnect the Mini USB cable Click Close ...

Страница 37: ...io system Composite Audio Plug the supplied red and white connectors into the AUDIO R and AUDIO L color coded matching jacks on the DSM 120 Plug the opposite ends to the matching jacks on your audio system Note This cable is not supplied Head Phone Plug a standard mini plug head phone jack into the HEAD PHONE connector on the DSM 120 You can also connect standard PC speakers to the head phone jack...

Страница 38: ... Menu To access the Setup Menu select Setup on the menu and press Enter on the remote control Wireless Connection If you are connecting wireless using the built inantenna then you do not need to connect the supplied Ethernet cable For an optimal wireless connection place the antenna at a 90o angle as shown in the image to the right Select one of two ways to connect your DSM 120 to your network RJ ...

Страница 39: ...n directly transfer music files from your PC to the DSM 120 using the included Mini USB cable to connect the DSM 120 to the USB port on the PC You can also directly transfer music files from your DSM 120 to your PC Select one of two ways to connect your DSM 120 with USB In order to use the Mini USB connection you must have a standard IDE 2 5 Hard Drive installed in your DSM 120 Please see the sectio...

Страница 40: ...ions use the up and down arrows on the remote control To toggle between the Back Next and Rescan buttons use the left and right arrows on the remote control Press Enter to select a field or confirm a selection The DSM 120 Setup Wizard Select your network Connection Type To skip the Setup Wizard select No Select Yes to continue Note You do not have to setup your device if you simply want to playback ...

Страница 41: ...options are Disable 64BitHEX 128BitHEX 64BitASCII and 128BitASCII Select your Index Key You can select numbers between 1 and 4 Note This screen is only available if you do not select Disable at the WEP screen Provide a WEP key The key you enter here must match the key of the wireless network exactly Encryption 64 bit 128 bit Character Length Example Character Length Example HEX 10 12345678FA 26 45...

Страница 42: ... Mode Provide an IP Address if you selected Static IP Provide a Subnet Mask if you selected Static IP Provide a Gateway if you selected Static IP Provide a DNS if you selected Static IP A DHCP enabled router automatically assigns IP addresses to devices on your network If you have a DHCP enabled router select DHCP ...

Страница 43: ...43 DSM 120 User s Manual D Link Systems Inc The DSM 120 Setup Wizard Your MediaLounge DSM 120 is now ready to stream music content for enjoymentonyourhomeentertainment center ...

Страница 44: ...ttings on your DSM 120 Note Windows Connect Now is only available on PCs running Windows XP with Service Pack 2 installed In the menu bar go to Start All Programs Accessories Communications and click Wireless Network Setup Wizard Your system will display the Setup Wizard Welcome screen Click Next to continue Windows Connect Now Configuration Select to add a new device to your existing wireless netw...

Страница 45: ...ve to save your wireless network settings and click Next to continue Plug your flash drive into a USB port on this computer The drive letter will appear in the pull down menu You can choose to use this drive or select another drive Click Next to save your wireless settings to the USB flash drive This may take a few seconds This screen will appear when the wireless settings have been saved to the USB...

Страница 46: ...Next remove the USB Flash Drive from your PC and insert into the USB port on top of the DSM 120 The following screen will appear prompting you to apply your wireless settings Click OK to continue The following screen confirms that your wireless settings have been applied Click OK ...

Страница 47: ... remove the USB Flash Drive from the DSM 120 and insert it back into the USB port on your PC Click Next to continue Wireless configuration using Windows Connect Now is now complete The setup wizard will display the devices that have been setup with your wireless network Click Finish ...

Страница 48: ...ton To move to the next menu screen use the right arrow Similarly use the left arrow to move to the previous screen See page 13 for more information on navigation arrows on the remote control From this home screen you can access PC Music Local Music Online Music or Setup The DSM 120 Home screen is the top level menu Now Playing If you are playing a music track and decide to return to the main menu...

Страница 49: ...128kbps or higher with a sample rate of 44 1kHz Supported Music Formats The following music file formats are supported MP3 up to 320 kbps MPEG 1 Layer 3 Audio file The standard Internet music file format This is the most commonly used audio format WMA Does not support WMA lossless WMA Pro Windows Media Audio file Supported by the Microsoft Windows Media player and some music jukebox programs Also supp...

Страница 50: ...al subfolders The DSM 120 automatically organizes your music files by genres artists albums and tracks This information is obtained from the ID3 tags in each of your music files The ID3 tag is created for you when you rip copy your music from your CD However if your music files have incorrect or incomplete tags the tracks may not appear where they should in your music categories ...

Страница 51: ...screen 1 Select the PC Music category from the Home screen 2 Select a viewing category Use the down arrow and up arrow on the remote control to navigate to a viewing category by All Tracks Playlist Genres Artists Albums or Folders Select the option by clicking Enter or the right arrow on the remote control 3 Select a Track Use the up arrow and down arrow buttons to navigate one track at a time The...

Страница 52: ... remote control When the icon with the text REPEAT ONE appears this will repeat the music track that is currently playing When the icon with the text REPEAT ALL appears this will repeat all of the tracks within your currently selected folder or playlist When Shuffle is selected you should see this image When Repeat All is selected you should see this image PressingShufflewillallow you to toggle betw...

Страница 53: ...you should see all of your music files In this example USB was selected from Local Music Press the Enter or right arrow button to start the playback of your selected music file Note You must partition your 2 5 Hard Drive before you can use it in your DSM 120 Please see page 62 for instructions on partitioning the Hard Drive Note The DSM 120 only supports a 2 5 Hard Drive with a FAT or FAT32 file syst...

Страница 54: ...ss to thousands of radio stations The audio is streamed directly over the Internet Live365 allows you to select your own preset stations and provides custom station recommendations Select Online Music from the Home screen Press Enter on the remote control to select Live365 Use the up and down arrows on the remote control to navigate through the options Press the Enter or the right arrow button on ...

Страница 55: ...Use the down arrow to navigate towards the bottom of the list and select Setup After you select Setup you should see the option Login After you login to Live365 you will be able to play music Click Login to enter in your Login information If you do not have a Live365 account use you PC to sign up for one Enter in your Name username and Pswd password and select OK ...

Страница 56: ...rminology used in the Setup functions please see the Glossary Using the up arrow and down arrow buttons on your remote control scroll down the list to highlight your selection then press Enter or the right arrow to select your choice Navigating the menus Use the up and down arrow buttons on the remote control to navigate between the options Press Enter on the remote to select the highlighted item ...

Страница 57: ... music player Check Connection Select this option to check the validity of your network connection Some firmware updates may display an informational message telling you to upgrade your version of the D Link Media Server software Your current version of the software should still work but to utilize all of the latest firmware features you should upgrade your Media Server software Please visit http su...

Страница 58: ...re OFF 5 Min 10 Min 15 Min 20 Min 25 Min 30 Min 40 Min 50 Min 60 Min 70 Min 80 Min and 90 Min Alarm Clock The DSM 120 is equipped with an alarm clock feature To set the alarm clock please do the following 1 Select Set Alarm Clock Use the navigation buttons on the remote control to enter a time that you would like the alarm to start 2 Select Enable Disable this will give you the choice to turn the ...

Страница 59: ...an Enable or Disable DSM 120 to automatically look for updates Update Version Selecting this option allows you to manually update your DSM 120 Hard Disk Use the up and down arrow buttons on the remote control to navigate between the following options Selecting this option will provide information on the attached hard drive Use the right arrow or press Enter to check the Hard Drive Capacity The inf...

Страница 60: ...nc LCD Logo Displays LCD Logo Displays The DSM 120 contains several logos that are displayed in the upper right hand corner of the DSM 120 Mute Volume Stop Pause WLAN wireless signal Wired ethernet cable No Network Shuffle Repeat All Repeat One ...

Страница 61: ... the cover Your DSM 120 should be ready to play music from your installed 2 5 Hard Drive Note Hard Drive is not included with the DSM 120 WARNING You must unplug the power from the DSM 120 before inserting the Hard Drive Note You must partition your 2 5 Hard Drive before you can use it in your DSM 120 Please see page 62 for instructions on partitioning the Hard Drive Note The DSM 120 only supports...

Страница 62: ...Disk Management 3 Windows should now give you the option to initialize the disk If not locate the new drive right click on the new disk where it reads Disk and choose Initialize This step may not be required for some hard drives 4 Go through the wizard 5 Once complete locate your hard drive in the bottom right pane Right click on the area with a status bar to the right of the Disk and choose New P...

Страница 63: ... is FAT32 Please note that Windows XP 2000 limits FAT32 partitions to 32GB 1 2 3 4 5 6 7 Once you ve finished with the wizard you should now be able to see the drive in Windows Explorer Note Your DSM 120 only works with FAT or FAT32 file systems You cannot create a partition larger than 32GB in size with the FAT32 file system by using the Format tool in Windows 2000 XP see page 64 ...

Страница 64: ... hard drive vendor includes partition software in the package for you to partition the hard drive 3 Start from a Microsoft Windows 98 ME Startup disk and use the Fdisk tool included on the disk to partition your hard drive For additional information about how to use a Microsoft Windows 98 ME Startup disk to format a hard disk you can fnd an article in the Microsoft Knowledge Base How to Use Fdisk ...

Страница 65: ...ile Manager File Manager After double clicking your DSM 120 device represented on the left window pane of the File Manager the next screen will verify if you would like to connect to your DSM 120 Wireless Music Player To establish a connection with your DSM 120 browse and double click the device listed here Note After selecting Yes the screen to your left will be displayed on your DSM 120 Once you...

Страница 66: ...anager s menu bar click Transfer and select Upload After the file has completely copied over you should notice the music file appears in the Destination area of the File Manager Also pay close attention to the Status message located near the bottom of the File Manager Status displays the current action of the File Manager Select Upload from the Transfer menu to upload a music file to the DSM 120 Not...

Страница 67: ...e menu Select Refresh to refresh the lists To delete a music file simply right click on the music file and you should see a sub menu The options of the sub menu are Download Delete Rename and New Folder Selecting Delete will remove the file permanently from the DSM 120 Right click the music file to delete Note Deleting a file from the DSM 120 will not delete it from the PC ...

Страница 68: ... control to higher and lower the volume respectively on the DSM 120 When pressing the Volume buttons the DSM 120 screen should change to a Set Volume screen see image below that displays a decibel output level Pressing the Mute button on the remote control will mute the sound from the DSM 120 see image below ...

Страница 69: ... you have selected your file and pressed the Copy button on the remote control you will see the following screen on your DSM 120 Note Do not unplug the DSM 120 during the copy process D Link is not responsible for hardware failure caused by user error Press Copy to copy files from your USB thumbdrive to your attached Hard Drive As your file is being copied the percentage of transfer should be display...

Страница 70: ...e on your PC the server software will be launched allowing you to add media files You may then select folders that contain music that you want to play Can I access Live365 without the Media Server software running Yes by selecting the Online Music option from the Home screen If I am running Windows Media Connect do I need to run the D Link Media Server software No you may run both applications but ...

Страница 71: ...ternet connection How do I change the bit rate of an audio file There are various conversion programs available for download on the Internet How do I copy files from my PC You can copy files from your PC by using the D Link MediaLounge File Manager Software please see page 31 You can also copy files from your PC to your USB thumbdrive and then use the Copy button while your thumbdrive is connected to ...

Страница 72: ...t http support dlink com My remote control isn t working Make sure the batteries are inserted correctly Try removing the batteries and reinserting them without touching any buttons on the remote control Replace the batteries with new ones I can t use my HDD or USB device that I just installed Please make sure that it is a FAT or FAT32 File System Reformatting your Hard Drive to this File System ma...

Страница 73: ... attached to your DSM 120 and to a network switch hub or router Verify that the switch hub or router is powered on If you are using static IP addresses verify the IP address and netmask are in the same range as other addresses on your network Verify that the address is not already in use by another PC or device Make sure the files you are sharing use a supported file format and encoding scheme I can...

Страница 74: ...6 kHz For best results rip your MP3 files at 320 kbps or higher with a sample rate of 44 1 kHz I am not able to play certain media files The DSM 120 supports most industry standard file formats but even supported file formats can be encoded in ways that are not supported Try exporting media with To check the bit and sample rates of a music file 1 Right click on the file and select Properties 2 Select th...

Страница 75: ...he main home screen select Setup and then select Version Under the Version menu select the option Device Info The firmware version will be listed here I am unable to access Napster content Make sure you have Windows Media Connect running and that you are sharing the folder that contains the Napster audio files Make sure you have validated the D Link player from within Windows Media Connect I was abl...

Страница 76: ... with the D Link Media Server If you are sharing gigabytes of content with your media server software it may take several minutes depending on the size of the content you are sharing The list of music tracks show up as either blank fields or strange characters Make sure you have english only in your file s metadata Unicode is not supported at this time What is the largest single file size that a DSM ...

Страница 77: ... 4GHz swivel type monopole antenna Frequency 2 4GHz to 2 5GHz Impedance 50 ohms Gain 2dBi Dimensions H x W x L 1 5 x 11 25 x 16 75 Weight 5 5 pounds Security Hardware based WEP Wired Equivalent Privacy Up to 128 bit encryption Configuration UPnP AV 1 0 Enabled INMPR Compliant Maximum wireless signal rate derived from IEEE Standard 802 11a and 802 11g specifications Actual data throughput will vary N...

Страница 78: ...ndows 2000 or XP 500MHz processor 128MB memory 20MB available hard disk space CD ROM drive Broadband Internet Service For online music access and firmware updates Power Source 12V 1 25A Environmental specification Operating temperature 0 C to 45 C Storage temperature 25 C to 55 C Operating relative humidity 10 to 95 non condensing Warranty 1 Year ...

Страница 79: ...sic on your DSM 120 However your monitor can be in a low power state or turned off To change your power settings on Windows XP 1 Click on Start 2 Select Control Panel 3 Select Performance and Maintenance 4 Select Power Options 5 Change both System standby and System hibernates to Never 6 Click OK To change your power settings on Windows 2000 1 Click on Start 2 Select Settings 3 Select Control Pane...

Страница 80: ...uce your DSM 120 s range from 3 90 feet 1 30 meters Be aware of the direct line between network devices A wall that is 1 5 feet thick 5 meters at a 45 degree angle appears to be almost 3 feet 1 meter thick At a 2 degree angle it looks over 42 feet 14 meters thick Position devices so that the signal will travel straight through a wall or ceiling instead of at an angle for better reception Building ...

Страница 81: ...e system on a basic MBR disk using a sector size of 512 bytes to approximately 2 terabytes FAT32 file system cluster sizes Partition Size Cluster Size less than 260MB 512 Bytes 260MB through 8GB 4KB 8GB through 16GB 8KB 16GB through 32GB 16KB 32GB through 2TB 32KB However as Windows 2000 or Windows XP fully supports using a FAT32 partition over 32GB and only does not permit formatting a FAT drive o...

Страница 82: ...y used wired network technology Standard Ethernet supports up to 10Mbps Fast Ethernet supports up to 100Mbps Gateway This is the IP address of the device that connects you to another network such as a router A router would be the gateway between your local area network and the Internet Infrastructure This wireless networking mode is used by wireless networks with a router or an access point IP Add...

Страница 83: ...ireless Devices networked using radio frequencies instead of physical cabling Music M3U is a playlist format and is the default playlist format of WinAMP and most other media player software It allows multiple files to be queued in a program in a specific format MP3 is the file extension for MPEG 1 audio layer 3 Layer 3 is one of three coding schemes layer 1 layer 2 and layer 3 for the compression of...

Страница 84: ...an customers can contact D Link Technical Support through our website or by phone Tech Support for customers within the United States D Link Technical Support over the Telephone 877 453 5465 24 hours a day seven days a week D Link Technical Support over the Internet http support dlink com e mail support dlink com Tech Support for customers within Canada D Link Technical Support over the Telephone ...

Страница 85: ...tantially conform to D Link s then current functional specifications for the Software as set forth in the applicable documentation from the date of original retail purchase of the Software for a period of ninety 90 days Software Warranty Period provided that the Software is properly installed on approved hardware and operated as contemplated in its documentation D Link further warrants that during ...

Страница 86: ...he foregoing requirements or for which an RMA number is not visible from the outside of the package The product owner agrees to pay D Link s reasonable handling and return shipping charges for any product that is not packaged and shipped in accordance with the foregoing requirements or that is determined by D Link not to be defective or non conforming What Is Not Covered The Limited Warranty provi...

Страница 87: ... Inc Other trademarks or registered trademarks are the property of their respective owners Copyright Statement No part of this publication or documentation accompanying this product may be reproduced in any form or by any means or used to make any derivative such as translation transformation or adaptation without permission from D Link Corporation D Link Systems Inc as stipulated by the United St...

Страница 88: ...8 DSM 120 User s Manual D Link Systems Inc Registration Product registration is entirely voluntary and failure to complete or return this form will not diminish your warranty rights Registration 09 21 05 ...

Отзывы: