background image

1

D-Link DSL-540B ADSL+ 4-Port Router User Manual

Section 5 - Log In To The Router 

Log in to the Router 

This section will explain how to log in to your router using the following steps:

1. Launch your web browser.

. Enter the URL http://19.168.1.1 in the address bar and press 

Enter

.

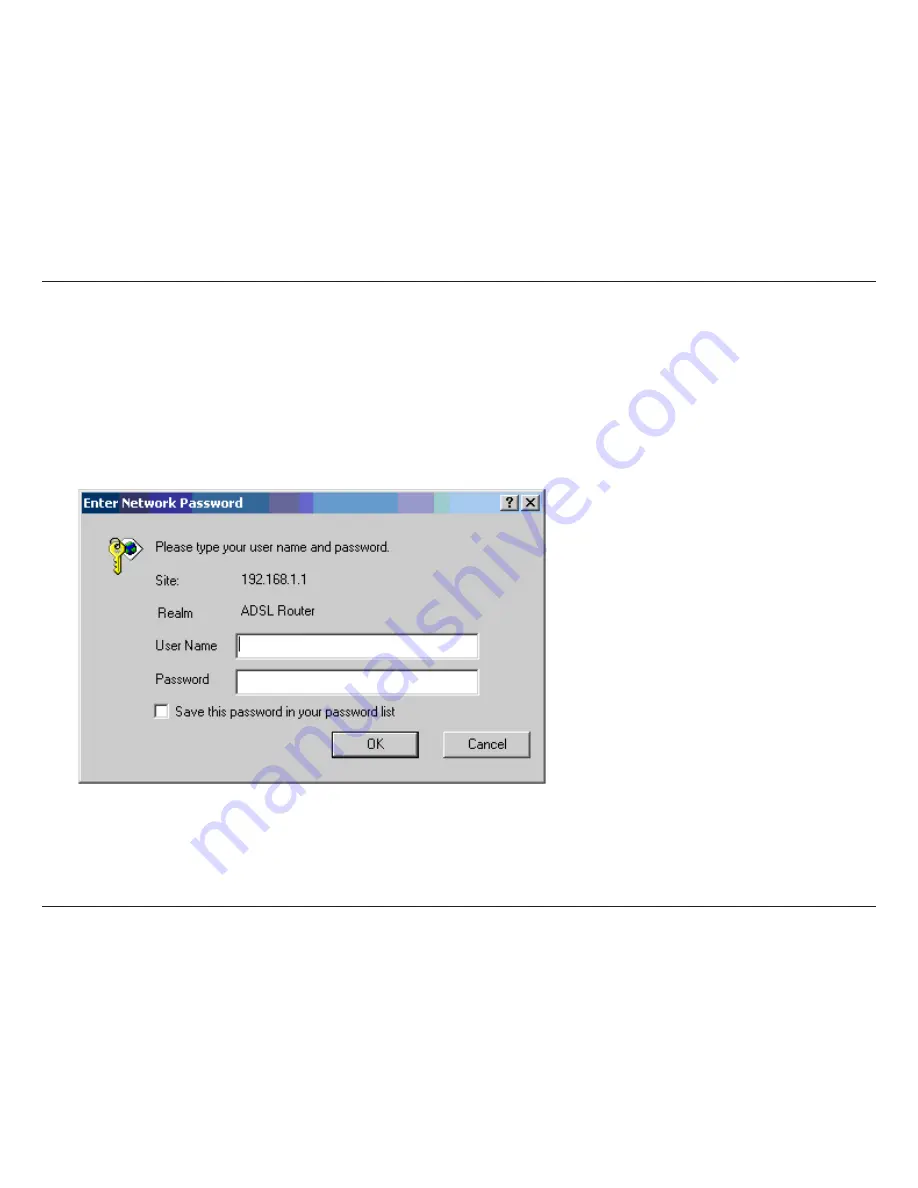
A login screen like the one below will be displayed after you connect to the user interface.

3. Enter your user name and password, and then click 

OK

 to display the user interface.   

Note:

 There are three account types, each 

requiring a different username and password.


•  The user account provides limited access to  

certain configurations (username / password:  

user / user

).

•  The admin account can perform all functions 
   (username / password: 

admin / admin

). 

•  The support account is for ISP technicians for  

maintenance purposes 

   (username / password: 

support / support

). 

Note: 

Passwords can be changed at any time.

Note:

 This manual has been prepared using the admin user name.

Содержание DSL-2540B - ADSL2/2+ Modem With EN Router

Страница 1: ......

Страница 2: ...on 13 WAN 20 LAN 26 DNS 27 DNS Server Configuration 27 Dynamic DNS 28 Logout 29 Advanced Setup 30 ADSL 30 ADSL Settings 31 ADSL Tone Settings 32 Virtual Server 33 NAT Virtual Servers Setup 33 DMZ 36 SNMP 36 Filter Outbound 37 Outgoing IP Filtering Setup 37 Filter Inbound 38 Incoming IP Filtering Setup 38 Bridge Filters 40 MAC Filtering Setup 40 Routing 42 Routing Static Route 42 RIP 43 Quality of ...

Страница 3: ...tatus 54 Device Info 54 DHCP Clients 54 WAN Info 55 Route Info 55 Log 56 LAN 56 WAN 57 ADSL 58 ADSL BER Test 59 Troubleshooting 61 Networking Basics 63 Check your IP address 63 Statically Assign an IP address 64 Contacting Technical Support 65 Warranty 66 Registration 68 ...

Страница 4: ... one included with the DSL 2540B will cause damage and void the warranty for this product Important Safety Instructions Place your router on a flat surface close to the cables in a location with sufficient ventilation To prevent overheating do not obstruct the ventilation openings of this equipment Plug this equipment into a surge protector to reduce the risk of damage from power surges and lightn...

Страница 5: ... an Ethernet enabled computer on ports 1 4 This LED blinks during data transmission DSL LED A Solid light indicates the DSL is synchronized A flashing LED indicates the router is attempting to synchronize with the DSL provider Internet LED A solid green light indicates that the router has an IP address and is connected to the Internet A red light indicates that the router does not have an IP addre...

Страница 6: ...4 Connect Ethernet devices such as computers switches and hubs ON OFF Press this button to turn the unit on or off Reset Pressing the Reset button restores the router to its original factory default settings Power Receptor Receptor for the supplied power adapter DSL Line Connecttoanactivetelephone line RJ 11 ...

Страница 7: ... cable NOTE See connections on the installation diagram Connect the PC to the Router To use the Ethernet connection connect the Ethernet cable from the computer directly to the router Connect one end of the Ethernet cable to the port labeled LAN on the back of the router and attach the other end to the Ethernet port of your computer If your LAN has more than one computer you can attach one end of ...

Страница 8: ...er Adapter Complete the process by connecting the supplied 12VAC 1A power adapter to the POWER connector on the back of the device and plug the adapter into a wall outlet or power strip Then turn on and boot up your PC and any LAN devices such as hubs or switches and any computers connected to them ...

Страница 9: ... D Link DSL 2540B ADSL2 4 Port Router User Manual Section 3 Installation Diagram Installation Diagram ...

Страница 10: ...000 operating system If you are using Windows XP please proceed to page 10 1 In the Windows taskbar click on the Start button and point to Settings Control Panel Network and Dial up Connections in that order 2 Click on Local Area Connection When you have the Local Area Connection Status window open click on Properties 3 Listed in the window are the installed network components If the list includes...

Страница 11: ... the IP address field and Subnet Mask field 11 Click on OK twice to save your changes and then close the Control Panel Windows XP 1 In the Windows taskbar click on the Start button then go to Control Panel and then click Network Connections 2 In the Network Connections window right click on the Local Area Connection icon and click on Properties 3 Listed in the Local Area Connection window are the ...

Страница 12: ... user interface 3 Enter your user name and password and then click OK to display the user interface Note There are three account types each requiring a different username and password The user account provides limited access to certain configurations username password user user The admin account can perform all functions username password admin admin The support account is for ISP technicians for ...

Страница 13: ...up and DNS configuration The below sections explains the setup for each Wizard This section will explain how to quickly configure the router if your only intention is to access the Internet ATM PVC Configuration To enable the auto connect process click on the box labeled DSL Auto connect a process that will automatically detect the first usable PVC and automatically detect PPPoE PPPoA and Bridge P...

Страница 14: ... User Manual Section 6 Home If you uncheck the DSL Auto connect box the resulting screen is seen below Enter the VPI VCI as indicated by your ISP There is also an option to enable Quality of Service When you are ready click Next to continue ...

Страница 15: ...r Manual Section 6 Home Next is the Connection Type screen where you can select the type of network protocol and encapsulation mode over the ATM PVC that your ISP has instructed you to use The following is a PPPoA example Click Next to continue ...

Страница 16: ... ADSL2 4 Port Router User Manual Section 6 Home Enter the PPP username and password given by your ISP Then decide if you will be using any features such as dial on demand PPP IP extension keep alive and then click on Next ...

Страница 17: ...2 4 Port Router User Manual Section 6 Home The next step is to configure the Network Address Translation NAT settings For the example NAT will be enabled Leave the remaining fields at their defaults and click Next to continue ...

Страница 18: ...ask to make the LAN interface correspond to your LAN s IP Subnet If you want the DHCP server to automatically assign IP addresses then enable the DHCP server and enter the range of IP addresses that the DHCP server can assign to your computers Disable the DHCP server if you would like to manually assign IP addresses Click Next to continue ...

Страница 19: ...e After all WAN configurations are complete the WAN Setup Summary screen displays all WAN settings that you have made Check that the settings are correct before clicking on the Save Reboot button Clicking on Save Reboot will save your settings and restart your router ...

Страница 20: ...s as provided by your ISP Click on the Add button if you want to add a new connection for the WAN interface and to proceed to the ATM PVC Configuration screen as seen on page 21 The ATM PVC Configuration screen allows you to configure an ATM PVC identifier VPI and VCI and select a service category ...

Страница 21: ...at is continuously available during the connection time It is commonly used for uncompressed audio and video information such as videoconferencing interactive audio telephony audio video distribution e g television distance learning and pay per view and audio video retrieval e g video on demand and audio library Non Realtime VBR Non Real time Variable Bit Rate Can be used for data transfers that h...

Страница 22: ... PPP over ATM PPPoA PPP over Ethernet PPPoE MAC Encapsulation Routing MER IP over ATM IpoA Bridging If you will be using VLAN tagging click on the Enable 802 1q checkbox and then enter the VLAN ID number When finished with your selections click Next to continue Note These settings are ISP dependant For information regarding proper configuration contact your ISP ...

Страница 23: ...ded PPP IP extension Used by some ISP s Check with your ISP to see if it is required Keep alive Keeps you connected to your ISP even when no activity is present for a certain period of time Use static IP address Select if you want to use a non DHCP issued IP address to connect to the Internet If selected you will be asked to enter the static IP address When finished click Next to proceed to the NA...

Страница 24: ... Enable NAT Select enable if you wish to share one WAN IP address for multiple computers on your LAN Enable Firewall Select if you wish to enable the router s firewall for security Enable IGMP Multicast Select enable if you wish to be able to provide multicasts mostly used in video streaming Enable WAN Service Select if you wish to use WAN service and then set the service name This screen allows y...

Страница 25: ...ome After you apply the configuration it will return to the WAN Setup screen showing the new configuration Select the Finish button to save the changes and reboot the router When the router restarts the DSL Router Reboot screen will appear during the reboot process ...

Страница 26: ...d where it is headed There are two IGMP snooping options standard or blocking mode If you want the DHCP server to automatically assign IP addresses select enable DHCP server and enter the range of IP addresses that the DHCP server can assign Select Disable DHCP server if you would like to manually assign IP addresses The Save button only saves the LAN configuration data but does not apply the conf...

Страница 27: ... screen to request automatic assignment of a DNS or to specify a primary and secondary DNS If you uncheck the Enable Automatic Assigned DNS checkbox two additional fields will appear primary and secondary DNS server Enter one primary and one secondary DNS address in each field Click Apply to save the configuration ...

Страница 28: ...ctions to you without needing to track the IP address themselves This screen allows you to add a dynamic DNS address from DynDNS org or TZO First select the DDNS provider DynDNS org or TZO from which you have obtained a dynamic DNS address Enter the hostname and the interface that you are using Also enter the username and password assigned by the DNS service Click on Apply to save these configurat...

Страница 29: ...L2 4 Port Router User Manual Section 6 Home Logout To log out of the router s user interface at any time during the setup click on the Logout button A confirmation screen will appear confirming that you really want to log out ...

Страница 30: ...ons to your router such as creating a virtual server DMZ RIP Quality of Service QoS etc consider going through this advanced setup for a more comprehensive configuration ADSL The ADSL settings page contains modulation and capability settings Consult your ISP to determine the correct settings Click Apply if you are finished or click on Advanced Settings if you want to configure more advanced settin...

Страница 31: ...7 Advanced Setup ADSL Settings The test mode can be selected from the ADSL Advanced Settings page Test modes include normal reverb medley no retrain and L3 After you make your selection click on Apply to save these settings first before you go to Tone Selection ...

Страница 32: ...nd of ADSL is split into 256 separate tones each spaced 4 3125 kHz apart Each tone carries separate data so the router operates as if 256 separate routers were running in parallel The tone range is from 0 to 31 for upstream and from 32 to 255 for downstream Do not change these settings unless directed by your ISP ...

Страница 33: ...ort Triggering and DMZ Host A virtual server allows you to direct incoming traffic from the WAN side to a specific IP address on the LAN side This is useful if you have software that requires communication with the Internet e g peer to peer games etc This figure shows the Virtual Servers Setup page that allows you to configure your virtual server s Click on the Add button to configure a virtual se...

Страница 34: ...n list and then enter the server IP address The Server IP Address would normally be the IP address of the computer on your network which is using the application or game See Networking Basics in the Appendix section of this manual to determine your IP address Once you are satisfied with your selection click Apply once ...

Страница 35: ...tion 7 Advanced Setup The following screen appears after you save your selection To add additional virtual servers click on the Add button If you need to remove any of the server names select the check box in the remove column and click on the Remove button ...

Страница 36: ...Simple Network Management Protocol is a network protocol that provides a means to monitor the status and performance of the router as well as make configuration changes It enables a management station to configure monitor and receive trap messages from network devices that are configured for SNMP To configure the SNMP agent select Enable Enter a Read Community Set Community System Name Location Co...

Страница 37: ...iltering Setup The outgoing filter will block the LAN traffic from entering the WAN side Click on the Add button to create filters This next screen will appear when you click Add Enter the filter name source information from the LAN side and destination information from the WAN side Then click Apply to save ...

Страница 38: ...r when you create an IP filter This screen lists the IP filters that were added from the previous screen To change your settings click on the Add or Remove buttons Incoming IP Filtering Setup Incoming IP filter allows specified the WAN traffic to pass through the firewall Click the Add button to add incoming filter settings ...

Страница 39: ...ocol source address information from the WAN side and destination address information to the LAN side Select the WAN interface and when ready click Apply to add the filter The following screen appears when you create an IP filter The screen lists the IP filters that were added from the previous screen To change your settings click the Add or Remove buttons ...

Страница 40: ...er User Manual Section 7 Advanced Setup MAC filtering can forward or block traffic by MAC address You can change the policy or add settings to the MAC filtering table using the MAC Filtering Setup screen Bridge Filters MAC Filtering Setup ...

Страница 41: ...n entry to the MAC filtering table Select Add from the MAC Filtering Setup screen The Add MAC Filter screen should then appear Select a ProtocolType enter the Destination and Source MAC address the necessary Frame Direction and WAN interface bridge mode only Click Apply to save After you save the settings a screen showing the settings will appear On this screen you will be able to view and delete ...

Страница 42: ... Route page can be used to add a routing table a maximum of 32 entries can be configured To proceed click Add Routing Routing Static Route On the Static Route Add page enter the destination network address subnet mask gateway and select an available WAN interface When complete click Apply ...

Страница 43: ...a process of moving a packet from one node to another by forwarding the packet to the next router It determines a route based on the smallest hop count between source and destination routers If RIP is set to active the router will advertise its routes reachability information to others if RIP is set to passive the router will not advertise its routes but will listen and update its routes based on ...

Страница 44: ...ities to traffic on the router Click Add to view the Add Network Traffic Class Rule screen Quality of Service QoS Quality of Service is a method of identifying classifying and assigning priorities to traffic that passes through the router This ensures that time sensitive data e g video streaming is given priority over other non essential data ...

Страница 45: ...ection 7 Advanced Setup This screen allows you to add a network traffic class rule A rule consists of a traffic class name and at least one condition All configured conditions must first be met before the rule takes effect Click Apply to save any changes ...

Страница 46: ... activities System Allows you to perform functions such as save reboot backup update settings and restore default settings Firmware Allows you to upgrade your router with new available firmware versions Test Allows you to view test information for your Internet connection Admin There are three usernames and passwords admin support and user that can be used to control your router The passwords for ...

Страница 47: ...onize your time with a time server on the Internet To set the router s time click on the automatically synchronize with Internet time servers checkbox Addional time settings will appear below the checkbox Select from the list of NTP NetworkTime Protocol time servers Then select the time zone that you are in and click Apply to save ...

Страница 48: ...formation that has been logged Note When you click on the View System Log button the System Log screen is located under the Status section see screen on right To return to the previous screen to configure system log remember to click on the Tools tab located on top row first and then click on Remotelog If the log is enabled the system will log selected events including Emergency Alert Critical Err...

Страница 49: ...and Mode If the selected mode is Remote or Both events will be sent to a specified IP address and UDP port of a remote system log server If the selected mode is Local or Both events will be recorded and viewed locally Select the desired values and click Apply to save the system log options To configure the system log click the Configure System Log button ...

Страница 50: ...cessed again later This feature is useful if you have changed the configuration on the router but would like to revert to a previous configuration Save and Reboot The Save Reboot button when clicked will save all configuration changes made on the router and restart the device All new configuration settings will take effect when the router starts up again Backup Settings To save your current config...

Страница 51: ...on Update Settings The router will restore settings and reboot to activate the restored settings Restore Default Settings Restore Default Settings will delete all current settings and restore the router to factory default settings Click on the Restore Default Settings button to proceed The following confirmation dialog will appear confirming your decision to restore default settings Click on OK to...

Страница 52: ... new software for this router follow these steps to perform an upgrade 1 Obtain an updated software image file firmware from your ISP 2 Enter the path of the image file location or click the Browse button to locate the image file 3 Click the Update Software button once to upload the new image file ...

Страница 53: ... your DSL connection The results will show test results of three connections Connection to your local network Connection to your DSL service provider Connection to your Internet service provider There are three buttons at the bottom of the page Next Connection appears only if you have created more than one connection Test Test with OAM F4 ...

Страница 54: ...e shows details of the router such as the version of the software bootloader LAN IP address etc It also displays the current status of your DSL connection DHCP Clients Access the DHCP Leases screen by clicking DHCP under Status This shows the computers identified by the hostname and MAC address that have acquired IP addresses by the DHCP server The table will also show the time the DHCP lease will...

Страница 55: ...s previously set up in the Home section There is an extra Status column used for connection status information displaying either ADSL Link Down or ADSL Link Up Route Info The Route Info section displays route information showing the IP addresses of the destination gateway and subnet mask as well as other route information ...

Страница 56: ... Manual Section 9 Status Log This is the same screen as seen in the Remotelog section under tools LAN The LAN section shows received and transmitted packet information for the Ethernet interface Click on Reset Statistics to renew the information ...

Страница 57: ...40B ADSL2 4 Port Router User Manual Section 9 Status WAN The WAN section shows received and transmitted packet information for the WAN connections that you have set up Click on Reset Statistics to renew the information ...

Страница 58: ...58 D Link DSL 2540B ADSL2 4 Port Router User Manual Section 9 Status Information contained in the ADSL screen is useful for troubleshooting and diagnosing connection problems ADSL ...

Страница 59: ...DSL BERTest button at the bottom of the ADSL Statistics page the following pop up screen will appear allowing you to set the tested time and to begin the test Click Start to begin the test When you start the ADSL BER Test the following progress window will display the connection speed as well as the length of time that the test will run for At any time during the test click on the Stop button to t...

Страница 60: ...4 Port Router User Manual Section 9 Status When the test is complete the following window will display the test results showing the test time total transferred bits total error bits and error ratio Click Exit to close the window ...

Страница 61: ...ust be on the same IP subnet to connect to the web based utility Make sure you have an updated Java enabled web browser We recommend the following Internet Explorer 6 0 or higher Netscape 8 or higher Mozilla 1 7 12 5 0 or higher Opera 8 5 or higher Safari 1 2 or higher with Java 1 3 1 or higher Camino 0 8 4 or higher Firefox 1 5 or higher Verify physical connectivity by checking for solid link lig...

Страница 62: ...er in the address bar This should open the login page for your the web management If you still cannot access the configuration unplug the power to the router for 10 seconds and plug back in Wait about 30 seconds and try accessing the configuration If you have multiple computers try connecting using a different computer 2 What can I do if I forgot my password If you forgot your password you must re...

Страница 63: ...k on Start Run In the run box type cmd and click OK At the prompt type ipconfig and press Enter This will display the IP address subnet mask and the default gateway of your adapter If the address is 0 0 0 0 check your adapter installation security settings and the settings on your router Some firewall software programs may block a DHCP request on newly installed adapters If you are connecting to a...

Страница 64: ...roperties Step 3 Highlight Internet Protocol TCP IP and click Properties Step 4 Click Use the following IP address and enter an IP address that is on the same subnet as your network or the LAN IP address on your router Example If the router s LAN IP address is 192 168 0 1 make your IP address 192 168 0 X where X is a number between 2 and 99 Make sure that the number you choose is not in use on the...

Страница 65: ...ct e g DSL 2540B Hardware Revision located on the label on the bottom of the router e g rev A1 Serial Number s n number located on the label on the bottom of the router You can find software updates and user documentation on the D Link website as well as frequently asked questions and answers to technical issues For customers within the United States Phone Support 877 453 5465 Internet Support htt...

Страница 66: ...by D Link in writing the replacement Software is provided only to the original licensee and is subject to the terms and conditions of the license granted by D Link for the Software Replacement Software will be warranted for the remainder of the original Warranty Period and is subject to the same limitations and exclusions If a material non conformance is incapable of correction or if D Link determ...

Страница 67: ...ITH LOSS OF INFORMATION OR DATA CONTAINED IN STORED ON OR INTEGRATED WITH ANY PRODUCT RETURNED TO D LINK FOR WARRANTY SERVICE RESULTING FROM THE USE OF THE PRODUCT RELATING TO WARRANTY SERVICE OR ARISING OUT OF ANY BREACH OF THIS LIMITED WARRANTY EVEN IF D LINK HAS BEEN ADVISED OF THE POSSIBILITY OF SUCH DAMAGES THE SOLE REMEDY FOR A BREACH OF THE FOREGOING LIMITED WARRANTY IS REPAIR REPLACEMENT O...

Страница 68: ...DSL2 4 Port Router User Manual Appendix D Registration Version 1 0 September 26 2006 Product registration is entirely voluntary and failure to complete or return this form will not diminish your warranty rights Registration ...

Отзывы: