7
Using the DSC-100
Setting Camera Shooting Modes
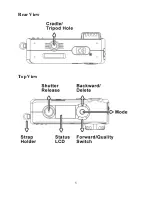
Press and hold the
Power
button for 3 seconds to power on the camera.
Then press the
Mode
button to set the shooting modes. The mode will
change each time you press the
Mode
button.
Single Snap Shot Mode (Default Setting)
Only one picture will be taken every time you press the
Shutter
Release
button.
Single Snap Shot with Self Timer Mode
The camera will take pictures 10 seconds after you press the
Shutter Release
button. The LED light on the front panel will
start to blink when you press the shutter button and stop
blinking after 10 seconds.
Continuous Snap Shot with Self Timer Mode
You can set the camera to take 1 to 10 continuous pictures with
a 10 second interval using the self-timer mode. Press the
Mode
button until you see the
Timer Mode
icon appear. Press the
Mode
button for 3 seconds and press the
Forward
"
" or
Backward
"
" buttons to set the number of pictures to take.
Click the
Shutter Release
button to apply the setting changes.
Press the
Shutter Release
button again to start taking pictures.
If you want to stop taking pictures, press the
Power
button.
Tip
:
Use a tripod or other steady support to hold the camera when
using the self timer or continuous snapshot modes.
Содержание DSC-100
Страница 1: ...D Link DSC 100 Digital Camera Webcam Digital Video User s Manual Rev 2001 05 18 ...
Страница 7: ...5 Rear View Top View ...
Страница 28: ...26 ...


