background image


DPH-C160S – DECT Cordless VoIP Phone – User Manual 

Web Interface Menu Items 


Below we will cover all of the possible features under each menu item within 

the Web Interface. 


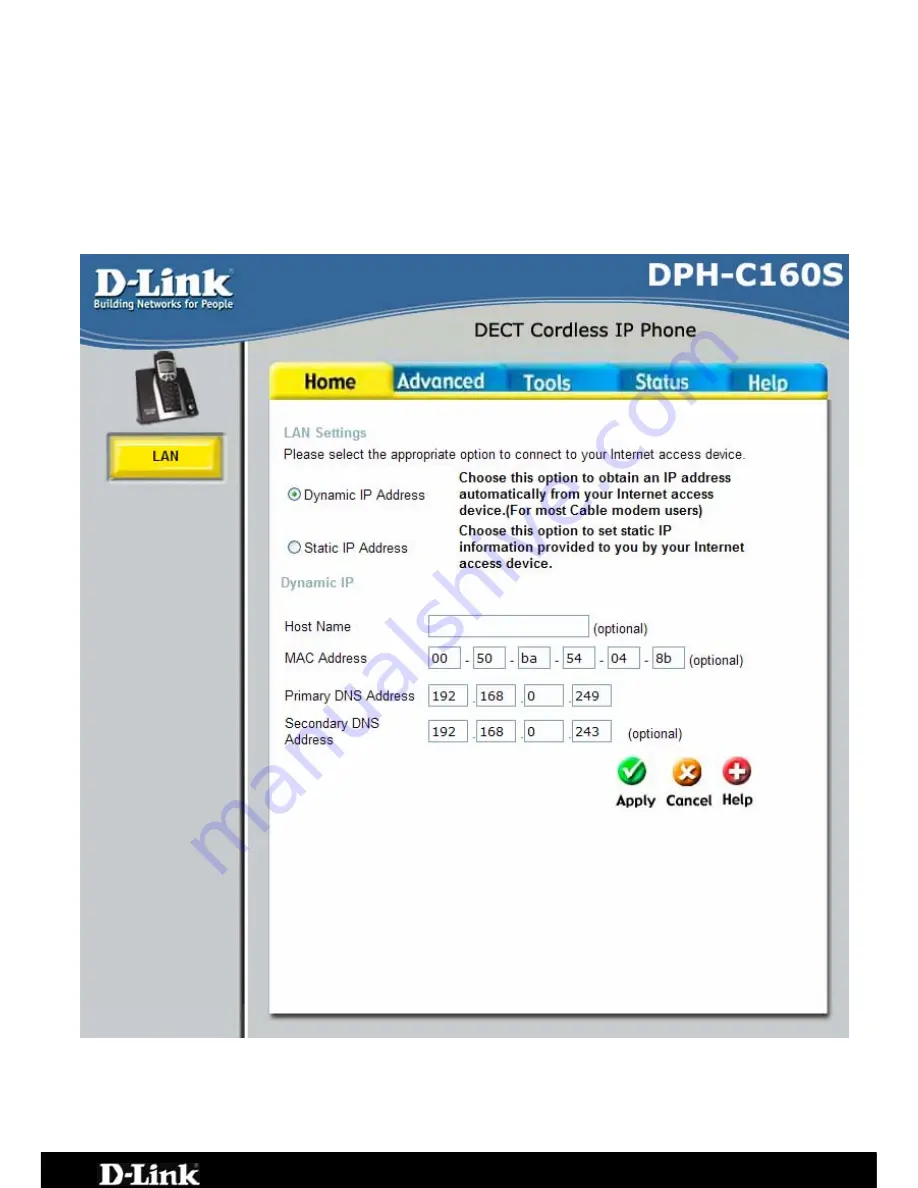
Home > LAN > Dynamic IP Address 


Dynamic IP Address 

Choose Dynamic IP Address to obtain IP Address information 
automatically from your router/gateway. This option should be 

Page 26 of 67 

Содержание DPH-C160S

Страница 1: ......

Страница 2: ...ECEIVING A CALL 16 LAST NUMBER REDIAL 17 USING THE SPEAKERPHONE 18 ADJUSTING THE VOLUME LEVEL 19 CONNECTING THE DPH C160S TO YOUR NETWORK 20 CONNECTING ACTIVATING YOUR VOIP SERVICE 21 CONFIGURING THE DPH C160S FOR USE WITH YOUR VOIP SERVICE PROVIDER 22 USING THE WEB INTERFACE 25 WEB INTERFACE MENU ITEMS 26 Home LAN Dynamic IP Address 26 Home LAN Static IP Address 28 Advanced VOIP Server Configurat...

Страница 3: ...HOW TO FACTORY RESET BASE STATION 56 TECHNICAL SPECIFICATIONS 57 APPENDIX 60 CONFIGURING YOUR PC S IP ADDRESS 60 Configure Windows XP for DHCP 60 WINDOWS 2000 IP PROTOCOL 63 Configure Windows 2000 for DHCP 64 WINDOWS ME IP PROTOCOL 64 Configure Windows ME for DHCP 65 WINDOWS 95 AND WINDOWS 98 IP PROTOCOL 65 Configure Windows 95 and Windows 98 for DHCP 65 Page 3 of 67 ...

Страница 4: ...ly with a different voltage rating than the one included with the DPH C160S will cause damage and void the warranty for this product If any of the above items are missing please contact your reseller System Requirements for Configuration Ethernet Based Cable or DSL Modem A multi port Ethernet router may be included in the same box as the Cable or DSL Modem mentioned above Computer with Windows Mac...

Страница 5: ...ge Outdoors 300 Metres Indoors 50 Metres Handset 150 Hours Standby Time 10 Hours Talk Time Handset Caller ID Function FSK DTMF Handset Phonebook Memory 50 Locations Intercom Call transfer of external calls Ringer melody selection 9 different melodies Ringer volume adjustment 9 levels Handset earpiece volume setting 9 levels Delete single or all records in phonebook Redialling and preparation diall...

Страница 6: ...ble Phone Connection Connect to your existing phone line using standard phone cabling LAN Port Connect the Ethernet cable from a computer on your LAN to this port Factory Reset Press this button to restore the DPH C160S to its factory default settings MAC Address The MAC address assigned to your DPH C160S by the factory Power Adapter Connect your 9VAC 1A power adapter here Page 6 of 67 ...

Страница 7: ...ut has not yet registered with a SIP server A solid LED indicates the DPH C160S has registered with a SIP server and ready for a VoIP call VoIP PSTN An active LED indicates a VoIP session has been established LAN LED A solid LED indicates an Ethernet link has been established The LED will blink when there is activity on this link Page 7 of 67 ...

Страница 8: ...a VoIP call PSTN Dial Tone On Hook Use this button to switch the Handset off by holding the button until Good Bye appears in the display Also this button is used to clear an input Use this button to hang up the Handset after you have finished a VoIP PSTN call Power Clear Use this button to initiate a PSTN call over your existing phone line It is also used to switch the Handset to speakerphone mode...

Страница 9: ...e Internet connection type Pressing the following followed by the IP button 1 will play your DPH C160S s IP address Pound Key Use this button for various input functions such as to enter a static IP address as described to the left Down Arrow Use the button to open the Phone Book numbers stored for your use Pressing this button during a telephone call will decrease the volume Menu OK Use this butt...

Страница 10: ...ew DPH C160S DECT Cordless VoIP Phone 1 Slide the battery cover in the direction of the arrow 2 Insert the new batteries as indicated matching the correct polarity 3 Replace the battery cover and slide it up until it snaps shut 4 Put the Handset into the Base 5 Connect the Base to the AC mains using the supplied AC adapter 6 Allow the batteries to charge for about 12 hours before using the Handset...

Страница 11: ...s To charge the Handset simply place it on the charger base as shown When the Handset is recharging the battery icon on the LCD display is turned on Please Note Reversing the orientation of the batteries their polarity may damage the Handset The batteries need to be replaced when they do not recover their full capacity after recharging When replacing the batteries use good quality NiMH rechargeabl...

Страница 12: ...ephone is in use i e a telephone call is in progress Speakerphone Indicates the handset is in speakerphone mode Line Indicates the line is engaged Operation Mode Displayed when the handset is in operation mode Caller ID Indicates a new call To view the caller access the Caller ID menu Battery Status Indicates the relative charge state of the handset s batteries more bars indicates a higher level o...

Страница 13: ...ery power is very low When you first turn on the handset the initial screen displays the handset number and the base number or base name if you have a name saved for the base In the case shown above the display indicates that this is handset 1 HS 1 and base 1 Base 1 When the DPH C160S has contacted the SIP server and becomes registered the name of the SIP service provider will be displayed as show...

Страница 14: ...ll appear in the handset s LCD display Dial the number you want to call The handset s LCD will display the phone number as you enter it This number is also dialled as you enter it To end the call either press the On hook button or replace the handset on the charger On hook Press this button to end the call You can also simply place the handset in the charger base to end any call This will end both...

Страница 15: ... press the On hook button or replace the handset on the charger Press this button to erase a single digit of a telephone number you have entered while the handset is in Standby Mode Holding this button for a couple of seconds will erase all of the digits of the telephone number Clear Keypad You can just dial a regular telephone number and then press the PSTN Dial Tone button The number will be dis...

Страница 16: ...he PSTN Dial Tone button if the handset is not in the charger To end the call either press the On hook button or replace the handset on the charger PSTN Dial Tone Press this button to answer an incoming PSTN or VoIP telephone call Press this button to end a telephone call You can also simply place the handset in the charger base to end any telephone call This will end both a PSTN and a VoIP teleph...

Страница 17: ...croll Up button To scroll through the list press the Scroll Up button repeatedly To end the call either press the On hook button or replace the handset on the charger Scroll Up Press this button to redial the displayed previously dialed telephone number Press this button to view the last number dialed To scroll through the last three numbers dialed press this button repeatedly PSTN Dial Tone Page ...

Страница 18: ... PSTN Dial Tone button until the speakerphone icon is displayed and you can hear the activity on the line from the speaker built in to the back of the handset To deactivate the speakerphone press the PSTN Dial Tone button until the speakerphone icon disappears The handset can then be used normally Press and hold this button to activate the speakerphone function To deactivate the speakerphone funct...

Страница 19: ... can adjust the earpiece volume level from 1 to 9 A higher number indicates a higher volume level To adjust the volume level press the Scroll Up or Scroll Down button during a telephone call Press these buttons to adjust the earpiece volume level during a telephone call Scroll Up Down Page 19 of 67 ...

Страница 20: ...tton followed by 1 that is star star one on the cordless A prerecorded voice message will read the IP address currently gned to the DPH C160S over the handset s speaker the handset assi Please write down the IP address of your DPH C160S below for your future reference please note that this IP may change if your router or DPH C160S is powered off for a period of time IP Address of DPH C160S ___ ___...

Страница 21: ...details on the activation of your account if it is not already activated Please follow the instructions on the VoIP Service Providers website to activate setup your account your so you can start making calls An example of this is shown below Figure 3 Activation Leaflet We recommend that you fill in Figure 4 with all of your details for future reference VoIP Account Number ________________________ ...

Страница 22: ... Address You can determine the IP address of your DPH C160S at any time by pressing the IP OK button followed by 1 that is star star one on the cordless handset A prerecorded voice message will read the IP address currently assigned to the DPH C160S over the handset s speaker Type the IP address of the DPH C160S into the address bar of your browser See figure 2 for the correct IP address Enter the...

Страница 23: ...ure 4 into the Password and Retype Password fields Step 2 Enter your Full Name into the Display Name field You should leave all of the other default settings unless instructed to change them by VoIP Service Provider To save the changes click the Apply button The following dialog box will open to prompt you to restart the DPH C160S DECT Cordless VoIP Phone to make your new settings take effect Page...

Страница 24: ...the DPH C160S and activate the new settings Click Reboot You will hear a short tone on the telephone and also see the words VOIP Ready written on the LCD after the DPH C160S has successfully connected to the VoIP Service Provider This means that the DPH C160S DECT Cordless VoIP Phone has now been registered with the VoIP Service Provider You should see this image right on the LCD when the DPH C160...

Страница 25: ...ress of your DPH C160S at any time by pressing the IP OK button followed by 1 that is star star one on the cordless handset A prerecorded voice message will read the IP address currently assigned to the DPH C160S over the handset s speaker Type the IP address of the DPH C160S into the address bar of your browser See figure 2 for the correct IP address Enter the Username and Password as admin This ...

Страница 26: ...elow we will cover all of the possible features under each menu item within the Web Interface Home LAN Dynamic IP Address Dynamic IP Address Choose Dynamic IP Address to obtain IP Address information automatically from your router gateway This option should be Page 26 of 67 ...

Страница 27: ...dress The default MAC Address is set to the LAN s physical interface MAC address on the DPH C160S It is not recommended that you change the default MAC address unless required by your network administrator Primary DNS Address Input the primary DNS Domain Name Server IP address provided by your ISP Secondary DNS Address This is an optional DNS Address entry to be used if the primary DNS Fails Enter...

Страница 28: ...mask gateway address and DNS address es provided to you by your network administrator Each IP address entered in the fields must be in the appropriate IP form which are four octets separated by a dot x x x x The Router will not accept the IP address if it is not in this format IP Address Input the public IP Address provided by your network administrator Subnet Mask Input your Subnet mask All devic...

Страница 29: ...teway Input the IP address of the router gateway to which you are connecting Primary DNS Address Input the primary DNS Domain Name Server IP address provided by your ISP Secondary DNS Address This is an optional DNS Address entry to be used if the primary DNS Fails Page 29 of 67 ...

Страница 30: ...CT Cordless VoIP Phone User Manual Advanced VOIP Server Configuration The DPH C160S must be configured with your VoIP Service Providers server details in order to establish a connection and make calls Page 30 of 67 ...

Страница 31: ...RL to have the router include the domain name with the SIP number in the SIP messages that it sends Select TEL URL to have the router use the SIP number without a domain name in the SIP messages that it sends User Parameter Phone You can set this to Enabled or Disabled This determines whether or not the phone number is appended to the information forwarded to your SIP server Your VoIP service prov...

Страница 32: ...Allows you to configure the order in which the codec s will be used to establish and maintain a call It is recommended to leave these in their default state unless required to change via VoIP Service Provider The Packet Interval is used to specify the size of the packet used for the VoIP traffic while used in conjunction with the specific codec It is not recommended that you change this unless spe...

Страница 33: ...visioning Function Use this drop down menu to enable or disable the Provisioning SSL nable Secure Shell SSL r URL s ber ke the Authentication Key ion key used for a secure connection P Function on the DPH C160S Use the drop down menu to e Serve Enter the URL of the Provisioning Server in this field Proxy Addres Enter the IP address of the Proxy Server in this field Proxy Port Num Enter the port nu...

Страница 34: ... intelligently modify the private IP address and port in its SIP SDP message by using the NAT mapped public IP address and port through a series of STUN queries against a STUN server located on the public Internet This will allow signalling and RTP media to successfully traverse a NAT without requiring any configuration changes on the NAT STUN is useful if you need to use the DPH C160S behind a mo...

Страница 35: ...UN Server IP Enter the IP address of a STUN serv S Address STUN Server Port Enter the port number the STUN server will use in this field If you do not have any information as to the proper po leave the default setting here STUN ReqInterval This determines the amount of time in seconds between STUN requests If you do not have any information as to the proper interval leave the default setting here ...

Страница 36: ...t This selects the port number the router will listen to when ter unless connect to the VoIP Service Provider Phone Number The telephone number assigned to your account Display Name The name that will be displayed when the account is in use U determining when calls are being made Do not al informed to by VoIP Service Provider or Support Department Page 36 of 67 ...

Страница 37: ...e User Manual Authentication Username vice Password d The Username used to access the VoIP Service Provider ser The Password used to access the VoIP Service Provider service Retype Passwor Retype your password to confirm Page 37 of 67 ...

Страница 38: ... User Manual Advanced VOIP Peer to Peer This page allows you to configure your device to make direct calls to another Index This field specifies the settings to the information entered in the VoIP device via an IP address Page 38 of 67 ...

Страница 39: ...assigned to this entry User IP Address Enter the IP address of the remote peer in this field Port Enter the UDP port number the remote peer will use to make the connection in this field If you do not have any information as to the proper port number leave the default setting here Page 39 of 67 ...

Страница 40: ...e provider uses Select Enabled RFC 2833 to send the DTMF tones in RTP packets Select Disabled G 711 to include the DTMF tones in the voice date stream This method works best when you are using a codec that does not use compression like G 711 Payload Type The payload type PT field identifies the format of the RTP ines its interpretation by the receiving bandwidth that a call uses by not transmittin...

Страница 41: ...When Enabled this will block your Outgoing Caller ID so that when you make a call it will make you appear to be an anonymous caller Incoming Caller ID Allows you to see the Callers ID when they make a call to you Do Not Disturb This will stop all calls from coming through and either relay them to a Voice Mail if the VoIP Service Provider uses this feature or it just drop the call Page 41 of 67 ...

Страница 42: ...led it will relay all calls when you are already on another call to a different number specified below usy Number This will be the number that calls when you are busy are to be forwarded to when Busy is Enabled Call Forwarding No Allows you to Enable or Disable the Call Forwarding No Answer ill relay all calls when you are already number specified below o Answer Number This will be the number that...

Страница 43: ...DPH C160S DECT Cordless VoIP Phone User Manual No Answer Timer This is the delay for the No Answer feature before calls are relayed to the No Answer Number Page 43 of 67 ...

Страница 44: ... C160S DECT Cordless VoIP Phone User Manual Advanced VOIP Speed Dial Contact List his page allows you to configured a Speed Dial and Contact List for making alls quickly from your handset T c Page 44 of 67 ...

Страница 45: ...number that you use for the Speed Dial dex This field specifies the settings to the information entered in th below table Dial Code The Dial Cod feature to engage the required Index Phone Number Basically the number that you wish the unit to dial when you enter the Dial Code Description A Brief Description to Identify the Index Page 45 of 67 ...

Страница 46: ...a eceive Gain Used to raise or lower the gain volume of signals that come in from the IP and are sent to the line side or trunk side interface The Rx Gain dB level may be set in 0 5 db increments from 20 dBm to 20 dBm ransmission Gain Used to raise or lower the gain volume of signals that go out to the IP from the line side or trunk side interface The Tx Gain dB level may be set in 0 5 db incremen...

Страница 47: ... web manager interface Be sure to save the new setting Web Management Web Management allows the DECT Cordless VoIP Phone to be configured from the Internet by a web browser A username and password is required to access the Web Management interface In general only a member of your network can browse the built in web pages to perform Administrator tasks Web Port Number The port number used to access...

Страница 48: ... that you are an Administrator New Password Enter the password here and the same password in the Confirm Password field This will be the password that the administrator will use to gain access to the configuration menu of the device The default password is admin Confirm Password See above Page 48 of 67 ...

Страница 49: ...se ou can also reset the unit to Factory Default Settings This will restore all onfigurations to the default value for the firmware and restart the unit This screen all u to backup and restore configuration files Click Backup up of a configuration file Click Upload to initiate the iguration file once you have loc button Y c Page 49 of 67 ...

Страница 50: ... com au tech You can download firmware upgrades to your hard drive from the D Link support site TFTP Server Address Type in the IP address of the computer you are loading the firmware from running the TFTP server application on Firmware Update Gives you the option to enable disable the firmware update feature File Name Enter the firmware file name in this field For example dph_c160s 100003DPH AUS ...

Страница 51: ...rver This will be the IP Address of ei SNTP Server ther an Internet or LAN based ime Zone The GMT Time Zone that you are currently in to ensure the correct time is on the unit TP Time Shows the current time on the unit you opt to use SNTP you must enter the SNTP server URL or IP address lick the Apply button to set the system time T N If C Page 51 of 67 ...

Страница 52: ...DPH C160S DECT Cordless VoIP Phone User Manual Tools Reboot Restart Device Click the Reboot button to restart the DPH C160S with the latest changes made to the configuration Page 52 of 67 ...

Страница 53: ...of the DPH C160S IP Address LAN Private IP Address of the DPH C160S Subnet Mask LAN Private Subnet Mask of the DPH C160S This page displays the current information for the DPH C160S It will display the LAN Information statistics This window will show the DPH C160S s working status LA Page 53 of 67 ...

Страница 54: ... VoIP Phone User Manual Status Stats The DPH C160S keeps a running log of statistics and activities occurring on th DECT Cordless VoIP Phone If th e e device is rebooted the statistics are utomatically cleared a Page 54 of 67 ...

Страница 55: ...tics ows you to run a basic network diagnostic PING to etermine if there is a network connection The best check that can be done is The DPH C160S all d to enter your router gateway s IP address to see if there is a connection between the two devices Page 55 of 67 ...

Страница 56: ...ill need to follow the below steps tep 1 Unplug power from the Base Station tep 2 Locate the factory reset button at the back of the Base Station tep 3 Insert a paper clip in to the reset pinhole Press and hold the reset utton with light pressure you should feel the button click in tep 4 Power the device back on by plugging the power in Continue to hold e reset button for 8 10 seconds then release...

Страница 57: ...ofile Frequency 1880 1900 MHz RF Channels 10 Channels Modulation GFSK Voice Coding ADPCM 32K bit s t LED Indicators Condition Colour Activity Power Status Power ON Power Off System ready but not yet registered System ready and registered Green N A Green Green Blinking N A Blinking Solid Ethernet Link Act Ethernet Port Link Ethernet Port Tx Rx Activity Green Green Solid Blinking VoIP PSTN VoIP PSTN...

Страница 58: ... 711 A law and U law G 726 G 729A iLBC Echo Cancellation G 168 CONFIGURATION MANAGEMENT DHCP Dynamic Host Configuration Protocol DHCP Client RFC2131 Embedded Web Server Configuration Restore Backup TELNET TFTP Client For firmwa configuratio re upgrade and n fi download le Performance Monitor SECURITY User Authentication Administration Username Password control for d WEB configurati TELNET an on SI...

Страница 59: ...IP Phone User Manual EMI CERTIFICATION FCC Class B BSMI Class B CE Class B ENVIRONMENTAL SPECIFICATIONS Operating Temperature 0 to 40 C Storage Temperature 10 to 55 C Operating Humidity Range 5 to 95 Non condensing Page 59 of 67 ...

Страница 60: ... it is not instructions are provided for installing it Once the protocol has been installed you can configure the system to receive IP settings from the Router For computers running non Windows operating systems follow the instructions for your OS that configure the system to receive an IP address from the Router that is configure the system to be a DHCP client v If you are using a Router to provi...

Страница 61: ... User Manual 2 In the Control Panel window click Network and Internet Connections 3 In the Network and Internet Connections window click Network Connections Click Network and Internet Connections Click Network Connections Page 61 of 67 ...

Страница 62: ... I w c ems by clicking on it once Click on Right click on the Local Area Connection icon and selec Properties option from the pull d menu t the own 5 n the General tab of the Local Area Connection Properties indow highlight Internet Protocol TCP IP under This onnection uses the following it the Properties button Click Properties Page 62 of 67 ...

Страница 63: ...n Properties dialog box displays with a list of currently installed network components If the list includes Internet Protocol TCP IP then the protocol has already been enabled skip ahead to Configure Windows 2000 for DHCP 5 If Internet Protocol TCP IP does not display as an installed component click Install 6 In the Select Network Component Type dialog box select Protocol and then click Add Select...

Страница 64: ...ntly install col TCP IP ahead to led 6 In the Select Network Component Type ect Protocol and then click Add 7 Select Microsoft in the Manufacturers box 8 Select Internet Protocol TCP IP in the Network Protocols list and then click OK 9 You may be prompted to install files from your Windows Me installation CD or other media Follow the instructions to install the files 10 If prompted click OK to res...

Страница 65: ... OK twice to confirm and save your changes and then Panel now ready to use the Router s DHCP server Windows 98 IP Protocol ocol and if necessary install it Windows task bar click the Start button poin click Control Panel Double click the Netw dialog box displays with a list of currentl network components If the list includes TCP IP 95 98 3 If TCP IP does not display as an installed component click...

Страница 66: ...ess VoIP Phone User Manual 6 Double click OK to confirm and save your changes You will be prompted to restart Windows When it started your computer is ready to use the Router s DHCP server 7 Click Yes has re Page 66 of 67 ...

Страница 67: ...te 1 Giffnock Avenue Zealand 0800 900 900 support dlink com au You can find software updates and user docume D Link Australia North Ryde NSW 2113 Sydney Australia TEL 61 2 8899 1800 FAX 61 2 8899 1868 Australia 1300 766 868 New URL www dlink com au www dlink co nz E MAIL V1 00AU Page 67 of 67 ...

Отзывы: