background image

78

D-Link DIR-2680 User Manual

Section 4 - Configuration

System Admin

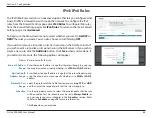
This page will allow you to change the administrator password and enable 

remote management. In the 

Management

 menu at the bar on the top of the 

page, click 

System


Admin

. To load, save, reset settings, or reboot the router, 

click 

System

 and refer t

Schedule

 on page 

75

.

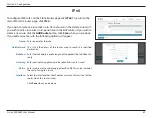
Admin Password

Password:

Enter a new password for the administrator account. You will need to 

enter this password whenever you configure the router using a web 

browser or using the D-Link Wi-Fi app.

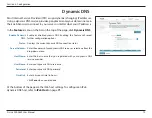
LED Control

Status LED:

Click to enable/disable status LED of device.

Click 

Save

 when you are done.

Содержание DIR-2680

Страница 1: ...Version 1 00 2019 03 12 User Manual DIR 2680 D Fend AC2600 Wi Fi Router...

Страница 2: ...acintosh are trademarks of Apple Inc registered in the U S and other countries App StoreSM is a service mark of Apple Inc Chrome browser Google Play and Android are trademarks of Google Inc Internet E...

Страница 3: ...Fi App 13 Setup Wizard 17 Configuration 22 Home 23 Internet 23 DIR 2680 24 Connected Clients 25 USB Device 26 Settings 27 Wizard 27 Internet 27 IPv6 37 VLAN 52 Wireless 54 Guest Zone 57 Network 58 USB...

Страница 4: ...106 iOS Devices 107 Mac OS X 111 Windows 7 114 Windows 8 1 8 118 Windows 10 124 Android 127 Connect a Wireless Client to your Router 131 WPS Button 131 Windows 10 132 Windows 8 134 WPA WPA2 134 Windo...

Страница 5: ...powersupplywithadifferentvoltageratingthantheoneincludedwiththeDIR 2680willcausedamageandvoidthewarranty for this product If any of the above items are missing or damaged please contact your local res...

Страница 6: ...erating system An installed Ethernet adapter Browser Requirements Internet Explorer 10 or higher Firefox 28 or higher Safari 6 or higher Chrome 28 or higher D Link Wi Fi Requirements iPhone iPad Andro...

Страница 7: ...nect to malicious addresses or unidentified devices joining your network When you are away from home you can also deny any new devices from connecting to your network D Fend also works with Amazon Ale...

Страница 8: ...ess connectivity with increased range and reliability Router includes one 10 100 1000 Gigabit Ethernet WAN port for fast paced Internet access and three Gigabit Ethernet LAN ports to give you high spe...

Страница 9: ...dicators 1 PowerButton PowerLED Press the power button to power the device on or off A solid blue light indicates a proper connection to the power supply The light will be solid yellow during the powe...

Страница 10: ...it WAN Port Using an Ethernet cable connect your broadband modem to this port 3 Gigabit LAN Ports 1 3 Connect Ethernet devices such as computers switches storage NAS devices and game consoles 4 WPS Bu...

Страница 11: ...the router then you must turn off your modem disconnect the USB cable and connect an Ethernet cable to the Internet port on the router and then turn the modem back on In some cases you may need to cal...

Страница 12: ...5 feet thick 0 5 meters at a 45 degree angle appears to be almost 3 feet 1 meter thick At a 2 degree angle it looks over 42 feet 14 meters thick Position devices so that the signal will travel straig...

Страница 13: ...1 The DIR 2680 is designed to give you the fastest most stable network connection possible Keep the router in an open area for better wireless coverage 3 Turn off and unplug the power and Ethernet cab...

Страница 14: ...onnect the supplied power adapter to the router and a power outlet press the power button and wait approximately one minute until the LED indicator on the front of the device changes from orange to so...

Страница 15: ...to the Wi Fi network printed on the included Quick Installation Card You can also find the Wi Fi network names and passwords printed on the label attached to the bottom your router DIR 2680 Modem 8 If...

Страница 16: ...connect to your clients D Link Wi Fi App Use your compatible Android or iOS device to configure your router Refer to D Link Wi Fi App on page 13 D Link Setup Wizard This wizard will launch when you l...

Страница 17: ...pp If you are using an Android device the appearance may be different from that of the screenshots but the process is the same Step 1 Search for the free D LinkWi Fi App on the App Store or Google Pla...

Страница 18: ...ailable devices Tap Next to continue Step 6 You will now be guided through a step by step process for setting up your device Simply follow the on screen instructions to complete the installation and D...

Страница 19: ...Link Wi Fi App continued Step 7 In order to use 3rd party services such as D Fend and Amazon Alexa to control and manage your device please register your device with D Link Cloud Service Step 8 Agree...

Страница 20: ...0 User Manual Section 3 Installation D Link Wi Fi App continued Step 9 Congratulations You can now connect to your Wi Fi network using the Wi Fi name and password you have set up Tap on the FINISH but...

Страница 21: ...http 192 168 0 1 PleasewaitwhileyourrouterdetectsyourInternetconnectiontype Iftherouter detects your Internet connection you may need to enter your ISP information such as username and password If the...

Страница 22: ...username and password and click Next to continue Note MakesuretoremoveyourPPPoEsoftwarefromyourcomputer Thesoftware is no longer needed and will not work through a router If the router detected or yo...

Страница 23: ...nectfeaturepresentsasinglewirelessnetwork When connecting clients to an extension network they will be automatically added to the best band either 2 4 GHz or 5 GHz To disable the Smart Connect feature...

Страница 24: ...m the drop down menu You can search for the time zone you wish by typing partial word of your region or city Click Next to continue Choose whether to keep your device up to date automatically or if yo...

Страница 25: ...tion 3 Installation You will be presented with a summary of your settings Click Next to finalize the settings or Back to make changes Congratulations your device has been successfully configured Click...

Страница 26: ...with pre configured device password The password is located on both the Quick Installation Card and on the device label at bottom of the device To access the configuration utility open a web browser...

Страница 27: ...ge displays whether or not the router is currently connected to the Internet If it is disconnected click Click to repair to bring up the setup wizard refer to SetupWizard on page 17 for more informati...

Страница 28: ...4 address and IPv6 address To reconfigure the network settings either click Go to settings on the lower left or click Settings at the top of the page and then Network on the menu that appears Refer to...

Страница 29: ...ddresses To edit each client s settings click the pencil icon on the client you want to edit Name Enter a custom name for this client Vendor Displays the vendor of the device MAC Address Displays the...

Страница 30: ...UPnP media server Windows File Sharing and FTP If you have a USB device connected you can see its name and how much free space it has To reconfigure the USB sharing settings either click Go to setting...

Страница 31: ...p of the page click Internet to see the Internet configuration options For Dynamic IP DHCP refer to page 28 For Static IP refer to page 29 For PPPoE refer to page 30 For PPTP refer to page 32 For L2TP...

Страница 32: ...mary DNS server IP address assigned by your ISP This address is usually obtained automatically from your ISP Secondary DNS Server Enter the secondary DNS server IP address assigned by your ISP This ad...

Страница 33: ...Server Enter the primary DNS server IP address assigned by your ISP Advanced Settings Secondary DNS Server Enter the secondary DNS server IP address assigned by your ISP MTU Maximum Transmission Unit...

Страница 34: ...t connection is maintained during inactivity To disable this feature select Always on as the reconnect mode Advanced Settings Address Mode Select Static IP if your ISP assigned you the IP address subn...

Страница 35: ...ice name optional Primary DNS Server Enter the primary DNS server IP address assigned by your ISP Secondary DNS Server Enter the secondary DNS server IP address assigned by your ISP MTU Maximum Transm...

Страница 36: ...d or Manual Maximum Idle Time Enter a maximum idle time during which the Internet connection is maintained during inactivity To disable this feature select Always on as the reconnect mode Advanced Set...

Страница 37: ...y IP Address Enter the gateway IP address provided by your ISP Primary DNS Server Enter the primary DNS server IP address assigned by your ISP Secondary DNS Server Enter the secondary DNS server IP ad...

Страница 38: ...al Maximum Idle Time Enter a maximum idle time during which the Internet connection is maintained during inactivity To disable this feature select Always on as the reconnect mode Advanced Settings Add...

Страница 39: ...y IP Address Enter the gateway IP address provided by your ISP Primary DNS Server Enter the primary DNS server IP address assigned by your ISP Secondary DNS Server Enter the secondary DNS server IP ad...

Страница 40: ...Lite DHCPv6 B4 IPv6 Address Enter the B4 IPv4 address value used here WAN IPv6 Address Once connected the WAN IPv6 address will be displayed here IPv6 WAN Default Gateway Once connected the IPv6 WAN d...

Страница 41: ...IPv6 refer to page 40 For Auto Configuration SLAAC DHCPv6 refer to page 42 For PPPoE refer to page 45 For 6rd refer to page 49 For Local Connectivity Only refer to page 51 My Internet Connection Is Ch...

Страница 42: ...he following DNS address If Use the following DNS address is selected Primary DNS Server Enter the primary DNS server address Secondary DNS Server Enter the secondary DNS server address LAN IPv6 Addre...

Страница 43: ...i e allowing for a larger address allocation such as 63 Contact your ISP for more information Autoconfiguration Type SelectSLAAC RDNSS SLAAC StatelessDHCP orStatefulDHCPv6 If you selected SLAAC RDNSS...

Страница 44: ...y DNS Server Enter the primary DNS server address Secondary DNS Server Enter the secondary DNS server address If Use Link Local Address is disabled these additional parameters are available for config...

Страница 45: ...DHCPv6 If you selected SLAAC RDNSS or SLAAC Stateless DHCP as the AutoconfigurationType Router Advertisement Lifetime Enter the router advertisement lifetime in minutes If you selected Stateful DHCPv6...

Страница 46: ...utomatically or Use the following DNS address If Use the following DNS address is selected Primary DNS Server Enter the primary DNS server address Secondary DNS Server Enter the secondary DNS server a...

Страница 47: ...han 64 i e allowing for a larger address allocation such as 63 Contact your ISP for more information Autoconfiguration Type SelectSLAAC RDNSS SLAAC StatelessDHCP orStatefulDHCPv6 If you selected SLAAC...

Страница 48: ...Lifetime Enter the router advertisement lifetime in minutes If DHCP PD is disabled in LAN IPv6 Address Settings and Stateful DHCPv6 is chosen as the Autoconfiguration Type IPv6 Address Range Start En...

Страница 49: ...need to change the MTU for optimal performance with your ISP Select Create a new session as the PPPoE Session Username Enter the username provided by your ISP Password Enter the password provided by...

Страница 50: ...y DNS Server Enter the primary DNS server address Secondary DNS Server Enter the secondary DNS server address LAN IPv6 Address Settings Enable DHCP PD Enable or disable prefix delegation services This...

Страница 51: ...n LAN IPv6 Address Settings Enable Automatic DHCP PD in LAN Enable or disable DHCP PD for other IPv6 routers connected to the LAN interface Note Thisfeaturerequiresasmallersubnetprefixthan 64 i e allo...

Страница 52: ...IPv6 Address Range End Enter the ending IPv6 address for the DHCP server s IPv6 assignment If DHCP PD is disabled in LAN IPv6 Address Settings IPv6 Address Range Start EnterthestartingIPv6addressforth...

Страница 53: ...hub and spoke method of networking 6rd Configuration Choose the 6rd DHCPv4 Option to automatically discover and populate the data values or Manual Configuration to enter the settings yourself If you s...

Страница 54: ...cted SLAAC RDNSS or SLAAC Stateless DHCP as the AutoconfigurationType Router Advertisement Lifetime Enter the router advertisement lifetime in minutes If you selected Stateful DHCPv6 as the Autoconfig...

Страница 55: ...lay the below settings IPv6 ULA Settings Enable ULA Click here to enable Unique Local IPv6 Unicast Addresses settings Use Default ULA Prefix Enable this option to use the default ULA prefix If you sel...

Страница 56: ...y VLAN feature Priority ID Enable or disable traffic priority ID for the Internet IPTV and VoIP VLANs If Status is enabled Internet VLAN ID Enter the VLAN ID for your Internet connection as provided b...

Страница 57: ...nterfaceTrafficType Setting LAN 1 3 Wireless Guest Zone From the drop down menu you can select the type of connection Internet IPTV orVoice over IP coming from theWAN connection to each interface on t...

Страница 58: ...t the desired wireless transmission power Schedule Use the drop down menu to select the time schedule that the rule will be enabled for The schedule may be set to Always Enable or you can create your...

Страница 59: ...n Mixed 802 11g n 802 11n only 802 11 Mode 5 GHz Select the desired wireless networking standards to use The available options for the 5 GHz wireless network are Mixed 802 11b g n Mixed 802 11g n 802...

Страница 60: ...the time schedule that the rule will be enabled for The schedule may be set to Always Enable or you can create your own schedules in the Schedules section Refer to Schedule on page 75 for more inform...

Страница 61: ...s Note If Smart Connect is disabled you will have to separately configure guest Wi Fi for both 2 4 GHz and 5 GHz wireless bands 2 4 GHz 5 GHz Status Enable or disable the 2 4 GHz 5 GHz wireless networ...

Страница 62: ...1 If you change the IP address once you click Save you will need to enter the new IP address in your browser to get back into the configuration utility Subnet Mask Enter the subnet mask of the router...

Страница 63: ...s lease in minutes Always Broadcast Enable this feature to broadcast your network s DHCP server to LAN WLAN clients Advanced Settings WAN Port Speed You may set the port speed of the Internet port to...

Страница 64: ...work UPnP Media Server Choose a name for your UPnP media server so that it can be found Windows File Sharing SAMBA Status Enable or disable the Windows file sharing function allowing connected clients...

Страница 65: ...ty service integration such as Amazon AlexaTM or Google AssistantTM for your device through Cloud You can view the account information that is currently registered with your device s D Link Cloud acco...

Страница 66: ...wing configuration is available Internet Speed Checkup Click on Check Speed to launch a speedtest of your internet connection A window will pop up to show you the results of the speedtest Afterrunning...

Страница 67: ...signed Medium priority If no devices are explicitly assigned a priority they will all be treated with equal priority If some devices are not assigned a priority and others are the unassigned devices w...

Страница 68: ...ternet and is not recommended in ordinary situations DMZ IP Address If you enabled DMZ enter the IP address of the client you wish to expose or use the drop down menu to quickly select it Enable SPI I...

Страница 69: ...trouble connecting with your corporate network try turning this ALG off Please check with the system administrator of your corporate network whether your VPN client supports NAT traversal RTSP Allows...

Страница 70: ...e a new rule click the Add Rule button Click Save when you are done If you edit or create a rule the following options will appear Name Enter a name for the rule Source IP Address Range Enterthesource...

Страница 71: ...options will appear Name Enter a name for the rule Local IP Enter the IP address of the computer on your local network that you want to allow the incoming service to Alternatively select the device f...

Страница 72: ...edit a rule click on its pencil icon in the Edit column If you wish to create a new rule click the Add Route button Click Save when you are done If you edit or create a rule the following options wil...

Страница 73: ...n you are done If you edit or create a rule the following options will appear Name Enter a name for the rule DestNetwork This is the IP address of the router used to reach the specified destination Pr...

Страница 74: ...e IPv6 host settings To configure an IPv6 dynamic DNS host refer to IPv6 Host on page 71 Enable Dynamic DNS Enable or disable dynamic DNS Enabling this feature will reveal further configuration option...

Страница 75: ...rule click on its pencil icon in the Edit column If you wish to create a new rule click the Add Record button Click Save when you are done If you edit or create a rule the following options will appe...

Страница 76: ...e DDNS address will be easier than an IP address In the Features menu on the bar on the top of the page click QuickVPN Click User to create manage and delete user accounts with user defined access to...

Страница 77: ...dress Autoconfiguration Settings Authentication Protocol Choosetheauthenticationprotocoltype MSCHAPv2 PAP orCHAP MSCHAPv2 is the default MPPE Select the encryption cipher strength None RC4 40 or RC4 1...

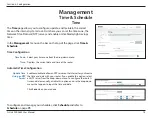
Страница 78: ...and manage your schedules click Schedule and refer to Schedule on page 75 Time Configuration Time Zone Select your time zone from the drop down menu Time Displays the current date and time of the rou...

Страница 79: ...cil icon in the Edit column If you wish to create a new rule click the Add Rule button Click Save when you are done If you edit or create a rule the following screen will appear First enter the name o...

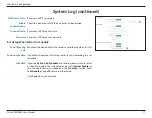
Страница 80: ...logs to a SysLog Server If Logging to the Syslog Server is Enabled Syslog Server IP Address Enter the IP address for the Syslog server If the Syslog server is connected to the extender select it from...

Страница 81: ...Log When Full or On Schedule Send When Log Full If enabled this option will set the router to send the log when it is full Send on Schedule If enabled this option will set the router to send accordin...

Страница 82: ...page click System Admin To load save reset settings or reboot the router click System and refer to Schedule on page 75 Admin Password Password Enter a new password for the administrator account You wi...

Страница 83: ...ng any rules that you have created If you want to save the current router configuration settings usetheusetheSavebuttonintheSaveSettingsToLocalHard Drive section above Auto Reboot Configuration Reboot...

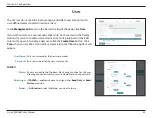
Страница 84: ...pencil icon in the Edit column If you wish to create a new user click the Create User button Click Save when you are done If you edit or create a rule the following options will appear User Name Enter...

Страница 85: ...ccess for this user Permission If FTP is enabled choose to assign either Read Only or Read Write permission Folder Click Browse to select the folder you want to share VPN Status Enable or disable Virt...

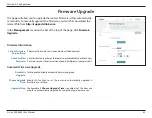
Страница 86: ...are Version Date The current firmware s version and date will be displayed Check for New Firmware Click this button to prompt the router to automatically check for a new firmwareversion Ifanewerversio...

Страница 87: ...Section 4 Configuration Upgrade Manually Upgrade Firmware To upgrade manually download the firmware file you wish to upgrade to ClicktheUpgradeFirmwarebuttonandbrowsetothefiletoinstall the new firmwar...

Страница 88: ...the WAN LAN and wireless segments In the Management menu on the bar on the top of the page click Statistics You can view the Internet LAN Wi Fi 2 4 GHz or Wi Fi 5 GHz by clicking on the respective ta...

Страница 89: ...ablinganddisablingyourWi FiguestzonewithouthavingtogointotheUI rebooting the router checking your router for firmware upgrades and telling your router to run an internet speed test In order to use thi...

Страница 90: ...steps show the iOS interface If you are using an Android device the appearance may be different from that of the screenshots but the process is the same Step 1 Launch the Amazon Alexa app Amazon Alex...

Страница 91: ...87 D Link DIR 2680 User Manual Section 4 Voice Assistants Step 3 Tap on Skills Games Step 4 Search for D Link Wi Fi Tap on the search result...

Страница 92: ...88 D Link DIR 2680 User Manual Section 4 Voice Assistants Step 5 Tap Enable to link the skill Step 6 Sign in using your D Link account details...

Страница 93: ...Congratulations D LinkWi Fi has been successfully linked as a skill for your Amazon device Close the window by tapping Done on the top left corner of the screen Refer to Amazon Alexa Voice Commands on...

Страница 94: ...Task Command Enable the guest zone Alexa ask D Link Wi Fi to enable my guest zone Disable the guest zone Alexa ask D Link Wi Fi to disable my guest zone Find out the guest zone credentials Alexa ask...

Страница 95: ...following steps show the iOS interface If you are using an Android device the appearance may be different from that of the screenshots but the process is the same Step 1 Launch the Google Assistant a...

Страница 96: ...92 D Link DIR 2680 User Manual Section 4 Voice Assistants Step 3 Tap Yes Step 4 Sign in using your D Link account details...

Страница 97: ...ual Section 4 Voice Assistants Step 5 Congratulations D LinkWi Fi has been successfully linked to your Google Assistant Refer to Google Assistant Voice Commands on page 94 for tasks that you can ask y...

Страница 98: ...k Command Enable the guest zone OK Google ask D Link Wi Fi to enable my guest zone Disable the guest zone OK Google ask D Link Wi Fi to disable my guest zone Find out the guest zone credentials OK Goo...

Страница 99: ...ntrol of your devices and be the first to know and respond to potentially threatening activity on your network such as devices trying to connect to malicious addresses or unidentified devices joining...

Страница 100: ...ersion The following steps show the iOS interface If you are using an Android device the appearance may be different from that of the screenshots but the process is the same Step 1 Launch the D Link W...

Страница 101: ...97 D Link DIR 2680 User Manual Section 5 D Fend Step 3 Tap the D Fend icon Step 4 Tap the Download App button The link will direct you to download the app from Google Play or the App Store...

Страница 102: ...98 D Link DIR 2680 User Manual Section 5 D Fend Step 5 You can now launch the D Fend app from within the D Link Wi Fi app or from your home screen D Fend...

Страница 103: ...ote D Fend to Alexa linking is only available on Android devices Step 1 Launch the Amazon Alexa app Amazon Alexa You will need the Amazon Alexa app an Amazon account and an Amazon Alexa device to use...

Страница 104: ...100 D Link DIR 2680 User Manual Section 5 D Fend Step 3 Tap on Skills Step 4 Search for D Fend Tap on the search result...

Страница 105: ...101 D Link DIR 2680 User Manual Section 5 D Fend Step 5 Tap Enable to link the skill Step 6 Sign in using your D Link account details...

Страница 106: ...102 D Link DIR 2680 User Manual Section 5 D Fend Step 7 Congratulations D Fend has been successfully linked as a skill for your Amazon device...

Страница 107: ...of a scan Alexa ask D Fend if there are any vulnerabilities found Pause the internet for the children Alexa ask D Fend to pause the internet for all kids Pause the internet for someone Alexa ask D Fe...

Страница 108: ...d devices to have access to your network while you re away Probably not With a single tap Away Mode allows you to temporarily block Internet access for specific devices on your network that you ve def...

Страница 109: ...le device to places with free untrusted Wi Fi hotspots in places like coffee shops and hotels by encrypting and relaying it through your home Internet connection This extra hop reduces the chances of...

Страница 110: ...ur information may be intercepted since you control the Quick VPN server you may ignore this UDP Ports 500 4500 1701 and IP Port 50 must be open in order for Quick VPN to work L2TP IPsec VPN usage may...

Страница 111: ...fo r i O S d e v i c e s R e fe r t o Q u i c k V P N o n p a g e 7 2 for more information on setting up the router for Quick VPN 1 Touch Settings on your iPhone or iPad Scroll to and tap General Scr...

Страница 112: ...t Password and Secret Refer to Quick VPN on page 72 Description For reference purposes only used to differentiate between multiple VPN connections Server Enter the IP DDNS address of your Quick VPN se...

Страница 113: ...DIR 2680 User Manual Section 6 Quick VPN 5 Tap Done to save and return to the main VPN Configurations page Your iOS device is now configured to connect to your Quick VPN server VPN Setup Instructions...

Страница 114: ...nect To connect or disconnect from to your Quick VPN server open Settings and under General tap the button next to VPN TheVPN icon will appear in the notification area at the top of your screen indica...

Страница 115: ...er your user account password when prompted Close the Profiles dialog Mac OS X VPN Setup Instructions This section provides QuickVPN setup instructions for OS X using the ExportProfile function Refer...

Страница 116: ...IR 2680 User Manual Section 6 Quick VPN Enter your Passkey in the Shared Secret text box and click OK Apply then OK Your Mac is now configured to connect to your Quick VPN server VPN Setup Instruction...

Страница 117: ...User Manual Section 6 Quick VPN Connect or Disconnect To connect to or disconnect from your Quick VPN server go to System Preferences Network Select the Quick VPN connection and click on the Connect o...

Страница 118: ...nd files box Select Set up a virtual private network VPN connection Enter the IP DDNS address of your Quick VPN server in the Internet address box create a name for your connection in the Destination...

Страница 119: ...save your password enter your Password and check Remember this password Click Create to continue Do not click Connect Now Click Close Click the Start button and type view network connections into the...

Страница 120: ...w configured to connect to your Quick VPN server Click Advanced settings Enter your Passkey in the Key text box under Use preshared key for authentication Click OK to close Advanced Properties and cli...

Страница 121: ...or disconnect from your Quick VPN server click on the Network Settings icon in the notification area of the Windows taskbar and from the Dial Up and VPN section click on your Quick VPN connection and...

Страница 122: ...ck VPN Windows 8 1 8 VPN Setup Instructions This section provides Quick VPN setup instructions for Windows 8 1 8 Click the Start button and type vpn Select Manage virtual private networks From the Net...

Страница 123: ...e for your VPN connection 3 Enter your IP DDNS address of your Quick VPN server 4 Select User name and password from Type of sign in info 5 If you would like windows to remember your sign in informati...

Страница 124: ...nual Section 6 Quick VPN Select the Securitytab For the TypeofVPN select Layer2TunnelingwithIPsec L2TP IPSec Right click on the Quick VPN Connection you just created and left click on Properties VPN S...

Страница 125: ...art button and type view network connections Select View network connections Right click your Quick VPN Connection and left click Properties Select the Security tab For the Type of VPN select Layer 2...

Страница 126: ...ttings Enter your Passkey in the Key text box under Use preshared key for authentication Click OK to close Advanced Properties and click OK to close Quick VPN Properties YourWindows8 1 8systemisnowcon...

Страница 127: ...k VPN Connect or Disconnect To connect to or disconnect from your Quick VPN server click on the Network Settings icon in the notification area of the Windows taskbar Click on your Quick VPN connection...

Страница 128: ...ser Manual Section 6 Quick VPN Click Start Settings Network Internet Network and Sharing Center VPN Add a VPN Connection Windows 10 VPN Setup Instructions This section provides Quick VPN setup instruc...

Страница 129: ...of your Quick VPN server 4 Select L2TP IPSec with pre shared key from VPN type 5 Enter the Passkey 6 Select User name and password from Type of sign in info If you would like windows to remember your...

Страница 130: ...nect To connect to or disconnect from your Quick VPN server click on the Network Settings icon in the notification area of the Windows taskbar and click on your Quick VPN connection The Network Intern...

Страница 131: ...anual Section 6 Quick VPN This section provides Quick VPN setup instructions for Android devices Your device s screens may vary Go to Settings More from the Wireless networks VPN ADD VPN NETWORK Andro...

Страница 132: ...or your VPN connection 2 Select L2TP IPSec PSK for Type 3 Enter the IP DDNS address of your Quick VPN server 4 Enter your Passkey PSK in IPSec pre shared key field 5 Choose Save Your Android device is...

Страница 133: ...2680 User Manual Section 6 Quick VPN Connect or Disconnect To connect to or disconnect from your Quick VPN server go to Settings More from the Wireless networks VPN and select the Quick VPN connectio...

Страница 134: ...130 D Link DIR 2680 User Manual Section 6 Quick VPN To connect enter your Username and Password and select CONNECT To disconnect select DISCONNECT Connect or Disconnect Continued...

Страница 135: ...ayers Blu ray DVD players wireless printers and cameras will have a WPS button or a software utility with WPS that you can press to connect to the DIR 2680 router Please refer to your user manual for...

Страница 136: ...lation Card or the label located at the bottom of the device to find the default network name and Wi Fi password Otherwise enter the Wi Fi credentials set during the product configuration To join an e...

Страница 137: ...eck box You will then be prompted to enter the Wi Fi password network security key for the wireless network Enter the password into the box and click Next to connect to the network Your computer will...

Страница 138: ...r wireless adapter If you are joining an existing network you will need to know the security key Wi Fi password being used To join an existing network locate the wireless network icon in the taskbar n...

Страница 139: ...ter the password into the box and click Next If you wish to use Wi Fi Protected Setup WPS to connect to the router you can also press the WPS button on your router during this step to enable the WPS f...

Страница 140: ...your wireless router or access point before configuring your wireless adapter If you are joining an existing network you will need to know the security key or passphrase being used 1 Click on the wir...

Страница 141: ...D you would like to connect to and click the Connect button If you get a good signal but cannot access the Internet check your TCP IP settings for your wireless adapter Refer to the Networking Basics...

Страница 142: ...word that is on your router and click Connect You can also connect by pushing the WPS button on the router It may take 20 30 seconds to connect to the wireless network If the connection fails please v...

Страница 143: ...ity as seen below Right click on the wireless computer icon in your system tray lower right corner next to the time Select Connect to a network If you receive the Wireless Networks Detected bubble cli...

Страница 144: ...ireless Utility by right clicking on the wireless computer icon in your system tray lower right corner of screen Select Connect to a network It is recommended that you enable wireless security WPA WPA...

Страница 145: ...y key or passphrase Wi Fi password that is on your router and click Connect It may take 20 30 seconds to connect to the wireless network If the connection fails please verify that the security setting...

Страница 146: ...device itself Your computer must be on the same IP subnet to connect to the web based utility Make sure you have an updated Java enabled web browser We recommend the following Microsoft Internet Expl...

Страница 147: ...r in the address bar This should open the login page for your web management If you still cannot access the configuration unplug the power to the router for 10 seconds and plug back in Wait about 30 s...

Страница 148: ...ring the MTU in increments of ten Ex 1492 1482 1472 etc To find the proper MTU Size you ll have to do a special ping of the destination you re trying to go to A destination could be another computer o...

Страница 149: ...h 1452 28 1480 Once you find your MTU you can now configure your router with the proper MTU size To change the MTU rate on your router follow the steps below Open your browser enter the IP address of...

Страница 150: ...ireless LANs are used increasingly in both home and office environments and public areas such as airports coffee shops and universities Innovative ways to utilize WLAN technology are helping people wo...

Страница 151: ...transmit data from one point A to point B But wireless technology has restrictions as to how you can access the network You must be within the wireless network range area to be able to connect your c...

Страница 152: ...speakers and other devices that operate on batteries Who uses wireless Wireless technology as become so popular in recent years that almost everyone is using it whether it s for home office business D...

Страница 153: ...etting up a wireless network Tips Here are a few things to keep in mind when you install a wireless network Centralize your router or access point Make sure you place the router access point in a cent...

Страница 154: ...er to peer communication using wireless network adapters on each computer such as two or more DIR 2680 wireless network USB adapters An Infrastructure network contains an access point or wireless rout...

Страница 155: ...ur IP address please follow the steps below Click on Start Run In the run box type cmd and click OK Windows 7 Vista users type cmd in the Start Search box At the prompt type ipconfig and press Enter T...

Страница 156: ...lick on the Local Area Connection which represents your network adapter and select Properties Step 3 Highlight Internet Protocol TCP IP and click Properties Step 4 Click Use the following IP address a...

Страница 157: ...dvanced Encryption Standard AES instead of TKIP User authentication which is generally missing in WEP through the extensible authentication protocol EAP WEP regulates access to a wireless network base...

Страница 158: ...0 to 40 C 32 to 104 F Storage 20 to 65 C 4 to 149 F Humidity Operating 10 to 90 maximum non condensing Storage 5 to 95 maximum non condensing Certifications FCC IC CE Dimensions Weight L x W x H 160...

Страница 159: ...erference will not occur in a particular installation If this equipment does cause harmful interference to radio or television reception which can be determined by turning the equipment off and on the...

Страница 160: ...du Canada Innovation Science and Economic Development Canada ISED Statement This device complies with ISED licence exempt RSS standard s Operation is subject to the following two conditions 1 this dev...

Страница 161: ...157 D Link DIR 2680 User Manual Appendix D Regulatory Information MPE 1 mW cm2 43 cm...

Страница 162: ...zband Fr quence bande s Bandas de Frecuencia Frequenza e Frequentie s Max Output Power EIRP Max Output Power Consommation d nergie max Potencia m xima de Salida Potenza max Output Max Output Power 5 G...

Страница 163: ...t ja toote p sivara on allalaadimiseks saadaval tootelehel www dlink com English Hereby D Link Corporation declares that this product accessories and software are in compliance with directive 2014 53...

Страница 164: ...gfelelnek a 2014 53 EU sz rendeletek rendelkez seinek Az EU Megfelel s gi nyilatkozat teljes sz vege s a term k firmware a term k oldal r l t lthet le a www dlink com c men Polski Polish D Link Corpor...

Страница 165: ...Corporation v yfir a essi vara fylgihlutir og hugb na ur eru samr mi vi tilskipun 2014 53 EB S kja m ESB samr misyfirl singuna heild sinni og fastb na v runnar af vefs u v runnar www dlink com Norsk...

Страница 166: ...your product uses 2 4 GHz and or 5 GHz wireless HINWEIS ZUR VERWENDUNG VON DRAHTLOS NETZWERK WLAN IN DER EUROP ISCHEN GEMEINSCHAFT NUR F R EIN DRAHTLOSES PRODUKT Der Betrieb dieses Ger ts in der Euro...

Страница 167: ...in de l UE Merci de vous r f rer au guide d utilisation ou de la fiche technique afin de v rifier si votre produit utilise 2 4 GHz et ou 5 GHz sans fil AVISO DE USO DE LA LAN DE RADIO INAL MBRICA EN L...

Страница 168: ...este per operare a 5 Ghz nell Unione europea Ti invitiamo a fare riferimento al manuale del prodotto o alla scheda tecnica per verificare se il tuo prodotto utilizza le frequenze 2 4 GHz e o 5 GHz KEN...

Страница 169: ...Sicherheitsvorschriften dienen als Hilfe zur Gew hrleistung Ihrer eigenen Sicherheit und zum Schutz Ihres Produkts Weitere Details finden Sie in den Benutzeranleitungen zum Produkt Statische Elektriz...

Страница 170: ...z toujours le produit de l alimentation avant de le nettoyer et utilisez uniquement un chiffon sec non pelucheux INSTRUCCIONES DE SEGURIDAD Las siguientes directrices de seguridad general se facilitan...

Страница 171: ...re sempre il prodotto dalla presa elettrica prima di pulirlo e usare solo un panno asciutto che non lasci filacce VEILIGHEIDSINFORMATIE De volgende algemene veiligheidsinformatie werd verstrekt om uw...

Страница 172: ...ieses Symbol auf dem Produkt oder der Verpackung weist darauf hin dass dieses Produkt gem bestehender rtlicher Gesetze undVorschriftennicht berdennormalenHausm llentsorgtwerdensollte sonderneinerWiede...

Страница 173: ...plus sur les produits et emballages respectueux de l environnement veuillez consulter le www dlinkgreen com ESPA OL ES Este s mbolo en el producto o el embalaje significa que de acuerdo con la legisl...

Страница 174: ...ergia e a ridurre le emissioni di anidride carbonica Per ulteriori informazioni sui prodotti e sugli imballaggi D Link a ridotto impatto ambientale visitate il sito all indirizzo www dlinkgreen com NE...

Страница 175: ...o ci zar wno w przypadku samych produkt w jak i opakowa Firma D Link zaleca aby Pa stwo zawsze prawid owo wy czali z u ytku swoje produkty D Link gdy nie s one wykorzystywane Post puj c w ten spos b p...

Страница 176: ...egtakar t s ban s a sz ndioxid kibocs t s nak cs kkent s ben K rnyezetbar t term keinkr l s csomagol sainkr l tov bbi inform ci kat a www dlinkgreen com weboldalon tudhat meg NORSK NO Dette symbolet p...

Страница 177: ...reducere CO2 udledningerne Du kan finde flere oplysninger om vores milj m ssigt ansvarlige produkter og emballage p www dlinkgreen com SUOMI FI T m symboli tuotteen pakkauksessa tarkoittaa ett paikall...

Страница 178: ...F r mer information om v ra milj ansvariga produkter och f rpackningar www dlinkgreen com PORTUGU S PT Este s mbolo no produto ou embalagem significa que de acordo com as leis e regulamenta es locais...

Отзывы: