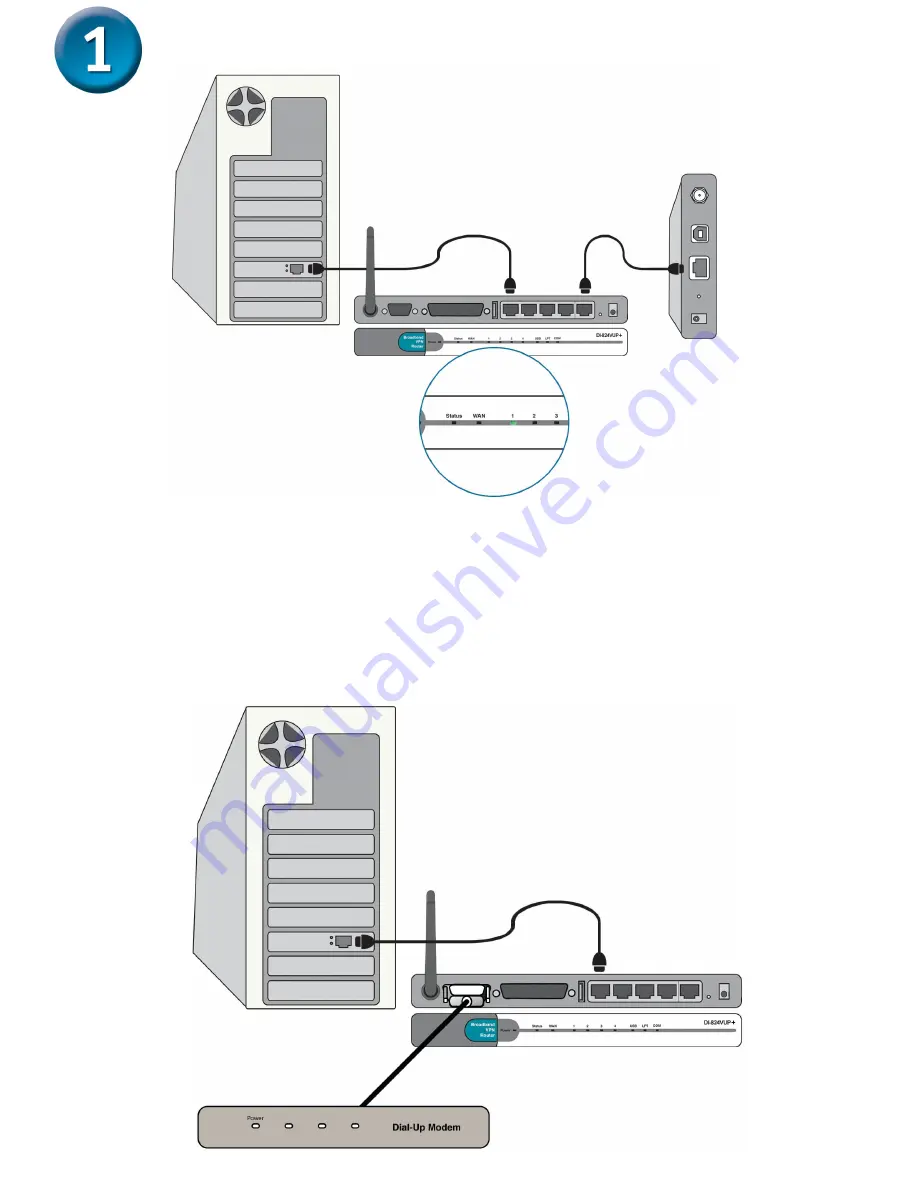
D-Link DI-824VUP+ 2.4GHz Wireless VPN Router and Print... Скачать руководство пользователя страница 3

3

Continued...

 C.

Insert an Ethernet cable to 

LAN Port 1

 on the back panel of the DI- and

an available Ethernet port on the network adapter in the computer you are using to
configure the DI-. The LED light for LAN Port 1 illuminates to indicate
proper connection. (Note: The LAN Ports on the DI- are Auto-MDI/MDIX.
Meaning you can use a straight-through or crossover-Ethernet cable in the LAN
Ports.)  (Fig.C)

 D.

COM Port for dial-up Internet connection (optional).  (Fig.D)

(Fig. C)

(Fig. D)

Содержание DI-824VUP+ 2.4GHz Wireless VPN Router and Print...

Страница 1: ...specifications subject to change without notice DI 824VUP 11072003 1 1 1 1 1 Thank you for purchasing this router to share your high speed Internet connection with other computers For you to share hig...

Страница 2: ...he DI 824VUP should be powered on and the Cable DSL modem should be turned off Cable DSL modem Power Off DI 824VUP Power On Fig B 2 Connect an Ethernet cable to the Ethernet jack located on the Cable...

Страница 3: ...in the computer you are using to configure the DI 824VUP The LED light for LAN Port 1 illuminates to indicate proper connection Note The LAN Ports on theDI 824VUP areAuto MDI MDIX Meaning you can use...

Страница 4: ...his button restores the Router to its original factory default settings F Parallel and USB Printer Port Used to connect to a Printer E Computers equipped with 802 11g wireless adapters will be able to...

Страница 5: ...on the port indicates a connection to an Ethernet enabled computer on ports 1 4 This LED blinks during data transmission POWER LED a solid light indicates a proper connection to the power supply WAN...

Страница 6: ...cted network should look similar to this Using The Setup Wizard The logon pop up screen will appear Open your Web browser and type http 192 168 0 1 into the URL address box Then press the Enter or Ret...

Страница 7: ...Wizard continued Once you have logged in the Home screen will appear You will see the following screens Click Run Wizard Click Next Click Next Set up your new password You have the option to establish...

Страница 8: ...uter Click Next Choose your time zone from the drop down list Click Next If you are unsure of which setting to select please contact your Internet Service Provider A this point the setup wizard will t...

Страница 9: ...ed fields Click Next If you selected Dynamic IP Address this screen will appear Used mainly for Cable Internet service Click the Clone MAC Address button to automatically copy the MAC address of the n...

Страница 10: ...d pass word provided to you by your ISP Click Next Click Next If you wish to use encryption for your 802 11g network the DI 824VUP is capable of three levels of wireless encryption 64 bit 128 bit and...

Страница 11: ...our Web browser i e Internet Explorer or Netscape Navigator to link to your favorite Web site to test your Internet connection Click to Exit Click Restart For additional settings or information refer...

Страница 12: ...will be shown automatically If it is not please run autorun exe on the CD ROM Installing the Print Server Software Wait until the following Welcome dialog appears Select the destination folder Click N...

Страница 13: ...e printer con nected to the printer port of the DI 824VUP a printer server On a Windows 95 98 platform open the Printers window in the My Com puter menu Click OK Now you can configure the print server...

Страница 14: ...dows 2000 XP Platforms The configuration procedure for a Windows 2000 XP platform is similar to that of Windows 95 98 except the screen of printer Properties Note Screen shots are taken in Windows 200...

Страница 15: ...for the DI 824VUP Broadband Router APPENDIX continued Restart your computer Click OK Click Internet Protocol TCP IP Click Properties Select Obtain an IP address automatically For Microsoft Windows XP...

Страница 16: ...e Router s IP address and the Ethernet adapter address will appear Click on Network Click on Apply Now Select Using DHCP in the Configure pull down menu Select Built in Ethernet in the show pull down...

Страница 17: ...17...

Страница 18: ...customers can contact D Link technical support through our website or by phone Tech Support for customers within the United States D Link Technical Support over the Telephone 877 453 5465 24 hours a...

Отзывы: