background image

56

DCS-G900 User’s Manual 

D-Link Systems, Inc.

IPView SE

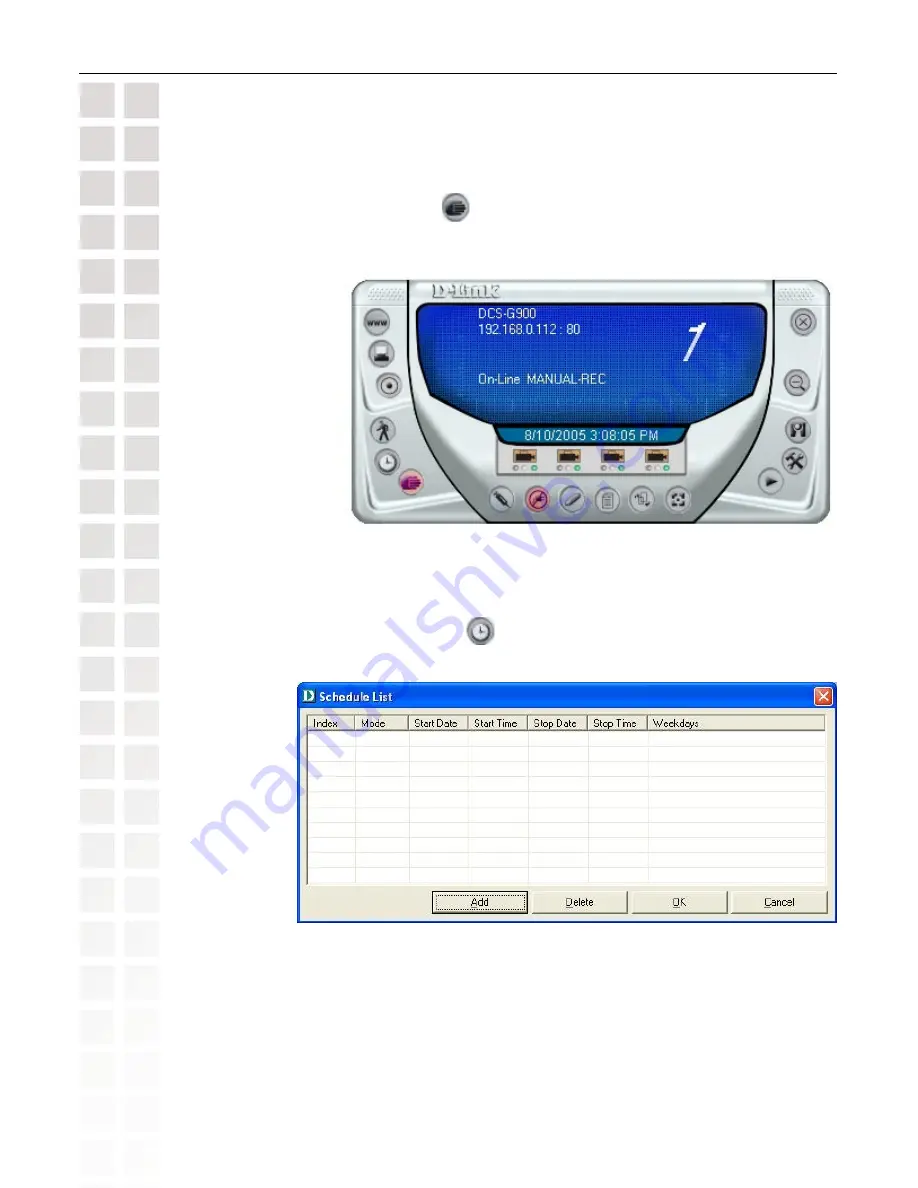
Manual Recording

Click the 

Manual Recording

 button         , to begin recording images from your camera. 

Schedule Recording

Click the 

Schedule Recording

 button       to record based on a specific time and date. 

Click 

Add

 to set the time and date for recording.

Содержание DCS-G900 - SECURICAM Wireless G Internet Camera Network

Страница 1: ......

Страница 2: ...3 Upgrade 33 Backup 33 Status 35 System 35 Video 35 Wireless 36 Network 36 User 37 Help 38 Installing the DCS G900 Behind a Router 39 Assigning and Opening the HTTP Port on the DCS G900 39 Router Setup and Installation 40 Assigning and Opening Virtual Server Ports 41 Viewing Your Camera 42 IPView SE Application Installation 43 IPView SE 46 IPView SE Icon Description 47 Add a New Camera 48 How to D...

Страница 3: ...ed Recording 56 Motion Recording 57 Scan 57 Camera s Extra Information 58 Play 58 System Configure 59 About 62 Uninstall IPView SE 63 Frequently Asked Questions 64 Internet Camera Features 64 Internet Camera Installation 66 How to Ping Your IP Address 68 Technical Specifications 69 Appendix 71 Wireless Installation Considerations 71 Glossary 72 Networking 72 Technical Support 74 Warranty 75 Registra...

Страница 4: ... in CPU and Web server that transmits high quality video images for monitoring The DCS G900 can be accessed remotely and controlled from any PC Notebook over the Intranet or Internet via a web browser The simple installation procedure and intuitive web based interface offer easy integration with your Ethernet Fast Ethernet or 802 11g wireless network The DCS G900 also comes with remote monitoring ...

Страница 5: ...ted Install Guide CD ROM with Manual 5V 2 5A Power Supply Antenna Camera Stand Ethernet CAT5 UTP Straight Through Cable A wireless 802 11g or 802 11b or Ethernet network PC with 1 3GHz processor 128MB RAM and 20GB of available hard disk space Windows XP 2000 A CD ROM drive Package Contents System Requirements ...

Страница 6: ... you to view and connect to nearby wireless networks Web Configuration Using a standard Web browser Administrators can configure and manage the Internet Camera directly from its own Web page via the Intranet or Internet This means you can access your DCS G900 at anytime from anywhere in the world Remote Monitoring Utility The IPView SE application adds enhanced features and functionality for the Int...

Страница 7: ...7 DCS G900 User s Manual D Link Systems Inc Hardware Overview Hardware Overview Front Power LED LAN LED Camera Lens Wireless Antenna Camera Stand ...

Страница 8: ...8 DCS G900 User s Manual D Link Systems Inc Hardware Overview Rear Ethernet Cable Connector Wireless Antenna Power Connector Camera Stand Reset ...

Страница 9: ...begin using the DCS G900 Wireless G Internet Camera you will need An existing network including a wireless 802 11b or 802 11g router or a router hub with an available Ethernet port The DCS G900 Wireless G Internet Camera connected to your router hub Getting Started ...

Страница 10: ...LED Indicator on the DCS G900 located below the Power LED is illuminated Attach the External Power Supply Attach the external power supply to the DC power input connector located on the rear panel of the DCS G900 and connect it to your local power supply Note Power source is confirmed when the red LED Power Indicator located to the right of the lens on the DCS G900 is illuminated Attach the Swivel ...

Страница 11: ...nd Password so that when remote users access the DCS G900 they will be allowed to view the images transmitted by the DCS G900 Note When the DCS G900 is used for the first time it is highly recommended that the Administrator set the Admin ID and Admin Password to constrain user access to the DCS G900 since the Default settings are Null String no password Once the ID and Password are defined only the ...

Страница 12: ... Setup Wizard The DCS G900 Setup Wizard You are now ready to run the Setup Wizard which will guide you quickly through the installation process Insert the D Link DCS G900 Driver CD into your CD ROM drive Click Next Click Install Wizard Click Install Software ...

Страница 13: ...13 DCS G900 User s Manual D Link Systems Inc The DCS G900 Setup Wizard Click Next Click Finish Click Yes ...

Страница 14: ...inst unauthorized access By default the Admin ID and Password are blank To change the Admin ID and Password select both Change boxes and enter a New ID and New Password Enter an IP Address and Subnet Mask for your camera if you want to change the current settings Enter your Gateway and DNS settings These settings must correspond with your network settings for you to access the camera If you are un...

Страница 15: ... Network Name SSID Wireless Channel Security Mode and Authentication must correspond with your wireless network settings for the camera to work If you need to make any changes click Back to modify your settings Otherwise click Restart to save and apply your settings Click Restart Click Next Enter the Encryption Mode Key Format and Encryption Keys for your wireless network Click Next ...

Страница 16: ...that you have the latest version of Java installed on your computer to ensure proper operation when viewing the video in Java mode Java can be downloaded for free from Sun s web site http www java com When you connect to the home page you will be prompted to download ActiveX If you want to use ActiveX to view your video images instead of Java then you must download ActiveX Please refer to the Manu...

Страница 17: ...ose this option to view video streaming on the Home page ActiveX Java Setup For Windows Users that do not have Java installed please choose this option to view video streaming on the Home page For Windows users that have Java installed can also use this for viewing video Mac users should also choose this mode to view video This will allow you to configure the DCS G900 ...

Страница 18: ...n Home Java For Windows users that have Java installed can also use this for viewing video MAC users should also choose this mode to view video Home Setup After clicking the Setup button you will be directed to Advanced System please see page 19 for more information ...

Страница 19: ... fields are required for setting up the Administrator name and password Camera Name Location Admin LED Control Admin ID Admin Password Confirm Password Enter the Administrator s ID or name Enter the Administrator s password Re enter the Administrator s password for confirmation You can set the LED in front of the DCS G900 to on Normal off OFF or blink randomly Dummy System Setting ...

Страница 20: ... adjust the brightness level The default setting is 64 Allows you to adjust the contrast level The default setting is 64 Allows you to adjust the saturation level The default setting is 64 Adjust the light frequency to suit your area of operation 50Hz and 60Hz are available to accommodate the different light frequencies found in USA 60Hz and Europe 50Hz for optimal image quality Horizontally rotat...

Страница 21: ...900 connected to a wireless adapter on the PC Service Set Identifier is an identifier for the wireless network name that other devices can recognize This page will allow you to select a wireless network that the DCS G900 was able to detect upon booting up see page 14 The default wireless channel setting is channel 6 Select the channel that is the same as the other wireless devices on your network Fo...

Страница 22: ... more than 1 network that you can connect to Instead of having to put in the encryption key every time you can select key 1 2 3 or 4 This is especially helpful for 128 bit HEX 52 characters This is where you can select which key you want to use In Open mode anyone with the right SSID can connect to the camera but in Shared mode the user will need to have the right encryption key to connect the cam...

Страница 23: ...mble The original 802 11 specification which defined only 1 and 2Mbps operation defined only a long preamble that uses a 128 bit sync field When the high rate i e 11Mbps 802 11b standard was created an optional short preamble using a 56 bit sync field was added This was intended to improve the efficiency of the wireless network for more real time applications such as streaming video Selecting short prea...

Страница 24: ...ermine if the destination is in the same subnet Enter your Default Gateway IP Address Subnet Mask Default Gateway Manually provide a fixed IP Address for your connection Dynamic Host Configuration Protocol is a networking protocol that will allow leasing of an IP address by the client from a server for a specified amount of time This alleviates the task of the user from having to keep track of avail...

Страница 25: ...il in this field Enter your password and or key in this field Most ISPs do not open port 80 a DCS G900 default video transfer port for their residential customers the DCS G900 has the ability to use a different port by enabling the second http port for its video transfer Port Number If the second port is enabled it will automatically disable the default port 80 Any unused ports can be used such as p...

Страница 26: ...ow e mail upload to that user You must click Add each time you add a user to the User List User Access Control Define Users Add User Delete User User List Select a user from the pull down list and click the Delete button This list shows all of the users added and their information of whether or not they can receive images by e mail User Name User Password Add the User Name of the user Add the User ...

Страница 27: ... account Daylight savings Selecting synchronize with computer time will automatically adjust for Daylight savings since this feature is built in to the Windows operating system The time will be based on the GMT setting and will be synchronized every 10 minutes This is also the default setting for the Internet Camera Remember that the time set does not take into account the Daylight Savings time Pl...

Страница 28: ...nection port accordingly Specifies the user name to access the external FTP server If you are to upload snapshots to an FTP server you will need to fill in the Domain name or IP address of your external FTP server The following user settings must be correctly configured for remote access Specifies the password to access the external FTP server Specifies the destination folder in the external FTP server...

Страница 29: ...so select how many seconds for each frame this is configurable from 1 to 65535 seconds This will be the name that precedes the time for example G9002005072116425101 jpg This means that the camera took a snapshot in the year 2005 July 21 at 16th hour 4 o clock 42 minutes and 51 seconds and it is picture number one Select overwrite and there will only be a few images that are constantly refreshed dep...

Страница 30: ... Name Password This is the domain name or IP address of your external e mail server This is the e mail address of the person sending the camera snapshots This is the e mail address of recipient for the SMTP server If the SMTP server uses authentication you must put your user name here This is the password that you use with your user name to connect to the SMTP server ...

Страница 31: ... Choosing always will start sending snapshots to the recipient s e mail account right away Choosing schedule will give you a choice as to when to start sending snapshots to the recipient s e mail account by the day as well as what time this should start and when to stop The frequency of the snapshot interval can also be configured from 1 to 65535 seconds ...

Страница 32: ... that you have configured in the Upload section If you have configured the FTP correctly you will be able to see a test file in your FTP server This will send a snapshot to the e mail account that you have configured in the E mail section If you have configured the SMTP account correctly you will be able to send a test file to the e mail account of the recipient ...

Страница 33: ...you select Apply Select Apply will reset the camera to all its default settings The Installation Wizard may need to be used in order to find the camera again Firmware Update This will allow you to upgrade the firmware for the camera Click Browse to find the path to the file of the firmware that you have previously saved by visiting http support dlink com ...

Страница 34: ...estore Device Configuration from File This will allow you to save the camera s configurations to your hard drive This is particularly useful if you will be installing more than one camera remember to make the IP Address unique to each camera so there will not be two cameras with the same IP Address on the same network ...

Страница 35: ...evice Status such as Camera Name Location Model Firmware Version MAC Address and IP Address Also displays information about the Ethernet Status such as Link Speed and Duplex Status Video Displays information about the Video Status such as Video Resolution Compression Rate Frame Rate Frame Size and Light Frequency ...

Страница 36: ...about the Wireless Status such as Connection Mode Link SSID Channel transmission Rate and Encryption Status Network Displays information about the Network Status such as IP Address Subnet Mask Default Gateway DNS Address 1 DNS Address 2 Dynamic DNS Secondary HTTP Port UPnP FTP Server Test and E mail Test ...

Страница 37: ...37 DCS G900 User s Manual D Link Systems Inc DCS G900 Configuration Status User Displays information about Active Users such as their IP Address Name DateTime and Miniseconds Packet ...

Страница 38: ...38 DCS G900 User s Manual D Link Systems Inc DCS G900 Configuration Help Click Help for easy access to information on specific fields ...

Страница 39: ...o open a second port and can proceed to the next section If port 80 is not available for example if you are already using port 80 to run a Web server or your ISP blocks access on port 80 you MUST open a second port and designate a new Web server port 800 801 802 etc IMPORTANT Be sure to take note of these settings since these same settings will be used to configure your router Note Some ISPs block ...

Страница 40: ...Address information will be listed on following window Determine Your Router s WAN IP Address Note Because a dynamic WAN IP address can change from time to time depending on your ISP you may want to obtain a Static IP address from your ISP A Static IP address is a fixed IP address that will not change over time and will be more convenient for you to use to access your camera from a remote location ...

Страница 41: ...tings Select a camera name Enter your camera s Local IP Address in the Private IP field Select TCP under Protocol Type If you are using the default camera port settings enter 80 in to the Public and Private Port section Schedule should be set to Always so that the camera images can be accessed at any time In the Virtual Servers List a check mark appearing before the camera name will indicate that t...

Страница 42: ...eb browser To access from the Internet simply type in the IP Address of the router given to you by your ISP a colon and the port number that you gave your camera Ex http 205 163 122 96 83 To access from a computer on your local home network simply enter the local IP Address of your camera i e 192 168 0 35 If using a port other than port 80 you must enter the IP address followed by a colon and the ...

Страница 43: ...an also record to hard drive and configure advanced settings for the DCS G900 IPView SE is a complete software management tool for the DCS G900 and includes all configurable settings available in the web configuration utility Insert the CD ROM into the CD ROM drive A menu screen will appear as shown below IPView SE Application Installation Click Install Software Click Install IPView SE ...

Страница 44: ...44 DCS G900 User s Manual D Link Systems Inc IPView SE Application Installation Click Yes Click Next Click Next ...

Страница 45: ...uccessfully installing the IPView SE the application program for the DCS G900 is automatically installed to Programs IPView SE Directory To start running the IPView SE click on Windows Start Programs IPView SE IPView SE Once the IPView SE application control panel is executed the interface will appear ...

Страница 46: ... of the IPView SE application User Interface with detailed procedures for using the application IPView SE allows you to manage your cameras by enabling you to search configure and preview all the DCS G900s from one location It is designed with a user friendly interface for ease of control and navigation ...

Страница 47: ...nect Assign IP to a Camera Liberate Camera Camera s Extra Information Configure Camera from Web Motion Setting Manual Recording Schedule Recording Motion Recording Scan Combine Play Help About Minimize Close Rotate Snapshot View List Zoom Maximize Color Setting Always on Top Wake Up Control Panel Upgrade Firmware ...

Страница 48: ...t you have your network configured correctly To add a remote camera you need to have Internet access If you are unsure of the IP Address of the camera you can click on Search to search for all available cameras that are installed on your local area network Note Only cameras on your local area network can be located using Search in IPView SE If you want to add a camera via the Internet you must ente...

Страница 49: ...y the camera will not be added into IPView SE The Login Camera dialog box will appear only if your have already set the Username and Password during the Web Configuration setting How to Delete a Camera Click the Liberate Camera button on the IPView SE while you are connected to the camera you would like deleted The IPView SE camera button become available as soon as you click on the Liberate Camera...

Страница 50: ...ng the IP Address Subnet Mask and Default Gateway Select DHCP if you do not wish to assign an IP address to your camera You may also click the Assign IP to a Camera button on the IPView SE which will bring up the Browse screen from above Simply click the Change IP Address button and the Change IP Address dialog box will appear Select Manually Assign IP if you want to connect manually to the camera...

Страница 51: ...ton on the IPView SE and you should see all four cameras combined see image below A maximum of 4 cameras can be viewed simultaneously with IPView SE Select any of the four cameras for the View Mode format If there is a green light next to the camera button that means that the IPView SE has a camera connected ...

Страница 52: ...iew Mode format click on the Rotate button and the image should rotate 90o to the left see image below View List Click the View List button All the cameras and their properties such as the camera name IP Address user name and functional information will be displayed in the View List screen ...

Страница 53: ...3 5 and x4 Color Setting Click the Color Setting button to adjust the Brightness Contrast and Hue Wake Up Control Panel Click the Wake Up Control Panel button to open the control panel again when it is closed Always on Top Click the Always on Top button to have the display screen always appear on top Close Click the Close button to close the display screen of the camera ...

Страница 54: ...he screen A Save Image dialog box will appear for you to save the snap shot picture How to Start Recording To start recording with a camera click the Manual Recording button An AVI file will appear in your IPView SE folder Note You must stop recording before changing any camera settings How to Stop Recording To stop recording with a camera click the Manual Recording button again ...

Страница 55: ...r the Settings in the DCS G900 IPView SE Configure Camera from Web Click the Configure Camera from Web button to start configuring your camera from the web again see page 19 Motion Setting Click the Motion Setting button to setup the options for motion recording On this screen you can select to Invoke Alarm and or Send E mail Click the E mail Setting button to configure your E mail The Sensitivity Lev...

Страница 56: ...View SE Manual Recording Click the Manual Recording button to begin recording images from your camera Schedule Recording Click the Schedule Recording button to record based on a specific time and date Click Add to set the time and date for recording ...

Страница 57: ...ording Clicking on the Motion Recording button will record images upon motion detection When this option is selected and the camera detects motion within the range of the viewing window recording will be triggered Recording will continue until no motion is detected Click on the Motion Setting button to set the sensitivity levels for motion recording see page 55 Scan Click the Scan button to displa...

Страница 58: ... s Manual D Link Systems Inc IPView SE Camera s Extra Information Click the Camera s Extra Information button to view information about your camera Play Click the Play button to playback video recorded from your camera ...

Страница 59: ...S G900 will not have a profile to load initially you will have to select all of your cameras and then click the Save or Save As buttons to save your profile Up to four cameras can be saved per configuration there are no limits as to how many configurations can be saved Click the Load button to load any of your configurations Profile ...

Страница 60: ...st the file size for recording the video images the default setting is 10MB If the recorded video files reach the file size video images will be recorded into another file automatically By File Size permits recording by file size from 10 MB to 50 MB Log Storage Storage List To modify the storage click the Modify button You should see the storage dialog box again To delete a storage select the path and ...

Страница 61: ...etween 300MB to 10GB hard drive reserve space depending on the free space available on your hard drive Note Selecting the Recycle option will disable the Recording File Path Settings in the Recording menu In this section you may choose between Windows system default or User define for the video player desired for playback of recorded video files Selecting User define will allow you to Browse for your...

Страница 62: ...62 DCS G900 User s Manual D Link Systems Inc IPView SE About Click the Help About icon and then select About for camera details such as software version ...

Страница 63: ...IPView SE Uninstall IPView SE A new prompt screen will be displayed like the one below confirming the removal At the Confirm Uninstall dialog box click OK to continue the process Uninstall IPView SE The InstallShield Wizard prompt will appear Click Finish to complete the uninstallation procedure ...

Страница 64: ... G900 simultaneously The maximum number of users that can log onto the Internet Camera at the same time is 8 Please keep in mind the overall performance of the transmission speed will slow down when multiple users are logged on 3 What algorithm is used to compress the digital image The Internet Camera utilizes Motion JPEG image compression technology to provide high quality images Motion JPEG is a...

Страница 65: ...ion You will need to do port forwarding by opening a port to the camera Please refer to your firewall s product manual for detailed instructions 10 Why can t I access the Internet Camera from a Web browser The possible cause might be the IP Address for the Internet Camera is already being used by another device To correct the possible problem you need to first disconnect the Internet Camera from the...

Страница 66: ...net Camera work locally but not remotely This might be caused by the firewall protection Check the Internet firewall with your system administrator The firewall may need to have some settings changed in order for the Internet Camera to be accessible outside your local LAN Refer to page 39 for more information about installing your camera behind a router Make sure that the Internet Camera isn t conflic...

Страница 67: ... Through the Web Configuration Video section of the web management you need to adjust the image related parameters for improved images such as brightness contrast hue and light frequency Please refer to the Web Configuration section for detailed information 18 Why are no images available through the Web browser The ActiveX might be disabled If you are viewing the images from Internet Explorer make s...

Страница 68: ...ernet Camera over the network Follow the step by step procedure below to utilize the PING command Start a DOS window Start Program Accessories Command Prompt Type ping x x x x where x x x x is the IP Address of the Internet Camera A successful connection to the camera will be indicated by 4 reply statements below How to Ping Your IP Address If you fail to connect to your camera you will see the fo...

Страница 69: ...s 25fps CIF 10fps VGA Compression Rate Selection 5 level Very Low Low Medium High Very High Video Resolution 160x120 320x240 640x480 Web Configuration Requirements Internet Explorer 5 0 or above or Netscape 6 0 or above 266MHz processor 32MB memory 64MB recommended VGA Card Resolution 800 x 600 or above Dimensions H x W x L 5 31 x 2 59 x 2 59 PC System Requirements Connection to 802 11g wireless or...

Страница 70: ...l D Link Systems Inc Technical Specifications Power Consumption 5W Environmental specification Operating temperature 5 C to 50 C Storage temperature 25 C to 50 C Operating relative humidity 5 to 95 non condensing Warranty 1 Year ...

Страница 71: ...your DCS G900 s range from 3 90 feet 1 30 meters Be aware of the direct line between network devices A wall that is 1 5 feet thick 5 meters at a 45 degree angle appears to be almost 3 feet 1 meter thick At a 2 degree angle it looks over 42 feet 14 meters thick Position devices so that the signal will travel straight through a wall or ceiling instead of at an angle for better reception Building mat...

Страница 72: ...ly used wired network technology Standard Ethernet supports up to 10Mbps Fast Ethernet supports up to 100Mbps Gateway This is the IP address of the device that connects you to another network such as a router A router would be the gateway between your local area network and the Internet Infrastructure This wireless networking mode is used by wireless networks with a router or an access point IP Ad...

Страница 73: ...lent Privacy A security protocol for wireless local area networks WLAN that is designed to provide the same level of security as a wired network WEP provides security by encrypting the data sent over the WLAN The DCS G900 supports 64 bit and 128 bit encryption Wired Devices networked via Ethernet cabling Wireless Devices networked using radio frequencies instead of physical cabling WPA PSK Wi Fi P...

Страница 74: ...contact D Link Technical Support through our website or by phone Tech Support for customers within the United States D Link Technical Support over the Telephone 877 453 5465 24 hours a day seven days a week D Link Technical Support over the Internet http support dlink com e mail support dlink com Tech Support for customers within Canada D Link Technical Support over the Telephone 800 361 5265 Mond...

Страница 75: ...stantially conform to D Link s then current functional specifications for the Software as set forth in the applicable documentation from the date of original retail purchase of the Software for a period of ninety 90 days Software Warranty Period provided that the Software is properly installed on approved hardware and operated as contemplated in its documentation D Link further warrants that during...

Страница 76: ...he foregoing requirements or for which an RMA number is not visible from the outside of the package The product owner agrees to pay D Link s reasonable handling and return shipping charges for any product that is not packaged and shipped in accordance with the foregoing requirements or that is determined by D Link not to be defective or non conforming What Is Not Covered The Limited Warranty provi...

Страница 77: ...s Inc Other trademarks or registered trademarks are the property of their respective owners Copyright Statement No part of this publication or documentation accompanying this product may be reproduced in any form or by any means or used to make any derivative such as translation transformation or adaptation without permission from D Link Corporation D Link Systems Inc as stipulated by the United S...

Страница 78: ... DCS G900 User s Manual D Link Systems Inc Registration Product registration is entirely voluntary and failure to complete or return this form will not diminish your warranty rights Registration 11 03 05 ...

Отзывы: