D-Link DCS-855L Скачать руководство пользователя страница 7

Do not overtighten the screws as this may damage the bracket.

Mount the Camera

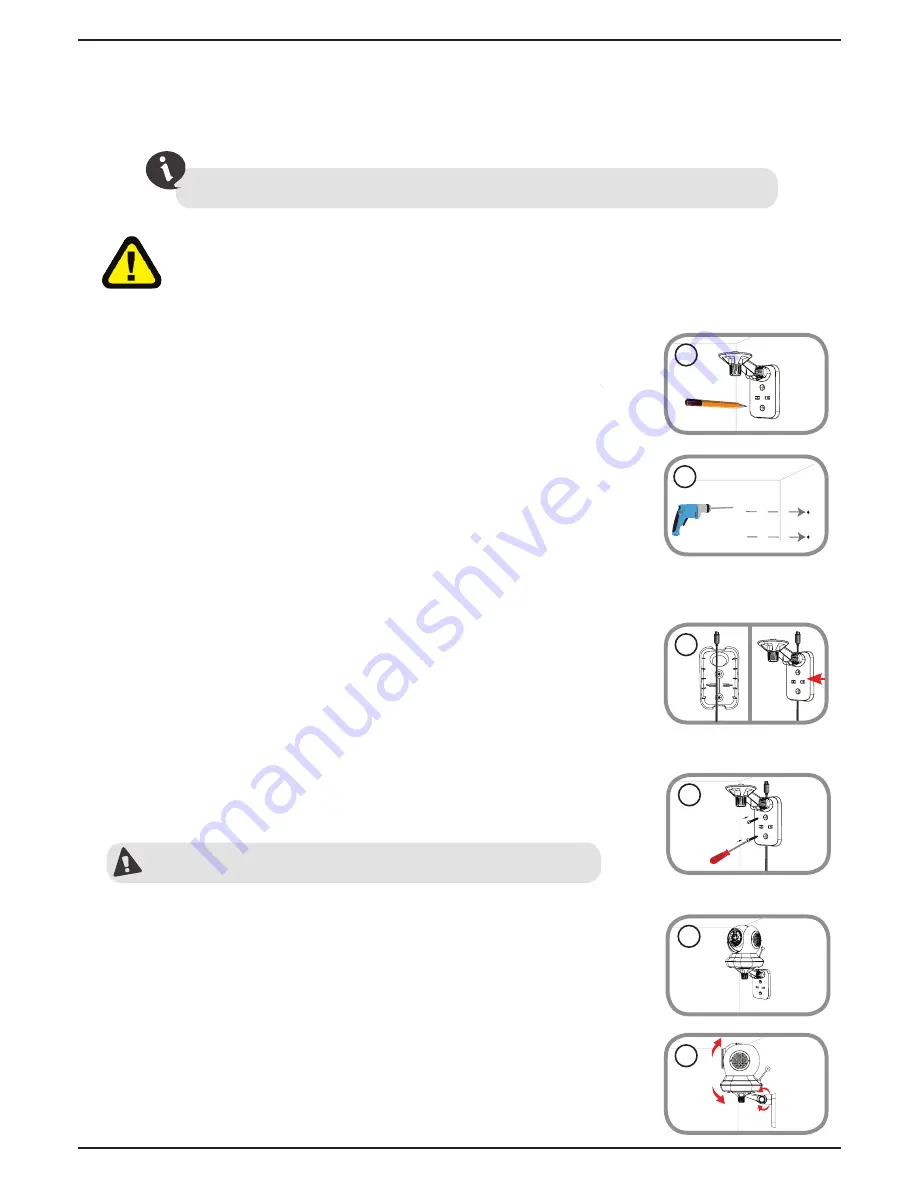
Please refer to the steps below to assist you with mounting the camera.

We suggest that you configure the camera before mounting.

• Place the mounting bracket where you want to 

position the camera and use a pencil to mark the 

points where you will drill the holes. 

Warning: Indoor use only. Do not mount in a location where it may 

be in contact with water as it may damage the product and/or cause 

injury

.

• If you prefer, you can conceal the cable behind the 

mounting bracket. Run the cable through the back 

of the mounting bracket, securing it with the built-in 

guides. Make sure you leave enough cable protruding 

to allow you to connect it to the camera.

• Use a 6mm drill bit to drill the holes where you 

marked. The holes should be 25mm deep (about 1 in 

deep). Insert the screws into the holes.

Note:


If the wall is made out of concrete, before inserting 

the screws, insert the provided plastic anchors to support 

the screws.

1

2

5

• Fasten the mounting bracket to the wall using the 

screws provided.

6

• Adjust the angle of the arm on the mounting bracket 

as desired. Tighten the thumbscrew to lock the arm 

into place.

• Using the supplied thumbscrew, fasten the camera 

to the mounting bracket. Connect the power cable to 

the camera.

3

4

7

Содержание DCS-855L

Страница 1: ...DCS 855L Quick Install Guide Wi Fi Baby Camera Pan Tilt HD Cloud Camera...

Страница 2: ...mera with a dry cloth Do not allow the camera to get wet This product is not a replacement for responsible adult supervision Before you Begin D Link and the D Link logo are trademarks or registered tr...

Страница 3: ...pp Store and Google Play Computer Requirements Computer with 1 3GHz processor or above and at least 128 MB RAM Microsoft Windows 8 7 Vista or Mac OS X 10 6 or higher InternetExplorer 7 Firefox 12 Safa...

Страница 4: ...ccent Ring Temperature Sensor Power LED Cover with Accent Ring Light Sensor Camera Lens NightVision Lights IR Micro USB Power Port BackView Direct Connect Button Reset Button Cloud Direct Mode LED mic...

Страница 5: ...AtHome 2 Remotely ConnecttoyourDCS 855LusingtheInternet Note YoucanalsoconnectdirectlytoyourDCS 855Lwirelessly sothereisnoneedforan Internetconnectionorarouter SeetheAdvancedFeaturessectionoftheUserM...

Страница 6: ...n WARNING STRANGULATION HAZARD Children have STRANGLED in cords Keep adapter cord out of reach of children minimum of 3 ft or 1 m away NEVER place the camera or adapter cord inside the crib or child s...

Страница 7: ...ket Run the cable through the back of the mounting bracket securing it with the built in guides Make sure you leave enough cable protruding to allow you to connect it to the camera Use a 6mm drill bit...

Страница 8: ...your wireless router This also applies when you enableDirectConnecttousethecameraawayfromhome Seethe AdvancedFeatures section of the User Manual for details The Wi Fi network name should be myBabyCam...

Страница 9: ...ound audio on the Configuration menu If you close the app the camera audio will be turned off 9 How do I adjust the sensitivity of motion and audio detection From the Live View page tap on the screen...

Страница 10: ...to receive alerts as specified Note Ifyoudonotreceivealerts gototheConfigurationmenuandadjustthe sensitivity level of sound and motion detection as described on the previous page question 9 11 Why do...

Страница 11: ...Notes 11...

Страница 12: ...Notes 12...

Страница 13: ...Notes 13...

Страница 14: ...Notes 14...

Страница 15: ...Notes 15...

Страница 16: ...heir respective owners Maximum wireless signal rate derived from IEEE Standard 802 11g and 802 11n specifications Actual data throughput will vary Network conditions and environmental factors includin...

Отзывы: