background image

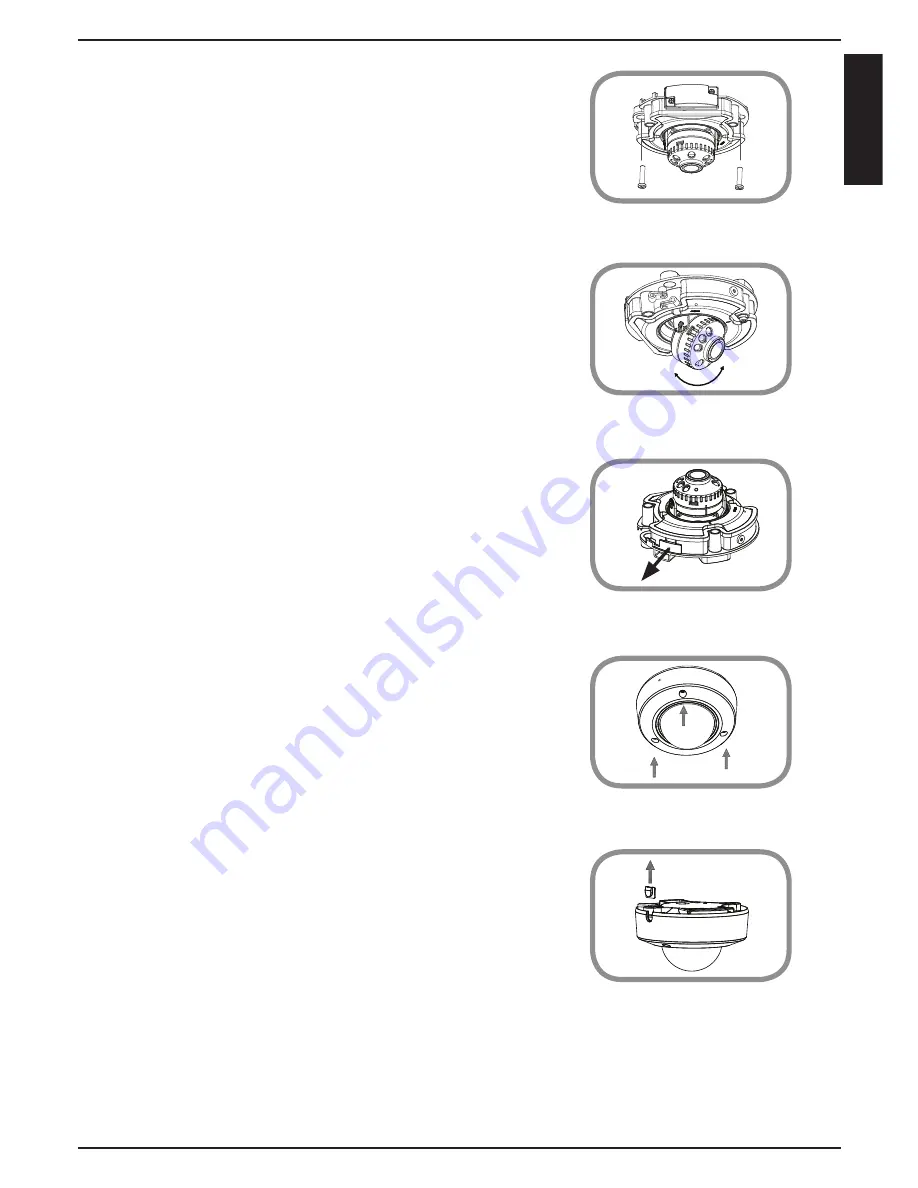
6.  Mount the camera on the wall or ceiling using 

the screws provided.

7.  Tilt and rotate the camera to your desired 

position. It may be helpful to do this while the 

camera is connected to your network so you 

can view its live video for reference.

9.  Reattach the camera cover with the screws and 

included wrench.

10.  If you are running the camera cables out the 

side of the camera, remove the cable channel 

cover and guide the camera cables through 

the cable channel before reattaching the 

cover.

8.  If you want to use a microSD card, lift the rubber 

flap on the side of the camera to expose the 

microSD card slot. Insert the microSD card, then 

close the rubber flap and make sure it is sealed 

properly.

5

EN

G

LIS

H

Содержание DCS-6212L

Страница 1: ...DCS 6212L Quick Install Guide FullHDOutdoorPoEMiniDomeCamera ...

Страница 2: ...ts Mobile Device to use mydlink Lite app iPhone iPad or Android smartphone or tablet Refer to the mobile app s store page to see if your device is compatible Network Device and Service A router with Internet service A Power over Ethernet PoE switch or router for PoE An e mail account required to create a mydlink account If you use a mobile device with the mydlink Lite app a PC is not required for ...

Страница 3: ...Launch the mydlink Lite app then create a new account or log in to your existing account Download the free mydlink Lite app on your smartphone or tablet by scanning the QR code below or by searching for mydlink Lite in the app store for your device 1 2 3 The app will guide you through the rest of the configuration process 3 ENGLISH ...

Страница 4: ...3 Dependingonthematerialofthewallorceiling use proper tools to drill two holes 25mm deep with a 6mm drill bit where you marked After drilling the holes insert the plastic anchors to support the screws If you are running the camera cables through the wall drill a hole in the center and pull the cables through the hole 4 If you are using PoE to power the camera use a small Philips screwdriver to rem...

Страница 5: ...eattach the camera cover with the screws and included wrench 10 If you are running the camera cables out the side of the camera remove the cable channel cover and guide the camera cables through the cable channel before reattaching the cover 8 Ifyou wantto use amicroSDcard lifttherubber flap on the side of the camera to expose the microSD card slot Insert the microSD card then close the rubber fla...

Страница 6: ...s working your router s LAN connections are working your router supports UPnP your camera is on the same network as your mobile device bothyourmobiledeviceandcamerahaveaworkingInternetconnection If your camera is still not working check your router and make sure it has the latest firmware 3 What can I do if I forget my password FAQs If you forget your password you must reset the camera Unfortunate...

Страница 7: ...hite haze when viewing in night vision mode When viewing in night vision mode the IR lights on the camera may be reflecting off a nearby surface Try repositioning the camera in order to avoid glare from IR LEDs 7 ENGLISH ...

Страница 8: ...p support dlink ca Canada Version 1 00 US _90x130 May 12 2015 RMN0101692 Copyright 2015 All rights reserved D Link and the D Link logo are registered trademarks of D Link Corporation or its subsidiaries Other trademarks are the property of their respective owners Product specifications size and shape are subject to change without notice and actual product appearance may differ from that depicted o...

Отзывы: