background image

Mount the Camera

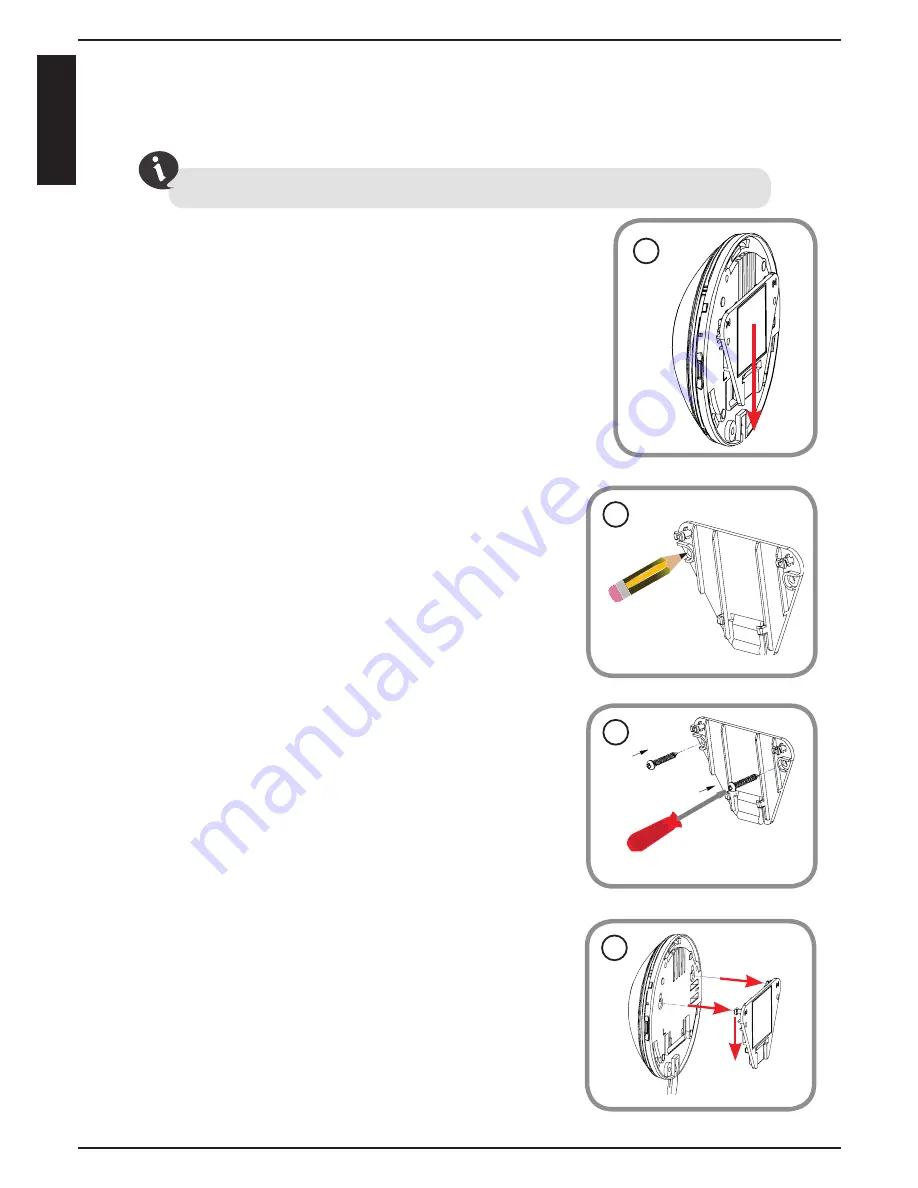
Please refer to the steps below to assist you with mounting the camera.

We suggest that you configure the camera before mounting.

1.  Unclip the wall bracket from the DCS-6010L 

by sliding the base down.

1

2.  Position the mounting bracket in the desired 

location and mark the surface behind it with 

a pencil using the bracket as a stencil.

2

3. Depending on the material of the wall or 

ceiling, use the proper tools to drill two 

holes where you marked with pencil. If the 

wall is made out of concrete, drill the holes 

approximately 25mm deep first. Then insert 

the plastic anchors to support the screws and 

fasten to the bracket.

3

1

2

4

4. Place the camera over the screw that is on 

the bracket. Make sure to fit the screw-heads 

over the big holes and slide it downward to 

lock firmly. Lightly pull the base forward to 

make sure that it is locked. 


Note: 

If mounting on a wall, ensure that the 

camera is oriented with the cables positioned 

to the bottom of the device.

8

EN

G

LI

S

H

Содержание DCS?6010L

Страница 1: ...DCS 6010L Quick Install Guide WirelessN360o NetworkCamera CloudCamera6100...

Страница 2: ...with Web Browser PC with 1 3GHz or above and at least 128MB RAM Windows 8 7 Vista or XP 32 bit or 64 bit Mac OS X 10 6 or higher Internet Explorer 7 Firefox Safari 4 or Chrome Installed and enabled Ja...

Страница 3: ...iPod Smartphone Tablet Laptop Laptop Desktop mydlink app Modem 1 mydlink Lite App Free Search for mydlink lite to download and install the app on your smartphone or tablet when connected to the Intern...

Страница 4: ...les are seated in the cable channel Set the cover in place and rotate to align the cable channel guide over the cable channel It is recommended to complete the Setup Wizard before putting the cover ba...

Страница 5: ...haveadded the camera to your account step 3 Zero Configuration Setup 1 2 Fromanycomputer openawebbrowser go to http www mydlink com and log into your account Click on the device name when the notice a...

Страница 6: ...waretoconfiguringyourcamera After about 20 30 seconds the Setup Wizard will open which will guide you step by step through the installation process from connecting your hardware to configuring your ca...

Страница 7: ...s not have Java installed by default Please download it from http www java com In Mac OS X 10 7 x Java applets are disabled by default Click the Finder Applications Utilities Java Preferences and chec...

Страница 8: ...the wall or ceiling use the proper tools to drill two holes where you marked with pencil If the wall is made out of concrete drill the holes approximately 25mm deep first Then insert theplasticanchor...

Страница 9: ...to enable the mydlink service in the future Check below if your camera is behind a router or firewall Log in to the router s setup page and add rules in the Virtual Server or Port Forwarding sections...

Страница 10: ...solutionsforadvanced users to choose from to manage their cameras and record videos Depending on theusersneeds oneortheothersolutioncanbeusedtosupplementtheircamera system NetworkVideoRecorders NVRs a...

Страница 11: ...Notes 11 ENGLISH...

Страница 12: ...Link Corporation or its subsidiaries Othertrademarksarethepropertyoftheirrespectiveowners MaximumwirelesssignalratederivedfromIEEE Standard 802 11g and 802 11n specifications Actual data throughput w...

Отзывы: