background image

32

D-Link DCS-5230L User Manual

Section 4 - Configuration

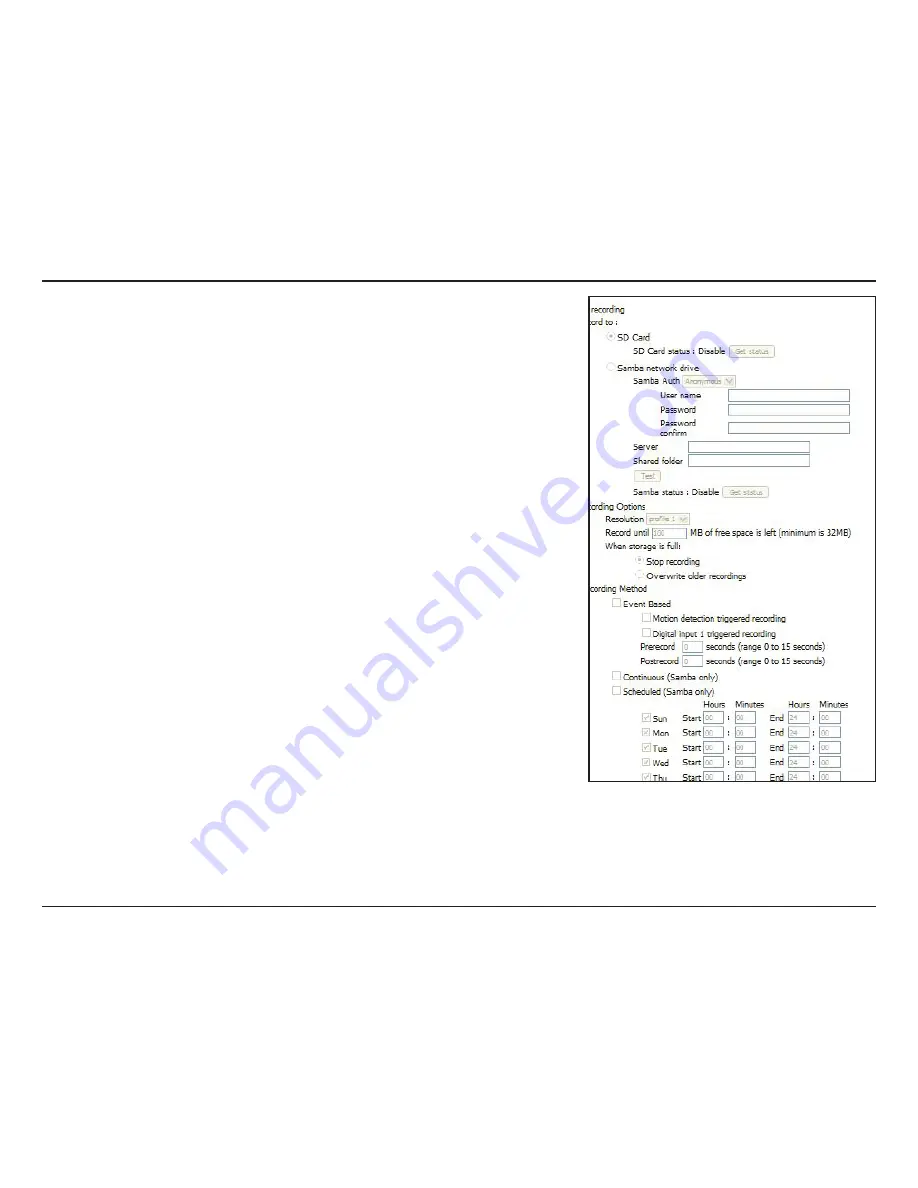
Recording Options

Resolution

: This will let you set which video profile you wish to use to record video. Please 

note that if the bitrate (bps) of the video profile is higher than your Samba network drive’s 

throughput, the recording’s framerate (FPS) may be reduced.

Record until

: You can use this setting to adjust how much free space must remain when 

recording. It is suggested that you set this to at least 32M to allow for enough buffer space 

for the camera to record with.

When storage is full

: When your storage device is full or has reached the free space limit 

specified in Record until, you can choose to stop recording, or you can have the camera 

delete old recordings to free space for new recordings to be saved.

Event Based

: Event based recording will allow you to record video when specific events 

happen.

Motion detection triggered recording: 

Enabling this option will set the camera to record 

video when motion is detected by


the camera.

Prerecord

: This will set how many seconds of video before the event takes place will be 

recorded.

Postrecord

: This will set how many seconds of video after the event takes place will be 

recorded.

Example:

 Using motion detection triggered recording and setting Prerecord to 5 seconds 

and Postrecord to 9 seconds, the camera will save video from 5 seconds before motion 

was detected to 9 seconds after motion was detected.

Continuous

: This will set the camera to record continuously.

Scheduled Recording

: This will set the camera to automatically record video during the 

specified times in the table below.

After making any changes, click the 

Save Settings

 button to save your changes, or click the 

Don’t 

Save Settings

 button to discard your changes.

Содержание DCS-5230L

Страница 1: ......

Страница 2: ... Portal provides detailed information on usage and configuration of your product with www mydlink com Section 3 Installation describes how to install the camera on your network page 12 Section 4 Configuration describes how to configure the settings on your DCS 5230L camera page 16 Section 5 Troubleshooting explains how to resolve common issues page 43 Section 6 Appendix contains special procedures...

Страница 3: ...mation Manual Revisions Trademarks D Link and the D Link logo are trademarks or registered trademarks of D Link Corporation or its subsidiaries in the United States or other countries All other company or product names mentioned herein are trademarks or registered trademarks of their respective companies Copyright 2010 by D Link Corporation All rights reserved This publication may not be reproduce...

Страница 4: ...e Camera to the Camera Base 13 Inserting a Micro SD Card 13 Connect the Ethernet Cable 14 Connect the Power Adapter 14 Connect to a Wireless Network Using WPS 15 Using the Configuration Menu 16 Web based Configuration Utility 17 Live Video 18 Camera 18 Setup 19 Wizard 19 Network Setup 20 Wireless 22 Dynamic DNS 23 Image Setup 24 Audio and Video 25 Motion Detection 27 Time and Date 28 Preset Positi...

Страница 5: ...iv D Link DCS 5230L User Manual Table of Contents Help 42 Troubleshooting 43 Installing Camera on a Router Without UPnP 44 Technical Specifications 50 ...

Страница 6: ...s network The DCS 5230L also comes with remote monitoring and motion detection features for a complete and cost effective home security solution Product Overview Remotely monitor your home or office over the Internet Web based Recording to a PC s local hard drive no software required Mydlink enabled technology simplifies setup by automatically configuring network settings Motion detection to trigg...

Страница 7: ...cording The DCS 5230L s 1 lux light sensitivity allows you to capture video in rooms with minimal lighting making it ideal for use in low light environments Web Configuration Using a standard Web browser administrators can configure and manage the Network Camera directly from its own Web page via Intranet or Internet This means you can access your DCS 5230L anytime from anywhere in the world Broad...

Страница 8: ...e Quick Installation Guide CD ROM Screw and wall mount kit Package Contents Note Using a power supply with a different voltage rating than the one included with the DCS 5230L will cause damage and void the warranty for this product If any of the above items are missing from your package please contact your retailer ...

Страница 9: ... 6 or higher with ActiveX controls enabled Web based Configuration Utility Requirements Computer with the following Windows based operating system An installed Ethernet adapter Browser Requirements Internet Explorer 6 0 or higher Firefox 3 0 or higher Safari 3 0 or higher Windows Users Make sure you have the latest version of Java installed Visit www java com to download the latest version myDlink...

Страница 10: ...verview Hardware Overview Front Micro SD Insert the Micro SD card into the DCS 5230L WPS Button Allows you to connect to a WPS router Camera lens Records video from the surrounding area PIR Sensor The slightest motion will trigger the camera to record ...

Страница 11: ...e power adapter Ethernet port Connects to a PC ornetwork through an Ethernet connection Camera base Allows you to attach the camera base or another mounting unit I O Connector Connect an I O cable to the DCS 5230L Microphone Connector Connect a microphone to hear audio from the area surrounding your camera ...

Страница 12: ...Portal After registering your DCS 5230L camera with a mydlink account in the Camera Setup Wizard You will be able to remotely access your camera from the www mydlink com website After signing in to your mydlink account you will see a screen similar to the following ...

Страница 13: ...rently cannot be accessed remotely If your camera is offline try the following Check to make sure that the Internet connection to your camera is working properly Try restarting your Internet router Check your camera s cable connections and make sure they are secure Check to make sure that the LED on your camera is lit solid green If you still cannot access your camera reset your camera and run the...

Страница 14: ...Video feed will be displayed Video will be shown at VGA resolution 640x480 if viewing your camera from a PC on the same local network or at QVGA resolution 320x240 if viewing your camera from a PC on a remote network Note If your router does not support UPnP there will be a 60 second time limit when viewing your camera remotely Maxmium only allow 3 views for video feed at a time ...

Страница 15: ...link Portal Camera Settings The Camera Settings tab allows you to access your camera s configuration interface To open your camera s configuration interface click Camera web page and enter the password exactly as listed on the Camera Settings page ...

Страница 16: ...This shows you the current password for your camera s configuration interface Clicking on the Show Password checkbox will either show or hide the password Clicking on the Password will open a window for you to log in to your camera s configuration interface This will then open the Maintenance Admin page where you can change your Password mydlink No This shows you the mydlink number of your device ...

Страница 17: ...er s CD ROM drive to start the autorun program The CD ROM will open the Camera Setup Wizard Simply click Start to go through the Setup Wizard which will help you through the entire installation process from connecting your hardware to configuring your camera Starting the Camera Setup Wizard Installation ...

Страница 18: ...are Installation Connect the Camera to the Camera Base Screw the camera base into the mounting point on the bottom of the DCS 5230L camera with a coin or screwdriver Inserting a Micro SD Card Insert your Micro SD card into the Micro SD card slot on the DCS 5230L ...

Страница 19: ... the cable to an available LAN port on your router or broadband modem Attach the power adapter to the power jack located on the back of the DCS 5230L and connect the power adapter to a power outlet After connecting the power adapter you should see the status LED on the front of the camera turn on The status LED will light red when it receives power will light green after the camera connects to the...

Страница 20: ...ur router within 60 seconds The WPS button is usually on the front or side of your router On some routers you may need to log in to the web interface and then click on an onscreen button to activate the WPS feature If you are not sure where the WPS button is on your router please refer to your router s User Manual The DCS 5230L will then automatically create a wireless connection to your router Wh...

Страница 21: ...your DCS 5230L At the end of the wizard click Go To Camera or enter the IP address of your camera into a web browser such as Internet Explorer To log in use the User name admin and the password you created in the Setup Wizard If you did not create a password the default password is blank After entering your password click OK Note If you are directly connecting your PC to the camera or if you or us...

Страница 22: ...17 D Link DCS 5230L User Manual Section 4 Configuration Web based Configuration Utility Use the following sections to set up and configure your network camera LIVE VIDEO SETUP MAINTENANCE STATUS HELP ...

Страница 23: ...er not included connected to the camera s Audio Out port This can be used to communicate with others near the camera This button will toggle the digital output on or off Use the Pan Tilt Zoom Action Pad to control the camera s pan or tilt The large tree icon controls the zoom in function The small tree icon on the right side controls the zoom out function The Home button can move the camera to the...

Страница 24: ...o set up motion detection Simply follow the instructions given in each step of the wizard to quickly set up your camera Alternatively you can manually set up your Internet connection by clicking Manual Internet Connection Setup and you can manually set up motion detection options by clicking on Manual Motion Detection Setup You can also see these settings by clicking on the menu on the left panel ...

Страница 25: ...t the IP address information for your camera IP Address Enter the IP address the camera should use Subnet Mask Enter the subnet mask that the camera should use Default Gateway Enter the default gateway that the camera should use Primary DNS Enter the IP address of the primary DNS server that the camera should use Secondary DNS Enter the IP adress of the secondary DNS server that the camera should ...

Страница 26: ... set to 554 You may change the port number if using multiple cameras Note You MUST also set up your router gateway for Port Forwarding Mapping this will enable remote viewing of your camera via the Internet Please refer to your router s instruction manual on how to open up ports For additional help on configuring your camera to work with your router please refer to Appendix A Installing the DCS 52...

Страница 27: ...d Hoc mode select the channel of the wireless network you wish to connect to or select Auto Authentication Select the authentication you use on your wireless network Open Shared WEP WPA PSK or WPA PSK2 Encryption If you use WPA PSK or WPA PSK2 authentication you will need to specify whether your wireless network uses TKIP or AES encryption If you use Open or Shared authentication this setting will...

Страница 28: ...pdate your DDNS server every time it receives a different IP address Depending on the service this update may take a few hours Enable DDNS Check this checkbox to enable the DDNS function of the camera Server Address Use the dropdown box on the right to select a DDNS service Host Name Type in the Host Name of the DDNS service User Name Enter your User Name for the DDNS service Password Enter the pa...

Страница 29: ...s the camera sensor s setting to avoid the image flickering under certain light sources such as florescent lights This is set to Auto by default White balance You can change the white balance of the camera image by selecting a setting from the dropdown box This is set to 60Hz by default B W Ticking this checkbox will change the camera image into black and white Flip This will flip the image vertic...

Страница 30: ...n and FPS settings are set to JPEG Quality This sets the JPEG quality of any manual snapshots you take when this video profile is selected RTSP URL This setting allows you to set a suffix for your camera s RTSP URL so you can view your camera s video with this video profile s settings For example if you enter mpeg4 as your RTSP URL setting and your camera s IP is 192 160 0 30 you can view your cam...

Страница 31: ...ote that the live video will turn to black and white mode when IR LEDs turned on Enable Speaker Checking this box will allow you to talk using the PC s microphone Enable Microphone Checking this box will enable you to listen to audio picked up by the camera s microphone This will allow you to hear what is happening near your camera Volume This sets the volume level of the incoming audio Note Highe...

Страница 32: ...s disabled This option allows you to set up Motion Detection on your IP camera In order to use motion detection you must first check the Enable Video Motion checkbox You can then click on the video window and draw motion detection zones by clicking and dragging your mouse Red areas indicate areas that will be monitored for motion The camera also has a PIR sensor which is used to detect motion usin...

Страница 33: ...This will set the Daylight Saving adjustment that will be used Daylight Saving Date This will set the beginning and ending dates of the Daylight Saving period You can also have the camera s clock set automatically or manually Synchronize with NTP Server Checking this checkbox will allow the camera to synchronize its clock with an NTP server NTP Server Use the dropdown box to the right to select an...

Страница 34: ...r a full cycle from the pull down menu Select a value between 0 and 10 0 being the slowest setting Select the speed at which the camera will pan during auto patrol Select a value between 1 and 3 1 being the slowest setting Enter a name for the position at which you would like to preset the DCS 5230L Click Add to add the new preset position to the Preset Locations list Using the drop down list you ...

Страница 35: ...ll the default home position use the Default Home button To use the Auto Patrol feature select the desired preset positions from the Preset Locations list and add them to the Selected Locations list by clicking Select You can then select the order in which the camera will patrol through the preset locations by selecting a location and clicking Up or Down Click Remove to remove a location from the ...

Страница 36: ...Re enter the password required to access your Samba drive for verification Server Enter the name or the IP of the server your Samba drive is located Shared Folder Enter the name of your shared folder Test Click this button to make a connection to the Samba network drive and it will let you know if the settings work Note You can create a simple Samba network drive on your Windows PC by right clicki...

Страница 37: ...ved Event Based Event based recording will allow you to record video when specific events happen Motion detection triggered recording Enabling this option will set the camera to record video when motion is detected by the camera Prerecord This will set how many seconds of video before the event takes place will be recorded Postrecord This will set how many seconds of video after the event takes pl...

Страница 38: ...l below according to schedule you define by checking days and entering the times you want to record between You can only save to an FTP server when taking scheduled snapshots E mail Address When checked the camera will send the snapshots it takes to the e mail address specified in the following text boxes If you do not know what to enter for the User Name Password or SMTP Mail Server contact your ...

Страница 39: ...nter the file path to the location on the FTP server you want to send snapshots to Filename Prefix Enter the prefix you want to attach to your snapshot files Port Enter the port used by the FTP server Interval Enter the time interval the camera will wait before taking a new snapshot Passive Mode If your FTP server requires you to use passive mode check this box Test Clicking this button will take ...

Страница 40: ...anual Section 4 Configuration Digital Output You can enable the digital output port as well as configure the trigger event Motion Detection When a motion detection is triggered D I Signal 1 A trigger from the Digital Input port ...

Страница 41: ... Num of files The amount of files in catalog Size The file s size Refresh Click it reload data to webpage Top Level Click it go back to previous level Delete Click this button to select all the files below OK Click this button to delete the selected files above Clicking Format SD Card will delete all data from the SD card and create folder for video SD CARD ...

Страница 42: ...sers by using the dropdown box You can also delete a user by selecting them with the dropdown box and then clicking the Delete button Device Setting Here you can change various other settings for your camera Camera Name Enter the name of your camera Enable OSD This will enable the information bar On Screen Display OSD to appear when viewing video Label This is the text label that will appear on th...

Страница 43: ...the current configuration to a hard drive Load From Local Hard Drive To load a saved configuration click on the Browse button to select a configuration file from your hard drive Then click the Load Configuration button to load the new configuration Restore To Factory Defaults Click this button to reset all settings to their factory defaults If you choose to reset your settings you will need to set...

Страница 44: ...t firmware to your computer s hard drive Click on Browse select the firmware file then click the Upload button While the firmware is being upgraded do not turn off your computer or camera and do not disconnect your network connection from your computer or camera Upgrading the firmware will not change any of your system settings but it is recommended that you save your system configuration before d...

Страница 45: ...40 D Link DCS 5230L User Manual Section 4 Configuration Status This screen shows you various information about your camera and its current settings Device Info ...

Страница 46: ...30L User Manual Section 4 Configuration The log shows you a list of events that have happened recently You can download the log by clicking the Download button or you can empty the log by clicking the Clear button Log ...

Страница 47: ...42 D Link DCS 5230L User Manual Section 4 Configuration Help The Help screen provides you with support information about the DCS 5230L for your reference ...

Страница 48: ...he camera from your mydlink account so you will need to add it back to your account later 2 In addition to using mydlink com is there another way to access my camera remotely over the Internet Yes you can access your camera over the Internet through the following URL after successfully installing your camera through the Camera Setup Wizard http mydlink No dev mydlink com For example if your camera...

Страница 49: ... or if you do not want to use DMZ follow these steps to allow multiple remote access to your cameras 1 Identify your camera on the network 2 Assign a local IP address and port for your camera 3 Determine your router s WAN IP Address Enable Remote Viewing 4 Open virtual server ports for your router Enable Remote Viewing 1 Identify Your Camera on the Network Log in to your camera s web interface fro...

Страница 50: ...al IP address is required to configure your camera and to view your camera within your local network You may use the default camera IP address of 192 168 0 20 If you wish to use a different IP address be sure that the camera settings correspond to your network settings The Default Gateway will be the IP address of your router s local IP address e g 192 168 0 1 if you are using a D Link router ...

Страница 51: ...n a Web server or your ISP blocks access on port 80 you MUST open a second port and designate a new Web server port 800 801 802 etc Similarly if port 554 is not available you will need to open a different port for RTSP Note Be sure to take note of these settings since these same settings will be used to configure your router Note Some ISPs block traffic on commonly used ports like port 80 to disal...

Страница 52: ...clarify the configuration process Note Because a dynamic WAN IP address can change from time to time depending on your ISP you may want to obtain a Static IP address from your ISP A Static IP address is a fixed IP address that will not change over time and will be more convenient for you to use to access your camera from a remote location You can also use DDNS to obtain an IP address Please refer ...

Страница 53: ... IP address in the private local IP field Select TCP under Traffic Type Enter the HTTP port your camera is set to use in the Start and End settings Note If you are using more than one camera you will need to select a different public port for each camera If you cannot use port 80 for your public port for example if you are already running a web server select a different public port for your camera...

Страница 54: ...rt 3gpp MPEG 4 stream PC rtsp ip address port play1 sdp MJPEG stream PC rtsp ip address port play3 sdp To access your camera from a computer on your local home network simply enter the local IP address of your camera i e 192 168 0 35 If using a port other than port 80 you must enter the IP address followed by a colon and the assigned port number Note If your camera is connected to the Internet you...

Страница 55: ... Supports Full Duplex operation MDI MDIX auto negotiation 802 3x Flow Control support for Full Duplex mode Wireless Connectivity 802 11g n Wireless with WEP WPA WPA2 Security WPS Support Sensor inch color VGA CMOS Sensor Lens Focal length 5 01mm F2 8 Microphone Signal noise ratio 40dB 3dB Omni directional Reset Button Reset to factory default Video Codec MPEG 4 MJPEG simultaneous dual format compr...

Страница 56: ...Auto Gain Control AWB Auto White Balance AES Auto Electronic Shutter Power Input 100 240VAC 50 60Hz Output 5VDC 2 5A Powered by an external power adapter Maximum power consumption DCS 5230L 6 3W Dimensions WxDxH 120 0mm x 81 5mm x 38 0mm without bracket and stand Weight 280g without bracket and stand Operation Temperature 0 to 40 C 32 to 104 F Storage Temperature 20 to 70 C 4 to 158 F Humidity 20 ...

Отзывы: