background image

18

D-Link DCS-4705E User Manual

Section 3: Configuration

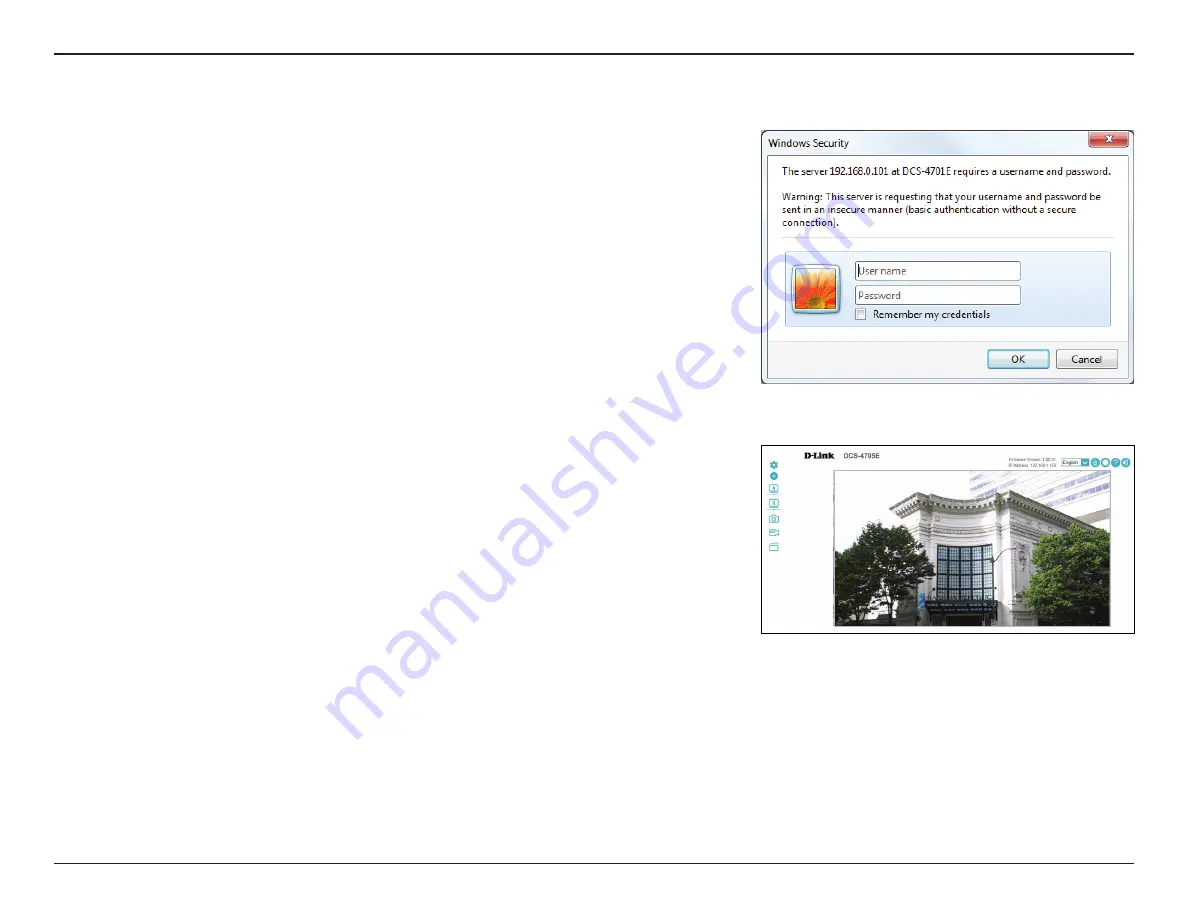
Step 3

The first time you connect to the camera, you will be asked to set a password for the 

administrator account. After entering a password, click 

Save

.

OR

Under Password, enter the same password configured during setup and click 

Login

 to continue.

Step 4

This section displays your camera’s live video. You can select your video profile and view or 

operate the camera. 

Содержание DCS-4705E

Страница 1: ...User Manual Version 1 00 10 05 2018 DCS 4705E Vigilance 5 Megapixel H 265 Outdoor Bullet Camera ...

Страница 2: ...te Description 1 00 10 05 2018 Version A1 with firmware version 1 00 Trademarks D Link and the D Link logo are trademarks or registered trademarks of D Link Corporation or its subsidiaries in the United States or other countries All other company or product names mentioned herein are trademarks or registered trademarks of their respective companies Copyright 2018 D Link Corporation All rights rese...

Страница 3: ...stallation 11 Software Installation 14 Configuration 17 Using the Configuration Interface 17 Live Video 19 Setup Wizard 21 Network Setup Wizard 22 Motion Detection Setup Wizard 24 Settings 26 Network Settings 26 Camera Settings 32 Event Management 39 Advanced Setup 48 Advanced 48 Camera Configuration 54 Camera Options 58 Camera Info 58 Time 59 Administration Settings 62 Camera Log 65 Technical Spe...

Страница 4: ...r reseller Safety Notice Installation and servicing should be done by certified technicians to conform with all local codes and prevent voiding your warranty DCS 4705E Vigilance 5 Megapixel H 265 Outdoor Bullet Camera Mounting Kit CD ROM with User Manual and software Quick Installation Guide Cable Waterproofing Connector Rubber Power Connector Plug ...

Страница 5: ...width requirement compared to H 264 while also saving storage capacity of NVR VMS The DCS 4705E also incorporates Power over Ethernet PoE allowing it to be easily installed in a variety of locations especially with D Link Surveillance Switches which supports ONVIF and surveillance VLAN bandwidth control and cable diagnostics functions The DCS 4705E can be accessed remotely controlled and configure...

Страница 6: ...notifications with snapshots when an event occurs such as when motion is detected Events can be triggered from several sources such as motion detection and time based events IR LEDs for Day and Night Functionality The built in infrared LEDs enable night time viewing of up to 30 meters With built in smart IR function it can avoid overexposure of near objects at night IP66 Weatherproof and Vandal pr...

Страница 7: ...onments 2 Camera Lens Camera lens to record video of the surrounding area 3 Adjustment Ring Loosen to adjust and tighten to lock the camera angle 4 Ethernet Port RJ 45 connector for Ethernet which can also be used to power the camera using Power over Ethernet PoE 5 Power Port Connects to an optional 12 V 1 5 A power adapter not included ...

Страница 8: ...er Manual Section 1 Product Overview 1 Grounding Screw Used to connect the camera to ground 2 Reset Button Press and hold this button down for 10 seconds to reset the camera to factory default settings 1 2 Hardware Overview ...

Страница 9: ... where you want to position the camera Use a 6 mm drill bit to make the required holes approximately 25 mm deep then insert the wall anchors into the holes Step 2 If you are running the camera cables through the wall drill a hole in the center and pull the cables through the hole Step 3 Use the screws provided to mount the camera to the wall If you are running the camera cables out the side of the...

Страница 10: ...ngle turntheadjustmentringcounterclockwisetoloosenit thenmove the camera to the desired position and angle When you are finished turn the adjustment ring clockwise to tighten it Step 5 Connect the power and Ethernet cables or just the Ethernet cable if you are using a PoE connection ...

Страница 11: ...or as shown Round Ethernet cable a crimping tool and RJ 45 plugs are required for this procedure Step 2 Thread bare Ethernet cable through the waterproof connector as shown then crimp an RJ 45 plug onto the cable Step 3 Crimp an RJ 45 connector onto the end of the cable Step 4 Connect the other end of the Ethernet cable to the camera s Ethernet port ...

Страница 12: ...ise until there is a tight seal around the Ethernet cable Step 5 Connect the RJ 45 plug into the Ethernet connector then screw the waterproof connector to the Ethernet connector by turning it about a half turn clockwise If you are using PoE to power your camera use the power connector cap to seal the power connector ...

Страница 13: ...13 D Link DCS 4705E User Manual Section 2 Installation If you are using a power adapter not included to power your camera wind waterproof tape around the connection in an overlapping manner to cover it ...

Страница 14: ...torun function on your computer is disabled or if the D Link Launcher fails to start automatically click the Start button and type D autorun exe where D represents the drive letter of your CD ROM drive and press Enter Step 2 Click on the D LinkSetupWizardSE icon that was created in yourWindows Start menu Start D Link Setup Wizard SE Software Installation ...

Страница 15: ...nd password for the camera and enter the new ID and password you wish to use Click Next to continue Step 3 The SetupWizard will appear and display the MAC address and IP address of your camera s If you have a DHCP server on your network a valid IP Address will be displayed If your network does not use a DHCP server the network camera s default static IP 192 168 0 20 will be displayed Select your c...

Страница 16: ...Take a moment to confirm your settings and click Restart Step 5 Select DHCP if your camera obtains an IP address automatically from a DHCP server such as a router Select Static IP if you want to manually enter the IP settings for the camera Click Next to continue ...

Страница 17: ...e IP address of your camera into a web browser such as Firefox To log in use the User name admin and the password you created in the Installation Wizard If you did not create a password the default password is blank After entering your password click OK Step 1 Click on the D LinkSetupWizardSE icon that was created in yourWindows Start menu Start D Link Setup Wizard SE Step 2 Select the camera and ...

Страница 18: ... you will be asked to set a password for the administrator account After entering a password click Save OR UnderPassword enterthesamepasswordconfiguredduringsetupandclickLogintocontinue Step 4 This section displays your camera s live video You can select your video profile and view or operate the camera ...

Страница 19: ...screen sizes for your camera s video Auto Screen Automatically resize the camera video to match your browser window Full Screen View your camera video using the entire screen 100 Screen View your camera s video at 100 size 50 Screen View your camera s video at 50 size 25 Screen View your camera s video at 25 size Video Profile 1 2 Select a video profile to use For more on setting up your video pro...

Страница 20: ...in the top right corner of the Live Video screen Alarm This will flash red when motion is detected Record Status This will turn red when the camera is recording Help Click this to open a window that describes the Live Video controls Logout Click this to log out of the web interface ...

Страница 21: ...gh setting up your camera s network and motion detection settings Network Setup Wizard Motion Detection Setup Wizard Click on this button to start the Network Setup Wizard Refer to Network Setup Wizard on page 22 Click on this button to start the Motion Detection Setup Wizard Refer to Motion Detection Setup Wizard on page 24 ...

Страница 22: ... the Internet If your camera is connected to a router or you are unsure how your camera will connect to the Internet select DHCP Select Static IP Client if your Internet Service Provider has provided you with connection settings or if you wish to set a static address within your home network Enter the correct configuration information and click Next to continue If you are using PPPoE select PPPoE ...

Страница 23: ...ble DDNS and enter your host information Click Next to continue Step 3 Enter a name for your camera and click Next to continue Step 4 Set the correct time to ensure that all events will be triggered as scheduled Click Next to continue Step 5 Confirm the settings are correct and click Apply to save them The settings will be saved to the DCS 4705E and the camera will restart ...

Страница 24: ... sensitivity and define what parts of the camera s view to monitor for motion You may specify whether the camera should capture a snapshot or record a video clip when motion is detected Please refer to Motion Detection on page 47 for more information about how to configure motion detection Click Next to continue Step 2 This step allows you to enable motion detection based on a customized schedule ...

Страница 25: ...clip systemlogwhenmotion is detected Select E mail FTP or Network Storage and enter the relevant information Click Next to continue Step 4 You have completed the Motion Detection Wizard Please verify your settings and click Apply to save them Please wait a few moments while the camera saves your settings and restarts ...

Страница 26: ...address automatically If you choose DHCP you do not need to fill out the IP address settings You may obtain a static or fixed IP address and other network information from your network administrator for your camera A static IP address may simplify access to your camera in the future Enter the fixed IP address in this field This number is used to determine if the destination is in the same subnet T...

Страница 27: ... host gateway and DNS server IPv6 Use this section to configure your camera s IPv6 settings After making any changes click the Save button to save your changes PPPoE Enable PPPoE User Name Password PPPoE Status Enable this setting if your network uses PPPoE Enter the username and password for your PPPoE account Re enter your password in the Confirm Password field You may obtain this information fr...

Страница 28: ...rt Access Name for Stream 1 2 The default port number is 80 The default name is video mjepg where is the number of the stream HTTP Use this section to configure the HTTP and HTTPS access settings for your camera After making any changes click the Save button to save your changes ...

Страница 29: ...rt number is 443 Enable the HTTPS service Choose the way the certificate should be created Three options are available Create a self signed certificate automatically Create a self signed certificate manually Create a certificate request and install Displays the status of the certificate The certificate cannot be removed while the HTTPS is still enabled To remove the certificate you must first unch...

Страница 30: ...he address of a particular stream For instance live1 sdp can be accessed at rtsp x x x x live1 sdp where the x x x x represents the ip address of your camera Use this section to configure your camera s RTSP and multicast stream settings After making any changes click the Save button to save your changes RTSP Multicast Multicast for Stream 1 2 The DCS 4705E allows you to multicast each of the avail...

Страница 31: ...is section to enable Bonjour which allows your camera to be accessed more easily on your network After making any changes click the Save button to save your changes Bonjour Bonjour Name Enable this to enable Bonjour support Enter a name to identify this camera on Bonjour ...

Страница 32: ...x when creating a snapshot or a video clip You may specify whether or not to illuminate the status LED on the camera For security reasons this setting is set to Off by default Camera Settings Camera Settings Use this section to configure the device name and LED behavior for your camera After making any changes click the Save button to save your changes ...

Страница 33: ...or different environments You can choose from Auto Outdoor Indoor Changes the exposure mode Use the drop down box to set the camera for Indoor Outdoor or Night environments or to Moving to capture moving objects You can also create 3 different custom exposure modes Max Gain will limit the brightness of the exposure This setting controls the amount of noise reduction that will be applied to the pic...

Страница 34: ...e how much sharpening to apply to the image Wide Dynamic Range WDR helps improve exposure making it easier to see objects in very bright or dark areas of the camera s image Specify a value to determine how much WDR adjustment to apply to the image or select None This reduces the amount of image noise when viewing a low light environment Click this button to reset the image to factory default setti...

Страница 35: ...s Night mode disables the IR Cut Filter and turns on the IR LEDs Set Day Night mode using the schedule set in the drop down boxes The camera will enter Day mode at the starting time and return to Night mode at the ending time Activate the Disable IR LED to set Day mode for the set times The camera can enable or disable the IR infrared light according to your preferences This setting provides addit...

Страница 36: ...er of the camera s video Enter a label for the camera which will be shown on the OSD when it is enabled Privacy Mask Enable Privacy Mask Setting Restore All The Privacy Mask setting allows you to click and drag the mouse cursor over the camera image to draw maximum 3 rectangular areas which will be blocked excluded from recordings and snapshots Click the Save button to save your changes Clear all ...

Страница 37: ... to use Frame size determines the total capture resolution Larger frame sizes provide more detail but will require more bandwidth You can set the maximum frame rate A higher frame rate provides smoother motion for videos and requires more bandwidth Lower frame rates will result in stuttering motion and require less bandwidth You may configure up to 2 video profiles with different settings for your...

Страница 38: ...onfiguration Constant Bit Rate Fixed Quality You can set the bit rate to use for this video profile Select the image quality level for the camera to try to maintain Higher quality levels will result in increased bit rates and use more bandwidth ...

Страница 39: ...gular video recordings according to a schedule you define Detailed information for the following steps can be found in the following pages Action Step 1 Select your destination Server and Media type Step 2 Select your Trigger event and Action Server E mail FTP Network Storage Media Snapshot Video Clip System Log Video motion detection Periodic System boot Event schedule Event Server can be any pre...

Страница 40: ...ettings Recording 1 To add a new server media event or recording item click Add A screen will appear and allow you to update the fields accordingly 2 To delete the selected item from the server media event or recording drop down menus click the Delete button next to it 3 Click on the name of an item to edit it Event Management ...

Страница 41: ...the settings for your target e mail account If you want to use an FTP server for your server select this and enter the settings for your target FTP server If you want to use a network storage device for your server select this and enter its settings here Server You can configure a server for each server type and up to 5 FTP servers After making any changes click the Save button to save your change...

Страница 42: ...event images are images taken before the main event snapshot is taken Set the number of post event images to take Post event images are images taken after the main event snapshot is taken For example If both the Send pre event images and Send post event images are set to 4 a total of 9 images are generated after a trigger is activated 1 pic 2 pic 3 pic 4 pic 5 pic 6 pic 7 pic 8 pic 9 pic The momen...

Страница 43: ...ded as a file name suffix Select this option to set the media type to video clips Set the video profile to use as the media source Refer to Video Stream on page 37 for more information on video profiles Thissetshowmanysecondstorecordbeforethemaineventvideoclipstarts Set the maximum length of video to record for your video clips Set the maximum file size to record for your video clips This is the p...

Страница 44: ...he delay time before allowing this event to be triggered again This is used for both motion detection events and event triggers Event Selecting this will trigger the event when motion is detected during live video monitoring Make sure you have enabled motion detection and specified what part of the image to monitor for motion For more details refer to Motion Detection on page 47 Selecting this wil...

Страница 45: ...ns Select the Server to use then choose the Media you want to save to it Please note that you need to set up your Server and Media entries first Event Schedule Specify when you want to monitor for this event Select which days to monitor for this event then select Always or enter the time interval to monitor for the specified event ...

Страница 46: ...cording source Recording Use the checkboxes to set which days to record video on Select Always to record for the entire day or select From and select what period of time you want to record using the drop down boxes SelectastoragedestinationthatwasconfiguredinServertosendrecordings there If this is selected files will be split based on the file size you specify If this is selected files will be bas...

Страница 47: ...vities may be useful when monitoring an area that rarely changes such as a storeroom or warehouse Set how much of the area being monitored for motion must change for motion to be detected A low percentage means that only part of the area being monitored has to change to detect motion and a high percentage means that most of the area needs to change to detect motion Low percentages can be useful wh...

Страница 48: ...abling this setting allows the camera to add port forwarding entries into the router automatically on a UPnP capable network If UPnP Port Forwarding is enabled you can set which port to use for forwarding If UPnP Port Forwarding is enabled this will show the UPnP Port Forwarding status Enabling Video Motion will allow your camera to use UPnP to automatically set up port forwarding on your router A...

Страница 49: ...DNS Server Address Host Name User Name Password Verify Password Timeout Status Check this box to enable the DDNS function Enter your DDNS server address or select a service from the drop down menu Enter the host name of the DDNS service Enter the username or e mail address used to connect to the DDNS service Enter the password used to connect to the DDNS service Enter your DDNS service password ag...

Страница 50: ...d Only Security Name Enable this option to allow for SNMPv1 and SNMPv2c management of the camera Enter a name for the read write community of your SNMP server Enter a name for the read only community of your SNMP server Enable this option to allow SNMPv3 management of the camera Enter a name for the read write community of your read write SNMP server Enter the type of authentication used by your r...

Страница 51: ... the type of authentication used by your read only SNMP server Enter the authentication password used for your read only SNMP server Enter the encryption password used for your read only SNMP server Authentication Type Authentication Password Encryption Password ...

Страница 52: ... the Class of Service setting implements a best effort policy to prioritize traffic without making any bandwidth reservations To use CoS enable it enter the VLAN ID to use for the camera and set the priority for your Live Video Live Audio Event Alarm and Management camera traffic Enabling QoS allows you to specify a traffic priority policy to ensure a consistent Quality of Service during busy peri...

Страница 53: ...ing IP address of the IP address range for the devices such as a computer that have permission to access the video of the camera The ending IP address of the IP address range for the devices such as a computer that have permission to access the video of the camera Click Add to save your changes Select an entry to remove from the Allow List then click Delete The list of IP addresses that have no ac...

Страница 54: ...on you may back up or restore the camera configuration Save To Local Hard Drive Load From Local Hard Drive You may save your current camera configuration as a file on your computer Locate a pre saved configuration by clicking Browse and then restore the pre defined settings to your camera by clicking Load Configuration ...

Страница 55: ...Section 3 Configuration Here you can reset the camera configuration back to the factory defaults Factory Reset Restore to Factory Default You may reset your camera and restore the factory settings by clicking Restore Factory Defaults ...

Страница 56: ...r set a schedule to reboot the camera automatically Reboot Device Reboot Device Schedule Reboot This will restart your camera If you want your camera to reboot on a regular schedule enable this option then select the days and time you want the camera to reboot on and click the Save button ...

Страница 57: ...xt to the D Link logo at the top of the page Firmware Update File Path To update the firmware select a firmware file to use from your hard drive by clicking Browse then click the Upload button Note While the firmware is being updated do not close the web browser or disconnect your camera s power or network connection until the update is complete ...

Страница 58: ...58 D Link DCS 4705E User Manual Section 3 Configuration This page displays detailed information about your camera the services running on your camera and active video streams Camera Options Camera Info ...

Страница 59: ... time zone from the drop down menu If your region uses Daylight Saving time you can enable it here Select Set date and time manually if you want to manually set the offset and the period of time that the Daylight Saving correction should be used Enter the offset that should be used when Daylight Saving is being used Set the date and time that Daylight Saving should start Set the date and time that...

Страница 60: ...guration This section lets you set your camera s date and time automatically by using an NTP server Auto Time Config NTP Server Enable this option to set your camera s time using an NTP server then select an NTP server to use from the drop down box ...

Страница 61: ...ate and time If you have NTP Server enabled in Auto Time Config you will need to disable it before setting the date and time manually Set Date and Time Set Date and Time Manually Copy Your PC s Time Enable this option to manually set the time and date This will synchronize the time information with your PC ...

Страница 62: ... User Manual Section 3 Configuration Here you may modify the administrator s password for your camera Administration Settings Admin Password New Password Retype Password Set a new password for the administrator s account ...

Страница 63: ...or accessing the camera User accounts are allowed to access the Live Video page but cannot access any of the camera s configuration pages User Accounts User Name New Password Retype Password Enter a user name for the user you wish to create Enter a password for the user you wish to create ...

Страница 64: ...nts for accessing the camera User List User Name If you want to change a user s password select a user from the drop down box enter the new password then click the Modify button If you want to remove a user from the user list select a user from the drop down box then click the Delete button ...

Страница 65: ...5E User Manual Section 3 Configuration This page displays the log information of your camera You may download the information by clicking Download You may also click Clear to delete the saved log information Camera Log ...

Страница 66: ...arm Configurable shutter speed brightness saturation contrast and sharpness WDR 3D filter Video Compression Simultaneous H 265 H 264 MJPEG format compression H 265 H 264 MJPEG multicast streaming JPEG for still images Video Resolution 16 9 2560 x 1440 up to 15 fps 1920 x 1080 1280 x 720 800 x 448 640 x 360 up to 30 fps 4 3 2560 x 1920 up to 15 fps 1600 x 1200 1440 x 1080 1280 x 960 800 x 600 640 x...

Страница 67: ...SR Chrome 42 and higher or Safari 9 and higher on Mac OS X D ViewCam System Requirements Operating System 32 bit Windows 8 7 SP1 64 bit Windows 10 8 7 SP1 Server 2012 Server 2008 R2 Web Browser Internet Explorer 7 or higher Protocol StandardTCP IP D ViewCam Software Functions Remote management of up to 32 cameras Supports all management functions provided in web interface Viewing of up to 32 camer...

Отзывы: