


9
D-Link DCS-4622 User Manual
Section 2: Installation
Installation
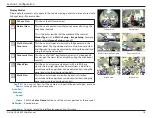
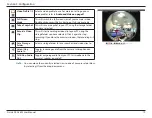
Mounting the Camera
It is highly recommended that you configure and test your camera before mounting it.
Use a screwdriver to unscrew the tilt adjustment screw. Pull the mounting plate
away from the camera mount.
Place the mounting plate where you want to position the camera and use a pencil
to mark the two mounting holes.
If you wish to run the camera cables through the wall or ceiling, mark the
center hole as well.
Use a 6 mm drill bit to make the required holes approximately 25 mm deep, then
insert the wall anchors into the holes. Use the screws provided to attach the
mounting bracket to the wall.
If you wish to run the camera cables through the wall or ceiling, drill the
center hole for the camera cables to pass through.


