background image

D-Link DCS-4603 Quick Installation Guide

54

54

P

OR

TUGU

Ê

S

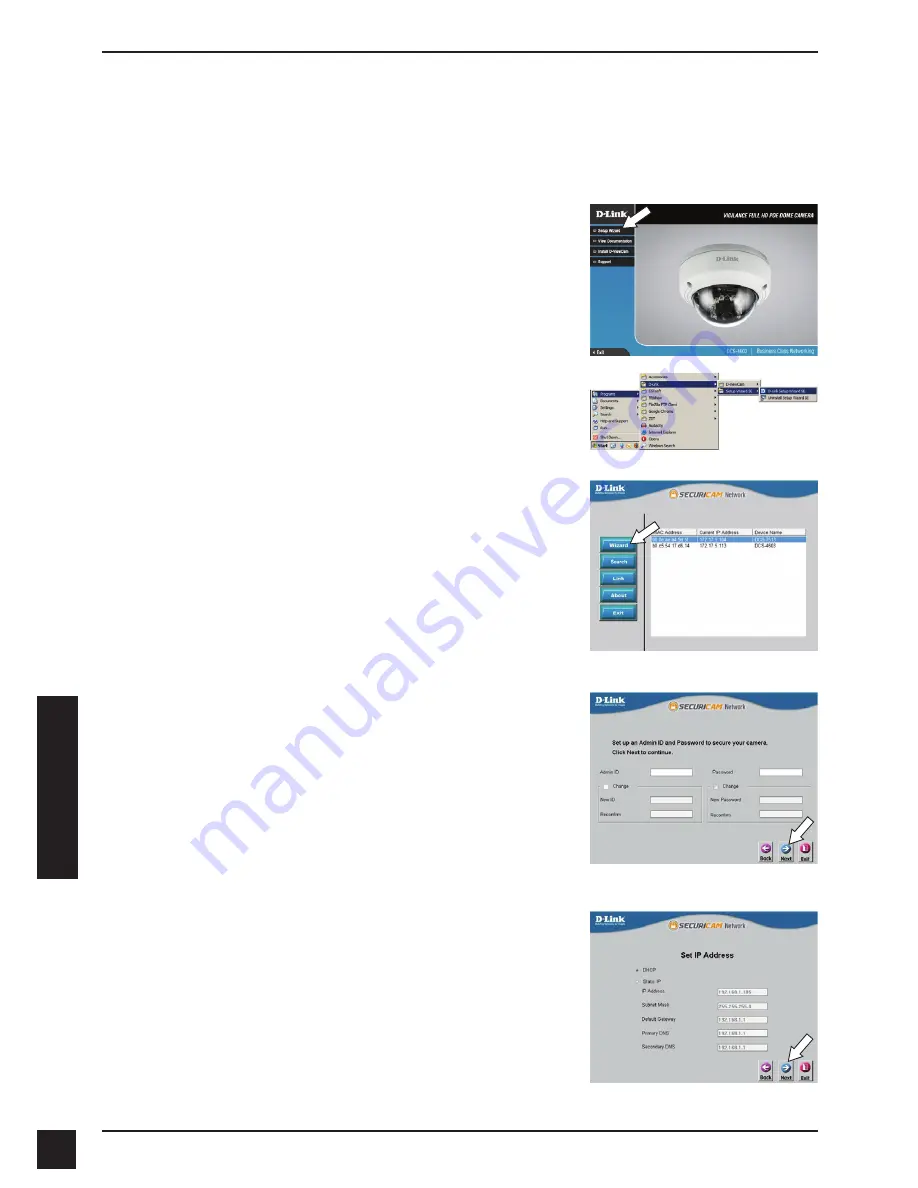
Como configurar a câmera

Insira o CD de instalação na unidade de CD-ROM do seu computador 

para iniciar a instalação. Se a função Autorun em seu computador estiver 

desativada, clique em 

Iniciar> Executar

. Digite 

D: \ autorun.exe

, onde D: 

representa a letra da sua unidade de CD-ROM.

Clique no ícone Assistente de configuração D-Link 

SE que foi criado no seu menu Iniciar do Windows 

(

Iniciar> D-Link> Assistente de configuração SE

).

O Assistente de configuração irá aparecer e 

mostrar o endereço MAC e endereço IP de sua 

câmera. Se você tiver um servidor DHCP em sua 

rede, um endereço IP válido será exibido. Se sua 

rede não utilizar um servidor DHCP, o endereço IP 

192.168.0.20 

da câmera será exibido.

Selecione sua câmera, em seguida, clique no botão 

Assistente para continuar.

Clique em Assistente de Configuração e siga as 

instruções para instalar o seu produto.


Digite o ID de administrador e senha. Ao efetuar 

login pela primeira vez, o ID do administrador 

padrão é admin com a senha em branco.
Clique nas caixas se você deseja mudar o ID e 

senha para a câmera, e digite o novo ID e senha 

que você deseja usar.
Clique em Avançar para continuar.

Selecione a opção 

DHCP

 se sua câmera obtém 

um endereço IP automaticamente a partir de um 

servidor DHCP (como um roteador).

Selecione IP estático se você quiser inserir 

manualmente as configurações de IP para sua 

câmera.
Clique em Avançar para continuar.

Содержание DCS-4603

Страница 1: ...entation also available on CD and via the D Link Website Quick Installation Guide Vigilance Full HD PoE Dome Camera Quick Installation Guide Installationsanleitung Guide d installation Guía de instalación Guida di Installazione Краткое руководство по установке Guia de Instalação Rápida 快速安裝指南 Petunjuk Pemasangan Cepat ...

Страница 2: ......

Страница 3: ...e User Manual which is available on the CD included in this package or from the D Link support website Package Contents DCS 4603 Vigilance Full HD PoE Dome Camera Mounting Kit Manual and Software on CD ROM Quick Installation Guide If any of the above items are missing please contact your reseller Safety Notice Installation and servicing should be done by certified technicians so as to conform to a...

Страница 4: ...e factory default settings Ethernet Jack RJ 45 connector for Ethernet which can also be used to power the camera using Power over Ethernet PoE Power Connector Connects to an optional 12 V 1 5 A power adapter not included Camera Cover Cover Screws The three screws can be removed with the included wrench Tilt Adjustment Screw Can be loosened to adjust camera angle Inner Cover ...

Страница 5: ...e a DHCP server on your network a valid IP Address will be displayed If your network does not use a DHCP server the network camera s default static IP 192 168 0 20 will be displayed Select your camera then click the Wizard button to continue Click Setup Wizard and follow the instructions to install the Setup Wizard Enter the Admin ID and password When logging in for the first time the default Admi...

Страница 6: ...The Setup Wizard will automatically open your web browser to the IP address of the camera This section displays your camera s live video You can select your video profile and view or operate the camera For additional information about web configuration please refer to the user manual which is available on the D Link website Enter admin as the default username and leave the password blank Click OK ...

Страница 7: ...approximately 25 mm deep then insert the wall anchors into the holes If you are running the camera cables through the wall drill a hole in the center and pull the cables through the hole Use the included wrench to loosen the 3 screws on the top of the camera then lift the camera cover off Use the screws provided to mount the camera to the wall If you are running the camera cables out the side of t...

Страница 8: ...mera Loosen the adjustment screw on the side of the camera then retighten it after moving the camera to the desired angle You can also rotate the camera by grasping the camera and turning it left or right When you are done adjusting the camera s angle put the inner cover back into place Note The camera has a limited range of motion if it stops when you are adjusting it do not attempt to rotate or ...

Страница 9: ...the wall you will also need to drill a hole for the cable channel Remove the cover from the camera Pass the camera connectors through the back or bottom cable channel on the DCS 37 1 Use the provided screws to mount the camera to the DCS 37 1 using the set of mounting holes marked A Remove the inner cover and adjust the angle and rotation of the camera as desired then put the inner cover back in p...

Страница 10: ...m the camera Pass the camera connectors through the back or side cable channel on the DCS 37 2 Use the provided screws to mount the camera to the DCS 37 2 using the set of mounting holes marked A Remove the inner cover and adjust the angle and rotation of the camera as desired then put the inner cover back in place Attach the camera cover If you are passing the camera cables through the wall place...

Страница 11: ...egt oder über die D Link Support Website zur Verfügung steht Packungsinhalt DCS 4603 PoE Dome Vigilance Full HD Camera Montageset CD ROM mit Software und Handbuch Installationsanleitung Sollte einer der oben aufgeführten Artikel fehlen wenden Sie sich bitte an Ihren Fachhändler Sicherheitshinweis Installation und Wartungsarbeiten sollten nur von zertifizierten Technikern vorgenommen werden zu jede...

Страница 12: ...deinstellungen zurück Ethernet Anschluss RJ 45 Anschluss für Ethernet der auch für die Stromzufuhr PoE der Kamera verwendet werden kann Netzanschluss Zum Anschluss an ein Netzteil 12 V 1 5 A nicht im Lieferumfang enthalten Abdeckschrauben Die drei Schrauben können mit Hilfe des mitgelieferten Schraubenchlüssels gelöst und entfernt werden Neigeeinstellschraube Kann zur Einstellung des Kamerawinkels...

Страница 13: ...er auf wird die standardmäßige statische IP Adresse 192 168 0 20 der Netzwerkkamera angezeigt Wählen Sie Ihre Kamera aus und klicken Sie dann auf Wizard Assistent um fortzufahren Klicken Sie auf Setup Wizard Setup Assistenten und folgen Sie den Anweisungen zu dessen Installation Geben Sie die Administratorkennung und das Kennwort ein Bei Erstanmeldung ist die standardmäßige Administratorkennung ad...

Страница 14: ... Sie auf Link um auf die Web Konfiguration zuzugreifen Der Setup Assistent öffnet automatisch Ihren Webbrowser mit der IP Adresse der Kamera In diesem Abschnitt werden Live Videoaufnahmen Ihrer Kamera angezeigt Sie können Ihr Videoprofil auswählen und die Kamera anzeigen und bedienen Weitere Informationen zur Web Konfiguration finden Sie in dem auf der CD ROM enthaltenen Benutzerhandbuch oder auf ...

Страница 15: ...es 6 mm Bohreinsatzes Stecken Sie dann die Dübel in die Löcher Sollen die Kamerakabel durch die Wand geführt werden bohren Sie ein Loch in der Mitte und führen Sie die Kabel hindurch Verwenden Sie den mitgelieferten Schraubenschlüssel um die drei Schrauben oben auf der Kamera zu lösen Nehmen Sie dann die Kameraabdeckung ab Befestigen Sie die Kamera mithilfe der mitgelieferten Schrauben an der Wand...

Страница 16: ...Sie die Einstellschraube an der Seite der Kamera bewegen Sie die Kamera in den gewünschten Winkel und ziehen Sie dann die Schraube wieder an Sie können die Kamera auch drehen indem Sie sie mit der Hand nach links oder rechts bewegen Bringen Sie nach Einstellung des Kamerawinkels die Innenabdeckung wieder an Hinweis Die Kamera verfügt über einen beschränkten Bewegungsbereich Wenn sie bei der ihrer ...

Страница 17: ...steckverbindungen durch den rück oder unterseitigen Kabelkanal an der DCS 37 1 Befestigen Sie die Kamera mithilfe der mitgelieferten Schrauben an der DCS 37 1 indem Sie die mit dem Buchstaben A gekennzeichneten Montagelöcher nutzen Bringen Sie die DCS 37 1 mithilfe der mitgelieferten Schrauben an der Wand an Bringen Sie die Kameraabdeckung an Werden die Kamerakabel durch die Wand geführt setzen Si...

Страница 18: ...ten Schrauben an der DCS 37 2 indem Sie die mit dem Buchstaben A gekennzeichneten Montagelöcher nutzen Bringen Sie die DCS 37 2 mithilfe der mitgelieferten Schrauben für die inneren Montagelöcher an der Wand an Bringen Sie die Kameraabdeckung an Werden die Kamerakabel durch die Wand geführt setzen Sie den Gummistopfen in den Kabelkanal an der Seite um ihn abzudichten Nehmen Sie die Innenabdeckung ...

Страница 19: ... le Manuel d utilisation disponible sur le CD joint à ce coffret ou sur le site Web d assistance D Link Contenu de la boîte Caméra dôme Vigilance DCS 4603 PoE Full HD Kit de montage Manuel et logiciel sur CD ROM Guide d installation rapide Contactez votre revendeur s il manque l un des éléments ci dessus Remarque de sécurité L installation et l entretien doivent e tre re alise s par des technicien...

Страница 20: ... caméra Connecteur Ethernet Connecteur RJ 45 pour Ethernet pouvant également servir à alimenter la caméra utilisant la fonction PoE alimentation électrique par câble Ethernet Connecteur d alimentation Se connecte à un adaptateur d alimentation de 12 V 1 5 A optionnel non inclus Vis du couvercle Les trois vis peuvent être enlevées avec la clé fournie Vis de réglage de l inclinaison Peut être desser...

Страница 21: ...e adresse IP valide s affiche Si votre réseau n utilise pas de serveur DHCP l adresse IP statique par défaut de la caméra réseau 192 168 0 20 s affiche Sélectionnez votre caméra puis cliquez sur Wizard Assistant pour continuer Cliquez sur Setup Wizard Assistant de configuration et suivez les instructions pour installer l assistant de configuration Saisissez l ID admin et le mot de passe Lorsque vo...

Страница 22: ...ctionnez la caméra puis cliquez sur Link Connexion pour accéder à la configuration Web L Assistant de configuration ouvre automatiquement votre navigateur Web à l adresse IP de la caméra Cette section présente la vidéo en direct de votre caméra Vous pouvez sélectionner votre profil vidéo et voir ou utiliser la caméra Pour obtenir des informations complémentaires sur la configuration Web reportez v...

Страница 23: ...ires à environ 25 mm de profondeur puis insérez les chevilles dans les trous Si vous faites passer les câbles de la caméra à travers le mur percez un trou au centre et tirez les câbles à travers le trou Utilisez la clé fournie pour desserrer les 3 vis sur le dessus de la caméra puis soulevez le couvercle de la caméra Utilisez les vis fournies pour fixer la caméra au mur Si vous faites passer les c...

Страница 24: ...sur le côté de la caméra puis resserrez la après avoir déplacé la caméra pour qu elle soit dans l angle que vous souhaitez Vous pouvez également faire pivoter la caméra en la saisissant et en la tournant vers la gauche ou vers la droite Lorsque vous avez terminé le réglage de l angle de la caméra remettez le couvercle intérieur en place Remarque la caméra possède une amplitude de mouvement limitée...

Страница 25: ...ulotte Retirez le couvercle de la caméra Passez les connecteurs de la caméra à travers la goulotte à l arrière ou au bas du DCS 37 1 Utilisez les vis fournies pour fixer la caméra au DCS 37 1 en utilisant l ensemble des trous de fixation marqués A Utilisez les vis fournies pour fixer le DCS 37 1 au mur Fixez le couvercle de la caméra Si vous faites passer les câbles de la caméra à travers le mur p...

Страница 26: ...fixer la caméra au DCS 37 2 en utilisant l ensemble des trous de fixation marqués A Utilisez les vis fournies pour monter le DCS 37 2 au mur en utilisant les trous de fixation intérieurs Fixez le couvercle de la caméra Si vous faites passer les câbles de la caméra à travers le mur placez le bouchon en caoutchouc dans la goulotte latérale pour la sceller Retirez le couvercle intérieur et ajustez l ...

Страница 27: ...io disponible en el CD incluido en el paquete o en el sitio web de asistencia de D Link Qué contiene la caja Cámara domo DCS 4603 Vigilance Full HD PoE Kit de montaje Manual y software en CD ROM Guía de instalación rápida Si falta cualquiera de los componentes anteriores póngase en contacto con el proveedor Aviso de seguridad La instalación y el mantenimiento deben realizarlo técnicos cualificados...

Страница 28: ...eterminados de fábrica Clavija Ethernet Conector RJ 45 para Ethernet que se puede utilizar también para alimentar la cámara usando alimentación a través de Ethernet PoE Conector de alimentación Se conecta a un adaptador de alimentación de 12 V 1 5 A opcional no incluido Tornillos de la cubierta Los tres tornillos se pueden retirar con la llave incluida Tornillo de ajuste de inclinación Se pueden a...

Страница 29: ...no utiliza un servidor DHCP se mostrará la dirección IP estática predeterminada de la cámara 192 168 0 20 Seleccione la cámara y a continuación haga clic en el botón Wizard Asistente para continuar Haga clic en Setup Wizard Asistente de configuración y siga las instrucciones para instalar el asistente de configuración Introduzca el ID de administrador y la contraseña Al iniciar sesión por primera ...

Страница 30: ...a y haga clic en Link Vincular para acceder a la configuración web El asistente de configuración abrirá automáticamente el explorador de web en la dirección IP de la cámara Esta sección muestra el vídeo en directo de la cámara Puede seleccionar el perfil de vídeo y ver o utilizar la cámara Para obtener información adicional acerca de la configuración web consulte el manual de usuario incluido en e...

Страница 31: ...ontinuación introduzca los anclajes de pared en los orificios Si pasa los cables de la cámara a través de la pared taladre un agujero en el centro y tire de los cables a través del orificio Utilice la llave incluida para aflojar los 3 tornillos de la parte superior de la cámara y a continuación levante la cubierta de la cámara hacia afuera Utilice los tornillos suministrados para montar la cámara ...

Страница 32: ...mara Afloje el tornillo de ajuste del lateral de la cámara y a continuación vuelva a apretarlo después de mover la cámara al ángulo deseado También puede girar la cámara agarrando la cámara y girándola a la izquierda o a la derecha Cuando termine de ajustar el ángulo de la cámara coloque de nuevo la cubierta interna en su sitio Nota la cámara tiene un rango de movimiento limitado si se detiene cua...

Страница 33: ...cable Retire la cubierta de la cámara Pase los conectores de la cámara a través del canal del cable posterior o inferior del DCS 37 1 Utilice los tornillos suministrados para montar la cámara en el DCS 37 1 usando el juego de orificios de montaje marcados como A Utilice los tornillos suministrados para montar el DCS 37 1 en la pared Acople la cubierta de la cámara Si va a pasar los cables de la cá...

Страница 34: ...2 Utilice los tornillos suministrados para montar la cámara en el DCS 37 2 usando el juego de orificios de montaje marcados como A Utilice los tornillos suministrados para montar el DCS 37 2 en la pared usando los orificios de montaje internos Acople la cubierta de la cámara Si va a pasar los cables de la cámara a través de la pared coloque el tope de goma en el canal del cable lateral para sellar...

Страница 35: ... incluso nella confezione o scaricabile dal sito Web di supporto di D Link Contenuto della confezione Telecamera vigilance a cupola PoE Full HD DCS 4603 Kit di montaggio Manuale e software su CD ROM Guida di installazione rapida Se uno o più degli articoli sopra elencati risultano mancanti rivolgersi al rivenditore Nota relativa alla sicurezza Per evitare di invalidare la garanzia l installazione ...

Страница 36: ...ica della telecamera Spinotto Ethernet Connettore RJ 45 per Ethernet che può essere utilizzato anche per alimentare la telecamera quando si utilizza PoE Power over Ethernet Connettore di alimentazione Viene connesso a un alimentatore opzionale da 12 V 1 5 A non incluso Viti della copertura Per rimuovere le tre viti utilizzare la chiave in dotazione Vite di regolazione dell inclinazione Può essere ...

Страница 37: ...di un server DHCP viene visualizzato l indirizzo IP statico predefinito della telecamera di rete ovvero 192 168 0 20 Selezionare la telecamera quindi fare clic sul pulsante Wizard Procedura guidata per continuare Fare clic su Setup Wizard Configurazione guidata e attenersi alle istruzioni per installare la Configurazione guidata Immettere l ID e la password dell amministratore Quando si effettua l...

Страница 38: ...igurazione Web La procedura guidata di configurazione apre automaticamente il browser Web all indirizzo IP della telecamera In questa sezione è visualizzato il video in diretta della videocamera È possibile selezionare il profilo video desiderato e visualizzare le immagini o mettere in funzione la telecamera Per ulteriori informazioni sulla configurazione Web fare riferimento al manuale utente inc...

Страница 39: ...ri profondi all incirca 25 mm quindi inserire i tasselli nei fori Se i cavi della telecamera sono nascosti nel muro praticare con il trapano un foro al centro e far passare i cavi attraverso il foro Utilizzare la chiave in dotazione per allentare le 3 viti nella parte superiore della telecamera quindi staccare la copertura Utilizzare le viti fornite per montare la telecamera a parete Se i cavi ven...

Страница 40: ...telecamera Allentare la vite di regolazione sul lato della telecamera quindi serrarla di nuovo dopo aver impostato la corretta angolazione per la telecamera Per ruotare la telecamera è anche possibile afferrarla e girarla verso destra o sinistra Una volta regolata l angolazione della telecamera reinstallare il coperchio interno Nota il movimento della telecamera è limitato se si blocca durante la ...

Страница 41: ...a dalla telecamera Passare i connettori della telecamera attraverso il retro o la canalina per cavi sul fondo del supporto DCS 37 1 Utilizzare le viti in dotazione per montare la telecamera sul supporto DCS 37 1 utilizzando il set di fori di montaggio contrassegnati A Utilizzare le viti fornite per fissare il supporto DCS 37 1 alla parete Riavvitare la cupola esterna Se si passano i cavi della vid...

Страница 42: ...e le viti in dotazione per montare la telecamera sul supporto DCS 37 2 utilizzando il set di fori di montaggio contrassegnati A Utilizzare le viti fornite per fissare il supporto DCS 37 2 alla parete utilizzando i fori di montaggio più interni Riavvitare la cupola esterna Se si passano i cavi della videocamera nella parete collocare il tappo in gomma nella canalina per cavi laterale per sigillarla...

Страница 43: ...ске из комплекта поставки или через Web сайт D Link Комплект поставки Купольная Full HD камера DCS 4603 с поддержкой PoE Комплект для монтажа CD диск с руководством пользователя и программным обеспечением Краткое руководство по установке Если что либо из перечисленного отсутствует пожалуйста обратитесь к поставщику Меры безопасности Во избежание прекращения гарантии установку и обслуживание должны...

Страница 44: ...заводским Ethernet разъем Разъем RJ 45 для подключения Ethernet кабеля а также для подачи питания камеры по технологии Power over Ethernet PoE Разъем питания Разъем для подключения 12 В 1 5 А адаптера питания адаптер не входит в комплект поставки Винты Три винта могут быть сняты с помощью входящего в комплект поставки ключа Винт регулировки наклона Может быть ослаблен для регулировки положения кам...

Страница 45: ...р то будет отображен IP адрес назначенный этим сервером Если в сети не используется DHCP сервер то отобразится статический IP адрес камеры по умолчанию 192 168 0 20 Выберите камеру и нажмите кнопку Wizard для продолжения Нажмите Setup Wizard чтобы начать установку Введите имя пользователя Admin ID и пароль Password Имя пользователя по умолчанию admin пароль оставьте пустым Если Вы хотите изменить ...

Страница 46: ... Link для доступа к Web настройкам Мастер установки автоматически откроет Web браузер по IP адресу камеры В данном разделе доступен просмотр видео с камеры в реальном времени Вы можете выбрать профиль видео и просматривать изображение с камеры Для получения дополнительной информации по настройке камеры пожалуйста обратитесь к руководству пользователя на CD диске из комплекта поставки или на Web са...

Страница 47: ... мм сверлом диаметром 6 мм Затем вставьте в отверстия анкеры Если требуется проложить кабели для камеры в стене просверлите отверстие в центре и протяните кабели через это отверстие С помощью входящего в комплект поставки ключа ослабьте 3 винта в верхней части камеры Затем снимите защитную крышку камеры Установите камеру на стену с помощью входящих в комплект поставки винтов Если требуется вывести...

Страница 48: ... ее с камеры Ослабьте регулировочный винт находящийся сбоку камеры настройте требуемое положение и затяните винт Положение камеры также можно менять зажав ее и поворачивая влево или вправо После того как регулировка положения камеры будет завершена установите внутреннюю крышку на место Примечание Диапазон перемещения камеры ограничен если она остановится во время выполнения регулировки не пытайтес...

Страница 49: ...Снимите крышку основания камеры Выведите провода на заднюю часть кронштейна или протяните их через специальное отверстие на нижней части DCS 37 1 Используйте монтажные отверстия и входящие A комплект поставки винты для крепления камеры к DCS 37 1 Используйте входящие в комплект поставки винты для крепления DCS 37 1 к стене Установите защитную крышку камеры Если кабели прокладываются в стене устано...

Страница 50: ...жные отверстия и входящие A комплект поставки винты для крепления камеры к DCS 37 2 Используя монтажные отверстия на внутренней части кронштейна и входящие в комплект поставки винты прикрепите DCS 37 2 к стене Установите защитную крышку камеры Если кабели прокладываются в стене установите резиновую заглушку в канал для кабелей на боковой части кронштейна Снимите внутреннюю крышку камеры Отрегулиру...

Страница 51: ...нтали 340 По вращение 340 Характеристики изображения Настройка качества и размера изображения скорости передачи кадров и скорости передачи данных Метки времени и вставки текста Настраиваемые окна для обнаружения движения Настраиваемые зоны приватных масок Настройка скорости затвора яркости насыщенности цвета контраста резкости WDR и 3D фильтра Сжатие видео Сжатие в форматах H 264 MJPEG H 264 MJPEG...

Страница 52: ...ями Обнаружение движения Уведомление о событии и загрузка стоп кадров видеоклипов через электронную почту или FTP Поддержка нескольких серверов SMTP и FTP Несколько уведомлений о событии Несколько способов записи для создания резервных копий Удаленное управление Создание стоп кадров видеоклипов и сохранение на локальный жесткий диск Доступ к интерфейсу с настройками через Web браузер Системные тре...

Страница 53: ...омплект поставки Вход 100 240 В переменного тока 50 60 Гц Выход 12 В постоянного тока 1 5 А Потребляемая мощность 5 6 Вт 5 Температура Рабочая от 0 до 40 C Хранения от 20 до 70 C Влажность При эксплуатации от 20 до 80 без конденсата При хранении от 5 до 95 без конденсата Сертификаты CE CE LVD FCC C Tick Размеры ...

Страница 54: ...tá disponível no CD incluído neste pacote ou do site de suporte da D Link Conteúdo da embalagem Camera Domo Full HD PoE para Vigilânci DCS 4603 Kit de montagem Manual e software em CD ROM Guia rápido de instalação Se qualquer um dos itens acima estiver faltando entre em contato com o seu revendedor Aviso de segurança Instalação e manutenção devem ser feitas por técnicos certificados de modo a esta...

Страница 55: ...gurações padrão de fábrica Conector Ethernet Conector RJ 45 para Ethernet pode ser também utilizado para ligar a câmera através de conexão PoE Conector de alimentação Conecta se a um adaptador de alimentação opcional de 12 V 1 5 A não incluso Parafusos da tampa Os três parafusos podem ser removidos com a chave incluída Parafusos de ajuste de incli nação Podem ser afrouxados para ajustar o ângulo d...

Страница 56: ...um endereço IP válido será exibido Se sua rede não utilizar um servidor DHCP o endereço IP 192 168 0 20 da câmera será exibido Selecione sua câmera em seguida clique no botão Assistente para continuar Clique em Assistente de Configuração e siga as instruções para instalar o seu produto Digite o ID de administrador e senha Ao efetuar login pela primeira vez o ID do administrador padrão é admin com ...

Страница 57: ...ção SE Selecione a câmera e clique no link para acessar a configuração web O Assistente de Configuração irá abrir automaticamente o seu navegador para o endereço IP da câmera Esta seção exibe o vídeo ao vivo da câmera Você pode selecionar o perfil de vídeo e visualizar ou operar a câmera Para obter informações adicionais sobre a configuração web por favor consulte o manual do usuário incluído no C...

Страница 58: ...s necessários cerca de 25 mm de profundidade em seguida insira as buchas nos furos Se você estiver passando os cabos da câmera através da parede faça um buraco no centro e puxe os cabos através do orifício Use a chave incluída para afrouxar os três parafusos na parte superior da câmera em seguida levante a tampa da câmera para cima Use os parafusos fornecidos para montar a câmera na parede Se você...

Страница 59: ...ior e remova a da câmera Solte o parafuso de ajuste no lado da câmara volte a apertá lo depois de mover a câmera para o ângulo desejado Você também pode girar a câmera segurando a mesma para a esquerda ou direita Quando você terminar de ajustar o ângulo da câmera coloque a tampa interna de volta no lugar Nota A câmera tem limitação de movimento se ela parar quando você está ajustando a não tente g...

Страница 60: ... tampa da câmara Passe os conectores da câmera na parte de trás ou canal de cabo de fundo sobre a DCS 37 1 Use os parafusos fornecidos para montar a câmera ao DCS 37 1 utilizando o conjunto de furos de montagem marcados A Use os parafusos fornecidos para montar o DCS 37 1 na parede Fixe a capa de proteção da câmera Se você estiver passando os cabos da câmera através da parede coloque a tampa de bo...

Страница 61: ...para montar a câmara ao DCS 37 2 utilizando o conjunto de furos de montagem marcados A Use os parafusos fornecidos para montar o DCS 37 2 na parede utilizando os furos de montagem interiores Fixe a capa de proteção da câmera Se você estiver passando os cabos da câmera através da parede coloque a tampa de borracha no canal a cabo um lado para selá lo Remova a capa de proteção e ajuste o ângulo e ro...

Страница 62: ... Guide 60 60 中 文 快速安裝指南 此安裝指南提供安裝DCS 4603網路攝影機在您網路的基本操作 若要 取得更多關於使用此攝影機的方式 請參考光碟內附的使用手冊 或至 D Link技術支援網站下載產品使用手冊 包裝內容 DCS 4603 Full HD 半球型網路攝影機 壁掛配件 光碟 包含使用手冊及安裝程式 快速安裝指南 若有缺少上述的任何物品 請聯絡您的經銷商 安全須知 此產品應該由具備相關證照的技術人員安裝 以符合當地的法規及避免 產品的保固失效 ...

Страница 63: ...3 Quick Installation Guide 61 61 中 文 硬體概觀 IR 指示燈 在低光源的環境下 提供照明 攝影機鏡頭 攝影機外殼 Reset 按鈕 將攝影機回復 至出廠預設值 乙太網路線接頭 可連接RJ 45乙太網路線來透過PoE方式供電給攝影機 電源接頭 可選擇性連接12 V 1 5 A電源供應器 未附 在包裝內 外殼螺絲 可使用包裝內附的扳 手來鬆開螺絲 調整螺絲 可以鬆開螺絲來調 整攝影機的角度 內罩 ...

Страница 64: ...d SE圖示 開始 D Link Setup Wizard SE 設定精靈中將會顯示您攝影機的MAC位址及IP 位址 若您的網路中有DHCP伺服器時 將會 顯示由DHCP派發的有效IP位址 若您的網路 中沒有DHCP伺服器 則將會顯示攝影機的預 設IP位址192 168 0 20 請選擇您的攝影機 再點選 Wizard 的按鈕 來繼續 在點選Setup Wizard來開始安裝 請輸入管理者 Admin 的名稱和密碼 在首次登 入時 預設的管理者名稱為 admin 無密碼 若您要更改攝影機的管理者 admin 名稱和密碼 時請勾選核取方塊 並輸入您要設定的新名稱 及密碼 請點選 Next 來繼續 若您要讓攝影機在開機後自動由DHCP伺服器 例如路由器 取得IP位址時請選擇 DHCP 若您要讓攝影機每次皆使用相同的IP時請選擇 Static IP 並輸入您要使用的IP位址 請點選 Next 來...

Страница 65: ...機 透過網頁瀏覽器來觀看攝影機影像 請點選Windows開始選單中的D Link Setup Wizard SE圖示 開始 D Link Setup Wizard SE 請選擇攝影機並點選 Link 的按鈕來連結網 頁設定介面 設定精靈將會自動以攝影機的IP位址來開啟設 定網頁 畫面中會顯示您攝影機的即時影像 您可以選 擇影像設定檔來觀看或調整設定 若要取得更 多關於設定網頁的資訊 請參考包裝內附的光 碟或D Link網站上的使用手冊 請在 User name 的欄位中輸入預設的 admin Password 的欄位不需輸入 空 白 並點選 OK 來進入設定網頁 ...

Страница 66: ...tion Guide 64 64 中 文 壁掛方式 建議您在壁掛前先完成所有設定並確認可連通網路 請將定位貼紙黏貼至您想要安裝攝影機的位置 請依照牆面的材質以適當的工具 用6mm的鑽頭 鑽約25mm深的孔 然後放入壁虎以支撐螺絲 若您要將攝影機的線材穿過牆壁 請在中央鑽 孔並拉線穿過牆壁 請使用包裝內附的螺絲來將攝影機鎖上牆壁 請使用包裝內附的扳手將攝影機外罩的3個螺絲 鬆開 再打開攝影機外罩 若您要將攝影機的線材放置在攝影機旁 請將 線材沿著底座的線槽放置 ...

Страница 67: ...lation Guide 65 65 中 文 連接電源線及乙太網路線 若您要使用PoE連線 時則僅需要連接乙太網路線 若要調整攝影機的角度 請拉起並取下黑色內 罩 您可將攝影機側邊的調整螺絲轉鬆 將攝影機 調整至您想要的位置及角度後再將螺絲轉緊 您也可以握住攝影機往左或往右轉動 在您調整完攝影機的角度後 請將內罩放回 備註 因為攝影機可轉動的範圍有限 若您在調 整時停在某個位置 請勿再嘗試做進一步的轉 動 請將攝影機的外罩裝回 60O 340O 340O ...

Страница 68: ... 將DCS 37 1安裝貼紙貼在欲設置的位置 接著 使用6公釐鑽頭 在安裝貼紙所標示的螺絲孔位 上鑽出25公釐深的孔 將壁錨支撐螺絲塞入孔 中 若需要從牆的另一端進行配線 請在安裝 貼紙上所標示的配線孔位上鑽出一個配線孔道 將攝影機底座蓋取下 將攝影機的線從DCS 37 1後方或底部的配 線孔道穿出 使用隨附螺絲將攝影機固定在 DCS 37 1上標示A的螺絲孔位 使用隨附螺絲將DCS 37 1定在壁面 裝上攝影機蓋 若是從牆的另一端進行配線 請將橡皮塞塞入 底部的配線孔道 取下攝影機內蓋 依需求來調整攝影機角度 接著將攝影機內蓋裝回 ...

Страница 69: ...上鑽出25公釐深 的孔 將壁錨支撐螺絲塞入孔中 若需要從牆的另一 端進行配線 請在安裝貼紙上所標示的配線孔位上鑽出 一個配線孔道 將攝影機底座蓋取下 將攝影機的線從DCS 37 2後方或底部的配線孔道穿出 使用隨附螺絲將攝影機固定在DCS 37 2上標示A的螺絲 孔位 使用隨附螺絲將DCS 37 2定在壁面 裝上攝影機蓋 若是從牆的另一端進行配線 請將橡皮塞塞入底部的配 線孔道 取下攝影機內蓋 依需求來調整攝影機角度 接著將 攝影機內蓋裝回 其他資訊 請造訪官方網站http www dlink com來取得更多產品的 相關資訊與協助 保固資訊 請造訪網站http warranty dlink com 來查看在您地區的保固資訊 ...

Страница 70: ...al Pengguna yang tersedia di CD yang disertakan dalam paket ini atau dari situs web dukungan D Link Isi Kemasan DCS 4603 Full HD PoE Dome Kamera Kewaspadaan Mounting Kit Manual dan Software pada CD ROM Panduan Instalasi Cepat Bila terdapat bagian yang hilang harap segera hubungi penjual Anda Catatan Keselamatan Instalasi dan servis harus dilakukan oleh teknisi bersertifikat sehingga dapat sesuai d...

Страница 71: ...kembali ke pengaturan awal pabrikan Ethernet Jack Konektor RJ 45 untuk Ethernet yang juga dapat digunakan untuk menyalakan kamera menggunakan Power over Ethernet PoE Konektor listrik Menghubungkan ke adaptor daya opsional 12 V 1 5 A tidak termasuk Sekrup Penutup Tiga sekrup dapat dilepas dengan menggunakan alat yang disediakan Sekrup Penyesuai Kemiringan Dapat melonggarkan penyesuaian sudut kamera...

Страница 72: ...ada jaringan Anda sebuah IP Address yang valid akan ditampilkan Jika jaringan Anda tidak menggunakan server DHCP IP default 192 168 0 20 kamera jaringan akan ditampilkan Pilih kamera Anda kemudian klik tombol Wizard untuk melanjutkan Klik Setup Wizard dan ikuti petunjuk untuk menginstal Setup Wizard Masukkan ID Admin dan password Ketika log in untuk pertama kalinya ID Admin default adalah admin de...

Страница 73: ...a dan klik Link untuk mengakses konfigurasi web Setup Wizard akan secara otomatis membuka browser web Anda ke alamat IP kamera Bagian ini menampilkan tampilan langsung video kamera Anda Anda dapat memilih video profil dan melihat atau mengoperasikan kamera Untuk informasi tambahan tentang konfigurasi web silakan lihat panduan pengguna yang disertakan pada CD ROM atau website D Link Masukkan admin ...

Страница 74: ...lukan dengan kedalaman sekitar 25 mm kemudian masukkan jangkar dinding ke dalam lubang Jika Anda menjalankan kabel kamera melalui dinding bor sebuah lubang di tengah dan tarik kabel melalui lubang Gunakan kunci pas yang termasuk dalam kemasan untuk melonggarkan 3 sekrup di bagian atas kamera lalu angkat penutup kamera Gunakan sekrup yang disediakan untuk memasang kamera ke dinding Jika Anda menjal...

Страница 75: ...krup penyesuaian di sisi kamera kemudian kencangkan kembali setelah memindahkan kamera ke sudut yang diinginkan Anda juga dapat memutar kamera dengan memegang kamera dan menggesernya ke kiri atau kanan Ketika Anda selesai menyesuaikan sudut kamera tempatkan penutup bagian dalam kembali ke tempatnya Catatan Kamera ini memiliki ruang gerak yang terbatas jika berhenti saat Anda sedang menyesuaikan ja...

Страница 76: ...bang untuk saluran kabel Lepaskan penutup dari kamera Lewati konektor kamera melalui belakang atau saluran kabel bawah DCS 37 1 Gunakan sekrup yang disediakan untuk memasang kamera ke DCS 37 1 menggunakan set lubang pemasangan yang ditandai A Gunakan sekrup yang disediakan untuk memasang DCS 37 1 ke dinding Pasang pelindung kamera Jika Anda melewati kabel kamera melalui dinding tempatkan stopper k...

Страница 77: ...a DCS 37 2 Gunakan sekrup yang disediakan untuk memasang kamera ke DCS 37 2 menggunakan set lubang pemasangan yang ditandai A Gunakan sekrup yang disediakan untuk memasang DCS 37 2 pada dinding menggunakan lubang pemasangan dalam Pasang pelindung kamera Jika Anda melewati kabel kamera melalui dinding tempatkan stopper karet ke dalam saluran kabel bawah untuk menutup itu Lepaskan pelindung dalam da...

Страница 78: ...ceathisownexpense Non modification Statement Any changes or modifications not expressly approved by the party responsible for compliance could void the user s authority to operate the equipment Caution This device complies with Part 15 of the FCC Rules Operation is subject to the following two conditions 1 This device may not cause harmful interference and 2 this device must accept any interferenc...

Страница 79: ...nterference by one of the following measures Reorient or relocate the receiving antenna Increase the separation between the equipment and receiver Connect the equipment into an outlet on a circuit different from that to which the receiver is connected Consult the dealer or an experienced radio TV technician for help Non modification Statement Any changes or modifications not expressly approved by ...

Страница 80: ...n Für einige Produkte mit austauschbaren Akkus lesen Sie bitte das Benutzerhandbuch und befolgen Sie die dort beschriebenen Anleitungen Vermeiden Sie dass Speisen oder Flüssigkeiten auf Ihr Produkt gelangen und stecken Sie keine Gegenstände in die Gehäuseschlitze oder öffnungen Ihres Produkts Verwenden Sie dieses Produkt nicht in unmittelbarer Nähe von Wasser und nicht in Bereichen mit hoher Luftf...

Страница 81: ...llegata a terra prima di toccare il prodotto Non cercare di riparare il prodotto e non smontarlo mai Per alcuni prodotti dotati di batteria sostituibile dall utente leggere e seguire le istruzioni riportate nel manuale dell utente Non versare cibi o liquidi sul prodotto e non spingere mai alcun oggetto nelle aperture del prodotto Non usare questo prodotto vicino all acqua in aree con elevato grado...

Страница 82: ...Sie die Umwelt zu schonen und die menschliche Gesundheit zu schützen D Link und die Umwelt D Link ist sich den möglichen Auswirkungen seiner Geschäftstätigkeiten und seiner Produkte auf die Umwelt bewusst und fühlt sich verpflichtet diese entsprechend zu mindern Zu diesem Zweck entwickelt und stellt D Link seine Produkte mit dem Ziel größtmöglicher Umweltfreundlichkeit her und verwendet wiederverw...

Страница 83: ...are l ambiente e a salvaguardare la salute umana D Link e l ambiente D Link cerca da sempre di ridurre l impatto ambientale dei propri stabilimenti e dei propri prodotti Allo scopo di ridurre al minimo tale impatto D Link progetta e realizza i propri prodotti in modo che rispettino il più possibile l ambiente utilizzando materiali riciclabili a basso tasso di tossicità sia per i prodotti che per g...

Страница 84: ...ste jej prosím na sběrné místo určené místními úřady k tomuto účelu Některá sběrná místa přijímají výrobky zdarma Recyklací výrobku i obalu pomáháte chránit životní prostředí i lidské zdraví D Link a životní prostředí Ve společnosti D Link jsme si vědomi vlivu našich provozů a výrobků na životní prostředí a snažíme se o minimalizaci těchto vlivů Proto své výrobky navrhujeme a vyrábíme tak aby byly...

Страница 85: ... sundhed D Link og miljøet Hos D Link forstår vi og bestræber os på at reducere enhver indvirkning som vores aktiviteter og produkter kan have på miljøet For at minimere denne indvirkning designer og producerer D Link sine produkter så de er så miljøvenlige som muligt ved at bruge genanvendelige materialer med lavt giftighedsniveau i både produkter og emballage D Link anbefaler at du altid slukker...

Страница 86: ...fast beslutna att minska den påverkan våra verksamheter och produkter kan ha på miljön För att minska denna påverkan utformar och bygger D Link sina produkter för att de ska vara så miljövänliga som möjligt genom att använda återvinningsbara material med låg gifthalt i både produkter och förpackningar D Link rekommenderar att du alltid stänger av eller kopplar ur dina D Link produkter när du inte ...

Страница 87: ...LGPL code for this product and the terms of the GPL and LGPL WRITTEN OFFER FOR GPL AND LGPL SOURCE CODE Where such specific license terms entitle you to the source code of such software D Link will provide upon written request via email and or traditional paper mail the applicable GPL and LGPL source code files via CD ROM for a nominal cost to cover shipping and media charges as allowed under the ...

Страница 88: ...rint such an announcement your work based on the Program is not required to print an announcement GNU GENERAL PUBLIC LICENSE TERMS AND CONDITIONS FOR COPYING DISTRIBUTION AND MODIFICATION GNU GENERAL PUBLIC LICENSE Version 2 June 1991 Copyright C 1989 1991 Free Software Foundation Inc 51 Franklin Street Fifth Floor Boston MA 02110 1301 USA Everyone is permitted to copy and distribute verbatim copi...

Страница 89: ...odifying or distributing the Program or any work based on the Program you indicate your acceptance of this License to do so and all its terms and conditions for copying distributing or modifying the Program or works based on it 6 Each time you redistribute the Program or any work based on the Program the recipient automatically receives a license from the original licensor to copy distribute or mo...

Страница 90: ...opyright C year name of author This program is free software you can redistribute it and or modify it under the terms of the GNU General Public License as published by the Free Software Foundation either version 2 of the License or at your option any later version This program is distributed in the hope that it will be useful but WITHOUT ANY WARRANTY without even the implied warranty of MERCHANTAB...

Страница 91: ......

Страница 92: ...Ver 1 01 WW _90x130 2016 07 06 RMN0102171A ...

Отзывы: