background image

86

Using IP surveillance Software (continued)

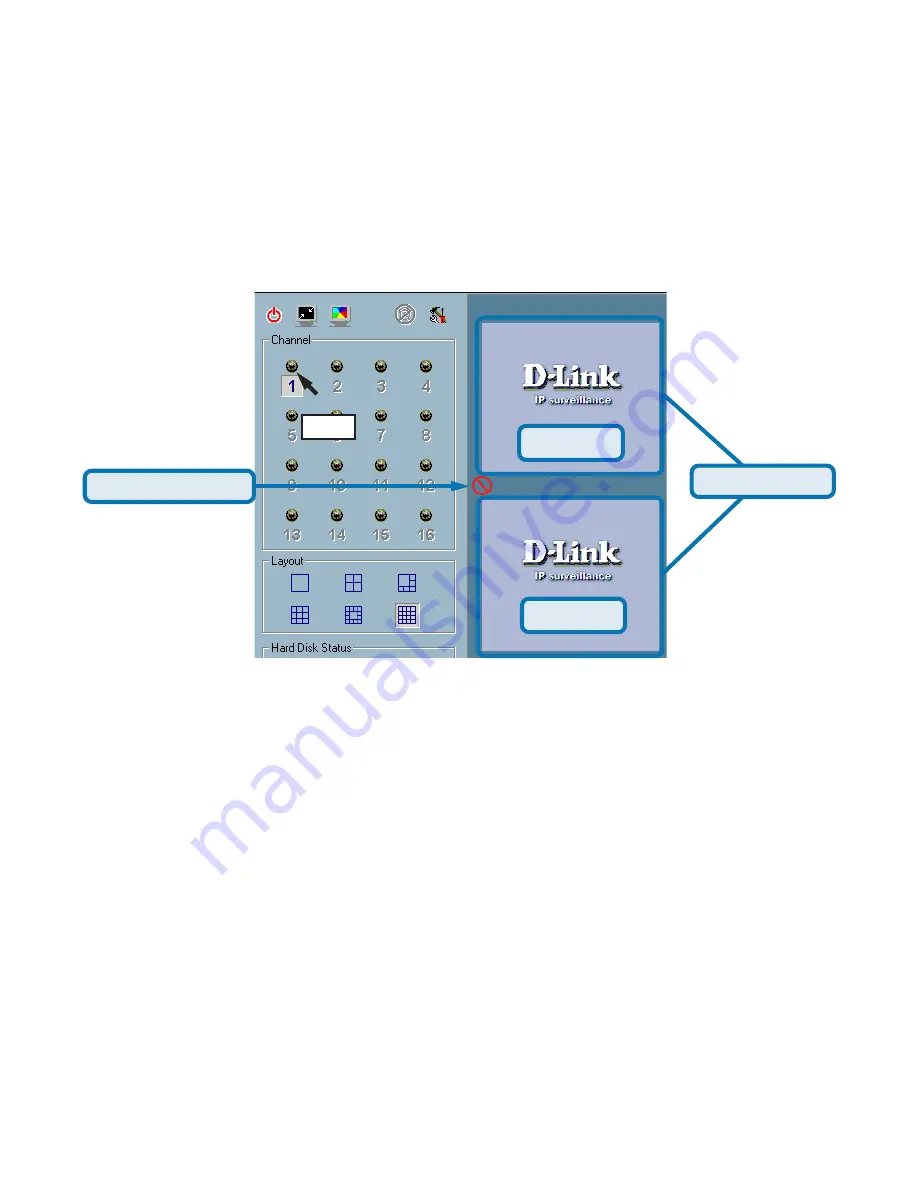
Video 1

Droppable area

Not droppable area

Monitor Program (continued)

Window A

Window B

Step 2: 

Press and hold the left mouse button, and then move the cursor to a

display window in the video area, which is shown below. Note that the cursor
will change according to the area in order to indicate whether the area is
droppable or not.

Step 3:

 Release the left mouse button while on top of a display window. In each

display layout, only one window can be assigned to a camera. Also, each camera
must have its own separate window when displayed. Once the video is in a
display window, it can be dragged and dropped to other windows. If you drag
one camera’s video to a window that already has its own camera’s video, the
two cameras will trade display windows. Dragging and Dropping is a very
convenient way to manipulate the video channels in the IP surveillance Software.

Содержание DCS-3220 - SECURICAM Network Camera

Страница 1: ...2 Way Audio Internet Camera with Digital Zoom Manual Building Networks for People Version 1 10 DCS 3220 10 04 04 ...

Страница 2: ... Browser 33 Record Snapshots to your FTP server with Motion Detection 59 Using IP surveillance Software 63 Installing IP surveillance Software 63 Launcher 68 Monitor Program 71 Scheduling 96 Playback Program 104 Schedule Video Recording with Motion Detection 119 Appendix 122 Frequently Asked Questions 122 How to PING Your IP Address 125 Reset and Restore 126 I O Connector 127 Adjusting the Camera ...

Страница 3: ...llcausedamageandvoidthewarrantyforthisproduct Minimum System Requirements Internet Explorer 6 x Internet Web Browser CPU Pentium 4 1 7GHz or above Pentium 4 2 8GHz plus processor with 512MB memory and a 32MB video card is required for multiple camera viewing and recording in IP Surveillance Memory Size 128MB VGA card resolution 800 x 600 or above Package Contents If any of the above items are miss...

Страница 4: ...ast Ethernet or broadband Internet connection to provide remote high quality video 2 way audio surveillance and 4x digital zoom1 The DCS 3220 Internet Camera differs from a conventional PC Camera because it is a stand alone system with a built in CPU and Web server providing a low cost solution capable of solving demanding security and home office monitoring needs The DCS 3220 can be accessed remo...

Страница 5: ...es or jurisdictions Nothing herein represents a warranty or representation that the D Link product provided herein is suitable for the end user s intended use under the applicable laws of his or her state D Link disclaims any liability whatsoever for any end user use of the D Link product which fails to comply with applicable state local or federal laws Web Configuration Using the Internet Explore...

Страница 6: ...r LED changes from green to red for 2 cycles For example you will see the LED turn to red twice release the reset button when the LED turns red the second time The Power LED will begin to flash indicating that the Internet Camera s settings are reverting back to the factory settings then turn back to green To reset the camera press the reset button once and the LED will flash to orange The Etherne...

Страница 7: ...nternet Camera Bottom Panel Socket for stand Power LED LED stands for Light Emitting Diode The Power LED is positioned on the right side of the Internet Camera lens As soon as the power adapter is connected to the Internet camera the power LED will flash red and green several times the DCS 3220 is conducting a self test Upon passing the self test the LED will turn green to indicate a good connecti...

Страница 8: ...camera stand with a swivel ball screw head that can be attached to the Internet Camera bottom socket cavity Attach the camera stand to the Internet Camera and station it for your application There are holes located in the base of the camera stand allowing the Internet Camera to be mounted to the ceiling or any wall securely Attaching the Internet Camera to the Camera Stand When you have a proper c...

Страница 9: ...to a computer and permits users to view the video and audio remotely After running the Installation Wizard you will be able to operate the DCS 3220 and view the camera remotely through Internet Explorer 6 x or above However it is necessary to install the IP surveillance software from the enclosed CD to create a truly powerful monitoring and surveillance system The following section will show in de...

Страница 10: ...10 Installation Wizard continued Click Installation Wizard Please wait while the InstallShield Wizard prepares to install Click Next ...

Страница 11: ...lder click Browse and select another folder Click Next Select the Program folder that Setup will add program icons to You may type a new folder name or select one from the existing folders list Click Next Please wait while the Installation Wizard is installed Installation Wizard continued ...

Страница 12: ...tton until a second cycle of blinking red and green lights indicates a second reset cycle has completed This will take approximately 5 7 seconds The opening Installation Wizard screen will appear and show a MAC address of the DCS 3220 and an IPAddress which may or may not be correct depending on what you have your DCS 3220 connected to If you have a DHCP server on your network there will be a vali...

Страница 13: ...ink to Selected Devices button Installation Wizard will automatically open your Internet browser to the IP Address of the DCS 3220 in this example it is http 192 168 0 12 Your DCS 3220 may have a different IP Address You have now completed the Setup Wizard and are ready to use your camera You can also continue to the section titled Installing IP surveillance Software P 21 to install the IP surveil...

Страница 14: ... number Remove Click to remove the selected camera s from the network Uncheck All Click to uncheck all selected cameras Links to Selected Devices Click to link all selected devices to the network Setup On the initial Setup Screen you can configure System and Date Time settings for each camera Click Next to configure Network settings for the camera System Settings Enter a Camera Name and create a R...

Страница 15: ...ox These settings can also be configured on the Advanced Network screen page 37 when configuring the camera via a Web Browser Click Next and then Apply to save the configured settings Users can click Previous to modify changes or mistakes The upgrade window allows users to upload a saved firmware file If the firmware is older than that currently on the camera a screen will appear indicating so and...

Страница 16: ... screen Click About to display the current version and date Click the Reset to Default tab to reset the camera s settings to factory defaults Locate the Firmware to Upgrade Indicate the location of the firmware to be uploaded to the camera Selected Package This displays the file name of the firmware selected for upload ...

Страница 17: ...UPnP enabled the device will be easier to configure If you do not want to use the UPnP functionality it can be disabled by unchecking the Enabled DDNS check box on the DDNS UPnP settings page under Advanced in the configuration menu Use the following steps to enable UPnP Universal Plug and Play settings only if you are running Windows XP Me If you are running Windows 98 2000 UPnP is not available ...

Страница 18: ...d Remove Windows Components The following screen will appear Select Networking Services Communications in Windows Me Click Details Select Universal Plug and Play Click Ok Enabling UPnP for Windows XP Me continued ...

Страница 19: ...19 Please wait while Setup configures the components Click Next Click Finish Enabling UPnP for Windows XP Me continued ...

Страница 20: ...et of your Internet Camera s IP address in this example 198 168 0 100 After you click on the DCS 3220 100 icon your Internet browser will automatically be opened to the IPAddress of the DCS 3220 in this example it is http 192 168 0 12 Your DCS 3220 may have a different IPAddress Note Screen shots are taken in Windows XP similar screens will appear in Windows Me Enabling UPnP for Windows XP Me cont...

Страница 21: ...heduled recording for each camera Email FTP snapshot AVI file export Motion detection for each camera The IP surveillance software on the CD included with the DCS 3220 Internet Camera converts the DCS 3220 into a powerful yet flexible surveillance system for home or business with these features Installing IP surveillance Software To install the IP surveillance software click on Install IP surveill...

Страница 22: ...e Licensing Agreement and click yes if you wish to accept the agreement Click No to exit the installation Installing IP surveillance Software continued Enter your name and company information and click Next Click Next Click Yes ...

Страница 23: ...23 Installing IP surveillance Software continued Click Next Select the destination directory Click Next Select the program folder the software will be installed into ...

Страница 24: ...24 The installation is complete Click Finish Installing IP surveillance Software continued Click Next ...

Страница 25: ...0 12 your DCS 3220 may have a different IP address based on what you used in the Installation Wizard program The window in the center of your browser is the camera image window You should now see a video image and hear the audio over your computer speakers from the DCS 3220 If you are having problems please consult the FAQ section of this manual page 122 ...

Страница 26: ... Internet Camera the Administrator has the exclusive privilege to access the System Administration settings to allow users entry and authorize privileges for all users The Internet Camera supports multi level password protection access to the Internet Camera that can be restricted to defined users who have a User Name and User Password which is assigned by the Administrator The Administrator can r...

Страница 27: ...Virtual Server Ports for Your Router Enable Remote Viewing This section is designed to walk you through the setup process for installing your camera behind a router and enable remote video viewing For the basic setup of the DCS 3220 follow the steps outlined in the Quick Installation Guide After you have completed the setup of the DCS 3220 outlined in the Quick Installation Guide you will have an ...

Страница 28: ...and Streaming audio and video This is the IP Address assigned to your camera Write it down for later use 192 168 0 146 is only an example You will probably have a different IP Address Run your Internet Explorer Web browser In the address bar type in the IP Address that was assigned to the Internet Camera by the Installation Wizard program The DCS 3220 Home Page appears with a window displaying liv...

Страница 29: ...amic means that your router s WAN IP address can change from time to time depending on your ISP Adynamic WAN IPAddress identifies your router on the public network and allows it to access the Internet To find out what your router s WAN IP Address is go to the Status menu on your router and locate the WAN information for your router As shown on the next page the WAN IP Address will be listed This w...

Страница 30: ...uter continued The firewall security features built into the DI 624 router prevent users from accessing the video from the DCS 3220 over the Internet The router connects to the Internet over a series of numbered ports The ports normally used by the DCS 3220 are blocked from access over the Internet Therefore these ports need to be made accessible over the Internet This is accomplished using the Vi...

Страница 31: ... Virtual Server settings Repeat the above steps adding ports 5002 and 5003 to both the Public and Private Port sections A check mark appearing before the entry name will indicate that the ports are enabled Click Enabled Enter a different name for each entry Enter your camera s local IP Address e g 192 168 0 146 in the example in step on page 28 in the Private IP field Select Both under Protocol Ty...

Страница 32: ...the router given to you by your ISP followed by a colon and the port number that you gave your camera e g http 205 163 122 96 83 It is not necessary to enter the colon and port number if you are using the default Web server port 80 To access from a computer on your local home network simply enter the local IP Address of the Camera followed by a colon and the port number e g 205 163 122 96 83 Viewi...

Страница 33: ...nternet Explorer If you are following this manual in the order it is presented you should now have an operating DCS 3220 Internet Camera configured with the Installer program You also have installed the IP surveillance software from the CD This section of the manual will deal with using the Internet Camera in two parts Using the DCS 3220 with an Internet browser and accessing the screens to contro...

Страница 34: ... Toggle on the Connection Type screen For additional information please refer to the section titled Home Connections Screen page 36 Speaker Volume Control Click to increase or decrease speaker volume Mute Speaker Click to mute the speaker Microphone Volume Control Click to increase or decrease microphone volume Mute Microphone Click to mute the camera s microphone Click the Zoom button below the i...

Страница 35: ...me page on your computer monitor Using the DCS 3220 with an Internet browser continued Click on the Connection Type button to change settings related to the connection There are two buttons on the left side of the Home page Connection Type and Configuration Click Connection Type ...

Страница 36: ...tings screen Using the DCS 3220 with an Internet browser continued Options UDP Protocol Allows for more real time audio and video streams However packets may be dropped and images obscured due to network burst traffic HTTP Protocol This protocol must be selected if the network is protected by a firewall that only allows the HTTP Port 80 to be opened If the user s network does not require the use o...

Страница 37: ...rent elements of the DCS 3220 can be configured The Advanced tab is the default screen in Configuration and Network is the default screen under Advanced Using the DCS 3220 with an Internet browser continued Click Configuration Any changes made to these settings will require the system to restart Make sure every field is correct before clicking on Apply ...

Страница 38: ...e mail account e g jdoe or jdoe yourisp com depending on your ISP 1st SMTP password The password used to log into your e mail account The password will appear as dots instead of entered characters The e mail address of recipients for snapshots or a system log file Multiple recipients must be separated by a semicolon Default router The router used to forward frames to destinations in a different su...

Страница 39: ... must be open for upload 1st FTP remote folder Granted password on the external FTP server Granted user name on the external FTP server 1st FTP user name Can be other than default port 21 If you find that you want to change the port to a number other than 21 you will need to specify the port when connecting to the FTP server For example FTP 68 5 1 81 60 if you are to use port 60 for your FTP serve...

Страница 40: ... the 1st FTP server is successful no attempts will be made to connect to the 2nd FTP server 2nd FTP remote folder Granted folder on the backup FTP server Mode Passive mode setting for the backup FTP server Secondary FTP passive HTTP Settings If the DCS 3220 is located inside the network protected by firewall a data connection for FTP may be prohibited Passive mode FTP can bypass the rule and succe...

Страница 41: ...th most Cable and DSL connections you are assigned a dynamic IP address and that address is used only for the duration of that specific connection With the DCS 3220 you can set up your DDNS service and the DCS 3220 will automatically update your DDNS server every time it receives a different IP address Depending on the service this update may take a few hours UDP Video port Can be set to a port ot...

Страница 42: ...d DDNS UPnP Continued Enter your username or e mail used to connect to the DDNS server Universal PnP UPnP is short for Universal Plug and Play which is a networking architecture that provides compatibility among networking equipment software and peripherals The DCS 3220 is a UPnP enabled internet camera If your operating system is UPnP enabled the device will be easier to configure If you do not w...

Страница 43: ...Invalid settings may cause the DCS 3220 to not respond Change the configurations only if necessary Consult with your network administrator or your Internet Service Provider ISP if you do not have the necessary information If you cannot connect to the camera refer to page 126 for camera reset and restore factory settings procedures Click Video Select the option for color or monochrome video display...

Страница 44: ...der to send maximum frames with limited bandwidth especially when images change drastically For higher video detail regardless of the bandwidth selection select Fix quality and select a quality level This setting will utilize more bandwidth to send the maximum frames when images change drastically Using the DCS 3220 with an Internet browser continued Size Key frame interval Sets the key frame inte...

Страница 45: ... could not easily differentiate between 20 and 25 or 30 frames per second the slower frame rate will not be noticed If your network bandwidth is below 384 Kbps you should adjust the bit rate according to your bandwidth and experiment to allow for the best frame rate that can be achieved The faster frame rate in a slow network will blur the images You may also try to choose 352x240 in size option f...

Страница 46: ...mendations for setting video for the best performance continued Recording settings to compromise between real time and clear images If you have a broadband network set Fix quality to Good or better rather than setting the Bit rate Otherwise fix the bandwidth to accomodate your actual network speed and set the frame rate to 30 If the images quality is low select the lower frame rate above 15 Using ...

Страница 47: ...w network bandwidth environment the user can select this to improve audio by sacrificing some real time synchronization between audio and video Transmission Mode Select the transmission mode that the camera will use to transmit audio You can select Talk and Listen Simultaneously Talk or Listen not at the same time Talk Only Listen Only or Disable Selecting Talk and Listen Simultaneously will requi...

Страница 48: ... image and see what effect the setting will have on the image When the image is acceptable press to store the image settings or to recall the original settings Configuration Advanced Image Setting continued Click the image setting button from the configuration screen to access additional settings that affect how the video image appears Image Brightness Contrast Saturation and Hue are all adjusted ...

Страница 49: ... in red note remember that you can have up to 3 windows selected for motion detection You can return to the DCS 3220 Home Page and the monitored window will not be visible but the red frame will show on the home page when motion is detected Enable motion detection Check this option to turn on the motion detection Window Name The text entered here will show at the top of the motion window Sensitivi...

Страница 50: ... and then confirm the password in Confirm Password field This password is used to identify the administrator You can add accounts with User name and User Password for other users in the Add user section Using the DCS 3220 with an Internet browser continued You can provide up to twenty accounts for other users visitors Each account identifies the access right This allows multiple visitors to share ...

Страница 51: ...3220 with an Internet browser continued Configuration Tools System Camera name Check this option to shut off the LED next to the lens This will prevent anyone from observing the operation of the Internet Camera The text will display as the title of the window within the Windows operating system This name will also display on the log in screen once a password has been set Illegal characters are not...

Страница 52: ...l let DCS 3220 connect to default time servers Time zone Used to adjust the hour of time servers for local settings Update interval Set the interval of time in which the date and time will be adjusted Keep current date and time Using the DCS 3220 with an Internet browser continued Synchronize the date and time of DCS 3220 with the local computer The date and time of the PC is displayed and updated...

Страница 53: ...53 Using the DCS 3220 with an Internet browser continued Configuration Tools Applications Click on the Applications button to access the Applications settings from the Tools menu ...

Страница 54: ...Trigger condition There are 4 conditions related to the digital input and three windows for motion detection There can be multiple selections Select the appropriate digital input condition according to the characteristics of the external device High low indicate external voltage input for level trigger while rising falling is for edge triggers There are three windows shown for the names you define...

Страница 55: ...xternal FTP server will be refreshed at the specified interval Configuration Tools Applications Continued Trigger action There are four options for two actions regarding either trigger condition They can have multiple selections While choosing the trigger output alarm the digital output will short both pins to connect the circuit of the attached external device otherwise both pins will be open Whi...

Страница 56: ... status when shipped from the factory After confirmation the system will restart and require the Installation Wizard software program to locate the IP address of the DCS 3220 Using the DCS 3220 with an Internet browser continued Click Apply to make changes effective Configuration Status Device Info Click on the Status tab to access Device Info and a Log of DCS 3220 system activity The Device Info ...

Страница 57: ...address Primary DNS Address Secondary DNS Address Configuration Status Log Using the DCS 3220 with an Internet browser continued Click on the Log button to access a system log of system activity from the Status menu The content of the log file reveals useful information about the current configuration and connection logged after the DCS 3220 boots up Click Device Info Click Log ...

Страница 58: ...ccess descriptions of the particular function you need help with The help screen is organized in the order of the tabs and then each menu item under that tab Configuration Help Using the DCS 3220 with an Internet browser continued ...

Страница 59: ...rs can utilize the built in motion detection to monitor any abnormal movement and record the snapshots to an FTP or SMTP server In this window follow the steps below to ensure that motion detection is correctly enabled Check Enable motion detection Click on New to have a new window to monitor video Enter in a window name Tune the Sensitivity and Percentage according to the local environment The hi...

Страница 60: ...er unless your camera is behind a router If your camera is behind a router you can assign any port number to this field but you must enable port forwarding on the router Please refer to your router manual for more information on port forwarding 1st FTP server If you are going to upload snapshots to an FTP server you will need to fill in the Domain name or IP address of your external FTP server suc...

Страница 61: ...ccess your backup FTP server 2nd FTP password Specify the user password to your backup FTP server 2nd FTP remote folder Specify the destination folder on your external backup FTP server For detailed information about each setting please refer to Configuration Advanced Network in the section titled Using the DCS 3220 With an Internet Browser page 37 Click the apply button when finished Secondary FT...

Страница 62: ...ion Set the delay before detecting next event to avoid continuous false alarms following the original event Set the Snapshot interval to capture the direction of the moving object 5 5 5 5 5 Check the window name in this case Back Door 6 6 6 6 6 Check Upload snapshots while motion detected 7 7 7 7 7 Click Send snapshots by FTP and check FTP put snapshots with date and time suffix 8 8 8 8 8 Click th...

Страница 63: ...ill run automatically If it does not open My Computer and double click on the CD ROM icon Next the installation menu will appear Click Install Software The following window will appear Browser Internet Explorer 5 x or above CPU Intel Pentium 4 1 7GHz or above Pentium 4 2 8GHz plus processor with 512MB memory and a 32MB video card is required for multiple camera viewing and recording in IP Surveill...

Страница 64: ...ed The License Agreement window below will appear Please read the following license agreement carefully Click Yes to accept this agreement and proceed with the installation Click Next Click Yes Installing the IP surveillance software continued ...

Страница 65: ... enter the user name and company name Enter your user name and company name and then click Next to continue Click Next You must setup the administrator s password in order to proceed Input and confirm your password in the window shown in below Click Next to continue Click Next Installing the IP surveillance software continued ...

Страница 66: ...tware and click Next which is shown in the figure below You can change the installation directory by clicking Browse Click Next Select a program folder to install the application software and then click Next which is shown in the figure below Click Next Installing the IP surveillance software continued ...

Страница 67: ...mation in the window shown below click Next to start the installation of the application software Click Next Click Finish Click Finish in the window shown below to finish installation The program is now installed on your computer Installing the IP surveillance software continued ...

Страница 68: ...check But when users want to click on the icon of Launcher on system tray Launcher will popup a username password dialog the first time for menu popup or when Launcher is locked If a user fails to pass the authentication check no menu will show up If a user fails 3 consecutive tries he she will be locked out for a period of 60 seconds After passing authentication users will be able to use all func...

Страница 69: ...rface Below is the user interface for Launcher The main user interface for Launcher is an icon on system tray and the popup menu appears when the user clicks on the icon The menu items are listed below Lock Launcher When this item is selected Launcher will enter lock mode In lock mode whenever users want to invoke the menu a dialog asking for ID and password will appear The interface for this dial...

Страница 70: ...at Startup Users can select whether or not to autorun Launcher when Window boots up Monitor Starts up the Monitor program If the Monitor program is already running clicking this button will re open the Monitor window Playback Starts up the Playback program If the Playback program is already running clicking this button will re open the Playback window Logout Logs out user from IP surveillance Afte...

Страница 71: ...o the following features which make the system more powerful and convenient Simultaneous real time monitoring and recording audio and video High quality video up to full screen display High compression ratio Maximum of 16 cameras with different monitor layouts Auto alarm in multiple modes Account password protection Multiple recording modes Event driven Scheduled and manual recording for each came...

Страница 72: ...monitoring lock stop alert and configuration menu for camera configurations global settings scheduler settings and the user information of this application software Tips for these operations are provided when you move the mouse cursor over each icon Channel area This area displays the status of each video channel The information indicates the status of connection recording selection and alert even...

Страница 73: ... remove video from display windows DI DO control This tool receives the digital input signal and sends digital output signal to the remote Video Server Network Camera series product associated with the dedicated video channel Alert Message This tool will display the latest alert messages received by the remote Video Server Network Camera series product associated with the selected video channel Lo...

Страница 74: ... order to run the configuration Once you click Configuration Menu Camera Configurations for setting each camera all recording processes will be stopped indicated by a warning window popped up in advance to keep you informed Monitor Program continued In the monitor program the admin has the right to access the DCS 3220 Network Camera through this application software and change the local settings a...

Страница 75: ...remote settings for each camera you can refer to Using the DCS 3220 with an Internet Browser which starts on page 33 Local Settings Camera Selections Remote Camera Webpage Settings The Layout of the Configuration In the local settings shown below three main functionalities are provided Insert new camera to the list Delete camera from the list History of all cameras in the list Monitor Program cont...

Страница 76: ...ck the Ok button to close the dialog Then the system will try to connect to the selected camera If the connection succeeds the camera will be inserted to the camera selection list Click Ok Specify the IP address port and admin pass word of the camera Once added you will see the IP address of the camera and also the port that is opened on the camera port 80 in this example The selected camera has b...

Страница 77: ...eted History Clicking the History button will popup a historical camera list which lists the latest 16 cameras you inserted into the camera list 16 is the default number you can change the number of the latest installed cameras you want to keep in the registry Clicking on one camera in the history list will insert the camera into the camera list The historical camera list is shown below Historical...

Страница 78: ...tings Alert Sound Check this option to enable audio alert for the camera selected Enable digital input This function is similar to Enable Motion Detect mentioned above Once this option has been checked a digital input device will be able to trigger an alert sound and recording Record secs before event Once the automatic video recording has been activated you can change this setting to regulate the...

Страница 79: ... the proceeding cameras will then move 1 position up or 1 position down depending on which direction the selected camera was moved Step 1 Step 2 Press the left mouse button at the gray index field Move the mouse to your new selected location and release the mouse button Then Video 1 will be moved to the 12th row in this example Once you click the Save button in the left bottom corner of this windo...

Страница 80: ...eras These include the video database directory the usage of the Hard disk and options for video display You can activate the global settings window from Configuration Menu Global Settings shown above All recording processes will be stopped when activating the global settings window indicated by a warning window popped up in advance to keep you informed Monitor Program continued ...

Страница 81: ...op If this setting is unchecked a warning message will pop up when it is approaching the storage space limit All recording will stop when the limit of the hard disk usage is reached Reserved space Indicate the size of the hard disk that will be reserved for other Windows applications at least 15 The remainder of the hard disk space will be available for recording The more space you have reserved t...

Страница 82: ... The upper bar contains Camera location and time of the remote site The lower bar contains Connection time and Recording time All of them shown in the figure below can be enabled or disabled here individually for the status indication Apply to full screen mode can also be turned on here Once it has been checked the status bar in each channel showing date location connection and recording time will...

Страница 83: ...t size limit is 10MB The maximum value for this setting depends on the amount of Free Space available on your hard drive This value can be found under the Record Disk space Usage Settings section of the global settings window Backup Location Select Select the locations to backup by clicking the checkbox next to the location camera name To delete a location select the location and click the Delete ...

Страница 84: ...gnal associated with each channel number It indicates the status of the dedicated video channel which is depicted as follows Off The video channel is not connected with any DCS 3220 yet Green The green light means the DCS 3220 associated with this channel number is connected and the video is monitored in the video area Red The red light indicates the video from this channel is recording into the v...

Страница 85: ...cedures for drag and drop step by step Show the video of a specified channel This section depicts the method of how to show the video of a specific channel in the a display window Step 1 Move the mouse cursor to the display window shown below Video 1 5 9 13 Recording Selected Channel Connected and monitoring Not configured channel Configured but not connected no video Trashcan Mouse cursor Locatio...

Страница 86: ...rea is droppable or not Step 3 Release the left mouse button while on top of a display window In each display layout only one window can be assigned to a camera Also each camera must have its own separate window when displayed Once the video is in a display window it can be dragged and dropped to other windows If you drag one camera s video to a window that already has its own camera s video the t...

Страница 87: ...nge to the hand shape when it has been moved onto the displaying frame After that press the left mouse button and hold it Step 3 Move the cursor while still holding the left mouse button to the trashcan in the common area of the monitor program Step 4 When the cursor shape changes to an arrow shape over the trashcan release the left mouse button The video in the corresponding display window will d...

Страница 88: ...ent layouts available as shown below for the display windows in the monitor program You can select one of them by clicking on a layout icon In each layout you can drag and drop the channel number to any display window in the video area Following the procedures described in the section titled Show the video of a specified channel you can add the video channels to display windows within the selected...

Страница 89: ...hannel layout When you choose the one channel layout or four channel layout the Page up and Page down buttons will be shown in the left bottom corner of the video area You can use these two buttons to switch the pages as shown in the figure below Usetoswitchbetween cameras PT Monitor Program continued ...

Страница 90: ...ra from the multi camera layout double click on the desired display window You will see that the size of the display window is the same as the one channel layout Clicking the Back button in the upper left corner of the video area will switch to the previous selected multi camera layout The position that each video channel is in for every layout will be saved for the next time the layout is selecte...

Страница 91: ...ntrols The color of the channel number indicates the status of the DI Digital Input You can click the Switch button to change the HI LOW state of the DO Digital Output With these features you can monitor the remote sensor input from DI and also trigger the camera by DO switch Monitor Program continued Set digital output to LOW Set digital output to HIGH No connection PT When the color of a DI DO n...

Страница 92: ...vel changer is triggered the alert message will be shown in this window If there are more events than this window can display a scroll bar will appear The message format is described as follows time alert type channel number win1 win2 win3 For example the message PM 02 41 00 MO 1 0 1 1 means that this is a motion detection alert occurring at 02 41 00 PM in Motion Window 2 and Motion Window 3 for c...

Страница 93: ...above These functions are Quit By clicking this button IP surveillance will be closed with the latest settings saved Minimize Minimize the Monitor program Monitor Program continued By choosing About located in the configuration menu shown below a dialog box will appear and display the information about the installed version of IP surveillance The information includes the software name version user...

Страница 94: ...to stop the alert sound It will also switch the I O Control to theAlert Message receiver so that the alert messages can be reviewed Configuration Menu The menu includes Camera Configuration Global Settings Scheduler and About options Common Control Functions This section will describe the common control functions shown above which are depicted by the small icons These functions only apply to the c...

Страница 95: ...m the selected channel Stop After video recording has been activated this button allows you to manually stop recording of the selected video channel Snapshot This button will take a snapshot of the selected video channel and save the picture as a bitmap file to the hard disk You can set the directory for storing these bitmap files at the Configuration menu Global Settings screen Please refer to th...

Страница 96: ... will be able to easily regulate a schedule for each video channel The main features of the scheduler are Friendly graphic user interface for schedule editing Flexible schedule scheme suitable for all applications Individual schedule for each video channel Supports up to 9 preset schedule schemes for each video channel Automatic period recording Using the Scheduler This section discusses the metho...

Страница 97: ...layout of the scheduler and its components shown below will be described Part 1 Part 2 Part 3 Part 4 Scheduling continued The scheduler will not be accessible until at least one camera has been added to the camera list Go to the configuration menu and click on Scheduler to launch the scheduler ...

Страница 98: ... it Part 2 The second part is the Primary schedule settings It consists of the day time line week time line begin time selector end time selector and event mode settings Part 3 The third part is the Secondary schedule which consists of event mode settings Part 4 The fourth part contains the operation buttons for the user to manipulate the edited schedule of the selected video channel The scheduler...

Страница 99: ...nt time lines hour unit time line and week unit time line You can make your own schedule by plotting markers in all time lines These two time lines are associated with each other That is if you make changes in one time line the corresponding changes will be applied with scale to the other three time lines in the same schedule Before you begin make sure that you select Once P 97 if you want to choo...

Страница 100: ...g unmarking on the week time line for more details Schedule with Time Picker Begin and End Time Date picker Hour picker Minute picker There are three controlling units in both Begin Time and End Time selectors shown above The first unit of these two selectors is the date picker You can select day with it to set the beginning time and the ending time for the recording interval The second and third ...

Страница 101: ...the editing schedule scheme Note that only after you click on the Apply button the scheduling information settings will be written back into the whole editing schedule scheme That means this edited scheduling time interval is valid only after you Apply the changes Period picker Apply Erase Schedule in event mode You can select to record in Event mode or Continuous mode by the Schedule mode selecto...

Страница 102: ...is low The technical name for this event is line trigger rising Checking this will trigger recording while the digital input is changing from low to high The technical name for this event is edge trigger falling Checking this will trigger recording while the digital input is changing from high to low The technical name for this event is edge trigger Schedule modes If you select Continuous mode in ...

Страница 103: ...ideo channel Note that you should save the schedule you are currently working on before loading a new one Otherwise the current changes will be lost Clear This button will clear all changes in the current schedule of the selected video channel Save This button is used for saving changes to the current schedule Save As This button is used to save the current schedule as another file name instead of...

Страница 104: ...tool User input from full range to 1 second Zoom in from full range to 10 seconds Zoom out up to full range Full range System control tool Window locker System settings Features of Playback The playback program is a very powerful convenient and easy way to browse the recorded video It has one display mode normal display mode and two playback methods full range and time period There are several mai...

Страница 105: ...cation software The figure below shows the login dialog For security concerns only the admin account can log in to this program To change the password of the admin account please refer to the section titled Logging In Layout DisplayArea Control Area Pull Bar Area Area Selection Indicator Status Area HistogramArea Playback Program continued ...

Страница 106: ...s i e area selection indicator frame selection indicator and pull bar These features provide much more convenience while searching recorded video in the IP surveillance database MainAreas DisplayArea The display area is able to show the surveillance database of each camera by time You can change the video size through the display adjustment tool and the playback method through the play control too...

Страница 107: ...l exporting tool and system control tool StatusArea The status area is located at the bottom of the main window It tells you the program status information including display mode display size display speed exporting file format and exporting file name Indicators AreaSelectionIndicator In the main playback window the display area is surrounded by a blue rectangle This rectangle is the area selectio...

Страница 108: ... video will halt and then restart playing the video sequence from the point you selected If the video sequence has been paused the display area will show the point you selected without playing Note that the pull bar will only function under the normal display mode Settings After the main window is shown on the screen you must modify the settings to make it to work properly Click on the Settings bu...

Страница 109: ...elect the wrong mode the video shown in the display area will become distorted If you have chosen the wrong modulation mode you may open the settings dialog again change to the correct mode and restart the playback program The display will now be normal AVI file location This sets the directory where exported AVI files will be stored Exported AVI files will be stored in the sub directory camera na...

Страница 110: ...2 Changing the location selector to another location in control area 3 Changing the playback method selector to Full Range 4 Changing the playback method selector to Time Period Period Start Time Label Period End Time Label HistogramArea Under the normal display single frame mode you can use all the tools provided with the playback program except the page control In this mode the two labels under ...

Страница 111: ...see that period you can cancel it by just pressing the right button of your mouse with the left button still pressed If you click on the left button without dragging it the action will be the same as clicking on the pull bar in the same x axis position That means the playback system will shift to the pointed time and show video on the displaying frame Besides the dark regions in the histogram area...

Страница 112: ...se Period Selector Period selector provides you a precise way to choose the start time and the end time of a new period The end time must be later than the start time After you provide the correct start and end time clicking on the Play button will play the new period in the display area with changing the period start and end time label Besides the pull bar and histogram area will change too If th...

Страница 113: ...e mode you want to use first Otherwise the period selector will revert back to the previous period set the last time you changed the playback method selector AlertAreaSelector In the preview mode the playback program can show the information of total events of only one alert window each time If you want to see the events of the other two alert area windows you must change the alert area selector t...

Страница 114: ...e Stop button Note that once you press the Stop button the start point will be reset to the start of the present period Pause Resume The Pause button provides you a way to pause the video sequence display When the displaying video is paused click on the Pause button again to resume the video display Fast Play and Slow Play The camera supports a maximum of x16 fast forward play and minimum of 16 sl...

Страница 115: ... Zoom Out and Full Screen ZoomIn When you click on the Zoom In button one time the image size in the display area will be magnified 12 5 percent to the original size Due to the limitation of the display area size the maximum zoom in ratio supported is only 2 25 1 for NTSC modulation mode and 1 875 1 for PAL modulation mode If you want to see the image in more detail you can use the full screen fun...

Страница 116: ...ram area the display adjustment toolbox will change to a range adjustment toolbox The range adjustment toolbox provides a faster way to change the range of the displayed time period By using this toolbox you can browse the database of one location from any 10 second interval of the entire range The figure below shows the searching range adjustment toolbox composed of its own three elements i e Zoo...

Страница 117: ...iod from the newly defined start time When you click on the Full Range button you will get the same functionality as when you change the playback method selector to Full Range System Control Toolbox The system control toolbox provides some basic operations for the playback program The figure below shows the three elements of the system control toolbox i e Lock Window Settings Minimize and Exit Ful...

Страница 118: ... will pop up when you click the Settings button For more information about setting this program please refer to the section titled Settings Minimize Click this button in order to minimize the playback program window Exit The playback program will be closed immediately when you click on the Exit button ...

Страница 119: ... recording To schedule video recording with motion detection you must first enable motion detection on the Internet Camera Click the Motion Detection button under the Advanced tab from the Configuration screen to access settings that affect how the DCS 3220 Internet Camera can serve as a security device by recording only when motion is detected Note These settings can be configured in your Web bro...

Страница 120: ...nutes hours days weeks or months The Secondary Schedule allows you to set a schedule outside the Primary Schedule The Secondary Schedule provides two options to record without a specified date or time You can select Event Mode which will record whenever an event is triggered or Continuous Mode which will begin continuously after scheduling settings are saved You do not need to set the Secondary Sc...

Страница 121: ...n when finished You have now set a schedule to record video when motion detection is triggered If you would like to save this configuration click Save As to save this configuration to a folder in your hard drive This configuration can be used on another system running IP surveillance or can be used as a backup if you need to re install the IP surveillance software program Schedule Video Recording ...

Страница 122: ...n log onto the Internet Camera at the same time is 10 Please keep in mind the overall performance of the transmission speed will slow down when many users are logged on Q What algorithm is used to compress the digital image A The Internet Camera utilizes MPEG4 Simple Profile image compression technology to provide high quality images Q Can I capture still images from the Internet Camera A Yes you ...

Страница 123: ...rrect the possible problem you need to first disconnect the Internet Camera from the network Then run the PING utility follow the instructions in the Appendix How to Ping Your IP Address In Windows 95 98 2000 check that the IP Address of the Internet Camera is within the same subnet as your workstation Click Start Setting Control Panel and the Network icon Select TCP IP from the Network dialog box...

Страница 124: ...amera focus manually as described in Adjusting the Internet Camera Focus in the Appendix section of this manual A2 If you have previously changed the supplied CS type lens you may have unintentionally installed a C type lens without fitting the adaptor first Frequently Asked Questions continued Q I connected the Internet Camera directly to a computer with a cross over cable Ethernet cable and rece...

Страница 125: ...mation How to PING Your IP Address The PING Packet Internet Groper command can determine whether a specific IP address is accessible by sending a packet to the specific address and waiting for a reply It can also provide a very useful tool to confirm if the IP address conflicts with Internet Camera over the network Follow the step by step procedure below to utilize the PING command but first you m...

Страница 126: ...CS 3220 to user preferred settings 2 The LED on the front of the camera will begin blinking orange Lightly insert a paper clip or a similar sized tool into the reset hole on the back of the camera press lightly and then release the button Insert the paperclip or other tool and press and continuously hold down on the button recessed inside the reset hole Wait for the LED on the front of the camera ...

Страница 127: ...ce on or off The I O connector provides the physical interface for digital output DO and digital input DI that is used for connecting a diversity of external alarm devices to the Internet Camera such as IR Sensors and alarm relays The digital input is used for connecting external alarm devices and once triggered images will be taken and e mailed 1 SW_COMMON OUTPUT open from SW_OPEN at initial stat...

Страница 128: ... installation Note that the positive from the PIR is connected to the D of the I O port of the camera and the negative from the PIR is connected to the D of the camera I O port Configuring Your Camera for External Trigger Based Recording I O Connector continued To configure your camera to record when triggered by an external device you must first set your SMTP or FTP settings in order to send snap...

Страница 129: ...TP server to which recorded snapshots will be sent For detailed information about each setting please refer to Configuration Advanced Network in the section titled Using the DCS 3220 With an Internet Browser page 33 Click the apply button when finished Configuring Your Camera for External Trigger Based Recording continued I O Connector continued Click Network ...

Страница 130: ...r select All the time except for the above schedule if you want to enable full time snapshot recording Check Event operation Set the delay before detecting next event to avoid continuous false alarms following the original event Set the snapshot interval to capture the direction of the moving object 5 5 5 5 5 Check the trigger condition for input and motion detection in this case Input is Low 6 6 ...

Страница 131: ...sired image appears DO NOT over turn the lens in either direction as it will be out of focus Unless you want to substitute the lens DO NOT unscrew more than 1 0mm apart from the Fixed LensAssembly To help you get the best image quality keep in mind that while adjusting the DCS 3220 s focus you can preview the image quality from your Web browser Camera Lens Adjust focus by turning clockwise or coun...

Страница 132: ...tions below to replace the supplied lens with any C or CS type lens 1 Unscrew the Internet Camera lens 2 When using a C lens attach the new lens to a CS C adapter 3 Screw the new lens onto the Internet Camera If appropriate adjust the iris according to the prevailing light conditions 4 Refer to Adjusting the Internet Camera Focus on the previous page 5 Refresh the Web browser and monitor the resul...

Страница 133: ...T or 100BaseT Fast Ethernet Video Algorithm supported MPEG4 Simple Profile Audio Built in Microphone 8Kbps Video resolution Up to 30 fps at 176x120 176x144 Up to 30 fps at 352x240 352x288 Up to 10 fps at 704x480 704x576 General I O 1 opto isolated sensor input max 12VDC 50mA 1 relay output max 24VDC 1A 125VAC 0 5A Technical Specifications Security Administrator and user group protected Password au...

Страница 134: ... 1 2A external power supply Weight About 240g 8 5oz Dimension 159mm L x 83mm W x 54mm H 6 25 in x 3 25 in x 2 12 in Viewing system requirement Protocol Standard Internet TCP IP suite Operating system Microsoft Windows XP 2000 Me or 98SE Browser Internet Explorer 6 x or above Technical Specifications continued R Environmental Operating 40O F to 113O F Storage 4o F to 158o F Humidity Max 95 RH Safet...

Страница 135: ...U S and Canadian customers can contact D Link Technical Support through our website or by phone Tech Support for customers within the United States D Link Technical Support over the Telephone 877 453 5465 24 hours a day seven days a week D Link Technical Support over the Internet http support dlink com email support dlink com Tech Support for customers within Canada D Link Technical Support over t...

Страница 136: ...136 Time Zone Table GMT stands for Greenwich Mean Time which is the global time that all time zones are measured from ...

Страница 137: ...137 Time Zone Table continued ...

Страница 138: ... period of ninety 90 days Warranty Period provided that the Software is properly installed on approved hardware and operated as contemplated in its documentation D Link further warrants that during the Warranty Period the magnetic media on which D Link delivers the Software will be free of physical defects D Link s sole obligation shall be to replace the non conforming Software or defective media ...

Страница 139: ...ased from inventory clearance or liquidation sales or other sales in which D Link the sellers or the liquidators expressly disclaim their warranty obligation pertaining to the product Repair by anyone other than D Link or an Authorized D Link Service Office will void this Warranty Disclaimer of Other Warranties EXCEPT FOR THE LIMITED WARRANTY SPECIFIED HEREIN THE PRODUCT IS PROVIDED AS IS WITHOUTA...

Страница 140: ... Class B digital device pursuant to part 15 of the FCC Rules These limits are designed to provide reasonable protection against harmful interference in a residential installation This equipment generates uses and can radiate radio frequency energy and if not installed and used in accordance with the instructions may cause harmful interference to radio communication However there is no guarantee th...

Страница 141: ...141 Registration Register online your D Link product at http support dlink com register 10 04 04 ...

Отзывы: