Quick Installation Guide
3
ENGLISH
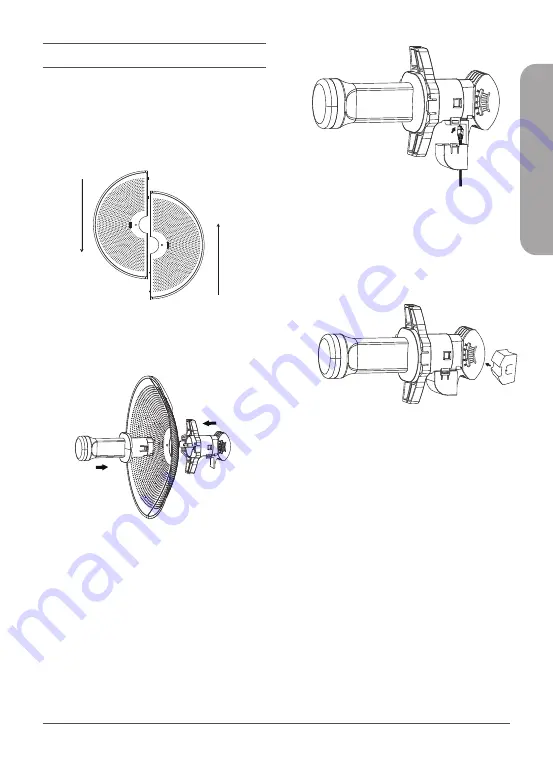
Figure 5: Connecting the Ethernet Cable
4.
Connect the adjustment kit to the base of
the DAP-3712 by pressing it in until it clicks
and locks in place. Use the adjustment
kit to position the antenna at the desired
angle
Figure 6: Attaching the Adjustment Kit
Preparation before Installation
Before installing the DAP-3712, check the
distance between the two sides and ensure
that they are within wireless signal range of
each other. It may be helpful to use a Graphic
Information System (GIS) program such as
Google Earth to check for obstructions between
the two sites. If there is an obstruction, it may
help to install the DAP-3712 as high as possible
to prevent the signal from being blocked.
Installation
Assembling the Access Point
1.
Assemble the dish of the DAP-3712 by
sliding the two halves together until they
lock in place.
Figure 3: Assembling the Dish
2.
Connect the antenna and base through
the hole in the center of the dish.
Figure 4: Attaching the Antenna
3.
Thread a standard RJ-45 Ethernet cable
through the cover for the PoE port on
the underside of the DAP-3712. Insert the
cable into the PoE port, then attach the
cover to the device.
Содержание DAP-3712
Страница 8: ...Ver 1 01 WW _130x183 2020 11 02 ...


