45
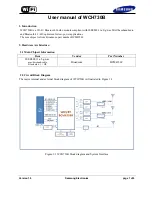
Device Configuration>Wireless
• SSID
: The Service Set (network)
Identifier of your wireless network.
• Channel
: Allows you to select a
channel. 6 is the default setting.
• SSID Broadcast
: Allows you to enable
or disable the broadcasting of the
SSID to network clients.
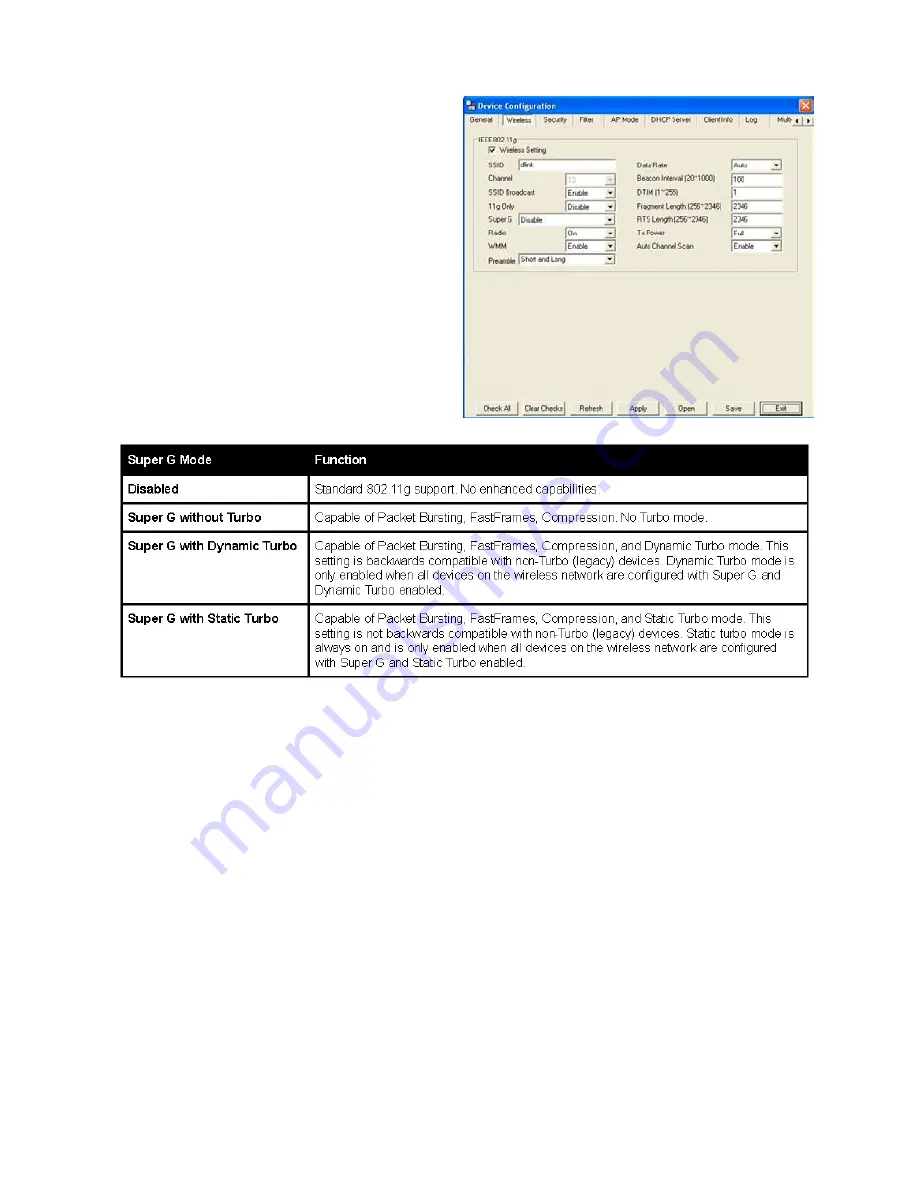
• Super G
: Super G is a group of
performance enhancement features
that increase end user application
throughput in an 80.g network.
Super G is backwards compatible
with standard 80.g devices. For
ideal performance, all wireless devices
on the network should be Super
G capable. The modes are listed
below:
• Radio Wave
: Enable or disable the wireless functionality of the selected device(s).
• WMM
: Select Enable or Disable. Enable is selected by default. WMM stands for Wi-
Fi multimedia, by enabling this feature it will improve the user experience for audio
and video application over a Wi-Fi network.
• Preamble
: Select the default value short and long, or long only .
• Data Rate
: A pulldown menu to select the maximum wireless signal rate for the
selected devices(s).
•
Beacon Interval (20~1000)
: Beacons are packets sent by an access point to
synchronize a network. Specify the beacon value for the selected device(s) here.
The
default value of 00 is recommended.
•
DTIM (1~255)
: DTIM (Delivery Traffic Indication Message) is a countdown informing
clients of the next listening window for broadcast and multicast messages.
•
Fragment Length (256~2346)
: This sets the fragmentation threshold (specified
in bytes). Packets exceeding the value set here will be fragmented. The default is
346.
•
RTS Length (256~2346)
: The RTS value should not be changed unless you encounter
inconsistent data flow. The default value is 2346.
•
Tx Power
: A pulldown menu for selecting the transmit power of the selected
•
Auto Channel Scan
: Enable to scan for the least populated channel. Enabled is
selected by default.
Using the AP Manager (continued)
Содержание AirPremier DWL-00AP
Страница 1: ... ...
Страница 10: ...10 Operational Modes ...
Страница 59: ...59 Setup Wizard continued Using the AP Manager continued The DWL 2200AP setup is complete Click Finish ...