background image

9

B. 

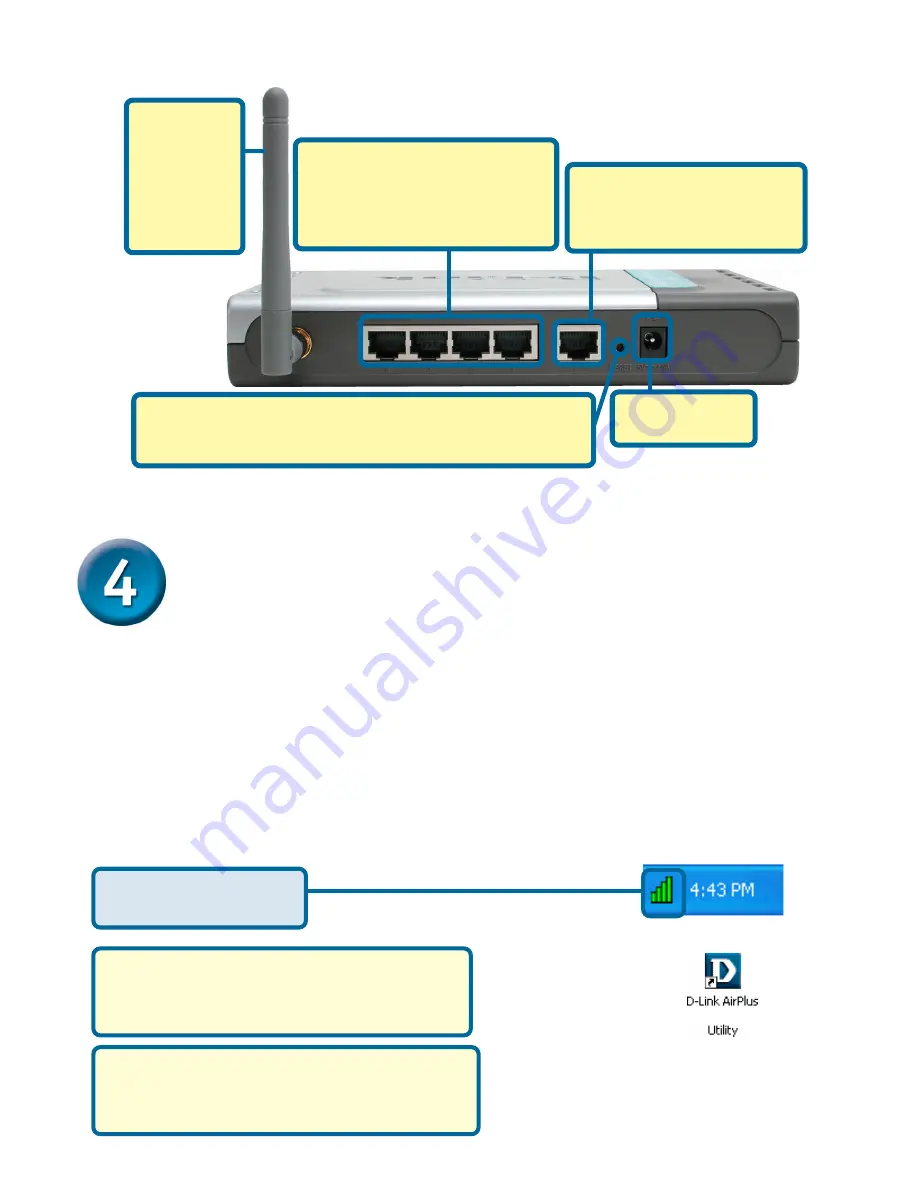
WAN PORT

Connect an Ethernet cable
to the Cable/DSL modem.

D. 

Antennas

Used to
wirelessly
connect to
802.11b
adapters.

C. 

LAN PORTS

These are the connections for
Ethernet cables to Ethernet
enabled computers.

A. 

Receptor for

Power Adapter

.

Reset Button

Pressing this button restores the Router to its original
factory default settings.

Your Installation is Complete!

Your Installation is Complete!

Your Installation is Complete!

Your Installation is Complete!

Your Installation is Complete!

After you’ve continued in Windows XP (or after the computer restarts
in the other Windows operating systems), the 

D-Link AirPlus DWL-

650+


Configuration Utility

 will automatically start and the utility icon

will appear in the bottom right hand corner of the desktop screen
(systray). 

If this icon appears


GREEN

then


you have success-

fully installed the DWL-650+

are connected to a wireless

network and are ready to communicate!


DWL-650+ 

Click


Yes 

to finalize

the installation

If the


utility icon


does not appear,

double-click the shortcut icon that has
appeared on your desktop

For


Windows XP

, if you wish to use the

D-Link AirPlus Utility, please refer to
Appendix B.

Содержание AirPlus DWL-650+

Страница 1: ...e and specifications subject to change without notice AirPlus Wireless Networking Kit Part No IG BDWL915 05052003 Check Your Package Contents DI 614 2 4GHz Wireless Router CD ROM containing Manual and Warranty Ethernet CAT5 UTP Straight Through Cable Using a power supply with a different voltage rating will damage and void the warranty of this product If any of the above items are missing please c...

Страница 2: ...2 Installation Map The diagram shown below illustrates a typical installation of this kit Please follow the instructions shown on the following page to install your kit successfully ...

Страница 3: ...unicate with other 802 11b devices on your network You must have at least the following to use the DWL 650 A laptop computer with an available 32 bit Cardbus slot At least a 300MHz processor and 32MB of memory Cardbus Controller properly installed and working in the laptop computer Installing the DI 614 Section 3 of this Installation Guide will walk you through the installa tion and configuration ...

Страница 4: ...650 Cardbus Adapter into your computer before installing the driver software TheInstallationScreenwillappear If the CDAutorun function on your computer does not automatically start go to Start Run and type D Setup exe If it does start proceed to the next screen Type D Setup exe Click Install Driver PC Utility The letter D represents the letter of the CD ROM drive Your CD ROM drive may be a differe...

Страница 5: ... down your laptop Insert the DWL 650 Wireless Cardbus Adapter into the Cardbus Slot in your Laptop Make sure to turn off the laptop computer Locate the Cardbus slot on your laptop computer Gently insert the DWL 650 into the Cardbus slot in your laptop computer as shown A B C ...

Страница 6: ...ate that the DWL 650 is properly inserted Link Activity LED Blinks when data is being transmitted through the wireless connection When you restart your com puter this Found New Hard ware Wizard Windows XP screen will appear Click Next Select Install the software automatically Recommended Restart your laptop Note Please do not remove the driver CD until the DWL 650 installation is complete ...

Страница 7: ...k driver software for this device is undergoing Windows Logo testing Microsoft certification is pending For Windows 2000 this Digital Signature Not Found screen may appear after your computer restarts Click Yes to finalize the installation For Windows Me and 98SE after your computer restarts this System Settings Change screen may appear Click Yes to finalize the installation Click Finish ...

Страница 8: ...dapter 3 Cable DSL modem Power On DI 614 Power On Insert the other end of the Ethernet cable to the WAN PORT on the back panel of the DI 614 The WAN LED light will illuminate to indicate proper connection If the WAN LED is not illuminated please go back to step B1 and repeat the instructions C Insert an Ethernet cable to LAN port 1 on the back panel of the DI 614 and an available Ethernet port on ...

Страница 9: ...on is Complete After you ve continued in Windows XP or after the computer restarts in the other Windows operating systems the D Link AirPlus DWL 650 Configuration Utility will automatically start and the utility icon will appear in the bottom right hand corner of the desktop screen systray If this icon appears GREEN then you have success fully installed the DWL 650 are connected to a wireless netw...

Страница 10: ...e DI 614 The logon pop up screen will appear Open your Web browser and type http 192 168 0 1 into the URL address box Then press the Enter or Return key Type admin for the username and leave the password field blank Click OK Please follow the steps below to configure your Broadband connection settings ...

Страница 11: ...e Setup Wizard continued You will see the following screens Set up your new password You have the option to establish a password Click Next Click Next Choose your time zone from the drop down list Click Next ...

Страница 12: ...ntinued If you are unsure of which setting to select please contact your Internet Service Provider Click Next Click Next This setup should be done on the computer that is registered on the ISP s network Please continue to Wireless Setup A this point the setup wizard will try to auto detect your Internet connection type If you have a Dynamic or PPPoE connection you will be brought to the correspond...

Страница 13: ... this option is selected then this screen will appear Used mainly for DSL Internet service Please be sure to remove any existing PPPoE client software installed on your computers Click Next Please continue to Wireless Setup Enter the IP Address informa tion in the appropriate fields as originally provided to you by your ISP You will need to complete all the required fields Enter in the Username an...

Страница 14: ... encryption settings for more secure wireless commu nication The Setup Wizard continued The default settings are SSID default Channel 6 Click Next Wireless Setup Click Next The DI 614 will connect with the DWL 650 right out of the box using the default settings If you choose to change the settings make sure that the Encryption and SSID settings are the same for both the DI 614 and any wireless ada...

Страница 15: ...e tab For additional settings or information refer to the Advanced Tools or Status tabs on the web management interface or to the Manual located on the CD Then relaunch your Web browser i e Internet Explorer or Netscape Navigator to link to your favorite Web site to test your Internet connection Click to Exit ...

Страница 16: ...omatically for the DI 614 Wireless Router For Microsoft Windows XP Go to Start right click on My Network Places select Properties Double click on the Network Connection associated with the Ethernet adapter i e D Link DFE 530TX APPENDIX A Restart your computer if necessary Click OK Select Obtain an IP address automatically Click Internet Protocol TCP IP Click Properties ...

Страница 17: ...wish to use the DWL 650 AirPlus Utility please use the following steps Click the XP Networking icon to access the Zero Configuration Wireless Settings Click Advanced Uncheck Use Windows to configure my wire less network settings Click OK ...

Страница 18: ...your laptop computer Q3 I am unable to access the Internet using the DWL 650 A1 Check that the LED indicators for the broadband modem are indicating normal activity If not there may be a problem with the broadband connection A2 Check that the LED indicators on the DI 614 are functioning properly If not check that the AC power and Ethernet cables are firmly connected A3 Check that the IP address su...

Страница 19: ...19 Notes ...

Страница 20: ...ical support through our website or by phone Tech Support for customers within the United States D Link Technical Support over the Telephone 877 453 5465 24 hours a day seven days a week D Link Technical Support over the Internet http support dlink com email support dlink com Tech Support for customers within Canada D Link Technical Support over the Telephone 800 361 5265 Monday to Friday 8 30am t...

Отзывы: