D-Link Air DCS-1000W Скачать руководство пользователя страница 4


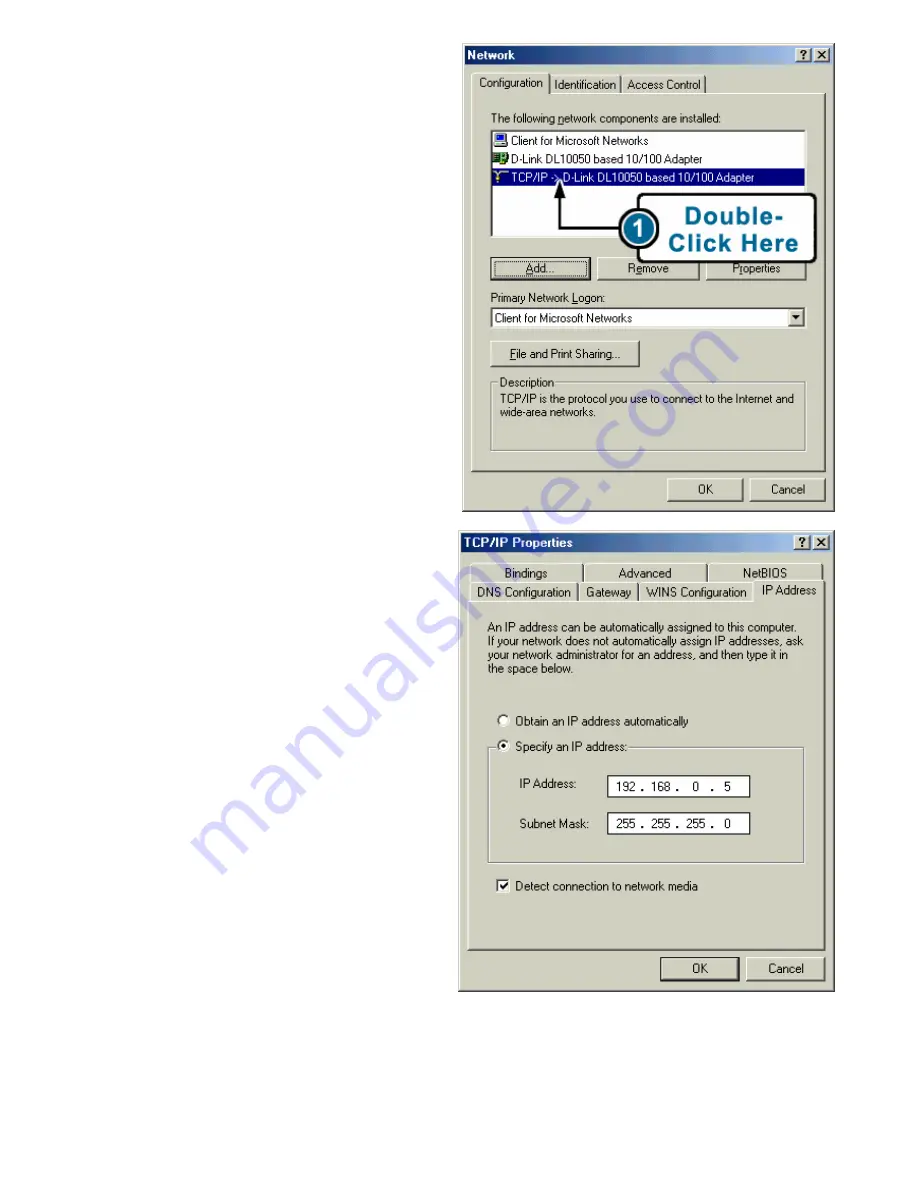
Under the configuration tab, find 
and double click 

TCP/IP

 for the 

network adapter used to 
configure the Intenet Camera. 


Please make note of the IP 
Address settings so that you can 
change these settings back after 
the configuration of the Internet 
Camera is complete. 


Select 

Specify an IP address 

and type “192.168.0.x” (the 
number “x” can be replaced 
with any number that will not 
conflict with other devices on 
your network). If your network 
does not already use the 
192.168.0.x IP address scheme, 
then using the number “5” as 
shown below will work. 


Click the “

OK

” button. 

Windows may copy files 
needed to complete your 
settings.  


When asked, restart the PC. If 
you are not asked, restart your 
PC manually. 


Содержание Air DCS-1000W

Страница 1: ...led and Compliant Web Browser CPU Pentium II 266 MHz or above Memory Size 32 MB 64 MB recommended VGA card resolution 800x600 or above An 802 11b Access Point for Infrastructure Mode or another 802 11b wireless adapter for Ad Hoc mode Hardware Installation DCS 1000W Only Attach the Wireless Antenna From the rear panel of DCS 1000W screw the 2 external antennas that came with DCS 1000W into the ant...

Страница 2: ...ork cable connector located on the Internet Camera s rear panel and attach it to the network We suggest using the Ethernet port to configure the DCS 1000W and then install the camera in its correct location Doing so will allow easy installation and proper configuration Attach the External Power Supply Attach the external power supply to the DC power input connector located on the Internet Camera s...

Страница 3: ... operating instructions for details on changing the IP address of your computer so that you can access and configure the Internet Camera If your computer already uses an IP address of 192 168 0 x please skip to the next section With your computer on open the Control Panel by clicking the Start button select Settings and click on Control Panel Find and Double Click the Network Icon ...

Страница 4: ...rnet Camera is complete Select Specify an IP address and type 192 168 0 x the number x can be replaced with any number that will not conflict with other devices on your network If your network does not already use the 192 168 0 x IP address scheme then using the number 5 as shown below will work Click the OK button Windows may copy files needed to complete your settings When asked restart the PC I...

Страница 5: ... camera into the IP Address Subnet Mask and Default Gateway fields If you are not sure what these settings should be please contact your network adminstrator to determine the correct settings The Default Gateway is the IP address of your Router This setting allows the Internet Camera to be seen from the public Internet Next type in the DNS IP Address of your Domain Name System servers into the coo...

Страница 6: ...e refer to the Manual Accessing the Streaming Video Using your favorite web browser type http address in the address box where address is the IP address that you assigned to the camera from the previous section Press Enter The Welcome screen of the Internet Camera will appear Click on View Image Java Mode from the Home screen to access the streaming video Next you will want to adjust the focus of ...

Страница 7: ... Sun s website http www sun com download Refer to the manual located on the CD ROM for additional information regarding all features and instructions related to the Internet Camera If problems arise when installing the camera or viewing the video please refer to the Appendix section of the Manual for troubleshooting tips If the Manual does not answer your questions please refer to the D Link techn...

Страница 8: ...8 Notes Building Networks for People ...

Отзывы: