background image

22

25

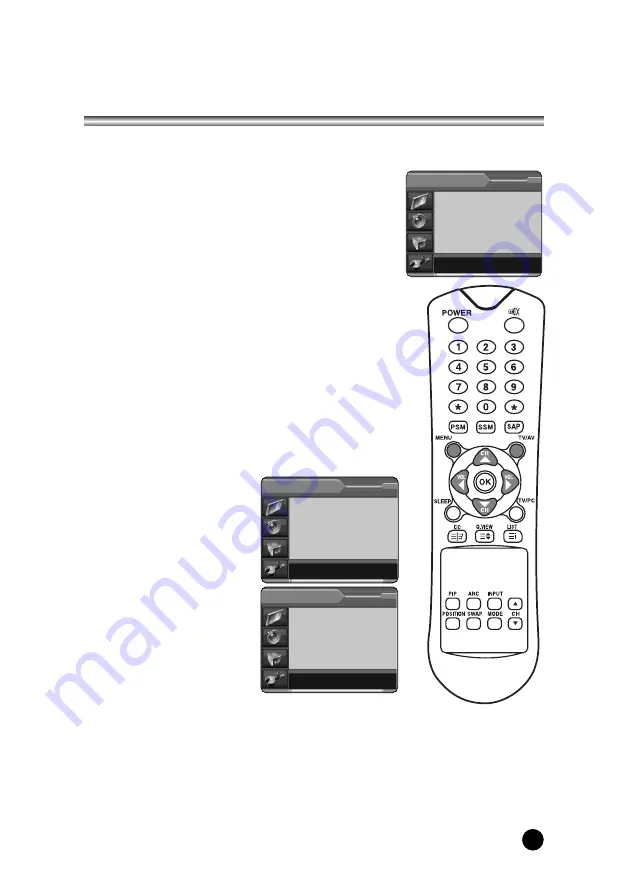
Radio Control

This function is possible only when the set is in Radio mode.(Radio mode is displayed
when the Setting for special menu is radio On.)

1. Use 

TV/AV

button on remote controller to select 

Radio mode

.

2. Press the 

MENU

button to set 

Radio Setup

menu.

3. Press the 

VOL

Ïq

button repeatedly to select 

Mode Auto

or 

Manual

.

* When the Radio Setup Mode is 

Auto

, only the 

programs stored in memory are selected. 

* When the Radio Setup Mode is 

Manual

, all frequencies 

are selected.

4. Press the 

CH

xy

button select 

Frequency

Then press the 

VOL

Ïq

button repeatedly to tune in the 

desired station manually. If you press the 

VOL

Ïq

button 

continually above 2 seconds, It automatically changes 
present frequency into next frequency.

5. Press the 

CH

xy

button to select 

Program

Then press the 

VOL

Ïq

button repeatedly to select 

program.

6. Press the 

CH

xy

button to select 

memorize

. If you want 

to memorize this radio setup, press the 

VOL

Ïq

button.

7. Press the 

CH

xy

button to select 

Delete

. Select 

Off

with the 

VOL

Ïq

button to delete the station. 

8. Press the 

CH

xy

button to 

select 

Auto Program

.

9. Press the 

VOL

Ïq

button 

repeatedly to automatically 
scans and tunes to the next 
available station.

10. Press the 

CH

xy

button to 

select 

Off Time

Then press the 

VOL

Ïq

button repeatedly to select 
Off, 5, 10, 30(minutes).

11. Press the 

CH

xy

button to 

select 

Edit Name

Then press the 

VOL

Ïq

button to edit radio name.

12. You can assign a radio 

name with 8 characters. 
Press the 

CH

xy

button repeatedly. You can use the 

numeric 0 to 9, the alphabet A to z(capital and small letters.) and a blank. 
With the 

VOL

Ïq

button, you can select in the opposite direction.

13. Press the 

MENU

button to return to prior menu. 

14. Press the 

TV/AV

button to exit. Then the radio setting condition is displayed.  

Note. 

If you want to listen to the radio, the ANT.jack must be connected to the   

antenna input of the set. 
And Radio function is available when the setting for Special menu is Radio On.

Position :▲▼

Next :◀▶

Exit : TV/AV

Mode

Auto

Frequency

87.50 MHz

Program

1

Memorize
Delete
Auto Program

Off Time

Off

Edit Name

Name

--------

Radio Setup

Start :◀▶

Back : MENU

Exit : TV/AV

Start

Radio Auto Program

Adjust : ▲▼◀▶

Confirm: OK

Back : MENU

Exit : TV/AV

Radio Name Edit

Station          01         --------

Содержание LT-26HMF

Страница 1: ...EUT Type 26 LCD TV Monitor FCC ID R8ILT 26HMF Test Report No GETEC E3 04 032 FCC Class B Certification APPENDIX H USER S MANUAL...

Страница 2: ...Owner s Manual Model LT 26HMF 26 WIDE TFT LCD TV MONITOR...

Страница 3: ...dio or television reception which can be determined by turning the equipment off and on the user is encouraged to try to correct the interference by one or more of the following measures Reorient or r...

Страница 4: ...unting of the product should follow the manufacturer s instructions and should use a mounting accessory recommended by the manufacturer 8 Transporting Product A product and cart combination should be...

Страница 5: ...ll liquid of any kind on the product 19 Servicing Do not attempt to service this product yourself as opening or removing covers may expose you to dangerous voltage or other hazards Refer all servicing...

Страница 6: ...st 14 Picture Control 15 Manual picture control 15 Auto picture control 15 Sound Control 16 Parental Control 17 18 INFORMATION 19 20 Captions 21 Other functions 22 24 Clock 22 Blue Back 22 Auto Sleep...

Страница 7: ...ure the following accessories are provided with Product 1 AC DC adaptor 3 Remote controller 5 Owner s manual 6 PC IN cable 7 PC Audio IN cable 4 Batteries type AAA 2 AC Cord Owner s Manual Model LT 26...

Страница 8: ...puts of an S VIDEO VCR to the Audio IN L MONO R 11 Ant Antenna input 1 ON OFF Switches TV set on or off 2 MENU Displays a menu 3 CH Program Up Down Selects a program or a menu item 4 VOL Volume Up Dow...

Страница 9: ...ns the sound on and off 3 NUMBER buttons Selects program numbers 4 TV AV Selects TV COMPONENT VIDEO S VIDEO RADIO Only when the set is Radio On PC ANALOG PC DIGITAL or DTV mode Clears the menu from th...

Страница 10: ...In this case darken the room or move the TV 12 VOL q Volume Up Down Adjusts the sound level Adjusts menu settings 13 TV PC Selects TV or PC mode directly 14 PSM Picture Status Memory Recalls your pre...

Страница 11: ...lect a Program number with the CHxy button or NUMBER buttons Volume adjustment Press the VOL q button to adjust the sound level Quick view Press the Q VIEW button to view the last Program you were wat...

Страница 12: ...ition Adjust Back MENU Exit TV AV Position Adjust Back MENU Exit TV AV Position Back MENU Exit TV AV Menu Picture q Sound q Special q Setup q Picture Contrast 90 Brightness 75 Colour 75 Sharpness 60 T...

Страница 13: ...is recommended that you use Auto program during installation of this set 1 Press the MENU button 2 Select the Setup menu 3 Select the Auto Program menu 4 Press the CHxy button to select Table mode 5...

Страница 14: ...OL qbutton V UHF Cable 6 Select the Edit Name with CHxy button Then press the VOL q button 7 Press the CHxy button repeatedly to edit program name You can use the numeric 0 to 9 the alphabet A to z ca...

Страница 15: ...13 program table pages in Which contain 125 programs Pressing the CHxy or VOL q button repeatedly turns the pages Program List You can check the Programs stored in the memory by displaying the Program...

Страница 16: ...rd Picture Appearance Mild Softer Picture Appearance Game External Video Game Picture Setup User Manual Picture Setup Selected Item Contrast Brightness Colour Sharpness Tint Setting Change More darkne...

Страница 17: ...ss the MENU button to return to preceding menu 7 Press the CHxy button to the Balance menu 8 Select the Balance menu with the VOL q button and adjust the balance of speaker 9 Select the AVL Automatic...

Страница 18: ...you consider acceptable to the viewer For example if you choose TV PG all more restrictive ratings will be automatically blocked the viewer will not be able to see TV PG TV 14 or TV MA rated programm...

Страница 19: ...the VOL q buttons to block or unblock the category To select a different TV Rating press the CHxybuttons with cusor in the first column 10 Press the VOL q buttons to select the MPAA Rating Then press...

Страница 20: ...ldren under 7 years old TV G TV PG TV 14 TV MA TV Y7 Parental Guidance Parents Strongly Cautioned Parents Strongly Cautioned Mature Audience Only Children 7 and over Considered suitable for all audien...

Страница 21: ...TV 14 and TV MA Next while the TV Ratings is highlighted repeatedly press the VOL q q buttons This will cycle through the available sub ratings FV D L S or V A highlighted letter U or B will be displ...

Страница 22: ...the TV signal The signal from the antenna is weak The program wasn t captioned when it was produced transmitted or taped 1 Press the MENU button 2 Select the the Special menu 3 Press the CH x xy y but...

Страница 23: ...ic buttons and the CHxy button Then press the VOL q button Select On or Off with CHxy button When the setting is On the set will be switched On automatically to the last selected program 9 Press the C...

Страница 24: ...Special menu Then press the VOL q button 3 Press the CHxy button to select Radio 4 Press the VOL q button to select Radio On or Off Note When the setting is On you can adjust radio function in radio...

Страница 25: ...DE button selects the 16 1 9 1 and 4 1 mode Multi picture mode is just available when the main picture is in AV mode Moving the PIP picture Press the POSITION button to adjust the position of sub pict...

Страница 26: ...VOL q button to delete the station 8 Press the CHxy button to select Auto Program 9 Press the VOL q button repeatedly to automatically scans and tunes to the next available station 10 Press the CHxy b...

Страница 27: ...e from the COMPONENT to the COMPONENT INPUT sockets of the set 3 Press the TV AV button to select COMPONENT the screen 4 Press the PLAY button on the DVD The COMPONENT playback picture appears on the...

Страница 28: ...The VCR playback picture appears on the screen Note If you have a mono VCR connect the audio cable from the VCR to the L MONO socket of set AV OUT 1 Connect the Audio outputs L R of the TV to Audio I...

Страница 29: ...brightness of picture Temperature Temperature is a measure of the warmth of the image color Clock This function is to minimize any vertical bars or stripes visible on the screen background And the hor...

Страница 30: ...FF 11 Select the Sound Mode with CHxy button 12 Press the VOL q button to select sound mode L R L L R R L R Audio signal from audio L input is sent to left loudspeaker and audio signal from audio R in...

Страница 31: ...y Reset This function allows you to return to the good picture reproduction programd at the factory and cannot be changed Position Adjust Back MENU Exit TV AV H V Position H Position 50 V Position 50...

Страница 32: ...de PC Digital In PC Analog In PC Audio In PC ANALOG INPUT 1 Connect the PC IN cable D sub jack from the monitor output socket of the PC to the PC ANALOG input socket of the set 2 Connect the PC Audio...

Страница 33: ...ion system NTSC Television program VHF 2 12 UHF 21 69 Cable S1 S41 LCD Panel 26 WIDE TFT LCD panel Resolution WXGA 1280 X 768 Power consumption 140W External antenna impedance 75 Audio output 10W 10W...

Страница 34: ...ecurely inserted Make sure COLOR and CONTRAST settings Is the unit receiving interference from other devices Transmission antennas of radio broadcasting stations and transmission antennas of amateur r...

Страница 35: ...34 Limited Warranty...

Отзывы: