CYP CM-1390M Скачать руководство пользователя страница 11

Use +/- to move the tick “

” to your desired adjust item, press the Menu/Enter 

to confirm your selection.

At this point, the selected parameter will turn red, and you can use +/- to 

increase or decrease the value of the parameter.

When adjustment is complete, press “MENU” to leave the parameter. Move 

the tick “

” to cancel the selection, press MENU/ENTER to Exit.

Output Setup

When output Set up is selected a submenu as below appears:

    Output Setup


  Timing XGA

    Exit

Press the “MENU/ENTER” button to enter into output timing select mode. Press 

+/- to toggle through a variety of output resolutions as below. Once your 

desired resolution is selected, press the MENU/ENTER to enter the resolution.
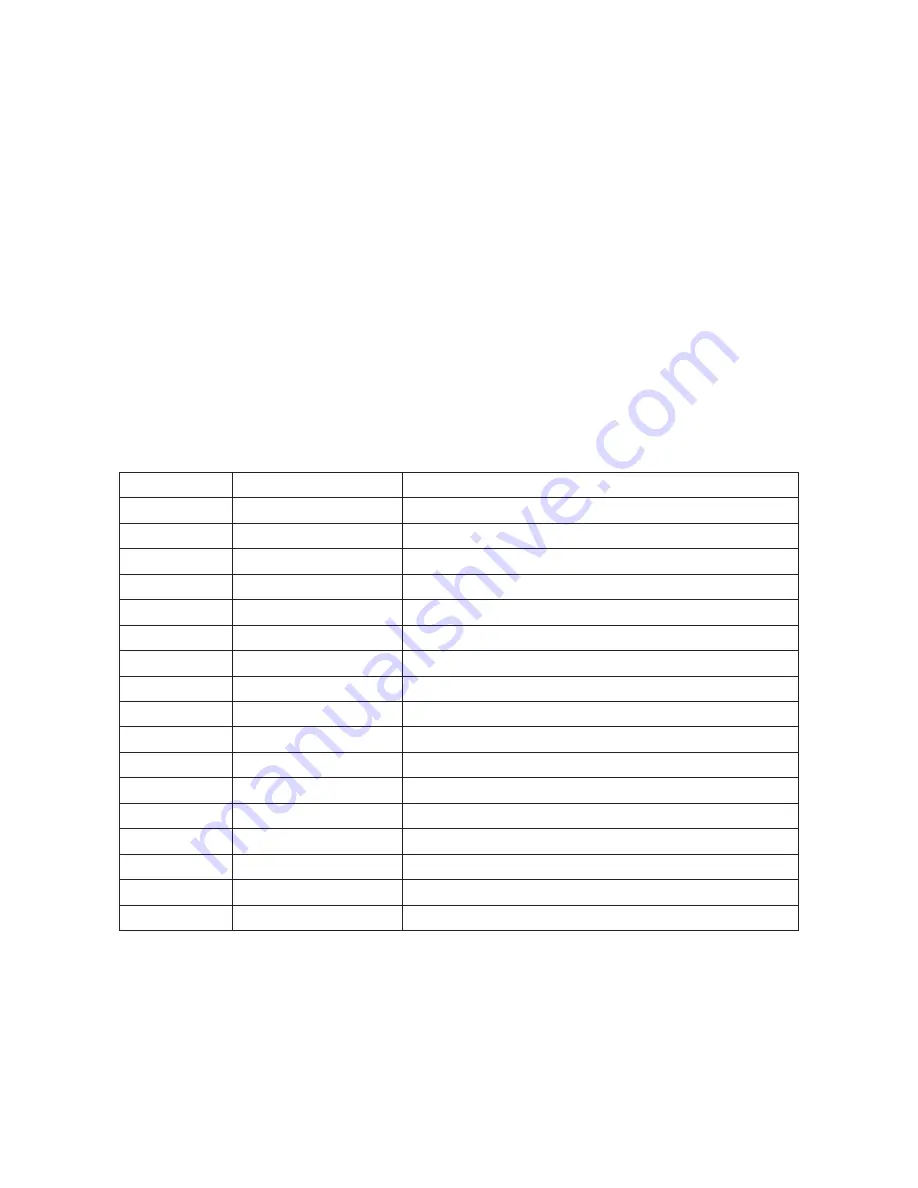
VGA

640x480

60Hz

SVGA

800x600

60Hz

XGA

1024x768

60Hz

1280 x 800

60Hz

WXGA

1360x768

60Hz

WSXGA

1440x 900

60Hz

SXGA

1280x 1024

60Hz

1400x1050

60Hz

1680x1050

60Hz

1600x1200

60Hz

UXGA

1920x1080

60Hz

WUXGA

1920x 1200

60Hz

480p

720x480

50Hz

576p

720x576

60Hz

720p

1280x720

Follow input source & can convert 50Hz

1080i

1920x1080i

Follow input source & can convert 50Hz

1080p

1920x1080p

Follow input source & can convert 50Hz

Native

Note:

 1.  PC output timing do not supports frame rate converstion.


2.  Component output timing except 480p@60 and 576P@50 do not


  supports frame rate converstion, all timing supports frame rate


  convertion of 50 & 60Hz.


3.  Select Native under PC mode, the device will display the timing    


  according to monitor's EDID Block #0. If under Composite mode, the  


  output timing will be 720p@60Hz.

7

Содержание CM-1390M

Страница 1: ...CM 1390M Video to VGA with YPbPr Scaler Box Operation Manual CM 1390M...

Страница 2: ...rves the right to make improvements to this document and or product at any time and without notice Copyright Notice No part of this document may be reproduced transmitted transcribed stored in a retri...

Страница 3: ...rain moisture or install this product near water Never spill liquid of any kind on or into this product Never push an object of any kind into this product through module openings or empty slots as yo...

Страница 4: ...roduction 2 Applications 3 Package Contents 4 System Requirements 5 Features 6 Specifications 7 Operation Controls and Functions 7 1 Front Panel 7 2 Rear Panel 8 Output Format 9 OSD Operation 10 Remot...

Страница 5: ...has many features to enhance the quality of your video 2 Applications Showroom environment Education demo Installation usage 3 Package Contents Video to VGA with YPbPr scaler Box VGA to YPbPr 3RCA ca...

Страница 6: ...ut supports 50Hz or 60Hz frame rate conversion 480p 576p excluded Video quality improvement DCTI Digital Chroma Transient Improvement DLTI Digital Luminance Transient Improvement Black level extension...

Страница 7: ...1080p 50 60 with VGA to YPbPr adaptor VGA WUXGA ESD Protection Human Body model 8kV air gap discharge 4kV contact discharge Dimensions mm 125 W x 123 D x 30 H Weight g 400 Chassis Material Metal Silks...

Страница 8: ...lected Input select button Press the button to select your desired input source between Composite Video and S Video IR Sensor Infrared ray remote control sensor Menu Enter This button serves two purpo...

Страница 9: ...Video Input Use a S Video cable to connect the S Video output of the source video equipment to this S Video input on the back of the video scaler S Video provides improved performance over Composite V...

Страница 10: ...x 1080i 1280 x 720 720 x 576 720 x 480 Follow input source and can convert 50Hz to 60Hz Follow input source and can convert 50Hz to 60Hz Follow input source and can convert 50Hz to 60Hz 50Hz 60Hz 9 OS...

Страница 11: ...ENU ENTER to enter the resolution VGA 640x480 60Hz SVGA 800x600 60Hz XGA 1024x768 60Hz 1280 x 800 60Hz WXGA 1360x768 60Hz WSXGA 1440x 900 60Hz SXGA 1280x 1024 60Hz 1400x1050 60Hz 1680x1050 60Hz 1600x1...

Страница 12: ...select your desired parameter press Picture again to confirm the selection Press to move up down the cursor to select your desired parameter or press to increase decrease the setting values Reset Pre...

Страница 13: ...n and Installation Analog Out Connect to your TV through VGA or component interface in case your TV has no DVI input VCR DVD STB DVHS CV SV Analog PC output Analog HDTV output VGA to YPbPr 3 RCA cable...

Страница 14: ...Acronyms A Acronym Complete Term CV Composite Video NTSC National Television System Committee OSD On Screen Display PAL Phase Alternating Line RGB Red Green Blue SV S Video 10...

Страница 15: ......

Страница 16: ...20101208 MPM CM1390M Home page http www cypress com tw CYPRESS TECHNOLOGY CO LTD...

Отзывы: