background image


Page 10 

cymatic audio


Live Recorder LR-

16


www.cymaticaudio.com

www.cymaticaudio.com

www.cymaticaudio.com

www.cymaticaudio.com


Start recording 

5.

Connect your recording source to the inputs on the rear panel ❻


of 

the 

LR-16

 (please refer to section ‘

Connecting recording sources’

)


and 

check whether you have an input signal by observing the 

Signal / Peak 

detection 

meters. If necessary adjust the output levels of your 

recording source or the input levels of the 

LR-16 

(please refer to


section ‘Recorder Menu / Input sensitivity’) 


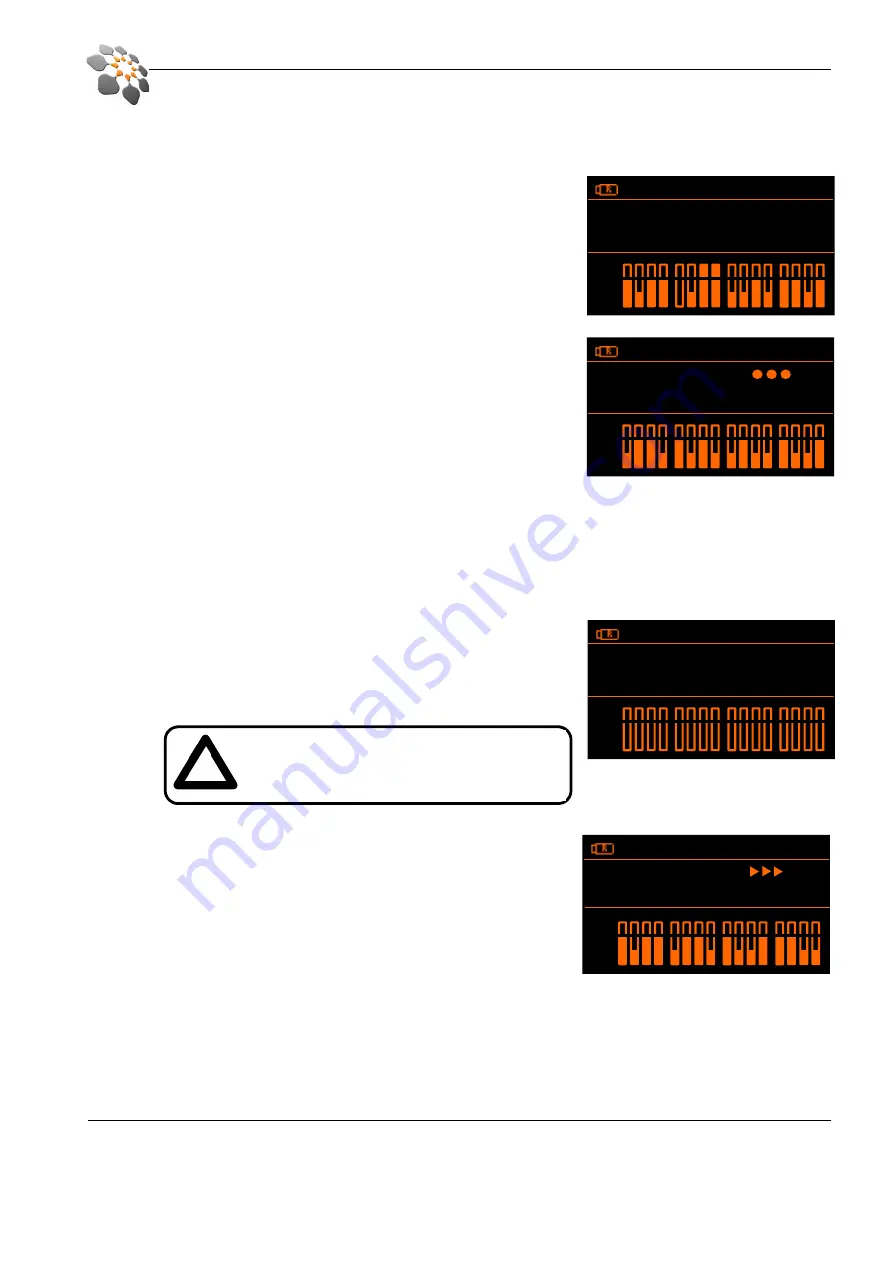
Press the Record  ⓰ button to start the recording. The 

LR-16

 will 

create a new Take, the record button light will turn red and the 
‘walking dots’ in the display indicate that the recording is running. At 
the same time the ‘Remaining time’ indicator in the top right corner 
will count down the maximum remaining time for this recording. The 
recording will be stored as 16 separate wave files into the 
‘Recording/Take_xx’ folder on the USB storage device. 


Creating a new track ‘on the fly’


6.

When the Record ⓰ button is pressed while the 

LR-16

 is already recording the device will close the current and 

create a new track on the USB storage device.


Stop the recording


7.

To stop the recording press the Stop button ⓮. The Play and Record 
buttons will flash for a few moments and the display will read ‘Please 
wait’ until the 

LR-16

 has finished writing all data to the storage device.


Playing back the recorded tracks 

8.

Use the Next ⓬/ Previous ⓭ or Up ⓱/ Down ⓳ buttons to step 
through the recorded tracks on the USB storage device. Hit the Play 
button to start playing back a track. The recording will be played out 
to the Headphone ❷ and Line ❼ outputs. To change the levels 
panning of each individual channel please refer to section ‘

Monitoring 

settings

’. 


Recording priority


9.

No matter what mode the device currently is in - hitting the Record ⓰ button will always cause it to instantly go 
into recording mode and start a new recording. While recording all buttons except for the Record ⓰ and Stop ⓮ 
buttons are blocked. 


 48. 0kH z     0 4:2 8:39  

Take  2  of  2  
Take _02         48 .0k Hz


Pk  
Sg  

 48. 0kH z     0 4:2 7:15  

Reco rdi ng          
Take _03         48 .0k Hz


Pk  
Sg  

 48. 0kH z     0 3:5 5:35  

Plea se  wai t          
Take _03         48 .0k Hz


Pk  
Sg  

!

Do not remove the storage device while the 

Record and Play buttons are still flashing – your 

recording might become unusable. 

 48. 0kH z     0 0:1 7:28  

Play ing          
Take _02         48 .0k Hz


Pk  
Sg  

Содержание LR-16

Страница 1: ...der LR 16 www cymaticaudio com www cymaticaudio com www cymaticaudio com www cymaticaudio com Live Recorder LR Live Recorder LR Live Recorder LR Live Recorder LR 16 User Manual connect record done cym...

Страница 2: ...nd Excessive vibration or shock Handling Never place objects filled with liquids such as vases on the Live Recorder LR 16 since this can cause electric shock Do not place naked flame sources such as l...

Страница 3: ...n the Live Recorder LR 16 If necessary slightly moisten the cloth Do not use abrasive cleanser wax or solvents such as paint thinner or cleaning alcohol since these may dull the finish or damage the s...

Страница 4: ...st result 8 3 Recording Home screen 9 4 Start recording 10 5 Creating a new track on the fly 10 6 Stop the recording 10 7 Playing back the recorded tracks 10 8 Recording priority 10 9 Recorder Menu 11...

Страница 5: ...n iPad Mac or PC the LR 16 serves as an 16 in 2 out USB audio interface When you ve finished your live recording in the field simply connect the LR 16 to your computer or tablet and you have a high qu...

Страница 6: ...ECTIONS USER INTERFACE FRONT VIEW 1 REAR VIEW 2 HEADPHONES VOLUME USB STORAGE CONNECTOR USB 2 0 hard disk or thumb drive connector for Direct to USB recording HEADPHONE Inch Headphones Jack POWER SWIT...

Страница 7: ...s menu Go back to previous screen Go back to previous screen Go back to previous screen Go to previous song Go to previous song Go to next song Go to next song Stop recording playback Stop playback St...

Страница 8: ...nce is too slow for Direct to USB recording you are given the option to format the drive This can in some cases improve the device s performance e g if the memory is too fragmented or the existing for...

Страница 9: ...d total number of recordings on the storage device Name of currently selected recording All recordings will automatically be named and numbered Take_01 to Take_99 The maximum number of recordings per...

Страница 10: ...cording the device will close the current and create a new track on the USB storage device Stop the recording 7 To stop the recording press the Stop button The Play and Record buttons will flash for a...

Страница 11: ...h channel individually The solo setting will only be active while the monitoring menu is active The mute setting will only be active until the LR 16 is restarted The volume and panning settings are sa...

Страница 12: ...red in the Music folder on the USB storage device will be displayed in a list Use the Up Down or Previous Next buttons to choose a song and the Select or Play Pause buttons to start playback The curre...

Страница 13: ...h USB thumb drives that do not deliver the necessary performance will lead to recording drop outs USB2 0 Hard Disks 2 USB Hard drives used for recording have to be fully compatible with the USB2 0 spe...

Страница 14: ...ks with standard TRS insert configuration so it is best connected to recording sources that provide per channel inserts The Return output is taken from the Line input over 110 Ohm resistor passive fee...

Страница 15: ...it should handle a short from Ring to GND properly The same setup as for a mono source can be used In rare cases where the source cannot tolerate a shorted Ring to GND a special cable e g Hosa PXF105...

Страница 16: ...The speed of your processor amount of RAM and capacity size and speed of your hard drives will greatly affect the overall performance of your recording system A faster processor and more RAM can reduc...

Страница 17: ...Windows task bar or by locating it in the Windows start menu Mixer View In order to change to the Settings View click on the Settings button Settings View Synchronization The Name the device will appe...

Страница 18: ...with the device name Settings View Output Channels The output channel names as they will appear in your DAW can be changed mid column If you check Include device name in ASIO display name the channel...

Страница 19: ...r from your computer Higher values offer less CPU usage and can resolve audio drop out issues Settings View About Displays device status device serial number driver version and device firmware version...

Страница 20: ...processor amount of RAM and capacity size and speed of your hard drives will greatly affect the overall performance of your recording system A faster processor and more RAM can reduce signal latency...

Страница 21: ...icaudio com regularly for firmware and driver updates The installed firmware version is shown briefly on the start screen of the LR 16 or you can determine it by opening the Settings About tab of the...

Страница 22: ...2 Format the USB storage device using the LR 16 format function to optimize file system 3 Set recording sample rate to 44 1kHz and or sample width to 16 bit My external USB2 0 hard disk is not recogni...

Страница 23: ...005 THD N 6dBFS 20 Hz 20 kHz 20 Hz 20 kHz bandwidth 82 dB 0 008 SNR 20 Hz 20 kHz bandwidth 99 dB 0 001 Crosstalk 20 Hz 20 kHz 89 dB PHONES Full scale output 8 2 dBu 2 VRMS Frequency response 20 Hz 20...

Страница 24: ...address supplied by Cymatic Audio is provided As Is and Cymatic Audio disclaims any and all warranties expressed or implied including but not limited to any implied warranty of non infringement of thi...

Отзывы: